DESi Utopic2 Series User manual

Utopic2 Smart Lock
USER MANUAL

!
GENERAL INFORMATIONS and WARNINGS
- We recommend you to put the keys to an accessible place (like car, bag etc.) in an emergancy
condition.
- If there is any problem with door or locking mechanism, first of all, those problems need to be
solved. Door's mechanical parts and locking mechanism should be working properly.
- Replace the batteries, if there is a battery warning. RECYCLE EMPTY BATTERIES!
- All the system need to be protected from water, direct sunlight and shocks.
- Place the batteries after installation of the system to the door. If the batteries are placed before
the installation, auto-rotating parts may cause injuries. WATCH YOUR FINGERS!
-For some doors, even if you remove cylinder screw, you cannot remove cylinder due to cramped
installation of defender. If this is the situation, follow the instructions below:
a- Untighten screws of cylinder defender (don’t remove the screws)
b- Remove cylinder screw and take out the old cylinder.
c- Install the device after disassemble the motozied part from the cylinder. (see p. 4 and 5)
2

3
Controlling Options and Compatible Accessories
Wireless Fingerprint Readers
Wireless Keypad
Wireless Auto-Locking Module
Wireless Home Automation Interface
Remote Controllers
Remote Access Module
BOX CONTENT
(May vary according to model number)
1x Smart Lock (with keys)
5x Alkaline Batteries
1x Installation screw and Hex key
1. FEATURES OF THE DEVICE
Structure
Engraved Aluminum, ABS Plastic, Zamak
Cylinder Length
(outside) 31 mm x 37 mm (inside)
Inside part can extensile up to 43 mm
(Different cylinder lengths are available)
Batteries and Battery Life
5x AA size 1,5 V Alkaline or Lithium Batteries
On a 2 turns lock, with 10 operations per day;
300 days (if RF or Bluetooth is enabled)
200 days (if RF and Bluetooth are enabled)
Communication Capability
Bluetooth Low Energy
ISM RF 434 Mhz

4
2. PARTS OF DEVICE and INSTALLATION
Cylinder
Handle
Handle Screw
Hex Screw The hole
for hex key
DEMOUNTING OF MOTOR AND CYLINDER
- Open “handle screw” and remove the handle by pulling.
- Remove the batteries.
- Rotate “hex screw” to counter-clock wise by using the
hex key out of the box. You will see the cylinder will be
disassembled from the motorized part.
To assemble two parts, combine cylinder and motorized
part in a proper way and rotate hex screw to clock wise.
Metal Extending Parts
(used if needed)
Plastic Cover Cover Spring

5
Up to 6 mm
EXTENDING INSIDE PART OF THE CYLINDER (if needed)
If the door thickness is not suitable to the cylinder of the device, inside part of the
cylinder may be extended up to 6 mm by 2 mm steps.
To extend the cylinder’s inside part, follow the instructions below:
- Open “handle screw” and remove the handle by pulling.
- Remove the batteries.
- Rotate “hex screw” to counter-clock wise by using the hex key out of the box till the
motorized part is disassembled from the cylinder.
- Add 2 mm metal extending parts as needed.
- Assemble cylinder and motorized part and rotate hex screw to clock wise direction.
- Install the batteries and check the device if it is working properly or not.
26 10 32
26 10 38
1.STEP
Remove
existing
cylinder.
2. STEP
Install
smart
lock and
tighten
the
screw.
That’s
it!
INSTALLATION OF MOTORIZED CYLINDER

6
MOBILE APPLICATION
If you enroll your smart phone as first controller, it will be master controller of your smart
lock.
Both master and user controllers can lock/unlock the smart lock. Besides, only the master
controller can change settings of smart lock.
Before using your smart lock, you should adjust it properly by setting “locking way” and
then “number of rotation” according to your lock.
If you want to change the master controller of smart lock, check
“HOW TO RESET SMART LOCK” topic on page 18 or please click on the link to watch
how to reset video https://youtu.be/Z2caq6RQ8-U
To use all available features of your device, we highly recommend you to use a
smartphone as master controller.
NOTE: For Android phones, when you are instaling the app, it will ask permissions. You need to approve all the permissions asked.
Otherwise, the application will not work properly. If you deny permissions, you will need to delete the application and install it
again.

7
3.1. ENROLLING A MOBILE PHONE AS MASTER CONTROLLER
1. Search “Desi Utopic” on stores. Download, install and run the application.
2. Choose language and confirm.
3. Press and hold “set/reset button” on smart lock until you hear a long and short warning tone and then
release button.
4. Touch “+” on the top left corner to see the list of Utopic smart locks around.
5. Touch to UTOPIC line and enter a name for your device and touch to green tick.
6. If the matching is successful, you will hear 2 short tones from motorized cylinder and your device will be
master controller of motorized cylinder.
Set / Reset
Button
Please watch video for details https://youtu.be/7iKNoLvnvN8

8
3.2. APPLICATION SETTINGS
If you touch to menu button on the top right corner when it is not connected to smart lock, you will reach to
settings menu of application. Related menu items are as follows:
Menu
Button
PASSWORD: You can disable, enable or change the password of application.
Also you can enable biometric login or face ID from that menu.
LANGUAGES: You can change language of the application.
SIRI SETTINGS: You can open your lock with voice commands (Only for
Iphone)
APPLICATION INFO: You can see the version of installed application.
VIDEOS: You can see videos about usage of smart lock.
FAQ: You can see questions and answers about usage.

9
3.3. SMART LOCK SETTINGS / ADMINISTRATION MENU
If you touch the menu button in the top right corner when the application is connected to smart lock as master controller, you
will reach to settings menu of connected smart lock. You can change settings of your smart lock and perform administrative
activities via this menu.
If you want to delete connected device from your mobile application, touch the “Delete Device” button in this menu.
Related menu has 4 tabs: Device Info, Knob Settings, Users, Reports.
5.3.1. DEVICE INFO TAB
In this tab, you can see following information:
Device Name
Favorite Device
Battery Level
Users - (Number of Enrolled Controllers)
Operations- (Number of Locking or unlocking)
Device Type
Software version
Button Mode
NOTE 1: Blue colored menus and menu items are available for master phone only.
NOTE 2:
Your device’s firmware can be updated via master
phone. For
details check page 26.
(Only N2 devices with firmware 80)
TIP: To access settings without problem wait until the lock status (top left), battery status (top right) appear on the home screen.
Menu
Button
Device
Info Tab

10
3.3.2. KNOB SETTINGS TAB
In this tab, there are following menu items:
NIGHT MODE AVAILABILITY: Night mode is a security option which
temporarily disables all controllers of motorized cylinder. In this way,
the door can only be opened by knob or the key. If this feature is enabled,
when you rotate your motorized cylinder through locking way 2 times, the
device will shift to night mode till you rotate the know or key through
unlocking way. For shifting to night mode, Semi-Automatic Mode should
be enabled.
SEMI-AUTOMATIC MODE: Your device has a semi-automatic feature
which senses the knob / key rotation and continue to rotate automatically.
On this menu item, you can enable / disable this feature.
AUTO LOCK*: Your device has an automatic locking feature which let the
device locks itself -either one turn or full turns- automatically in 15, 30, 45
or 60 seconds after it is unlocked. If you enable auto-locking, you will see
DAY MODE setting which gives flexiable options for office use. If DAY
MODE is enabled, you can define 1 or 2 periods for selected days, which
Auto-Locking will not work.
Please watch video for details https://www.youtube.com/watch?
v=IiVxwj-7yyI
Knob Settings
Tab
Menu
Button
NOTE: Auto Lock feature is only available
for device type N2 and firmware version
is 87 or higher.

11
3.3.2.1. KNOB SETTINGS TABADVANCED SETTINGS PAGE
BUZZER OF KNOB: You can enable / disable activation sounds coming from smart lock.
INVERT LOCKING WAY: You should set locking way of the device in accordance with your door’s
locking way.
ADJUST NUMBER OF TURNS: You should set how long the device will rotate to lock the door in
accordance with your door’s lock. For this purpose, close the door (do not lock) and then “Blue
Rotating Arrow” button. The device will retract the latch, lock and then unlock the door.
LATCH RETRACTION PERIOD: You can adjust the time period which the smart lock keeps latch of the
lock inside when it unlocks the door. (1 sec - 3 sec - 6 sec). 0 sec is for the doors without latch. MOTOR
POWER: You can adjust the power (and also speed) of motor in 4 different levels, adjust to the lowest
level which can lock and unlock your door without any problem. Higher powers will decrease battery
life.
MOTOR TYPE: If your smart lock is equipped with coreless motor, you need to change motor type to
coreless. If you have a device with coreless motor and if it cannot keep the latch of the lock inside,
enable “Power Hold” option.
NOTE 1:
LATCH RETRACTION PERIOD, MOTOR POWER, MOTOR TYPE features are only available for device type
N2 and firmware version is 87 or higher.
NOTE 2:
Utopic2 Gold Edition models have coreless motor, please be sure that coreless motor is set. Otherwise your
smart lock will not work properly.

12
3.3.3. USERS TAB
In this tab, you can manage controllers of smart lock including auto-locking module, home automation interface, keypad,
fingerprint reader, remote controllers etc. If you touch “Controllers” line, you can edit enrolled controllers. If you touch any
user, you reach dedicated controller page which you can edit name or delete the controller one by one. In addition, you can
apply time limited access to any user or controllers from this menu.
Menu
Button
Users
Tab
Touch
to reach
dedicated
user page
Besides managing contollers, you can generate and send “one time/limited time access passwords” by touching “Create
One Time Code” line. Details will be explained on page 20, 21 and 22.
You can enroll new controller if you touch
“Enroll New Controller” line, Please check next
2 pages for detailed explanation.
If you touch “Delete All Contollers” line, all
enrolled controllers will be deleted.
Please note that you cannot delete “Master
Controller” till you FACTORY RESET the smart
lock.

13
For fingerprint reader;
wake it up and touch the
locking button.
For auto-locking module;
take the magnet closer to
triangle sign and wait
indicator is lit.
3.3.4. ENROLL NEW CONTROLLER:
Your smart lock may learn up to 39 controllers. To shift your smart
lock to enrolling mode, touch “Green Plus” sign as shown and the
smart lock will give a long then short warning tones. After the
short tone, you need to send locking or unlocking signal via the
new controller as explained below:
For how to video, please click on the link
https://youtu.be/7iKNoLvnvN8?t=31
DESi
For keypad;
wake it up and touch the
locking button.
For remote controller;
press and hold any
button.
DESi
For home automation interface;
power up the device and short-circuit and then open-
circuit yellow and black cables.
3-12 V
DC For other controllers,
send locking or unlocking
signal via related
controller.
For enrolling a new
mobile phone, please
check next page.
Users
Tab
Menu
Button
Touch to
shift smart
lock to
pair mode
14
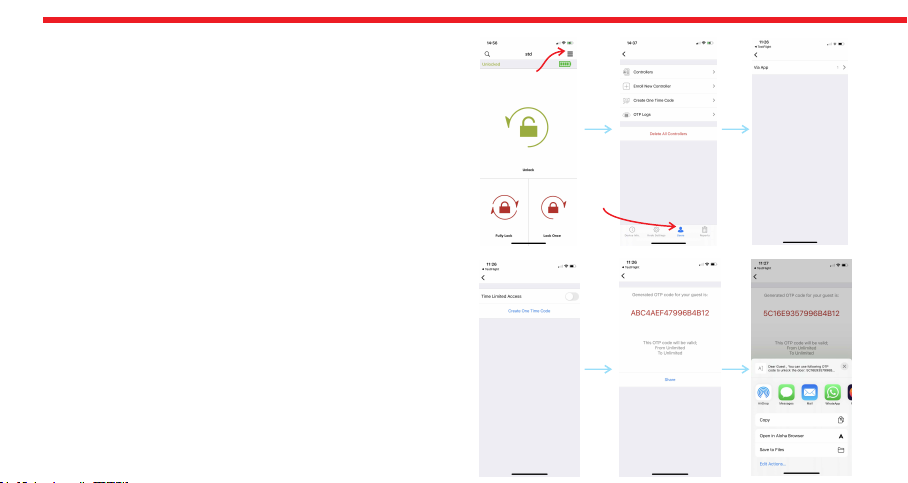
3.3.5. GENERATING ONE TIME/LIMITED TIME ACCESS
CODE VIA MASTER PHONE
If you are the master user of smart lock, you can let anybody
unlock the door via application or wireless keypad, even if you
are far away. Internet connection is not needed for this
function to work.
3.3.5.a. ONE TIME ACCESS VIA APPLICATION (Generating
One Time Access Code)
- Touch to “Settings” and go to “Users” tab then to “Create
One Time Code”, then “Via App”.
- If you want to limit the validity of the code by a period (you
need to connect smart lock via bluetooth), enable “Time
Limited Access” feature and set the beginning and ending
date. (During defined period, the generated code will work
only 1 time and if somebody tries to use generated code on a
date which is not in defined period, it will not work.)
- After that, touch to “Create One Time Code”. Pop-up will
appear which shows the generated code. You can touch to
“Share” button to share related information.
Menu
Users Tab
NOTE: OTP feature is only available for device type N2 and
firmware version is 87 or higher.

15
3.3.6. ENROLLING A NEW (USER) MOBILE PHONE VIA MASTER MOBILE PHONE
NOTE: For Android phones, all the requested permissions need to be given without any restriction during installation of app.
- With NEW MOBILE PHONE, search “Desi Utopic” on application stores. Download, install and run the application.
- Choose language and confirm.
-Connect to smart lock MASTER MOBILE PHONE, touch menu button in the top right corner and go to Users tab.
-On Users tab, touch “Enroll New Controller” line to go enrolling new contoller page. After that touch to “Green Plus”
sign next to “Enroll New Controller” line. Smart lock will give a long (5 sec.) and then a short warning tones.
-With NEW MOBILE PHONE, Touch “+” on the top left corner to see the list of Utopic smart locks around.
- Touch the UTOPIC line and enter a name and press green tick. When multiple warning tones heard, smart lock and
new mobile phone paired successfully.
For how to video, please click on the link https://youtu.be/wKUQSBkKHX4?t=50

16
4. USAGE
4.1. UNLOCKING AND OPENING THE DOOR
If you touch to Unlock button on application screen, system automatically unlocks and opens the door.
You can unlock/open the door by using the knob or the key as well. If semi-automatic working is
enabled, when you rotate the knob or the key to unlocking way, it will sense the movement and
continue automatically.
4.2. LOCKING THE DOOR
If you touch to “Lock Once” button, system will automatically lock the door one turn.
If you touch to “Fully Lock” button, system will automatically lock all the turns.
You can lock the door by using the knob or the key as well. If semi-automatic working is enabled, when
you rotate the knob or the key to locking way, it will sense the movement and lock the door one turn.
4.2.a NIGHT MODE
Night mode is a security option which temporarily disables remote controllers. In this way, the door
can only be opened by knob or the key. To shift the motorized cylinder to night mode:
- Close the door and turn the knob through locking way. The motorized cylinder will lock the door
one turn.
- Turn the knob again through locking way. It will lock all the turns.

17
In this way, the motorized cylinder will shift to Night Mode. To exit from night mode, turn the knob through unlocking way.
It will automatically unlock the door and shift to normal working mode. You can shift to or exit from night mode by using
key as well.
To use Night Mode, NIGHT MODE AVAILABILITY and ADJUSTING SEMI-AUTOMATIC WORKING settings need to be
enabled. If any of them is disabled, the motorized cylinder cannot shift to Night Mode.
5. MAINTENANCE
You can clean the surfaces with soft fabric. Do not use water or corrosive chemicals. Do not touch to electronic parts of
the device with a conducting metal or sharp object.
5.1. REPLACING MOTORIZED CYLINDER’S BATTERIES
- The motorized cylinder uses 5x AA size 1,5 V Alkaline or Lithium batteries.
- Do not use old and new batteries or different types of batteries together.
- If you are changing batteries, change them all. Use high quality batteries.
If you hear triple warning tone after any operation (locking/unlocking), or if
the motorized cylinder rotates too slowly, you need to replace the batteries. To change them,
open knob screw and remove knob (pull outward), uninstall old batteries and install new batteries
(watch polarities). Put knob back and tighten knob screw.
1
2

18
5.2. HOW TO RESET MOTORIZED CYLINDER
If you want to change master controller of motorized cylinder, you need to reset motorized cylinder. To do this, follow the
steps below:
- Remove 1 battery of your motorized cylinder and press and hold
“set/reset button”. Put the 5th battery. You will start to hear a long
warning tone from motorized cylinder. Continue to hold the
button till you hear two short tone after long warning tone.
- In this way, motorized cylinder will be reset and all the
controllers, including master controller, enrolled to the device will
be deleted.
Click on the link to watch how to reset video https://youtu.be/
Z2caq6RQ8-U
Set / Reset Button

- The application searches available smart locks around and when it finds, it will ask to use the code on the clipboard with a pop
up. Touch the confirm button. When you see the code as it is written on the screen, touch to “Green Tick” to unlock the door.
- If the code is valid for the lock, the smart lock will unlock the door and you will see a confirmation pop-up.
5.3.3.3.b. TIME LIMITED ACCESS VIA WIRELESS KEYPAD (The Wireless Keypad is
sold separately as an accessory) Before enrolling the wireless keypad to your smart
lock, you need to enable “Time Limited Access” mode on keypad’s settings. To
enable/disable “Time Limited Access” mode, follow the instruction below:
-Tap with your palm to wake up the device. Then touch the
-“SETTINGS” button. "MASTER" will be displayed on the screen.
-Enter 5 digit master password. “≡≡” symbol will appear on the screen.
-Touch the "0" button. "OTP" will appear on the screen. Touch the
"SETTINGS" to enter menu.
-Touch the 'LOCK' to cycle through the selections; "ON" means
-OTP is on, "OFF" means OTP is off.
-Touch the “SETTINGS” to save your choice.
Touch Buttons
Lock Button
Menu Button
Display
- Copy the shared code to clipboard. (You can copy all the shared text. The app will filter the code automatically.)
- Install Utopic application to your mobile phone, launch the app, choose the language.
- Hold your mobile as close as possible to the door that smart lock is installed and on the main screen, touch to “Use One Time
Pass Code” button located at the bottom of main screen.
5.3. Unlocking The Door By Using Generated Code
19

After enabling OTP mode on keypad, follow the steps below to enroll it to the smart lock:
- Launch the app on the master phone and connect to the smart lock.
- Touch to “Settings” icon located on upper right corner and go to “Users” tab.
- Touch to “Enroll New Controller” and then touch to “green plus” sign on the right. The smart lock will give a long
and then a short warning tone.
- After warning tones, wake the keypad up by putting your palm to the touch keys and then enter “2222”.
- Launch the app on the master phone and choose the smart lock that you want to generate codes.
- Touch to “Settings” icon located on upper right corner and go to “Users” tab.
- Touch to “Create One Time Code” and then “Via Keypad”.
- To have an enhanced / explanatory usage log, choose one of the following roles for the time limited code: Guest,
Administrator, Room Service, Maintenance, Runner
- After choosing the role, you will see following titles to set on coming page:
Check In & Out Time: Default check-in time is 14:00 and check-out time is 10:00. This period is valid for all the time
limited access codes. (To change default values of this setting, you need to connect smart lock via bluetooth)
Usage: You can choose if the generated password will be a one time (single) or multi time usable during given
period.
– The smart lock will give multiple warning tones and the keypad will be enrolled to the smart lock. After that launch
the app on master phone, connect to the smart lock, touch to “Settings” icon located on upper right corner and go
to “Users” tab. If the enrolling process is successful, you will see “Via Keypad” line, besides “Via App” when you touch
to “Create One Time Code” line.
Generating Time Limited Access Code To Use Via Keypad
20
Other manuals for Utopic2 Series
1
Table of contents
Other DESi Lock manuals


