DESi Utopic Series User manual

USER
MANUAL
UFC 60 / UFC 80
Wireless Auto-Rotating
Motorized Cylinder with
Wireless Fingerprint Reader
UFC 80
UFC 60
222

2
Table of Content
Warnings
Wireless Fingerprint Reader / Remote Controller
Wireless Motorized Cylinder
1. Installation
1.1. Motorized Cylinder
1.2. Fingerprint Reader
1.2.1. First Method (from Inside)
1.2.2. Second Method (from Outside)
2. Enrolling First (Master) Fingerprint
3. Administrative Actions / Settings
3.1. Entering to Administration Menu
3.2. Enrolling Fingerprint (LR)
3.3. Deleting Fingerprint (DL)
3.4. Deleting All Fingerprints (CL)
3.5. Adjusting Number of Turns (TC)
3.6. Adjusting Direction of Locking / Unlocking (MW)
3.7. Reporting Total Number of Enrolled Fingers (UC)
3.8. Adjusting Buzzer Sound (BU)
3.9. Night Mode Availability (RF)
3.10. Enable/Disable Semi-Automatic Working (SA)
4. Usage
4.1. Unlocking and Opening The Door
4.2. Locking The Door
5. Maintenance
5.1. Replacing Fingerprint Reader’s Battery
5.2. Replacing Motorized Cylinder’s Battery
6. Troubleshooting
.....................................................................................................................................
.................................................................................................................................................
.............................................................................
.................................................................................................................
...........................................................................................................................................
...........................................................................................................................
...........................................................................................................................
............................................................................................................
..................................................................................................
................................................................................................
....................................................................................................
..................................................................................................
..............................................................................................................
..............................................................................................................
.......................................................................................................
....................................................................................................
.......................................................................
..........................................................................
.........................................................................................................
............................................................................................................
..................................................................................
..................................................................................................................................................
..................................................................................................
............................................................................................................................
.......................................................................................................................................
........................................................................................
......................................................................................
................................................................................................................................
2
3
4
5
5
5
6
6
6
7
7
7
7
8
8
8
8
9
9
9
9
10
10
10
10
10
10
11

!WARNINGS
- Put the key of the lock to somewhere (car, bag etc.) which you
can reach easily, to use if there is a deformation on your finger or
if there is a problem with the device.
- Door's mechanical parts and locking mechanism should be
working properly. Otherwise, there would be problems during
operating the device. If there is any problem with door or locking
mechanism, first of all, those problems need to be solved.
- If there is a problem with the device, contact with your dealer as
soon as possible.
- Replace the batteries of the system, if there is a battery
warning.
- This device is not suitable for outdoor usage. It needs to be
protected from water and direct sunlight.
- When you look to the finger tip under direct sunlight, if you see
a shiny surface instead of fingerprint, or if there is any injury
which changes characteristic of fingerprint that means
fingerprint is not proper. System would have problems to
recognize that kind of fingerprints. NEVER enroll such
fingerprint as a master.
- This device is not suitable for doors which opens more than 40
times in a day.
3

Touch
Button
#2
Touch
Button
#1
Wake Up
Button
Fingerprint
Reader
Set
Screw
4
Display
REMOTE CONTROLLER (Optional)
21-Turn Locking
3
Unlocking
1 Full-Turn Locking
WIRELESS FINGERPRINT READER

222
5
WIRELESS MOTORIZED CYLINDER
1. INSTALLATION
1.1. Motorized Cylinder
Utopic cylinders have the same installation process of the ordinary cylinder.
Remove
existing
cylinder
That’s
all !
Install
utopic
cylinder
and
tighten
screw
Set Screw
31 mm 35 mm
47 mm
31 mm
Adjusting Cylinder Length of Utopic S
Utopic S’s cylinder length is 66 mm and its inner part can
be extended by 12 mm. Thanks to this feature:
- Utopic S can fit to the doors with different thicknesses.
- It supports seperated installation, means firstly you can
install cylinder part and than you can install the
motorized part. For security doors that kind of
installation is suggested.
To seperate motorized part from cylinder, loosen the set
screw and take the motorized part apart. In this way, you
can install cylinder of Utopic and make adjustments on
the door if needed. Than you can assamble motorized
part to the cylinder easily by tightening the set screw.
!Insert motorized part into cylinder while you are rotating it. The rotating shaft of device should fit
into its bearings in cylinder. Before tightening the set screw, make sure utopic controls the lock.
Cylinder
Knob
Knob Screw
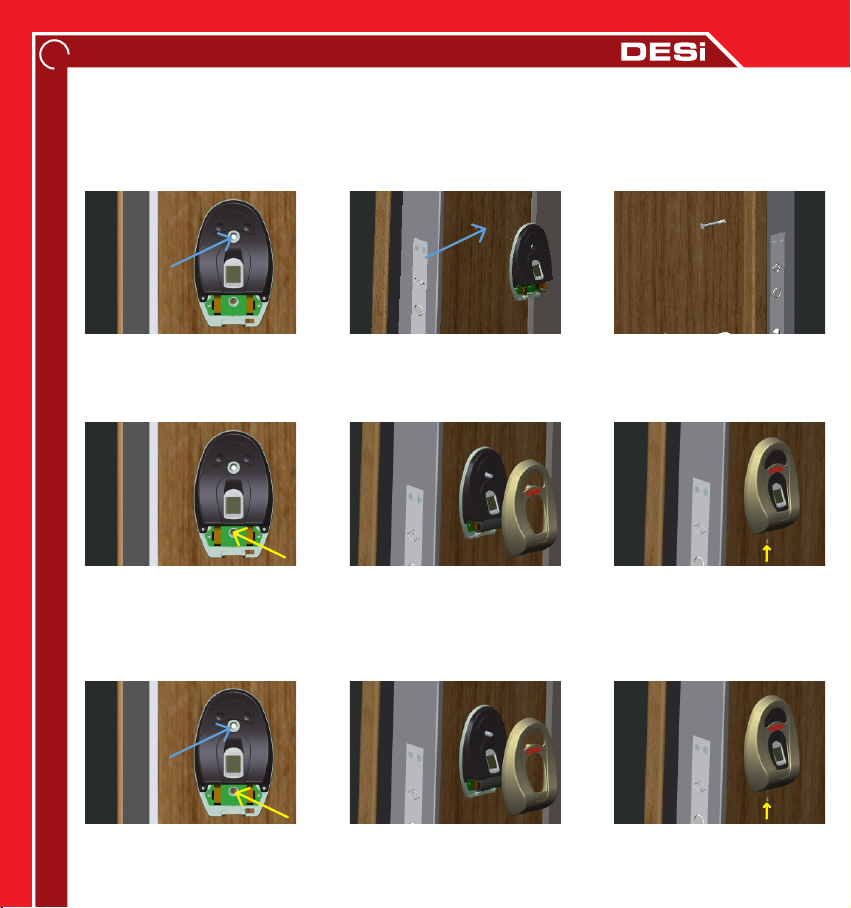
1.2. Fingerprint Reader
First of all, unscrew the set screw at the bottom of reader with a 19 mm (3/4") hex key and
seperate metal part and plastic part. After that, remove the battery, if it is already placed. Use
one of the methods below:
1.2.1. First Method (from Inside)
1.2.1. Second Method (from Outside)
Place reader to the door
and make a sign with a pen
through hole.
Drill a hole (side to side)
from signed point with 5
mm bit.
Put the long screw with
washer to hole from inside.
Outcoming part need to
be at most 12 mms.
Place reader as in 1st step.
Tighten the short screw by
using pointed hole.
Install battery and fix the
metal cover with long
screw installed at 3rd step.
Tighten the set screw.
Install battery and place
the metal cover.
1st Step1st Step1st Step 2nd Step2nd Step2nd Step 3rd Step3rd Step3rd Step
4th Step4th Step4th Step 5th Step5th Step5th Step 6th Step6th Step6th Step
1st Step1st Step1st Step 2nd Step2nd Step2nd Step 3rd Step3rd Step3rd Step
6
Place reader to the door
and tighten it with short
screws from two holes.
Tighten the set screw.

7
2. ENROLLING FIRST (MASTER) FINGERPRINT
Fingerprint reader comes without any fingerprint in its memory. The first 3 fingerprints are
accepted as master. Administrative activities like enrolling or deleting fingerprint can be done
by master fingerprints only.
To enroll first fingerprint:
- Touch to “wake up” and than “button #2". First “OK” and than “LR” code will be displayed.
- Touch to “button #1". “L0" code will be displayed.
- Put the finger to the reader. “L1" code will be displayed.
- Put the same finger again. First “L2" and than “OK” code will be displayed.
NOTE: System reads the finger 2 times during enrollment. If 2 reads don’t match, “EE” code will be
displayed and reader turns back to “L0" step. In this case, enrolling need to be repeated.
3. ADMINISTRATIVE ACTIONS / SETTINGS
3.1. ENTERING TO ADMINISTRATION MENU
To enter administration menu:
- Touch “wake up” and than “button #2". “AD” code will be displayed.
- Put one of the master fingers to the reader. First “OK” and than
administrator menu’s first item “LR” will be displayed. The other menu items are as follows:
3.2. ENROLLING FINGERPRINT (LR)
- Enter to administration menu.
- Touch to “button #1" when “LR” is on display. ”L0" will be shown.
- Put the finger to the reader. “L1" code will be displayed.
- Put the same finger again. First “L2" and than “OK” code will be displayed.
LR
DL
CL
TC
MW
UC
BU
RF
Display
Enrolling new fingerprint
Deleting fingerprint
Deleting all fingerprints
Adjusting number of turns
Adjusting direction of locking/unlocking
Reporting total # of enrolled fingers
Adjusting buzzer sound
Night mode availability
Function
Administration Menu -
Touching to “button #2"
shifts to next menu item
and
touching to “button #1"
selects shown menu item.
2
2
2
2
2
2
2
2
1
1
1
1
1
1
1
1
MA Adjusting semi-automatic working
1
2
!Master fingerprints need to be chosen carefully.
Don’t enroll a child’s finger or any finger which is deformed (or can be deformed
easily) as a master finger.

3.3. DELETING FINGERPRINT (DL)
- Enter to administration menu.
- Touch to “button #2" till “DL” appears and touch to “button #1" when “DL” is on display. ”01"
will be shown.
- Touch to “button #1" till you see the fingerprint id you want to delete and touch to “button
#2" when related id is on display.
- “OK” will be displayed and related fingerprint will be deleted.
NOTE 1: System assigns an id to fingers and this id is shown when finger is read.
NOTE 2: If you pass desired id by mistake, wait a few seconds till display goes o and restart.
3.4. DELETING ALL FINGERPRINTS (CL)
- Enter to administration menu.
- Touch to “button #2" till “CL” appears and touch to “button #1" when “CL” is on display. ”01"
will be shown.
- Touch to “button #1" till you see “17" and touch to “button #2".
- “OK” will be displayed and all fingerprints will be deleted.
NOTE: If you pass “17" by mistake, don’t touch any button and wait a few seconds till display goes
o. After that restart the procedure.
3.5. ADJUSTING NUMBER OF TURNS (TC)
As default, system is adjusted to 3 stage locks. If stage of the lock is dierent, close the door
and follow procedure below:
- Enter to administration menu.
- Touch to “button #2" till “TC” appears and touch to “button #1" when “TC” is on display. ”AT"
will be shown.
- Touch to “button #2". “OK” will be displayed and cylinder will automatically lock and unlock
the door to learn number of needed turns to lock and unlock.
3.6. ADJUSTING DIRECTION OF LOCKING / UNLOCKING (MW)
Direction of rotation needs to be set according to door’s opening way as follows:
- Enter to administration menu.
- Touch to “button #2" till “MW” appears and touch to “button #1" when “MW” is on display.
”MR” or “ML” will be shown.
- Touch to “button #1" to toggle between “MR” - right door and “ML” - left door. When desired
way is displayed, touch to “button #2".
- “OK” will be displayed and direction of locking/unlocking will be set.
8

3.7. REPORTING TOTAL NUMBER OF ENROLLED FINGERS (UC)
- Enter to administration menu.
- Touch to “button #2" till “UC” appears and touch to “button #1" when “UC” is on display. Total
number of enrolled fingerprints will be displayed.
3.8. ADJUSTING BUZZER SOUND (BU)
- Enter to administration menu.
- Touch to “button #2" till “BU” appears and touch to “button #1" when “BU” is on display. ”B0"
or “B1" will be shown.
- Touch to “button #1" to toggle between “B0” - buzzer is disabled and “B1” - buzzer is enabled.
When desired choice is displayed, touch to “button #2".
- “OK” will be displayed and buzzer sound will adjusted.
3.9. NIGHT MODE AVAILABILITY (RF)
- Enter to administration menu.
- Touch to “button #2" till “RF” appears and touch to “button #1" when “RF” is on display. ”RF1"
or “RF0" will be shown.
- Touch to “button #1" to toggle between “RF1” - night mode is not available and “RF0” - night
mode is available. When desired choice is displayed, touch to “button #2".
- “OK” will be displayed and night mode will be adjusted.
3.10. ENABLE/DISABLE SEMI-AUTOMATIC WORKING (MA)
- Enter to administration menu.
- Touch to “button #2" till “MA” appears and touch to “button #1" when “MA” is on display. “M0”
or “M1" will be shown.
- Touch to “button #1" to toggle between “M0” - semi-automatic working is disabled and “M1” -
semi-automatic working is enabled. When desired choice is displayed, touch to “button #2".
- “OK” will be displayed and semi-automatic working feature will be adjusted.
NOTE: If semi-automatic working feature is disabled, night mode cannot be used.
9
iNight mode is a special security option. In this mode, the motorized cylinder cannot be controlled
by fingerprint reader or remote controller. It can be controlled with the knob or the key only.
iIf semi-automatic working is enabled, when utopic is rotated by knob or key, it’ll continue to lock
the door or unlock and open the door automatically.

5. MAINTENANCE
External surfaces of the parts can be cleaned by a soft and slightly damp cloth. Never use
abrasive chemicals or water for this purpose.
Watch electronic parts of the system during changing batteries. Don’t contact sharp or
conductive materials to those parts.
5.1. Replacing Fingerprint Reader’s Battery
When you touch to “wake up” button if “BL” code is displayed after
animated arrows appeared, that means battery of fingerprint reader
is weak and need to be replaced with new one. To change the battery:
- Get a new CR123A lithium battery.
- Unscrew set screw (and unscrew long screw if you installed
fingerprint reader from inside) and remove metal cover.
- Replace the battery with new one. Watch the polarities!
- Place the metal part and tighten screws.
5.2. Replacing Motorized Cylinder’s Batteries
If you hear a buzzer sound from motorized cylinder after any operation or if it starts to operate
slowly, that means batteries of it are weak and need to be replaced. To change batteries:
- For Utopic S, get 3 pcs of CR123 type lithium batteries. For Utopic 2, get 5 pcs of AA size
high quality alkaline (or 1,5 V lithium) batteries.
10
4. USAGE
4.1. Unlocking and Opening The Door
Touch to “wake up” and put an enrolled finger to the reader. Fingerprint id will be displayed and
it will unlock and open the door. If the finger is not known or recognized, “NO” will be
displayed.
NOTE: If semi-automatic working feature is enabled, when Utopic is rotated through unlocking way
by knob or key, it’ll unlock and open the door automatically (see 3.10.)
4.2. Locking The Door
Touch to “wake up” and than “button #1". System will lock the door.
NOTE: If semi-automatic working feature is enabled (see 3.10), when Utopic is rotated through
locking way by using knob or key, it will lock the door one turn. To lock all turns, it need to be rotated
again. After full-turn locking, If “night mode” is set to “available” (see 3.9), utopic shifts to “night
mode”. To exit from “night mode”, it is enough to unlock the door by knob or key.

11
- Open knob screw by rotating it counter-clock wise and remove knob (pull outward.)
- Uninstall old batteries and install new batteries. Watch the polarities!
- Put knob back and tighten knob screw.
NOTE: Never use new batteries and old batteries together.
6. TROUBLESHOOTING
IF YOU CANNOT ENROLL FINGERPRINT
When you look to the finger tip under direct sunlight, if you see a shiny surface or if there is any
injury which changes characteristic of fingerprint, that means fingerprint is not proper. System
cannot learn that kind of fingerprints. Even it learns, you may have problems in usage.
IF SYSTEM CANNOT FULLY LOCK / UNLOCK THE DOOR
There can be high friction on the lock or latch bold. It can be caused by sag of the door or
unadjusted locking mechanism. Check if you can open the lock and latch with a key easily. If
there is a problem on door or lock, that need to be fixed.
Batteries of motorized cylinder may be weak. Change with new batteries.
IF DOOR IS NOT OPENED EVEN THE KNOB IS ROTATING
There is a problem related with connection between motor and cylinder. Call your dealer and
ask for service.
IF DOOR IS NOT OPENED EVEN READER CONFIRMS THE FINGER
Maybe someone shift the system to “NIGHT MODE”. Open the door with knob or a key to shift
to normal mode. (see page 10)
IF SYSTEM LOCKS INSTEAD OF UNLOCKING OR VICE VERSE
Direction of locking / unlocking is adjusted in a wrong way. You need to adjust direction of
locking / unlocking (see 3.6.)

Topkapı Maltepe Cd. No: 15 Zeytinburnu
34010 İstanbul /TURKEY
T. +90212 501 72 72
F. +90212 576 64 77
www.utopic.com.tr
www.desi.com.tr
Manufacturer
This manual suits for next models
2
Table of contents
Other DESi Lock manuals


