DESi Utopic R User manual

Wireless Motorized Cylinder
USER MANUAL
update 11.02.2021

!
GENERAL INFORMATION and WARNINGS
- Before using your motorized cylinder, Locking way (right or left handed door) and Number of turns should be adjusted
properly. Otherwise, the device will not work in the correct way and maybe broken.
- For emergency conditions, we recommend you to put the keys in an accessible place (like car, bag etc.)
- If there is any problem with the door or the locking mechanism, first of all, those problems have to be solved. The door's
mechanical parts and locking mechanism have to work properly.
- If there is a problem with the device, first look to the troubleshooting part of this manual. If you cannot solve the
problem, contact your dealer.
- All the system needs to be protected from water, direct sunlight and shocks.
- Auto-rotating parts of the device can cause injuries during installation. BE CAREFUL!
- If you are leaving your home for an extended period of time, first fully charge your motorized cylinder and take your
mechanical key with you. If you would leave more than 2 months, after charging your motorized cylinder, either shift the
motorized cylinder to childlock mode or leave your device as it is connected to charger. Otherwise, the batteries of your
product would die due to deep discharge.
2

3
Control Options and Compatible Accessories
Wireless Fingerprint Readers
Wireless Keypad
Wireless Auto-Locking Module
Wireless Home Automation Interface
Remote Controllers
Remote Access Module
2. BOX CONTENT
(May vary according to model)
1x Wireless Motorized Cylinder (with keys)
1x Charging Cable (USB)
1x Installation screw and Hex key
1. FEATURES OF THE DEVICE
Structure
ABS Plastic
Cylinder Length
(outside) 31 mm x 35 mm (inside)
Inside part can extensile up to 47 mm
(Different cylinder lengths are available)
Batteries and Battery Life
Your motorized cylinder is equipped with rechargeable
Lithium Ion batteries.
According to DESi labratory tests, with a usage of 10
operations per day on a 2 turns lock, battery life of
motorized cylinder is as follows:
90* days (Either RF or BLE is active)
60* days (Both RF and BLE are active)
Communication Capability
Bluetooth Low Energy
ISM RF 434 Mhz

4
3. PARTS OF DEVICE and INSTALLATION
Control
Buttons
Cylinder
Handle for
Manual
Operation
microUSB
Charging Port
1.STEP
Remove
existing
cylinder.
2. STEP
Install
motorized
cylinder and
tighten
the screw

5
In some security doors, even if you remove cylinder screw, you cannot remove cylinder due to cramped installation of
cylinder defender. Follow the instructions below, for that kind of situations:
- Untighten the screws of the cylinder defender (don’t remove the screws)
- Remove cylinder screw and take out the old cylinder.
- Disassemble the motorized knob from the cylinder.
- Install the cylinder part to the door and tighten the cylinder screw.
- Tighten the screws of the cylinder defender.
- Assemble the motorized knob with the cylinder.
DETACHING / ATTACHING MOTOR AND
CYLINDER
Loosen the set screw
with the hex key taken from
the box. Pull the motor part out.
To attach two parts, push the motor
properly into cylinder and tighten
the set screw. Set Screw
4. MASTER CONTROLLER AND USER CONTROLLERS
The first controller enrolled to motorized cylinder is accepted as the master controller. The rest of the controllers will be
user controllers. Both, master and user controllers can be used to lock/unlock the motorized cylinder but only the master
controller can change settings of motorized cylinder.

6
MOBILE APPLICATION
In this section, you can find details about usage of
Mobile Application
If you enroll your smart phone as first controller,
it will be master controller of your motorized cylinder.
Before you use your motorized cylinder, you should adjust it
properly according to the lock which motorized
cylinder will work together. First, you should adjust
“locking way” and then “number of rotation” (see page 10 and 11)
If you want to change the master controller of motorized
cylinder, check “HOW TO RESET MOTORIZED CYLINDER”
topic on the last page or please click on the link to watch how to
reset video https://www.youtube.com/watch?v=_4y8HBLEAyk
To use all available features of your device, we highly recommend you
to use a smartphone as master controller.

7
- Search “Desi Utopic” on application stores. Download, install and run the application.
- Choose language and set a password or skip it.
- Press and hold two buttons on motorized cylinder until you hear a long warning tone and then release buttons. After
that you will hear a short warning tone.
- On application screen, touch “+” on the top left corner to see the list of Utopic motorized cylinders around.
- Touch the UTOPIC line, enter a name for your device and touch the “green tick”. If a confimation pop-up appears,
confirm and device recognition process will start. If the matching is successful, you will hear 2 short tones from motorized
cylinder and your mobile phone will be master controller of motorized cylinder.
5. SETTING UP YOUR DEVICE
5.1. ENROLLING A MOBILE PHONE AS MASTER CONTROLLER
NOTE: For Android phones, when you are installing the app, it will ask permissions. All the requested permissions need to be
given without any restriction. Otherwise, the app may not work properly.
For how to video, please click on the link https://www.youtube.com/watch?v=kjLH2HGA7k8

8
5.2. APPLICATION SETTINGS
If you touch the menu button in the top right corner when it is not connected to motorized cylinder, you will reach settings
menu of application. Related menu items are as follows:
PASSWORD: You can disable, enable or change the password of
application.
LANGUAGES: You can change language of the application.
APPLICATION INFO: You can see the version of installed application.
VIDEOS: You can watch our support videos.
FAQ: Frequently Asked Questions and answers
Menu
Button

9
5.3. MOTORIZED CYLINDER SETTINGS / ADMINISTRATION MENU
If you touch the menu button in the top right corner when the application is connected to motorized cylinder as master
controller, you will reach to settings menu of connected motorized cylinder. You can change settings of your motorized
cylinder and perform administrative activities via this menu.
Before using your smart cylinder, “locking way” and “number of turns” settings must be adjusted properly. Otherwise, it
will damage the device’s mechanical structure.
Related menu has 4 tabs: Device Info, Knob Settings, Users, Reports
5.3.1. DEVICE INFO TAB
In this tab, you can see following information:
Device Name
Favorite Device
Battery
Users
Operations
Device Type
Software Version
If you want to delete connected device from your mobile application,
touch the “Delete Device” button in this menu.
Menu
Button
Device Info Tab
10
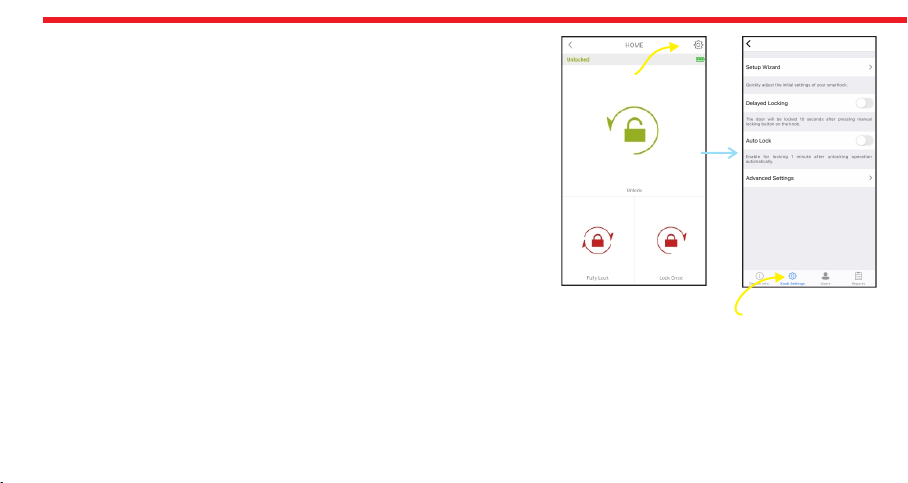
5.3.2. KNOB SETTINGS TAB
In this tab, there are following menu items:
SETUP WIZARD: You can reach quick setup settings and easily follow steps.
DELAYED LOCKING: If this feature is enabled, the device will lock the door
10 seconds after the locking button on the device is pressed. When you are
going out, if you press the locking button on the device and than close the
door, it will automatically lock your door in 10 seconds.
AUTO LOCK: Your device has an automatic locking feature which let the
device locks itself -either one turn or full turns- automatically in 15, 30, 45
or 60 seconds after it is unlocked. If you enable auto-locking, you will see
DAY MODE setting which gives flexiable options for office use.
If DAY MODE is enabled, you can define 1 or 2 periods for selected days, which
Auto-Locking will not work.
Menu
Button
Knob Settings
Tab
Advanced
Settings
Page
11
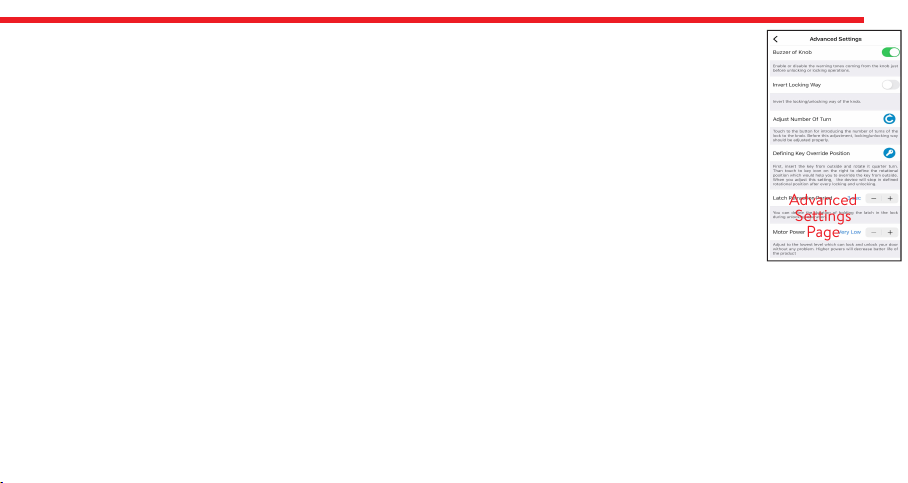
5.3.2.a. ADVANCED SETTINGS PAGE
BUZZER OF KNOB: You can enable / disable activation sounds coming from motorized cylinder.
INVERT LOCKING WAY: You should set locking way of the device in accordance with your door’s locking way.
ADJUST NUMBER OF TURNS: You should set how long the device will rotate to lock the door in accordance with your door’s
lock. For this purpose, close the door (do not lock) and then “Blue Rotating Arrow” button. The device will retract the latch,
lock and then unlock the door.
DEFINING KEY OVERRIDE POSITION: Only work with Utopic-OK encoder series smart lock.
LATCH RETRACTION PERIOD: You can adjust the time period which the smart lock keeps latch of the lock inside when it
unlocks the door. (1 sec - 3 sec - 6 sec). 0 sec is for the doors without latch.
MOTOR POWER: You can adjust the power (and also speed) of motor in 4 different levels, adjust to the lowest level which
can lock and unlock your door without any problem. Higher powers will decrease battery life.
MOTOR TYPE: If your motorized cylinder is equipped with coreless motor, you need to change motor type to coreless. You
can get detailed information from your dealer about coreless motor.
If you have a device with coreless motor and if it cannot keep the latch of the lock inside, enable “Power Hold” option.
BUTTONS FUNCTIONS: You can change roles of the buttons with this menu. B0- buttons work and you are able to get inside
reset or child mode. B1- buttons work but you cannot able get inside reset or child mode. B2- buttons are disable.
POWERFUL RF CONNECTION: You should activate this mode only if you are having problems with keypad, fingerprint
reader, remote control or similar RF-operated control devices. For example, if your lock only works when you enter your
password 2-3 times or swipe your finger, this mode should be activated. If you have not such a problem and activate this
mode, your smart lock will consume more battery.

12
5.3.3. USERS TAB
In this tab, you can manage controllers of motorized cylinder including auto-locking module, home automation interface,
keypad, fingerprint reader etc. If you touch “Controllers” line, you can edit enrolled controllers. If you touch any user, you
reach dedicated controller page which you can edit name or delete the controller one by one.
Menu
Button
Users
Tab
Touch
to reach
dedicated
user page
Besides managing contollers, you can generate and send “one time/limited time access passwords” by touching “Create
One Time Code” line.
OTP logs menu shows all password created for your devices via keypad.
You can enroll new controller if you touch
“Enroll New Controller” line, Please check next
2 pages for detailed explanation.
If you touch “Delete All Contollers” line, all
enrolled controllers will be deleted.
Please note that you cannot delete “Master
Controller” till you FACTORY RESET the
motorized cylinder.
For fingerprint reader;
wake it up and touch the
locking button.
For auto-locking module;
take the magnet closer to
triangle sign and wait
indicator is lit.
13
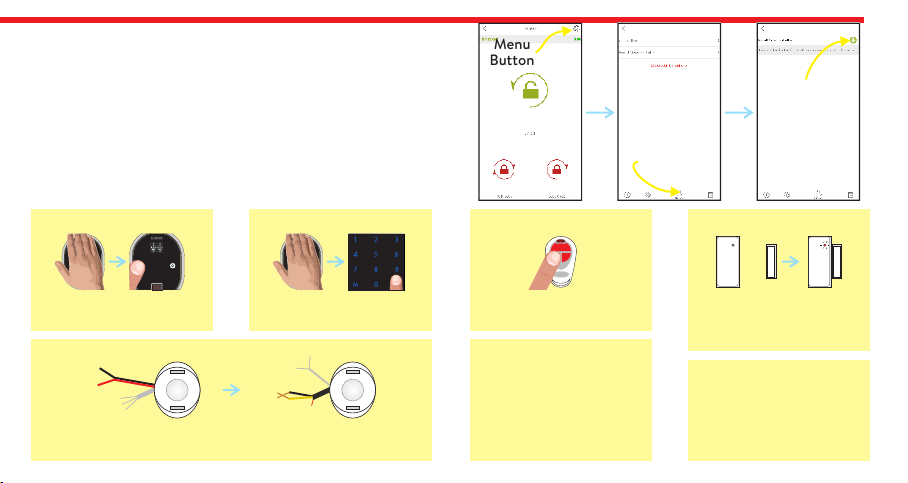
ENROLL NEW CONTROLLER:
Your motorized cylinder may learn up to 40 controllers. To shift your
motorized cylinder to enrolling new controller mode, touch “Green Plus”
button as shown. After touching button you will hear a long warning tone.
After that tone, you need to send locking or unlocking signal via the new
controller as explained below:
For how to video, please click on the link
https://youtu.be/7iKNoLvnvN8?t=30
Menu
Button
Users Tab
Touch to shift
motorized
cylinder
to enrolling
mode
DESi
For keypad;
wake it up and touch the
locking button.
For remote controller;
press and hold any
button.
DESi
For home automation interface;
power up the device and short-circuit and then open-
circuit yellow and black cables.
3-12 V
DC For other controllers,
send locking or unlocking
signal via related
controller.
For enrolling a new
mobile phone, please
check next page.

14
ENROLLING A NEW (USER) MOBILE PHONE VIA MASTER MOBILE PHONE
NOTE: For Android phones, all the requested permissions need to be given without any restriction during installation of app.
- With NEW MOBILE PHONE, search “Desi Utopic” on application stores. Download, install and run the application.
- Choose desired language and define a password or skip it.
-Connect to smart lock MASTER MOBILE PHONE, touch menu button in the top right corner and go to Users tab.
- On Users tab, touch “Enroll New Controller” line to go enrolling new contoller page. After that touch to “Green Plus”
sign next to “Enroll New Controller” line. Smart lock will give a long (5 sec.) and then a short warning tones.
-With NEW MOBILE PHONE, Touch “+” on the top left corner to see the list of Utopic smart locks around.
- Touch the UTOPIC line and enter a name and press green tick. When multiple warning tones heard, smart lock and new
mobile phone paired successfully.

15
5.3.4. REPORT TAB
In this tab, you can see which user unlocked or locked the device with
time and date information.
Menu
Button
Reports Tab
DELETE ALL REMOTE CONTROLLERS
If you want to delete all the controllers of motorized cylinder, touch “Delete All Controllers”.
The master controller cannot be deleted by using this menu item.

16
5.4. USAGE
Before you use your motorized cylinder, you should adjust it properly according to the lock which motorized cylinder will
work together. First, you should adjust “direction of locking” and then “number of rotation” (see page 10 and 11)
5.4.1. UNLOCKING AND OPENING THE DOOR
Launch the app, connect to your motorized cylinder and touch UNLOCK button. Your motorized cylinder will unlock and
open the door.
You can also unlock and open the door via button on motorized cylinder. For emergency conditions, the handle and key also can
unlock and open the door.
5.4.2. LOCKING THE DOOR
Launch the app, connect to your motorized cylinder and touch either LOCK ONCE (to lock the door 1 turn) or FULLY
LOCK (to lock all the turns) button. Your motorized cylinder will lock the door.
You can also lock the door via button on motorized cylinder. For emergency conditions, the handle and key also can lock the door.
5.4.3. CHILD LOCK
If you enable child lock feature, motorized cylinder will behave like a standard mechanical lock. You can use it either with a
mechanical key or the handle only. None of enrolled controllers (including master controller) will work till child lock is
disabled.
To enable child lock, press and hold two buttons on the motorized cylinder till you hear a long (3 sec.) warning tone. To
disable child lock, press and hold two buttons on the motorized cylinder till you hear 3 short warning tones.

17
5.5. MAINTENANCE
You can clean external surfaces by soft, slightly damp cloth. Never use abrasive chemicals or water for this purpose. Don’t
try to disassemble your motorized cylinder.
5.5.1. CHARGING YOUR MOTORIZED CYLINDER
If you hear three short tones after operation of the motorized cylinder or if the rotation speed is too slow compared to
normal working speed, you need to charge your motorized cylinder.
! ATTENTION !
- Charging period of your device is around 3 hours. We recommend you to charge it under supervision. We recommend
to charge your device once in two months even if the batteries are not empty. Do not leave charger on the smart lock
after fully charge operation.
- With your own risk, you can use any 5 V DC microUSB chargers or a powerbank. Use high quality chargers, cables and
powerbanks only.
- You may use your motorized cylinder as it is always connected to charger. The device will automatically adjust itself to
work as always connected. (valid for firmware version 72 and higher.)
- If you are leaving your home for an extended period of time, first fully charge your motorized cylinder and take your
mechanical key with you. If you would leave more than 2 months, after charging your motorized cylinder, shift the
motorized cylinder to child lock mode. Otherwise, the batteries of your product will die due to deep discharge.

18
9. TROUBLESHOOTING
IF THE MOTORIZED CYLINDER CANNOT FULLY LOCK/UNLOCK THE DOOR
There can be high friction on the lock or latch bold. It may be caused by sag of the door or unadjusted locking mechanism.
Check if you can open the lock and latch with a key easily. If there is a problem on door or lock, that need to be fixed.
Batteries of motorized cylinder may be weak. Recharge the batteries.
IF DOOR IS NOT OPENED EVEN THE KNOB IS ROTATING
There is a problem related with connection between motor and cylinder. Call your dealer and ask for service.
IF CONTROLLERS ARE NOT OPERATING THE MOTORIZED CYLINDER
Child lock would be activated. To deactivate child lock, press two buttons on motorized cylinder and wait till you hear 3
short warning tones.
IF YOU CANNOT ADJUST THE SETTINGS OF MOTORIZED CYLINDER WITH THE CONTROLLER
The controller is not enrolled to the motorized cylinder as master controller. If you want to change the master controller of
motorized cylinder, check “HOW TO RESET MOTORIZED CYLINDER” topic on the last page.

19
10. HOW TO RESET MOTORIZED CYLINDER
If you want to change master controller of your motorized cylinder or if you want to delete all controllers enrolled to the
device, you can reset your motorized cylinder as follows:
- Press and hold 2 buttons on the motorized knob. A long warning tone will be heard. Continue to hold the buttons. After a
while, second warning tone will start.
- During second warning tone, release the buttons and plug the provided charger into charging port of motorized cylinder
as soon as possible. Charger should be plugged to electricity as well.
- After a while, double tone and then triple tone will be heard and all the controllers, including master controller, enrolled
to the device will be deleted.
After resetting the motorized cylinder, please check if old master controller of motorized cylinder is deleted or not. If it is
not deleted, repeat the procedure above.
If it is deleted, press and hold 2 buttons on the motoized cylinder till you hear a long warning tone. After that send a
controlling signal via the desired master controller as follows:
- For mobile phone, please check page 7.
- For fingerprint reader, wake the fingerprint reader up and touch the locking button.
- For keypad, what the keypad up and touch the locking button.
- For master remote controller, press and hold button #2 till the motorized cylinder starts to operate.

copyright © DESi Alarm and Security Systems Inc.
www.desi.com.tr
Other manuals for Utopic R
1
Table of contents
Other DESi Lock manuals


Popular Lock manuals by other brands

INSAFE
INSAFE Matrix 3 User instructions

schmersal
schmersal AZM300Z-I2-ST-1P2P manual

Populife
Populife Smart Deadbolt user guide

Assa Abloy
Assa Abloy High Security Deadbolt 6000 Specifications

Assa Abloy
Assa Abloy Yale Real Living Assure Lock YRD426 manual

Davcor
Davcor Smartlock Digital 4300 MASTER SETUP AND OPERATIONAL INSTRUCTIONS


