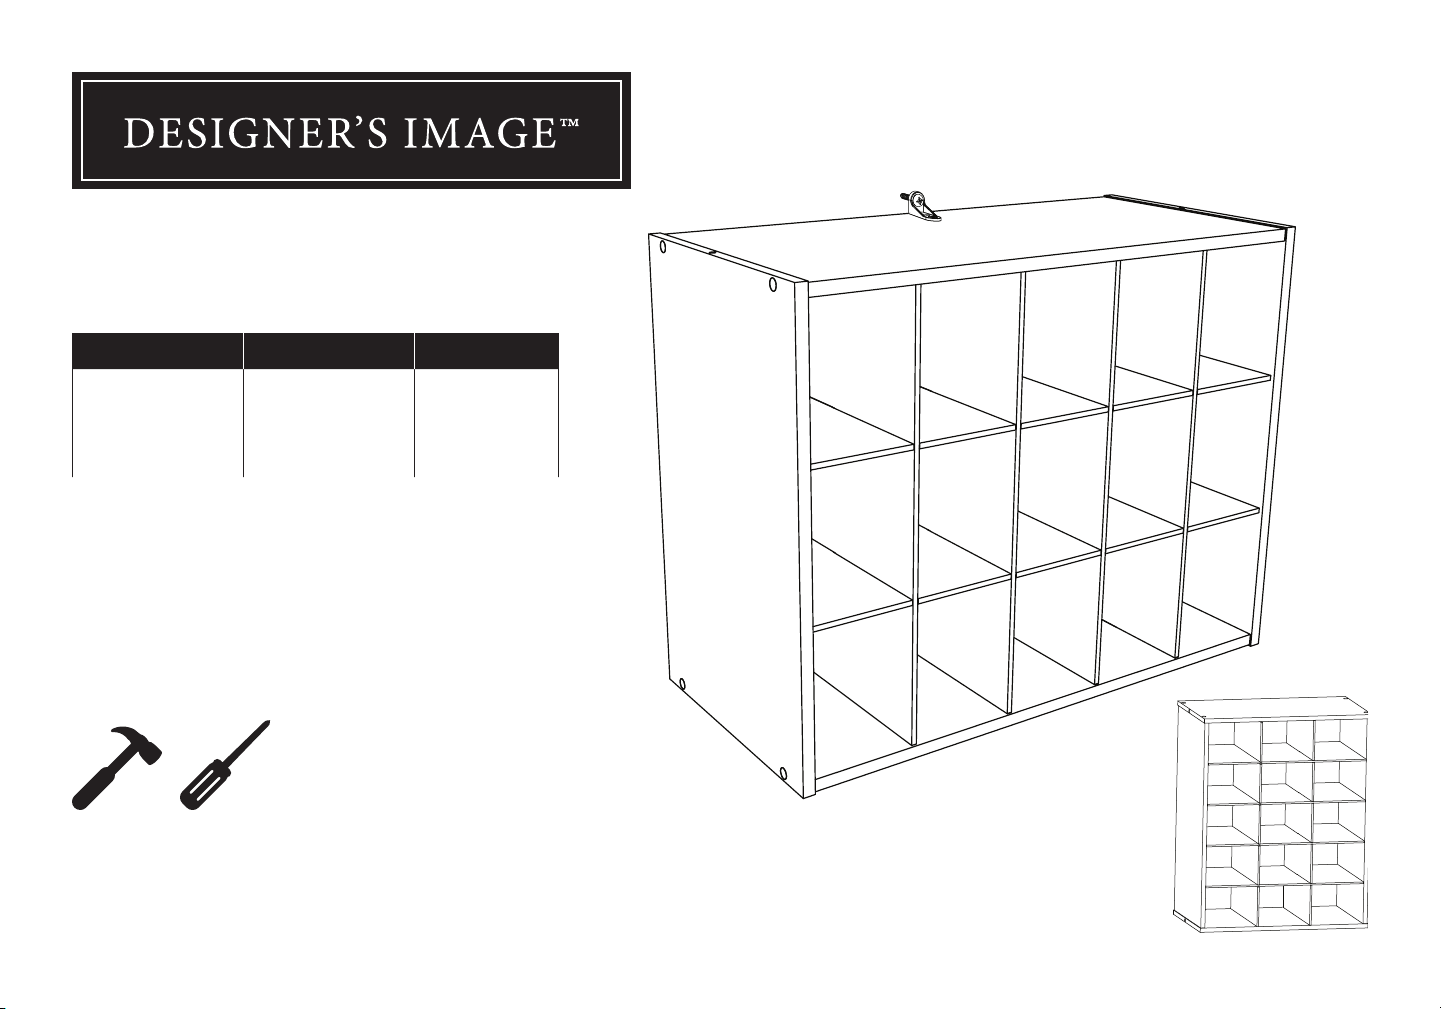
designer's image 211-4501 User manual
01-13957-00 11/20
Stackable 15-Cube Organizer
Assembly Instructions
SKU Reference # Finish
211-4501 3679 White
211-4500 3678 Java
211-4610 14594 Charcoal
Tools Needed:
hammer screwdriver
Optional Assembly
2
SAFETY PRECAUTIONS
• This unit contains small parts which could be a choking hazard for small children. Children should be
under adult supervision at all times or serious injury could occur.
• Always unload unit prior to moving the unit. The weight of personal belongings can cause the unit to
become unstable and either tip or collapse. Serious bodily injury and/or damage to personal belongings
may occur.
• Do not overload unit. If any shelf, top, or bottom of unit bows or bends, it is overloaded. The shelf, top, or
bottom could collapse and cause serious bodily injury and/or damage to personal belongings.
• Do not climb or step on the unit. This is not a bench. The unit may become unstable and either tip or
collapse. Serious bodily injury and/or damage to personal belongings may occur.
• Do not use this unit as a television stand. Serious bodily injury and/or damage to personal belongings
may occur.
• Do not mount or attach anything to the sides, rear, or front of the unit as this can create a force which can
cause the unit to tip. Serious bodily injury and/or damage to personal belongings may occur.
• Do not hang this unit on the wall. The product structure is not designed for wall hanging. Serious bodily
injury, damage to personal belongings, and/or damage to the wall may occur.
• All units must be secured individually to wall stud using hardware provided. If wall stud is not accessible,
consult your local hardware store for appropriate mounting hardware. Failure to do so may create an
unsafe tipping hazard that could lead to serious bodily injury and/or damage to personal belongings.
• Follow proper safety procedures if using power tools and ladders.
• We recommend you protect your work surface during assembly to prevent scratching or damage to table
tops, wood oors, etc.
• We recommend you hand-tighten screws. Use care not to overtighten if using power tools.
• If stacking units, follow all instructions to ensure units are stacked in the correct orientation.
Serious or fatal crushing injuries can occur from
furniture tip-over. To help prevent tip-over:
- Install tip-over restraint provided.
- Unless specically designed to accommodate, do not
set TVs or other heavy objects on top of this product.
- Never allow children to climb or hang on drawers,
doors, or shelves.
- Place heavy items on lower shelves and as far back
as possible.
Use of tip-over restraints may only reduce, but not
eliminate, the risk of tip-over.
WARNING
WARNING
STOP
FOLLOW
INSTRUCTIONS
CAREFULLY
Please do not return product to the retail store.
For product assistance and warranty information
please call Consumer Affairs at 1-800-874-0008.
Manufacturer Warranty
Manufacturer will replace any missing or damaged part
due to manufacturer defect. Please have proof of purchase.

3
(H8) x 20
nail
HARDWARE
(H1) x 8
assembly screw
#5 mm x 38 mm
(H5) x 1
L-bracket
(H6) x 1
L-bracket screw
#10 x 1/2 in. athead
(H7) x 1
wall screw
#10 x 1-1/2 in.
(H4) x 2
hole plug
(H3) x 2
dowel
(H2) x 8
screw cover

4
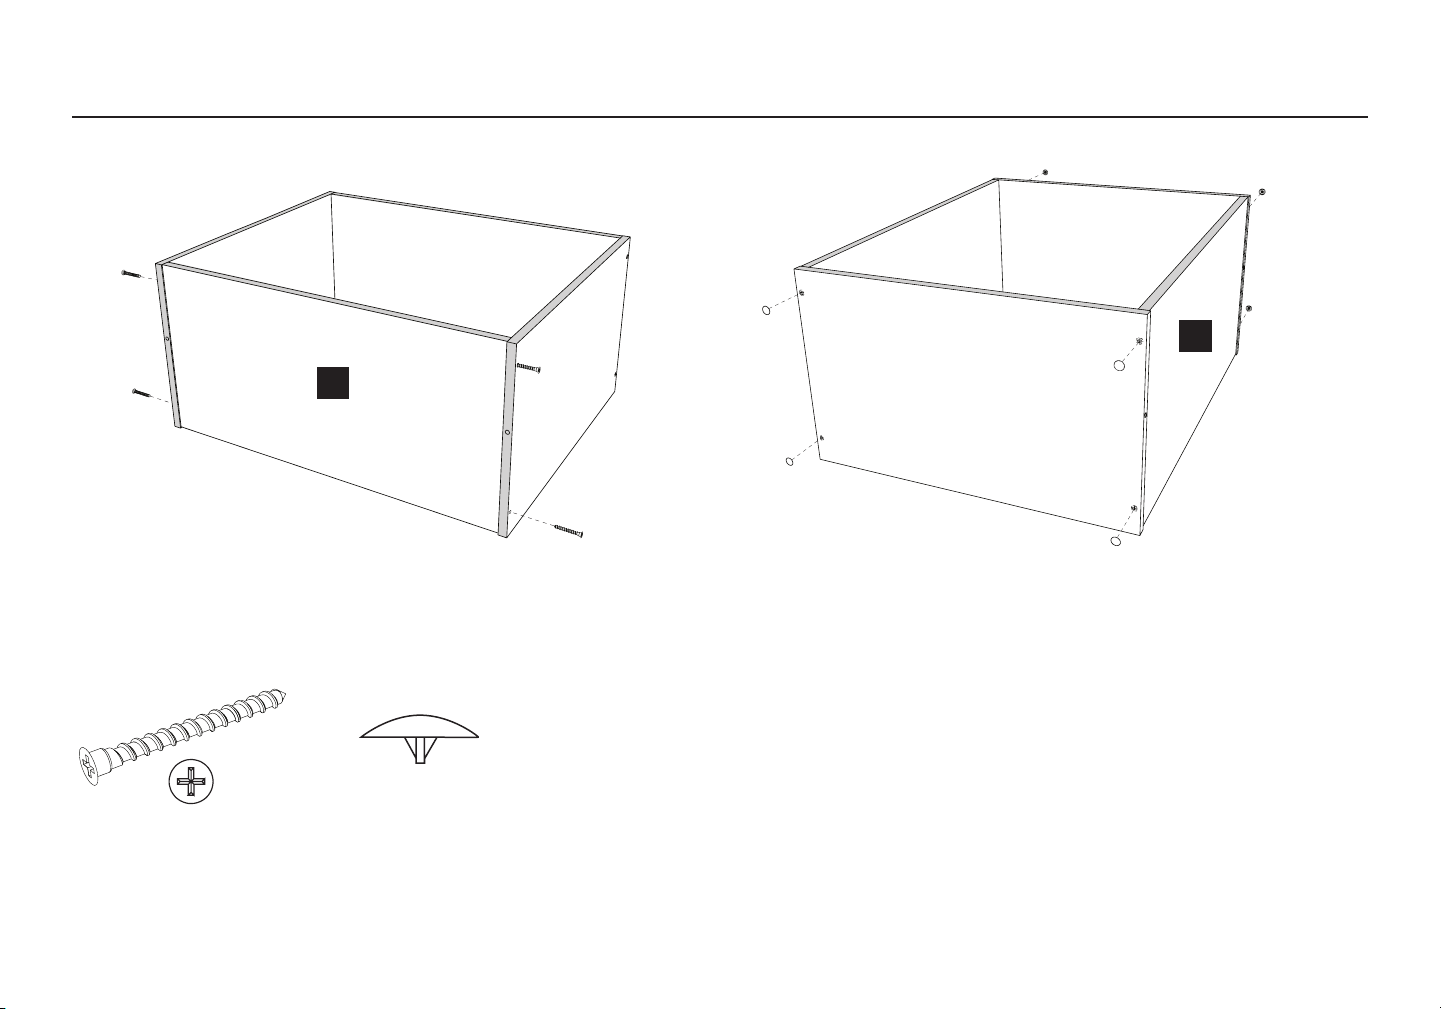
DESCRIPTION QUANTITY
A side panel 2
B shelf 2
C back panel 1
D 4-slot cross piece 2
E 2-slot cross piece 4
B
B
A
A
D
D
E E EE
C
Unfinished edges are shaded in gray in the illustrations throughout this document. It is
important to understand how finished edges go together. Take a moment to lay out all the
wood pieces and note the finished and unfinished (raw wood) edges. Arrange pieces so all
finished edges are facing the same way. While assembling, take care to note in each diagram
which way finished edges are facing. In general, all finished edges will face forward and all
finished sides (large area of piece) will face up when product is fully assembled and upright.
unfinished
edge
finished
edge

5
1. Use four assembly screws (H1) to attach side panels (A) to shelf (B).
2. Be sure to arrange pieces so all unfinished edges are facing the same way.
Unnished edges of unit facing up.
STEP 1
B
A
A
(H1) x 4
assembly screw
#5 mm x 38 mm
6
STEP 2
1. Attach shelf (B) to side panels with four assembly screws (H1) and then cover all screw heads with a screw cover (H2).
B
B
(H1) x 4
assembly screw
#5 mm x 38 mm
(H2) x 8
screw cover
7
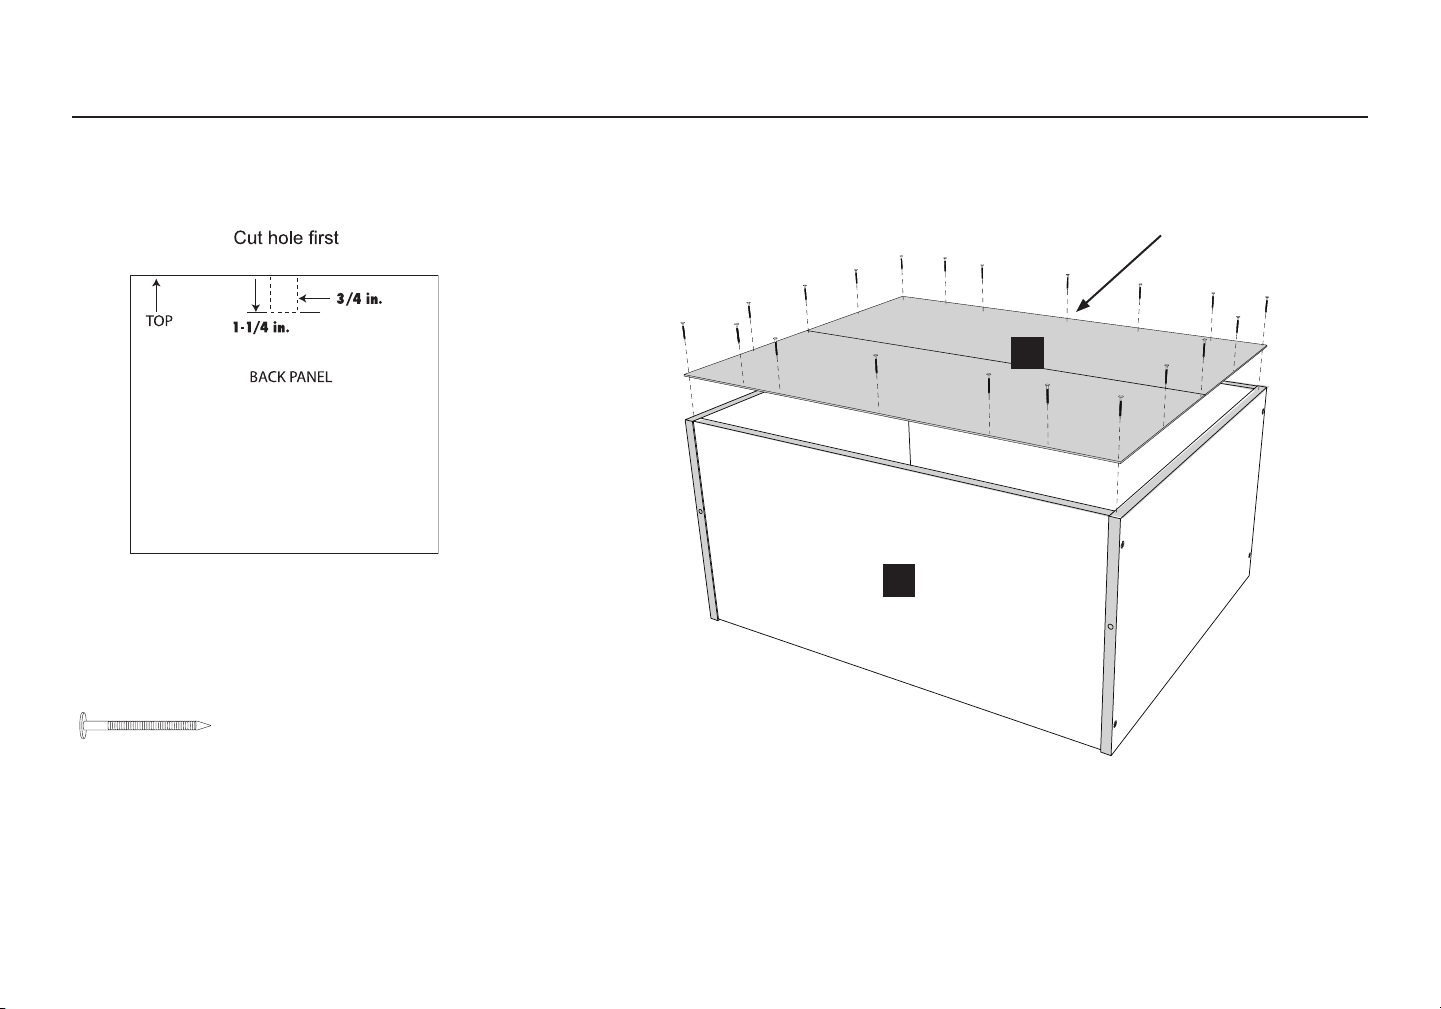
1. If you plan to stack units, use scissors or utility knife to cut a 3/4 in. x 1-1/4 in. hole in top center location of back panel.
2. With all unnished edges facing up, square up the unit by placing back panel (C) onto the cabinet. Nail the back into position using nails (H8).
Avoid angling nails.
For stacking units only - cut back panel rst. For single & stacking unit(s).
If stacking, place cut hole here
STEP 3
B
C
(H8) x 20
nail

8
STEP 4
1. Align unit with wall stud.
2. Install short end of L-bracket (H5) to wall/wall stud. Install long end of L-bracket to top panel (B).
3. Use 1-1/2 in. screw (H7) to secure L-bracket (H5) to wall/wall stud. Use 1/2 in. screw (H6) to secure L-bracket to top panel (B).
4. To secure stacked units—horizontal option only—or for more hidden hardware, mount L-bracket through cut hole in back panel.
5. Do not install this unit ush against the wall! This unit requires a gap of between 1/2 inch and 1 inch to install properly.
Bwall
stud
top
panel
B
Max.
1 in.
Min.
1/2 in.
wall
stud
B
top
panel
wall
stud
short
end
long
end
wall
stud
B
1. 2.
4. 5.
3.
WARNING
All units MUST be
fastened to the wall.
(H5) x 1
L-bracket
(H6) x 1
L-bracket screw
#10 x 1/2 in. athead
(H7) x 1
wall screw
#10 x 1-1/2 in.

9
1. Slide together 4-slot cross pieces (D) and 2-slot cross pieces (E) as shown.
2. Slide assembled cross pieces into nished unit.
All smooth, nished edges up.
All smooth, nished edges face out.
STEP 5
D
D
E
E
E
E
10
STEP 6
Single unit only when
mounted vertically.
Can not stack.
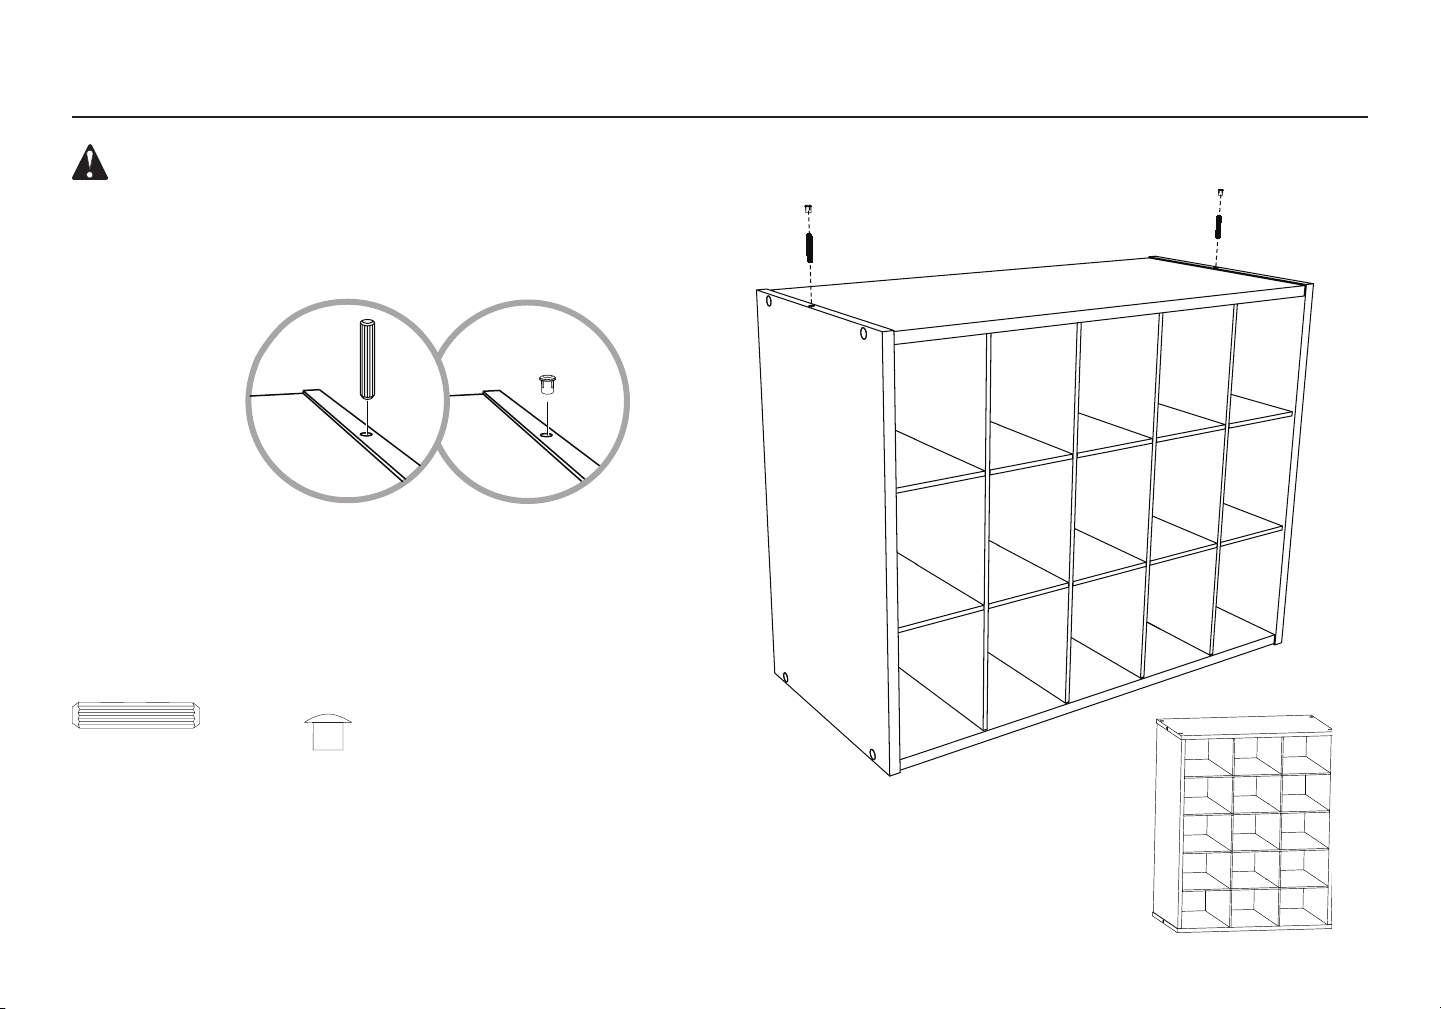
1. Install dowels (H3) or hole plugs (H4).
2. For single unit: Insert hole plugs (H4) into top holes.
3. For stacking units: Insert dowels (H3) into top holes.
for single unitfor stacking
WARNING
Do NOT stack more than one
unit on top of each another.
(H4) x 2
hole plug
(H3) x 2
dowel


This manual suits for next models
5
Table of contents
Popular Organizer manuals by other brands


Franklin
Franklin Rolodex RF-192 user guide

Seville Classics
Seville Classics ULTRADURABLE WEB520 Mounting instructions

Seville Classics
Seville Classics SHE16218B Assembly instructions

Closet Maid
Closet Maid 8-in-1 Closet Organizer 2890 installation instructions

Goodlife
Goodlife HOU714 Assembly instructions

AIC International
AIC International 23643 User instructions


