Deskshaper Deskshaper Pro User manual

DeskShaper Pro
BIS514
EN Instructions Manual
NL Handleiding
DE Handbuch
FR Mode d’emploi
Bisshops BV
Herengracht 338
1016 CG Amsterdam
The Netherlands
www.diverzus.nl


INDEX
ASSEMBLY AND USER MANUAL......................................................................... 2
SAFETY INSTRUCTIONS......................................................................................... 3
MOUNTING PARTS.................................................................................................. 5
MOUNTING INSTRUCTIONS................................................................................ 6
SEAT ADJUSTMENT AND ADJUSTMENT RESISTANCE................................. 9
MONTAGE EN GEBRUIKERSHANDLEIDING................................................. 10
VEILIGHEIDSINSTRUCTIES................................................................................. 11
MONTAGEONDERDELEN .................................................................................. 13
MONTAGEINSTRUCTIES .................................................................................... 14
STOELVERSTELLING EN VERSTELLING WEERSTAND................................ 17
INHALT...................................................................................................................... 18
SICHERHEITSHINWEISE...................................................................................... 19
MONTAGETEILE..................................................................................................... 21
MONTAGEANLEITUNG ....................................................................................... 22
SITZANPASSUNG UND EINSTELLBESTÄNDIGKEIT..................................... 25
CONTENU................................................................................................................ 26
CONSIGNES DE SÉCURITÉ.................................................................................. 27
PIECES DE MONTAGE........................................................................................... 29
INSTRUCTIONS DE MONTAGE.......................................................................... 30
AJUSTEMENT DU SIÈGE ET RÉSISTANCE À L’AJUSTEMENT..................... 33
- 1 -

- 2 -
EN
ASSEMBLY AND USER MANUAL
Thank you for your trust in the Deskshaper Pro. We are proud of our quality
product and hope that the DeskShaper Pro will provide many hours of good
practice.
The Deskshaper Pro is a product with which the resistance level for a
long-term exercise can be determined. Ideal for both home and oce.
This user manual belongs exclusively to the Deskshaper Pro, and contains
instructions for correct and safe assembly, use and maintenance. Observe
the usage / safety instructions, even when the product is passed on to third
parties. Keep the instructions so that they can always be consulted.

- 3 -
EN
1. SAFETY INSTRUCTIONS
Caution: Observe the following warnings and safety instructions before use!
Failure to follow the instructions can lead to serious personal injury.
1. Read the warnings posted on the Deskshaper Pro before use.
2. Carefully follow the safety and assembly instructions before using
the Deskshaper Pro. The Deskshaper Pro should be properly mounted and
tightened for use.
3. Keep children and pets away from the Deskshaper Pro.
4. Set up the Deskshaper Pro according to the instructions. Ensure a
rm and level surface, and avoid loose carpets and / or uneven surfaces.
5. Check the Deskshaper Pro for wear and / or loose parts before
each use.
6. Tighten loose parts and replace worn parts before using the Deskshaper Pro.
7. If applicable, follow the doctor's advice when developing the personal
training program.
8. Choose a training that ts with your own physical, strength and exibility
level and train within the limits of this.
9. Do not wear loose clothing while using the Deskshaper Pro.
10. Never use the Deskshaper Pro with bare feet or socks. Use good footwear,
such as running shoes or cross training shoes.
11. When getting on and o, and when using the Deskshaper Pro, pay
attention to the balance. Losing the balance can lead to a fall and serious
physical injury.
12. The Deskshaper Pro should only be used by one person at a time.
13. The Deskshaper Pro may not be loaded more than 120 kg.
14. Immediately replace defective components and stop using the Deskshaper
Pro until the components have been replaced / repaired.
15. Provide sucient available space around the Deskshaper Pro. Keep at least
one meter away from an obstruction.
16. In case of nausea or dizziness, stop using the Deskshaper Pro immediately.
17. Make sure the bolts and nuts are tightened before each use.

- 4 -
EN
WARNING:
Before starting a training or conditioning program, (if applicable) contact
with the doctor is recommended. Decide together if a medical examination
is needed. This applies especially in case of pregnancy, illness or lack of
sports experience (at 35 years and older).
ATTENTION: THE DESKSHAPER PRO SHOULD NOT BE CHARGED
WITH MORE THAN 120KG!
PAY ATTENTION! READ AND FOLLOW ALL SAFETY INSTRUCTIONS.
FAILURE TO COMPLY WITH THESE INSTRUCTIONS MAY RESULT IN
SERIOUS BODILY INJURY.
MAINTENANCE
- Check regularly that all screws are properly tightened
- Clean the Deskshaper Pro with a mild detergent.
- Use oil to keep the Deskshaper Pro running smoothly
- 1 year warranty
- 5 -
EN
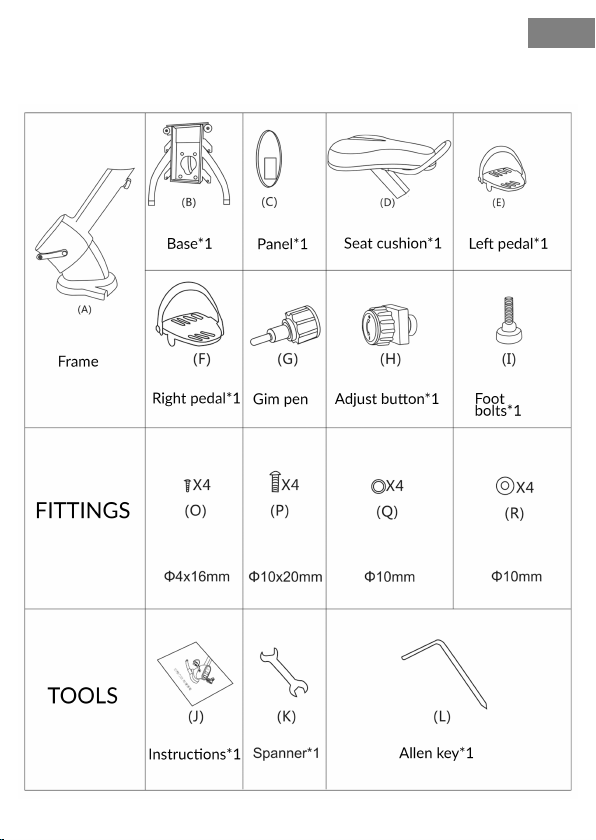
2. MOUNTING PARTS
3. MOUNTING INSTRUCTIONS
NL
- 6 -
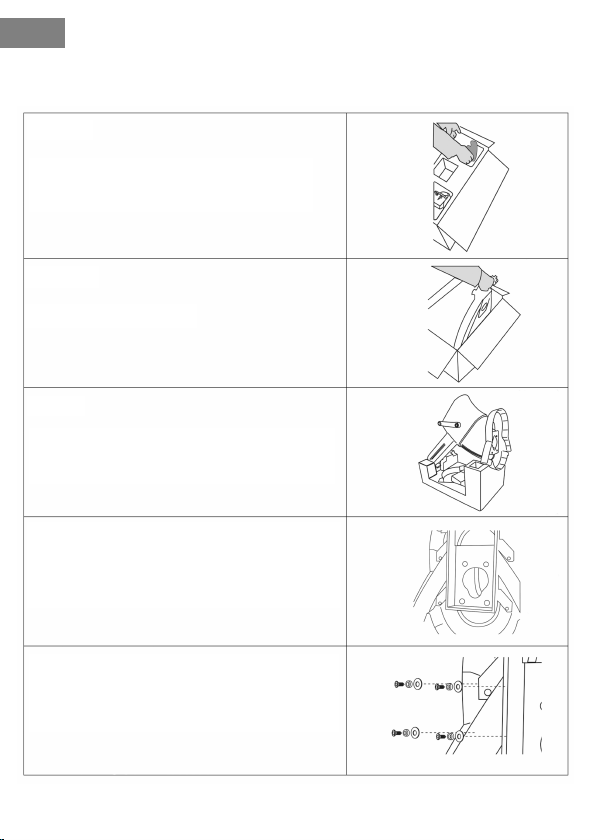
Open the box, place (H) and (C) in the hole
with the foam side in the box and remove
the whole piece from the foam lid.
STEP 1
STEP 2
Take (B) out of the box.
STEP 3
Remoce (A) from the foam, place (A) on the
foam and check if (A) is in a fully balanced
position.
STEP 4
Place (B) in the bottom of (A), place A on the
basis of the four holes from side to side.
STEP 5
Place (B) in the bottom of (A), align the four
holes.

- 7 -
EN
STEP 6
Place (Q), (R) on (P), then use (L) to turn the
screws in the base (B) and the frame.
STEP 7
Carefully adjust the plastic bottom casing of
the frame (B) so that the four holes of the
bottom casing alignment are correct. Use
(0) as screws.
STEP 8
Place panel (C) at the top of (A).
STEP 9
Insert (D) into the plastic tube of (A), with
(G) pulled out, then push (D) to the desired
height and release (G) to secure the saddle.
STEP 10
Use (L) to remove the bolt and washer from
(H), place (H) in the adjusting xed plate,
and alignthe screw holes. Use (L) for
securing.

EN
- 8 -
STEP 11
Turn part (E) anti-clockwise into the
crank with the L logo. Use (K) to
continue to lock the pedal
STEP 12
Turn part (F) anti-clockwise into
the crank with the R logo. Use (K)
to continue to lock the pedal.
STEP 13
If the device is not stable, adjust the (1) on both
sides to set the Deskshaper Pro stably.

4. SEAT ADJUSTMENT AND ADJUSTMENT RESISTANCE
WARNING: The Deskshaper Pro should never be used with a separate
seat cushion. Pull the seat cushion for moving and / or using the Deskshaper
Pro upwards to ensure that it can not be removed.
- 9 -
EN
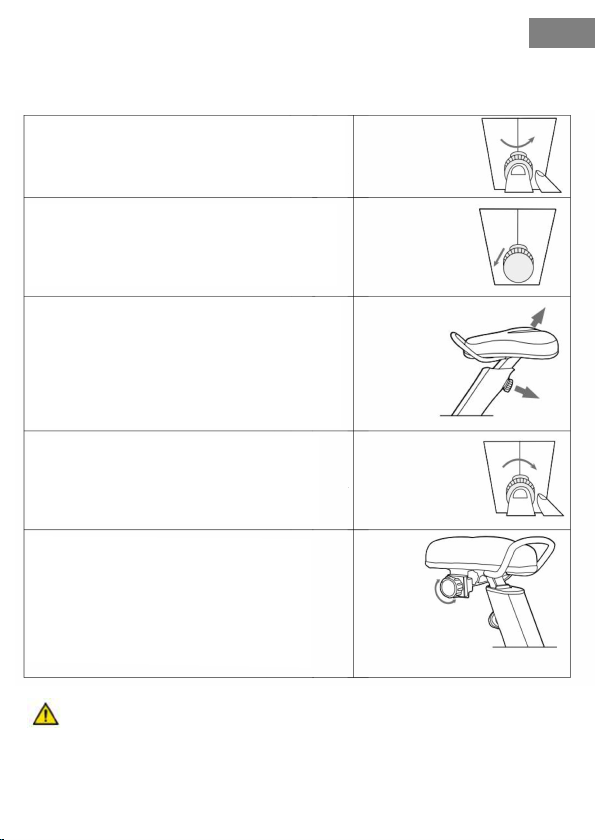
STEP 1
Turn the control knob of the seat
counterclockwise to loosen it.
STEP 2
Pull the control knob of the seat to release
the seat.
STEP 3
When holding the pulled-out button, move
the seat cushion up or down to the correct
height. Release the button when the required
height is reached, and slowly move the seat
cushion down until the pin locks into place.
Check whether the seat is locked by pulling
the saddle up. If the seat is properly locked, it
will not move up or down.
STEP 4
Turn the control knob of the seat clockwise
to lock the control knob. Before use, fully
tighten the knob.
STEP 5 - Setting the standing position
There are numbers on the regulation of the
resistance, 1 to 8. Number 1 is the least
resistance and gure 8 is the highest
resistance.1. To increase the resistance, turn
the dial clockwise.
2. To decrease the resistance, turn the rotary
knob anticlockwise.

DESKSHAPER PRO
MONTAGE- EN GEBRUIKERSHANDLEIDING
Bedankt voor het vertrouwen in de Deskshaper Pro. We zijn trots op dit
kwaliteitsproduct en hopen dat de DeskShaper Pro veel uren van goede
oefening zal bieden.
De Deskshaper Pro is een product waarmee het weerstandsniveau voor een
langdurige oefening kan worden bepaald. Dit is ideaal voor zowel thuis als
op kantoor.
Deze gebruikshandleiding behoort uitsluitend tot de Deskshaper Pro, en
bevat instructies voor juiste en veilige montage, gebruik en onderhoud.
Neem de gebruik/veiligheidsinstructies in acht, ook wanneer het product
wordt doorgegeven aan derden. Bewaar de instructies goed, zodat deze
altijd geraadpleegd kan worden.
NL
- 10 -

NL
- 11 -
1. VEILIGHEIDSINSTRUCTIES
Let op: Neem voor gebruik onderstaande waarschuwingen en
veiligheidsinstructies in acht! Het niet opvolgen van de instructies kan
leiden tot ernstig lichamelijk letsel.
1. Lees voor gebruik de op de Deskshaper Pro aangebrachte waarschuwingen.
2. Volg de veiligheid- en montage instructies zorgvuldig op voordat de
Deskshaper Pro in gebruik wordt genomen. De Deskshaper Pro dient goed
gemonteerd en aangespannen te zijn voor gebruik.
3. Houd kinderen en huisdieren uit de buurt van de Deskshaper Pro.
4. Stel de Deskshaper Pro in volgens de instructies. Zorg voor een stevige en
vlakke ondergrond, en vermijd losse tapijten en/of ongelijke oppervlakken.
5. Controleer de Deskshaper Pro voor elk gebruik op slijtage en/of losse
onderdelen.
6. Draai losse onderdelen vast en vervang versleten onderdelen alvorens
weer van de Deskshaper Pro gebruik te maken.
7. Volg, indien van toepassing, het advies van de arts op bij ontwikkeling
van het persoonlijke trainingsprogramma.
8. Kies voor een training die past bij het eigen fysieke, kracht- en
exibiliteitsniveau en train binnen de grenzen hiervan.
9. Draag geen losse of wapperende kleding tijdens het gebruik van de
Deskshaper Pro.
10. Gebruik de Deskshaper Pro nooit met blote voeten of sokken. Gebruik
goed schoeisel, zoals hardloop-, loop-, of cross-trainingsschoenen.
11. Let bij het op- en afstappen, en tijdens gebruik van de Deskshaper Pro
op het evenwicht. Het verliezen van het evenwicht kan leiden tot een val
en ernstig lichamelijk letsel.
12. De Deskshaper Pro dient slechts door één persoon per keer te worden
gebruikt.
13. De Deskshaper Pro mag niet meer dan 120kg worden belast.
14. Vervang defecte componenten direct en stop met het gebruik van de
Deskshaper Pro totdat de componenten zijn vervangen/gerepareerd.
15. Zorg voor voldoende beschikbare ruimte rondom de Deskshaper Pro.
Houd tenminste een meter afstand tot een belemmerend voorwerp aan.
16. Stop bij misselijk of duizeligheid direct met het gebruik van de
Deskshaper Pro.
17. Zorg dat de bouten en moeren voor elk gebruik zijn vastgedraaid.

WAARSCHUWING
Voor het starten van een oefen- of conditieprogramma dient er
(indien van toepassing) altijd contact met de betreende arts opgenomen
te worden. Bekijk samen of er een medisch onderzoek nodig is. Dit geldt
vooral in geval van zwangerschap, ziekte of gebrek aan sportervaring
(bij 35 jaar en ouder).
LET OP: DE DESKSHAPER PRO MAG NIET MET MEER DAN 120KG
WORDEN BELAST!
LET OP! LEES EN VOLG ALLE VEILIGHEIDSINSTRUCTIES OP.
HET NIET OPVOLGEN VAN DEZE INSTRUCTIES KAN LEIDEN TOT
ERNSTIG LICHAMELIJK LETSEL.
ONDERHOUD
- Controleer met regelmaat of alle schroeven goed zijn aangedraaid
- Maak de Deskshaper Pro schoon met een mild schoonmaakmiddel
- Gebruik olie om de Deskshaper Pro soepel te houden
- 1 jaar garantie
NL
- 12 -

2. MONTAGEONDERDELEN
NL
- 13 -
Knop *1

3. MONTAGEINSTRUCTIES
- 14 -
NL
STAP 1
Open de doos, plaats (H) en (C) in het gat
met de schuimkant in de doos en haal het
hele stuk uit het deksel van schuim.
STAP 2
Haal (B) uit de doos.
STAP 3
Haal (A) uit het schuim, plaats (A) op het
schuim en controleer of (A) in een volledig
gebalanceerde stand staat.
STAP 4
Plaats (B) in de onderkant van (A), lijn A op
aan de hand van de vier gaten van zijde tot
zijde.
STAP 5
Plaats (B) in de onderkant van (A), stem de
vier gaten af.
- 17 -
NL
4. STOELVERSTELLING EN VERSTELLING WEERSTAND
Waarschuwing: De Deskshaper Pro mag nooit worden gebruikt met
een los zitkussen. Trek het zitkussen voor het verplaatsen en/of gebruiken
van de Deskshaper Pro omhoog, om na te gaan of deze niet kan worden
verwijderd.
STAP 1
Draai de regelknop van de stoel tegen de klok
in om deze los te maken
STAP 2
2. Trek aan de regelknop van de stoel om de
stoel los te maken.
STAP 3
Bij het vasthouden van de uitgetrokken knop,
beweeg het zitkussen omhoog of omlaag, tot
de juiste hoogte. Laat de knop los wanneer de
vereiste hoogte is bereikt, en beweeg het
zitkussen langzaam naar beneden totdat de
pen vastklikt. Controleer of de stoel vastzit
door het zadel omhoog te trekken. Als de
stoel juist is vergrendeld, zal deze niet
omhoog of omlaag bewegen.
STAP 4
Draai de regelknop van de stoel met de klok
mee, om de regelknop vast te zetten. Draai
voor gebruik de knop volledig vast.
STAP 5 - Instellen van de weestand
Er staan cijfers op de regeling van de
weerstand, 1 tot en met 8. Cijfer 1 is de
minste weerstand en cijfer 8 is de hoogste
weerstand. 1. Om de weerstand te verhogen,
draai de draaiknop met de klok mee. 2. Om
de weerstand te verlagen, draai de draaiknop
tegen de klok in.

- 19 -
DE
1. SICHERHEITSHINWEISE
Achtung: Beachten Sie vor dem Gebrauch die folgenden Warnungen und
Sicherheitshinweise! Die Nichtbeachtung der Anweisungen kann zu
schweren Verletzungen führen.
1. Lesen Sie vor dem Gebrauch die Warnungen auf dem Deskshaper Pro.
2. Befolgen Sie sorgfältig die Sicherheits- und Montagehinweise, bevor Sie
den Deskshaper Pro verwenden. Der Deskshaper Pro sollte ordnungsgemäß
montiert und fest angezogen sein.
3. Halten Sie Kinder und Haustiere vom Deskshaper Pro fern.
4. Richten Sie den Deskshaper Pro gemäß den Anweisungen ein. Sorgen
Sie für eine feste und ebene Oberäche und vermeiden Sie lose Teppiche
und / oder unebene Oberächen.
5. Überprüfen Sie den Deskshaper Pro vor jeder Verwendung auf Abnutzung
und / oder lose Teile.
6. Ziehen Sie lose Teile fest und ersetzen Sie verschlissene Teile, bevor Sie
den Deskshaper Pro erneut verwenden.
7. Befolgen Sie ggf. den Rat des Arztes, wenn Sie ein persönliches
Trainingsprogramm entwickeln.
8. Wählen Sie ein Training, das zu Ihrer eigenen körperlichen, Kraft- und
Beweglichkeitsstufe passt, und trainieren Sie im Rahmen dieser Grenzen.
9. Tragen Sie während der Verwendung des Deskshaper Pro keine lockere
Kleidung.
10. Verwenden Sie den Deskshaper Pro niemals mit bloßen Füßen oder
Socken. Verwenden Sie gutes Schuhwerk wie Lauf- oder
Cross-Training-Schuhe.
11. Achten Sie beim Auf und Absteigen sowie beim Gebrauch des
Deskshaper Pro auf das Gleichgewicht. Der Verlust des Gleichgewichts
kann zu einem Sturz und zu schweren Körperverletzungen führen.
12. Der Deskshaper Pro sollte jeweils nur von einer Person verwendet
werden.
13. Der Deskshaper Pro darf nicht mehr als 120 kg belastet werden.
14. Tauschen Sie defekte Komponenten sofort aus und verwenden Sie das
Deskshaper Pro nicht weiter, bis die Komponenten ausgetauscht /
repariert wurden.
15. Sorgen Sie für ausreichend Platz um den Deskshaper Pro. Halten Sie
mindestens einen Meter Abstand von einem Hindernis.
16. Bei Übelkeit oder Schwindel sollten Sie den Deskshaper Pro nicht mehr
verwenden.

- 16 -
NL
STAP 11
Draai onderdeel (E), tegen de klok in,
in de crank met het L-logo. Gebruik (K)
om het pedaal verder vast te zetten.
STAP 12
Draai onderdeel (F), tegen de klok in,
in de crank met het R-logo. Gebruik
(K) om het pedaal verder vast te
zetten.
STAP 13
Als het apparaat niet stabiel staat, pas dan de (1) aan
beide zijden aan om de Deskshaper Pro stabiel neer
te zetten.

NL
- 15 -
STAP 6
Plaats na elkaar (Q), (R) op (P), gebruik dan
(L) om de schroeven in de basis (B) en het
frame te draaien.
STAP 7
Verstel de plastic bodembehuizing van het
frame (B) voorzichtig zodat de vier gaten
van de uitlijning van de bodembehuizing
goed staan. Gebruik (0) als schroeven.
STAP 8
Plaats paneel (C) aan de bovenkant van (A).
STAP 9
Plaats (D) in de plastic buis van (A), met (G)
naar buiten getrokken, druk dan (D) naar de
gewenste hoogte en laat (G) los om het
zadel vast te zetten.
STAP 10
Gebruik (L) om de bout en sluitring van (H)
af te halen, plaats dan (H) in de afstellende
vaste plaat, en lijn de schroefgaten uit.
Gebruik (L) voor het vastzetten.
This manual suits for next models
1
Table of contents
Languages:


