Deteknix QuestPro User manual

QUESTPRO
®

IN THE BOX
QUICK START
1. Controller 2. Armrest
3. Pro headphones
4. Magnetic USB charge cable
5. Audio adaptor
6. Screen protector
7. Rod set
8. 9.5x5.5 BladeS coil and cover
9. 11x9 RaptorS coil and cover
1 2 3
4
5 6
7
8 9
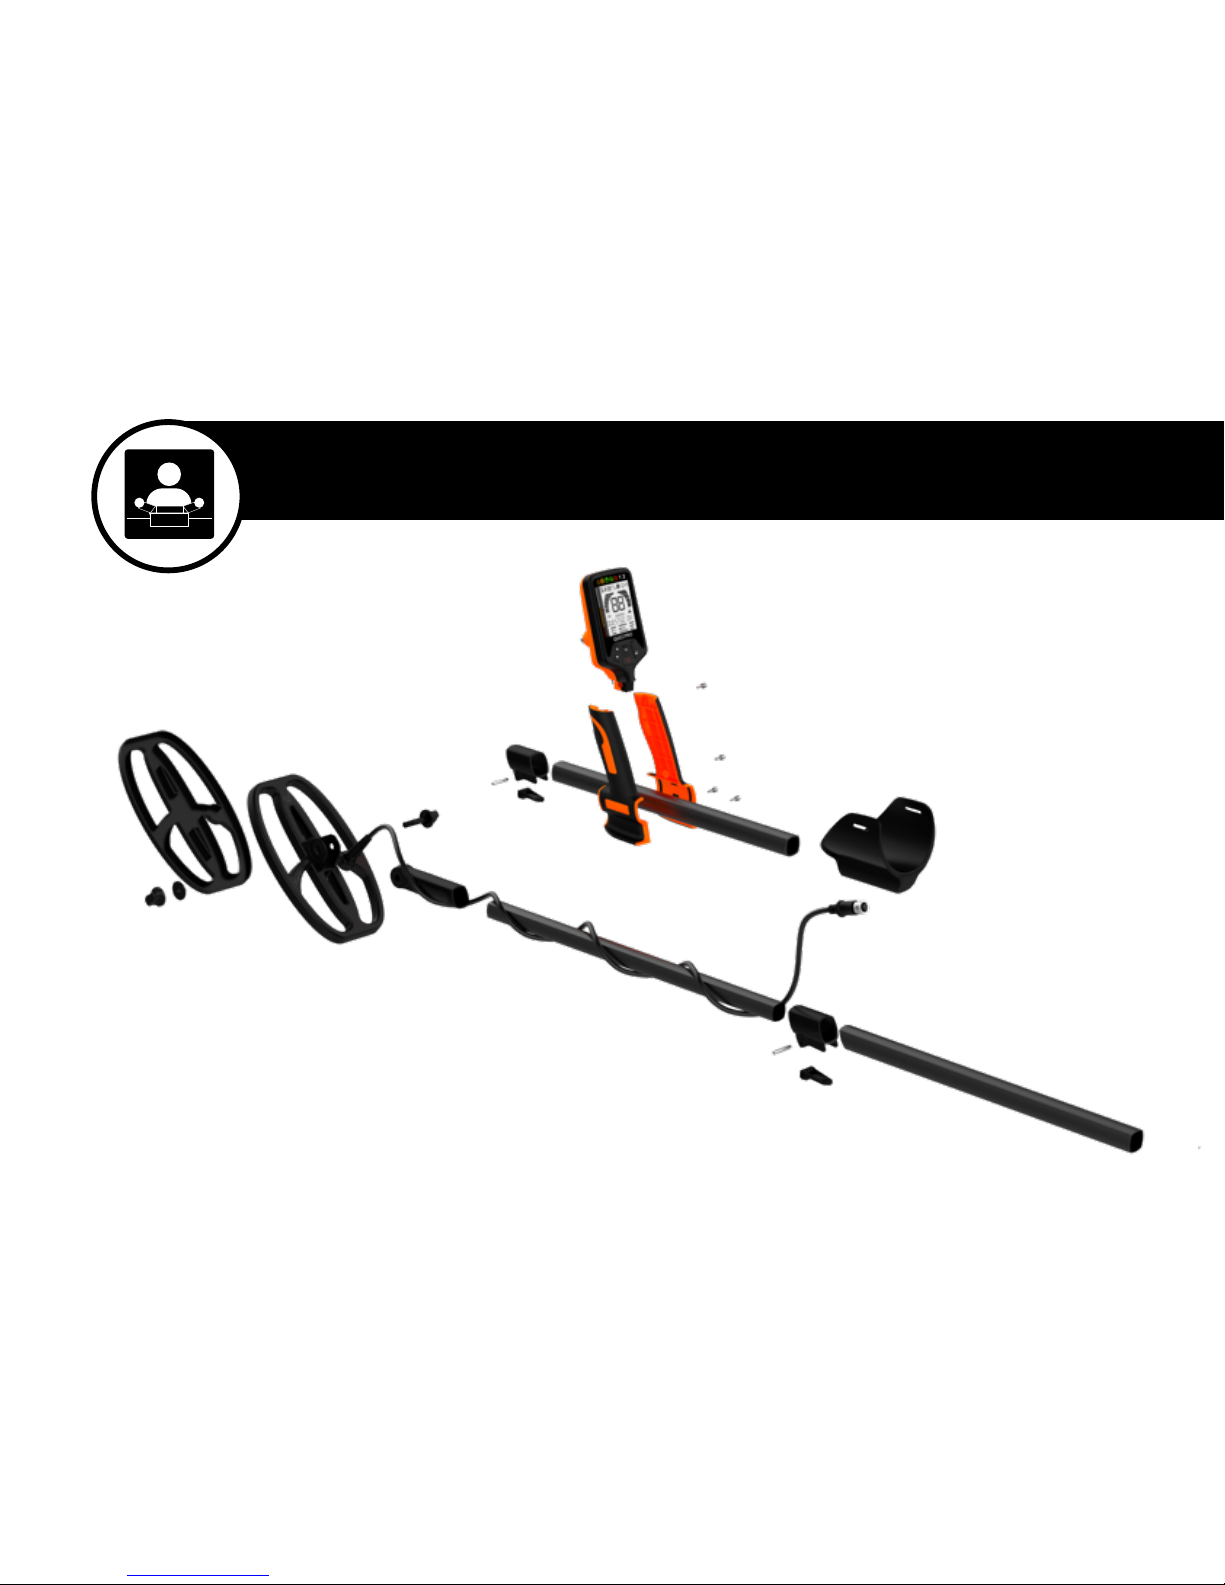
BREAKDOWN
QUICK START
1
2
3
45
6
8
910A
10B
11
12
8. Coil bolt 9.Coil cover. 10. (A) Lower Camlock (B) Upper Camlock
11. Coil washer and nut 12. Coil connector
1. Control box 2. Magic Grip handle pieces
3. Search coil 4. Armrest 5. Upper rod (aluminum)
6. Middle rod (aluminum) 7. Lower rod (plastic)
1 2
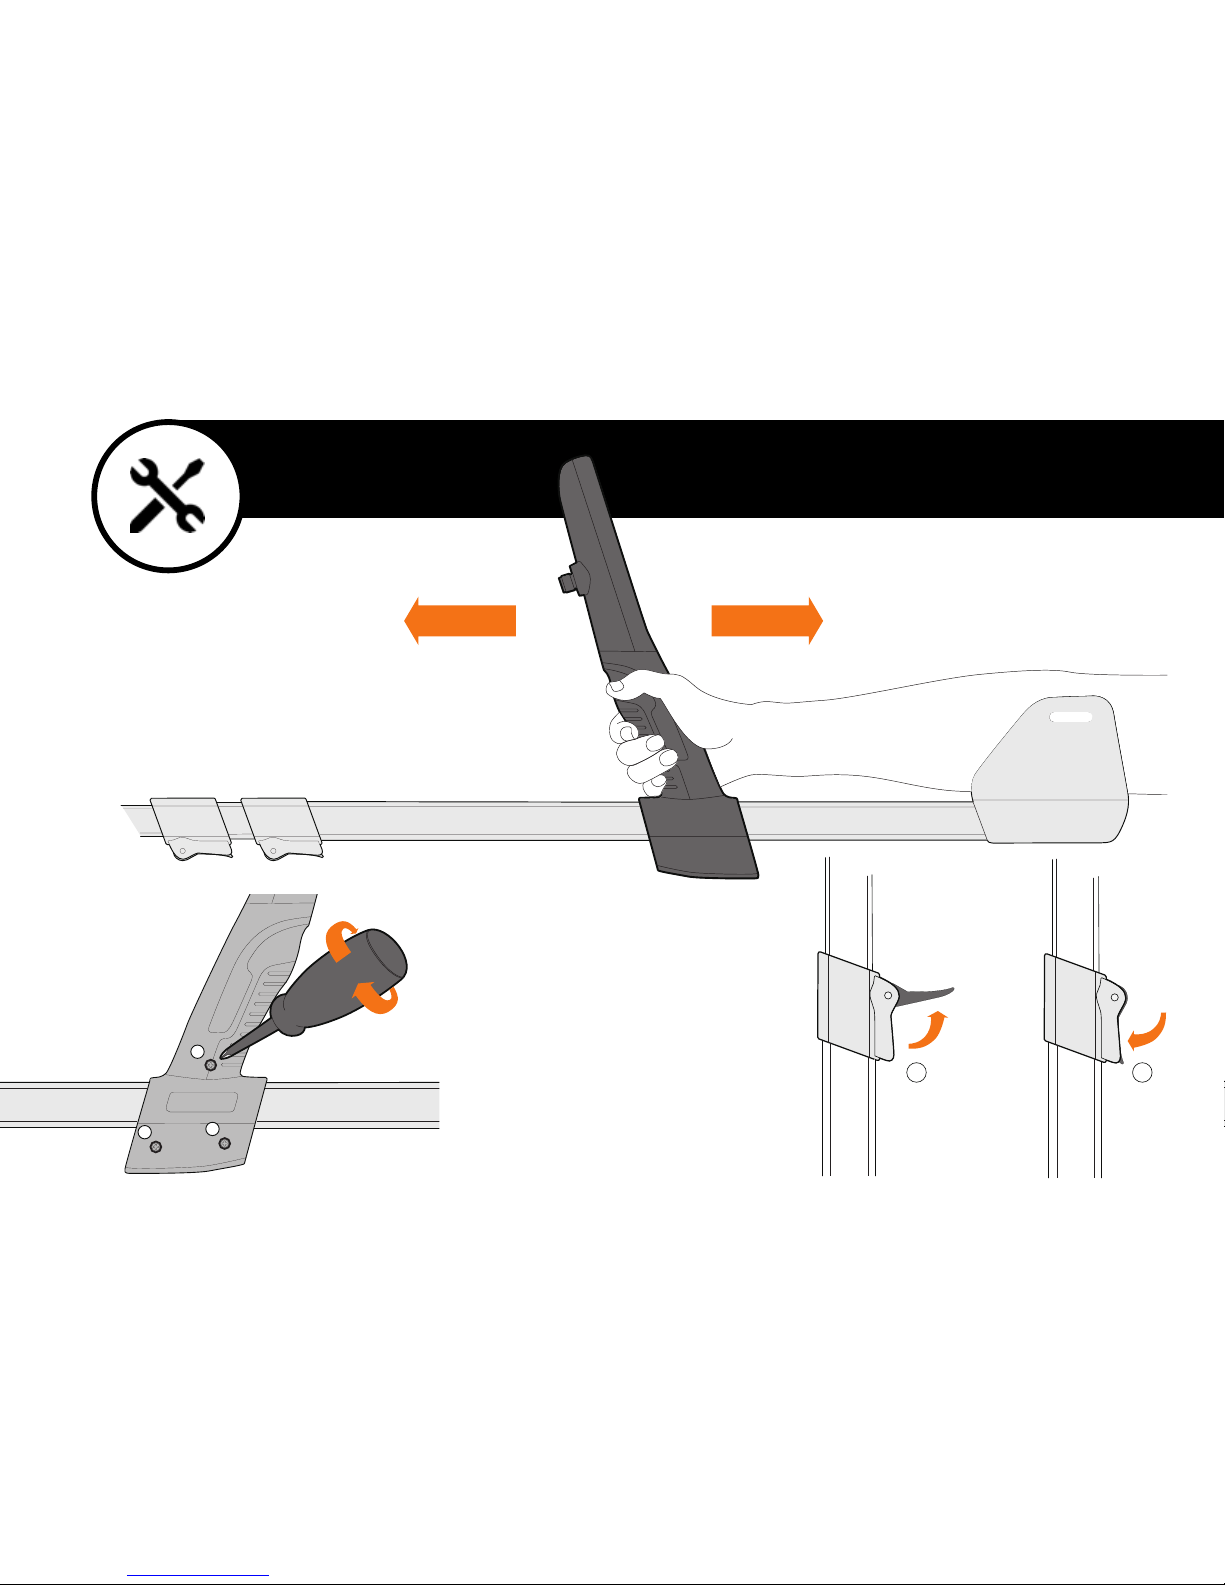
ASSEMBLE
QUICK START
1
23
1
23
32
1

2
1
ASSEMBLE
QUICK START
Install the coil.
12
3 2 1

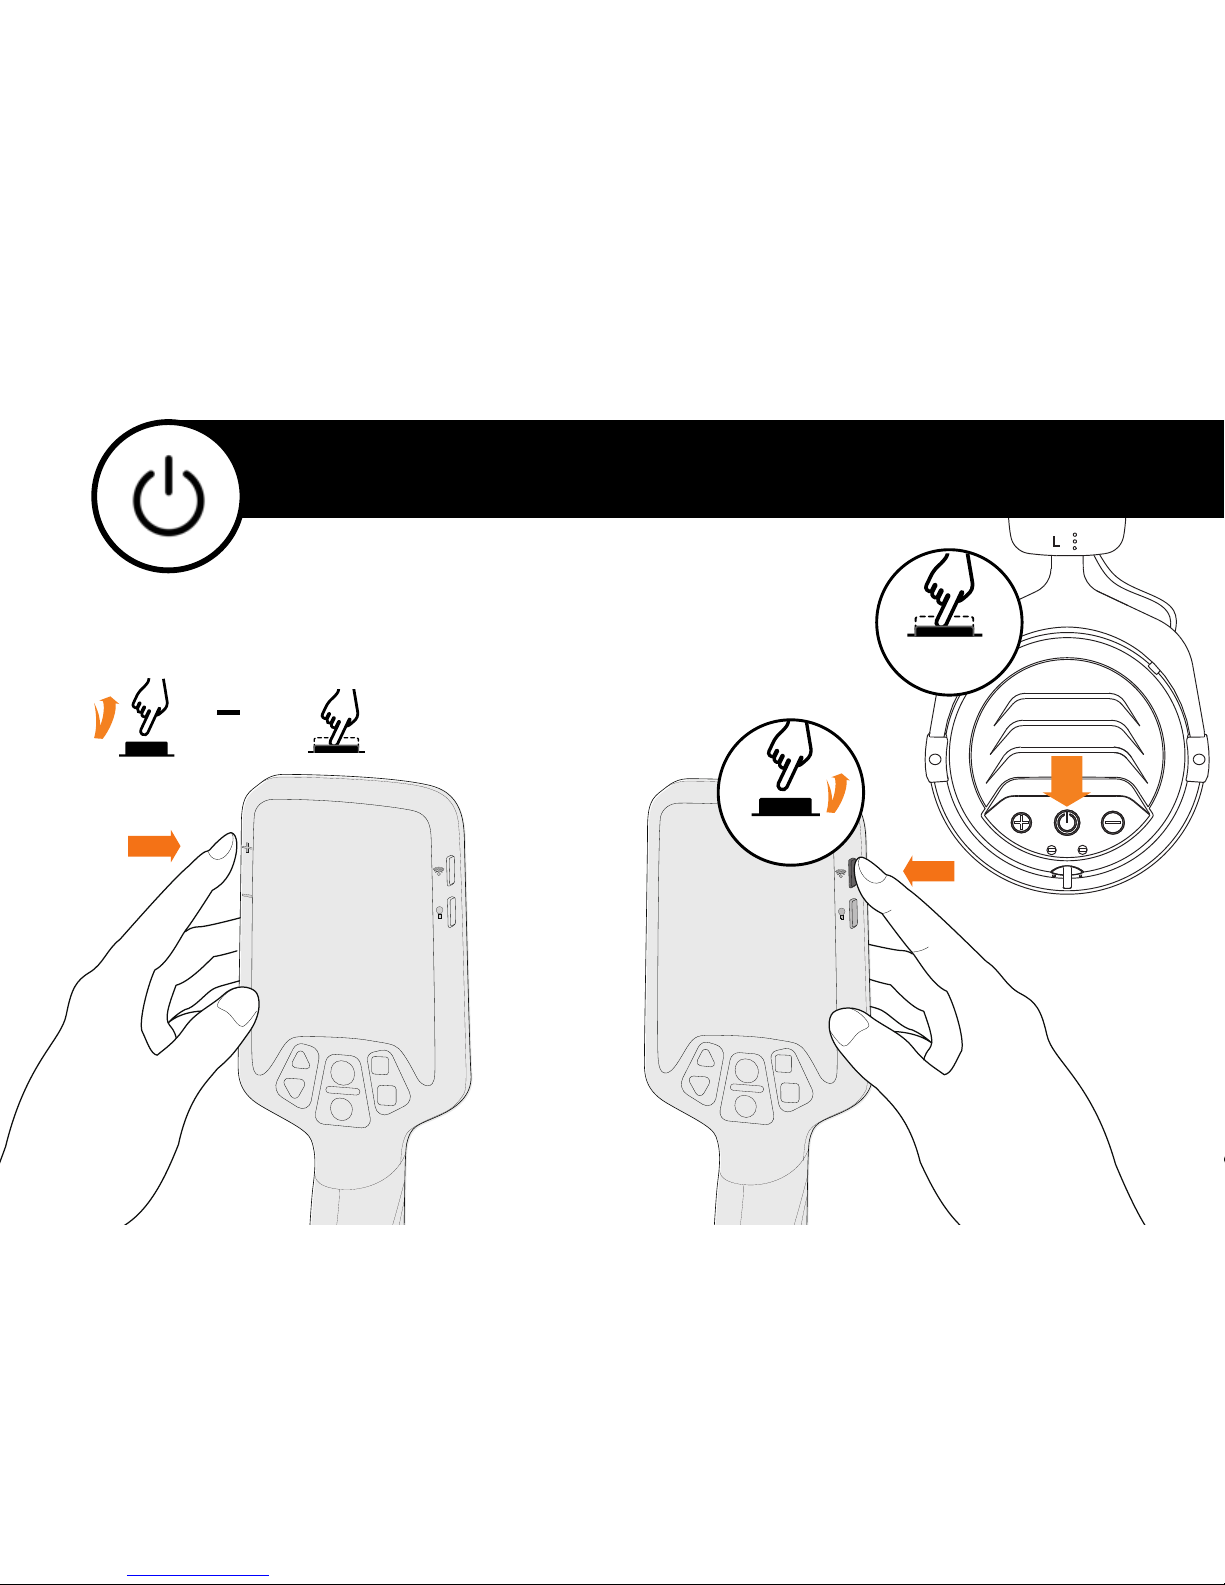
1Sec
QUICK START
ON
OFF
POWER ON/OFF
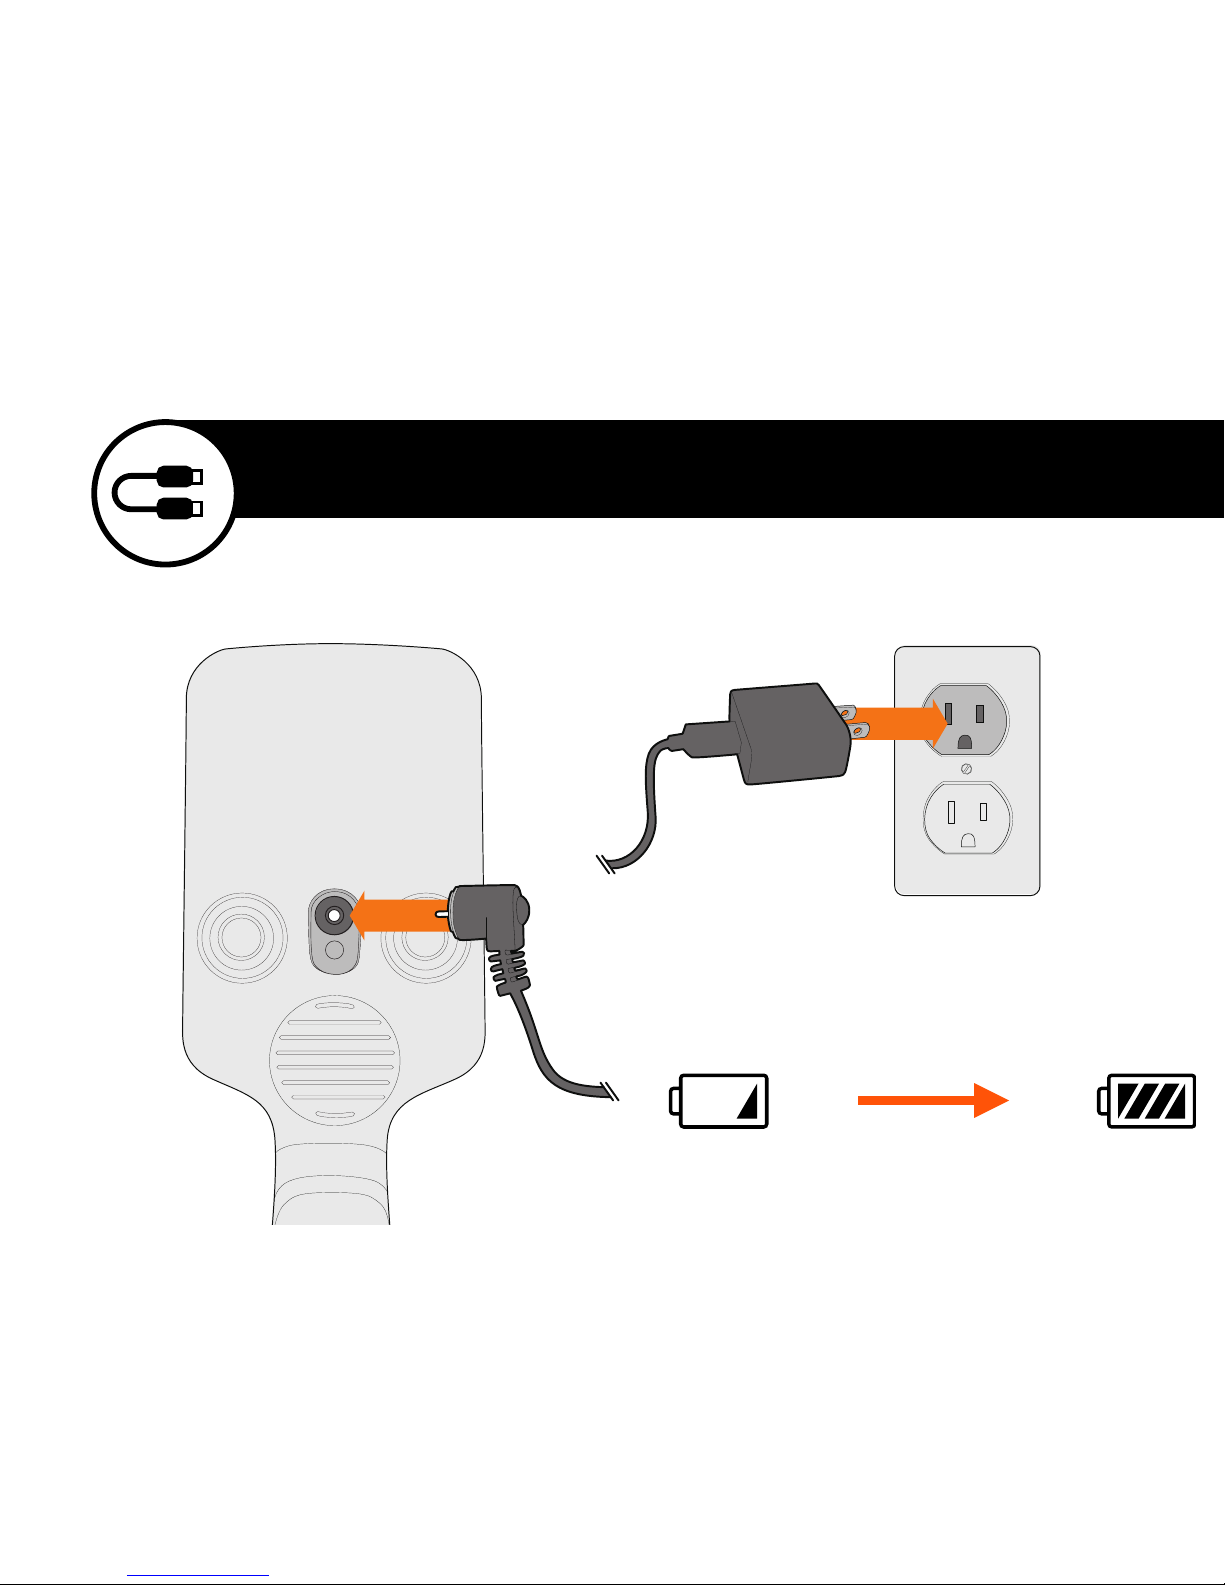
04:00Hr FULL
CHARGE
QUICK START
+ 1
4SEC
QUICK START
MUTE/MAX
VOLUMEVOLUME
AUDIO
TO USE PRO
HEADPHONES 1Sec
On/Off
On/Off
WHEN USE LOUD SPEAKER
OR WIRE HEADPHONES
2
1

QUICK START
Many things such as Power lines,
Electric fences even buildings can
cause Electrical Interference &
Falsing when your detector is in use
and there is no metal under the coil.
Users can reduce the sensitivity by
pressing on the downward triangle
button directly.Users can increase
sensitivity when searching in low
Interference Situations. It is always
best to maintain sensitivity as high
as is possible to achieve best depth.
HOLD
+/
ONE LEVEL
FAST +/
SENSITIVITY
SENSITIVITY

Level-up
Metal Detectors calculate the metal I.D. through the conductivity of
the metal.Higher conductive metals such as silver show higher digit
on the screen. Lower conductive such as Iron show lower on the
scale usually under 25.
The QUESTPRO comes with up to 40 bars of metal ID indication.
Users can select or deselect specific metal I.D.s to discriminate out
undesired metal objects.
After powering on click on the M button once and the bar under the
digit gauge will flash. Use the Triangle buttons to scroll through and
select bars that you wish to discriminate out. Once selected press M
to select / deselect to save. Once you have finished press Pinpoint
button to return to a working condition.
DISCRIMINATION

Level-up
After powering on the detector to scroll through the
various Programs, press and hold the Ground Balance
button while at the same time scrolling with the Triangle
buttons to arrive at the Programs you want. 1 and 2 are left
for customize users own program.
The four preset programs available are:
•Jewelry Mode. Very sensitive, high recovery speed,
target at Gold rings, Jewelry items. TID range 20 - 99
•Coin Mode. Very stable, medium recovery speed,
target for ancient or modern coins TID range 40 - 99
•Gold Field Mode. High recovery speed, ZERO
discrimination, good for gold prospecting.TID 0~99
•Beach Mode. Normal sensitivity, low recovery
speed, strong saltwater immunity. TID range 20 - 99
•Cache Mode. Middle recovery speed for deeper
penetration performance.
•1,2 Modes. For customization settings.
PROGRAM
1
2
Level-up
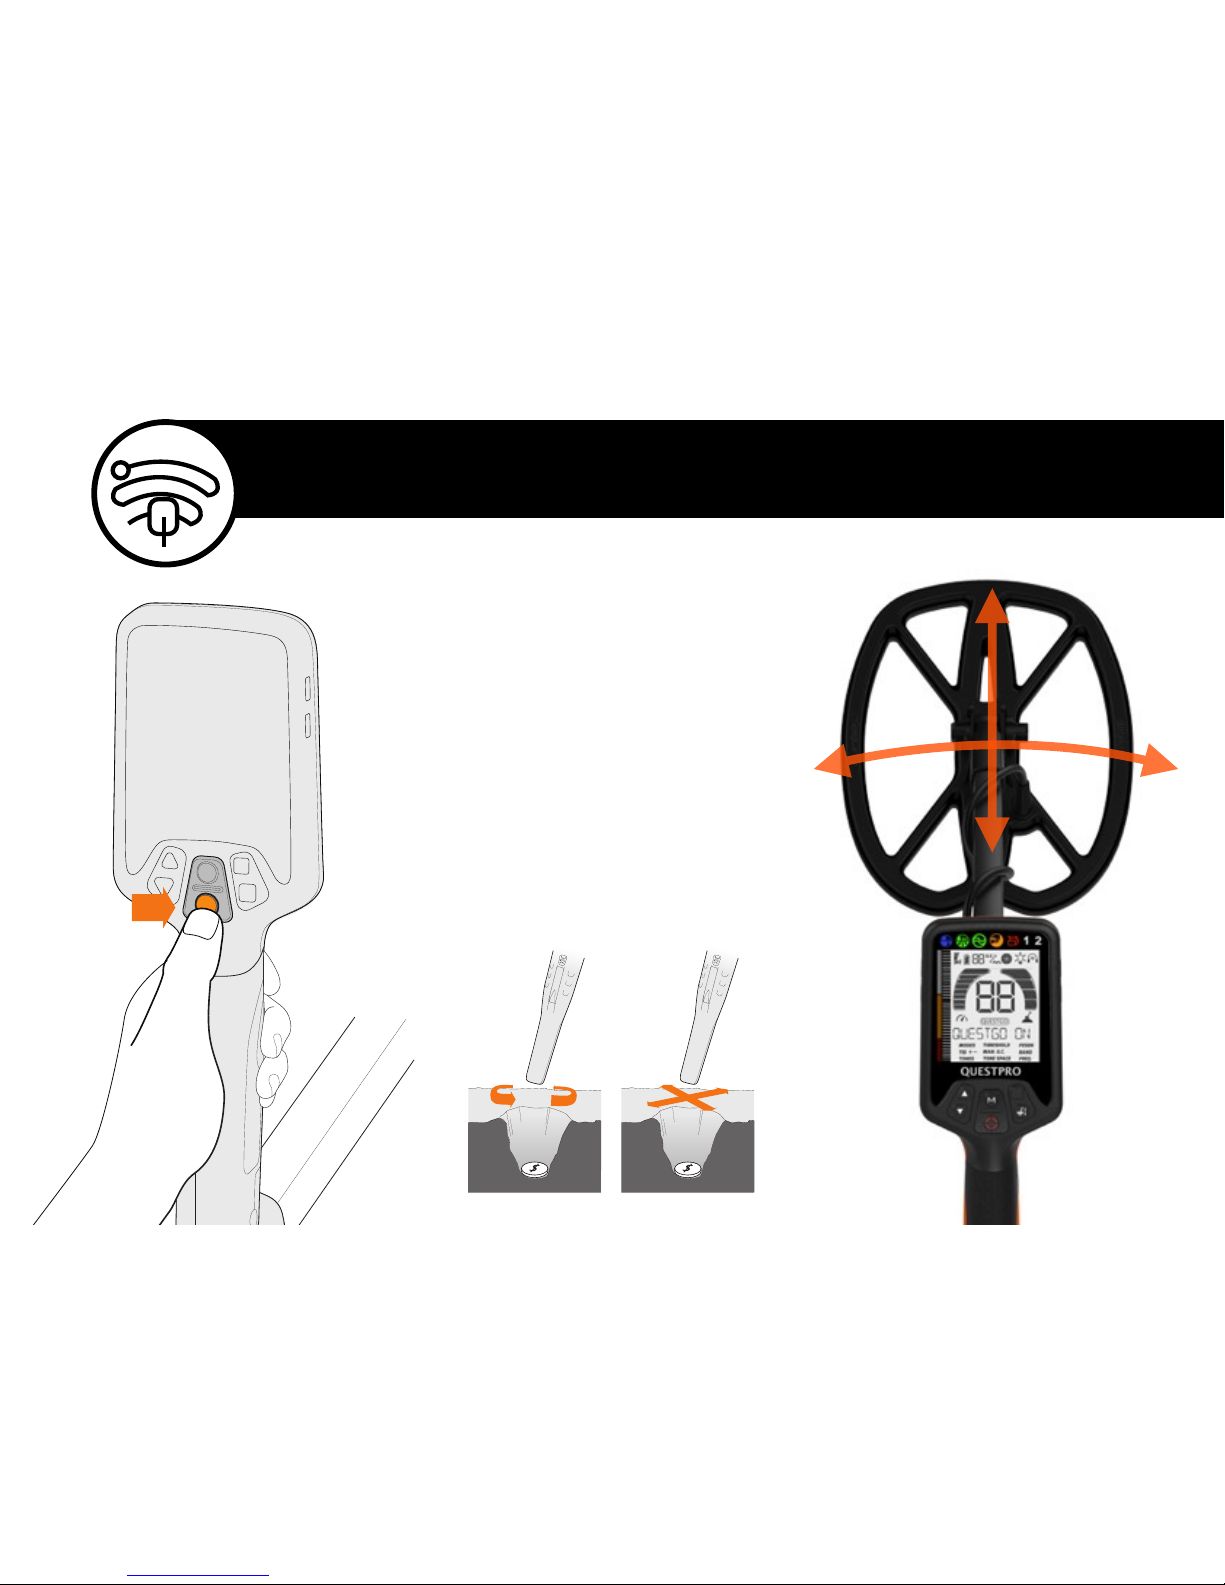
By pressing on the PINPOINT button(the
round button with cross sign), the detector
will enter a non-motion mode and alarm to
target without moving the coil. Users can use
this function to pinpoint target with cross
action as illustrated. The target depth will be
indicated through the right bars. The lower
bar the deeper the target is buried.
We strongly recommend to select the
Xpointer for further assistance during digging
to save the time.
PINPOINTING
Level-up
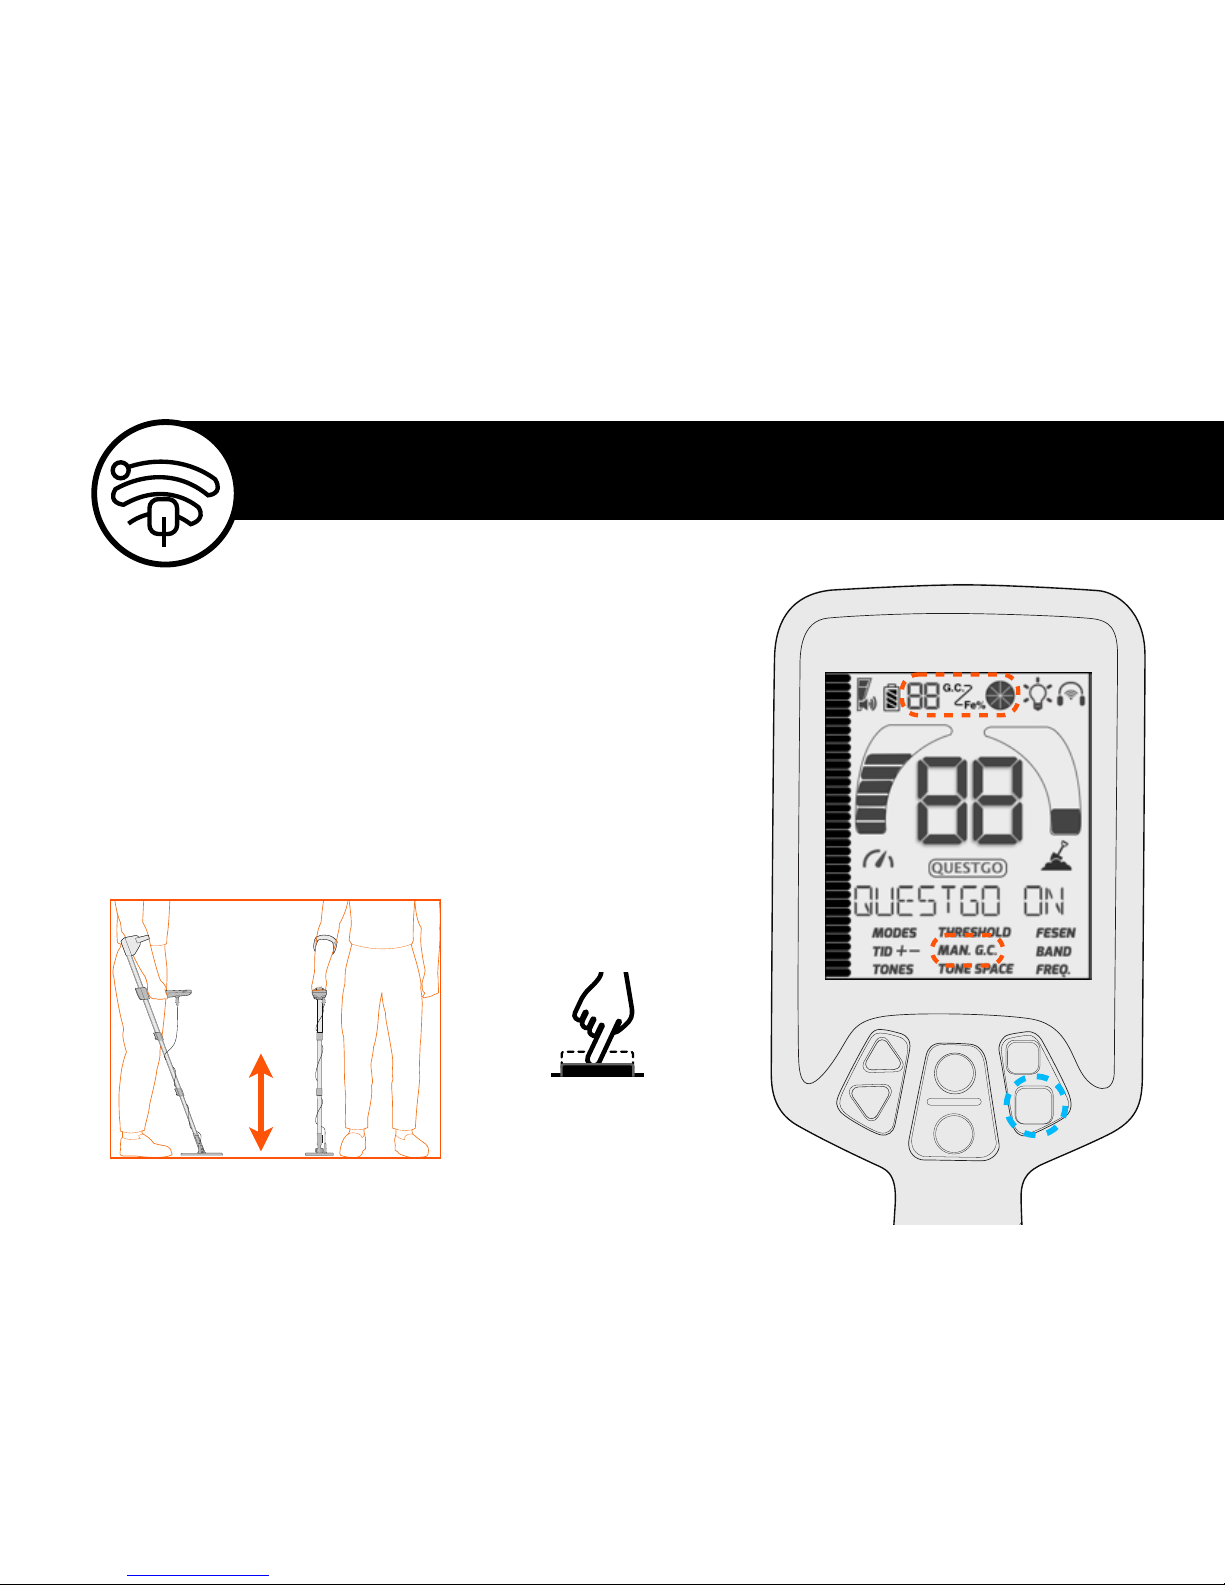
The QUESTPRO comes with Ground Balancing (GB) function. We recommend GB
every time you change the detecting area. Make sure you have no metal targets
under the coil while GB. When successfully ground balanced the matrix display
will show GC RESULT.
Press and hold the square button while pumping the coil 6” (15cm) height to 1”
above the ground. While pumping the coil the ground condition will indicate two
numbers, when these settle down and are stable GB is complete.The ground
mineralization condition is indicated by the round bar with FE%. The GC with two
digits indicate the ground cancelling level. If it is not possible to GB on highly
mineralized land you can use the GC function in the menu to set it manually.
GROUND BALANCING
HOLD&PUMP
TONE
Level-up
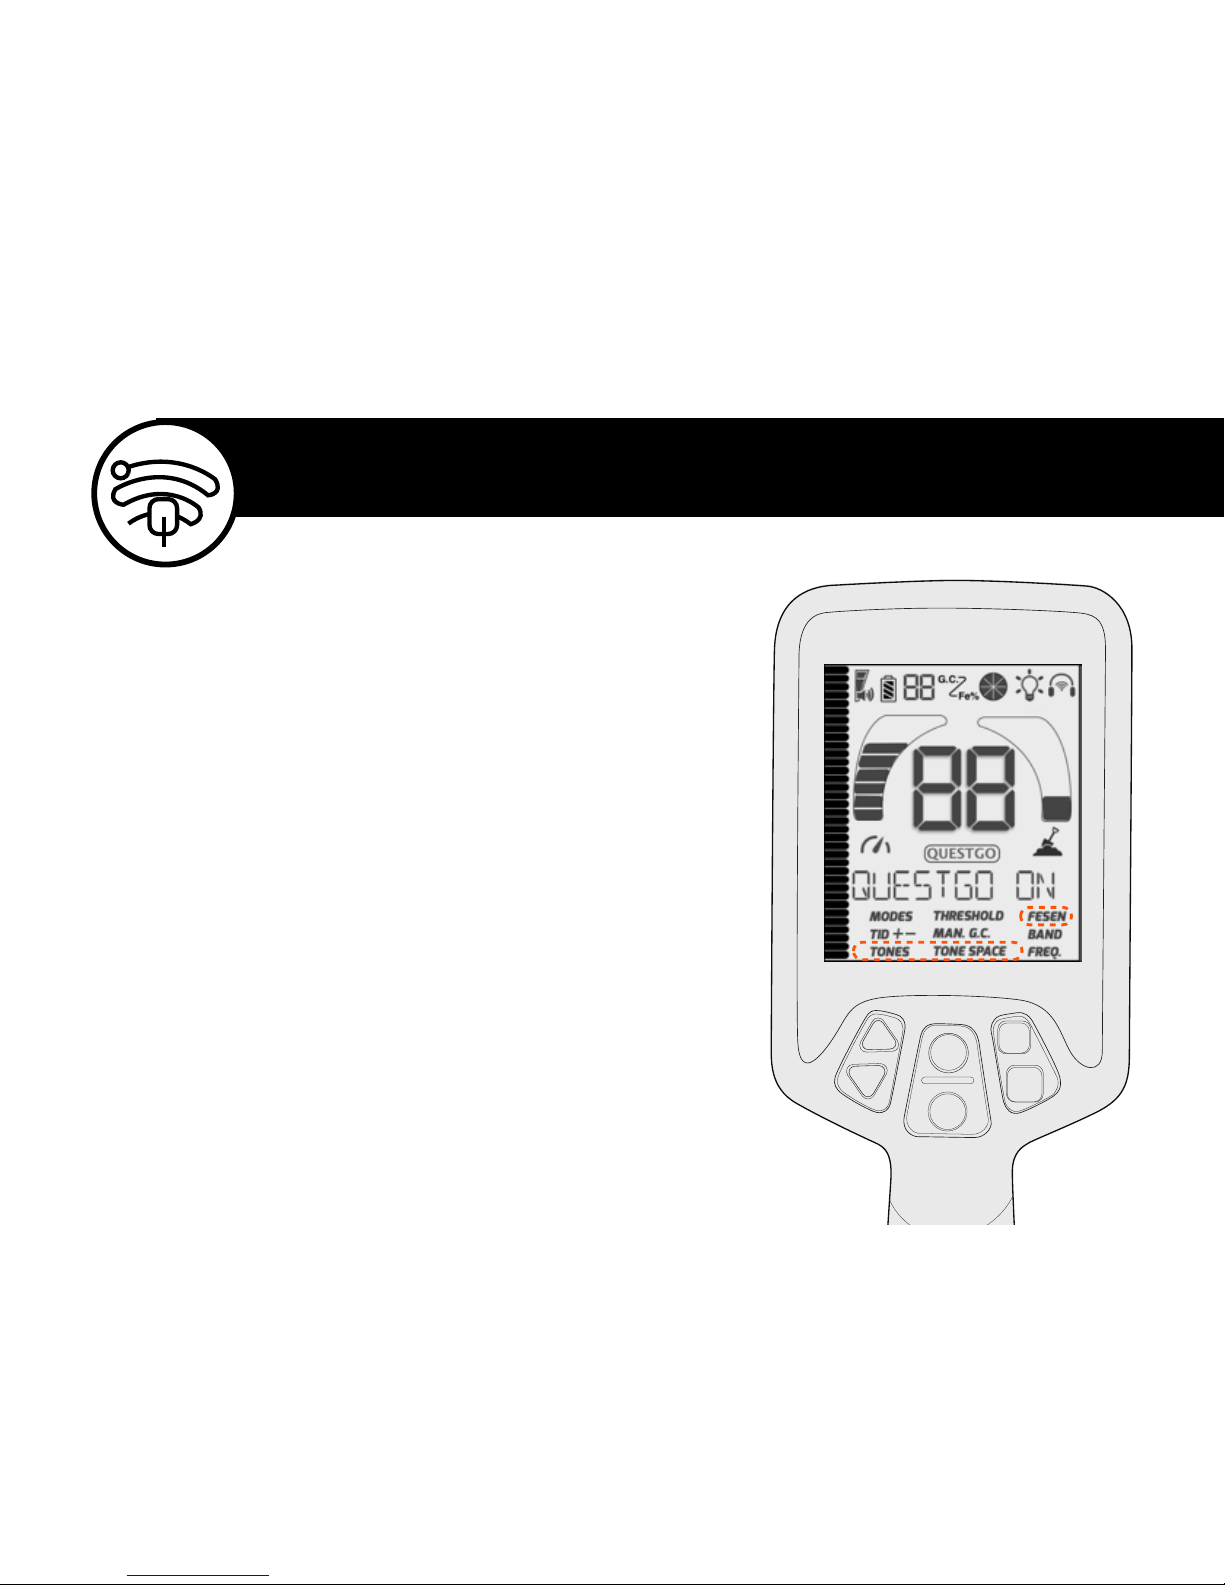
TONES.Users can select different TONES by their own preference and
different detecting conditions.
TONE SPACE. Users are be able to set where to start the middle tone
and high tone. When TONE SPACE menu been selected, use UP/
DOWN buttons to choose the point.
FESEN. Sense of Ferrous. In Trashy areas some good signals may be
muted together by an Iron signal.Users can turn the FESEN function
on to have more chance to hear the good signals.It may cause more
noise when FESEN has been activated.

BANDS
Level-up
BANDS: the frequency of transmitter. The QuestPro
comes with 5kHz, 13kHz, 20kHz three selectable
frequencies. We are keep working on better
algorithm for different frequencies. We will push to
our QuestGo APP to let you know when they are
available.
•5kHz is designed for deeper penetration. Good for
deep buried large items.
•13kHz is for general use frequency with most
versatile performance.
•20kHz is good for finer items, trashier area but
with lower depth. Such as gold field.

APP
Installation
Search and download QuestGo on App
Store for iPhones or GooglePlay store for
Android phones. System requirement:
Android 6.0 or higher, iOS 9.0 or
higher.
Click Setup account to register new account.
You can use your Facebook account to login
or by email. After type in Email and Password
click the Blue Arrow to receive verification
code. Find the code in your mail box and type
in here. Click Submit to finish
Enter your Email and Password and click
Loggin to enter the APP. Or just click
Facebook account.
Open your smartphone SETTING and enable
Bluetooth before connecting to the QuestPro.

APP
Interface
1. Time counter. 2. START button. 3. GPS
signal gauge. 4. Distance counter. 5. Finds.
6. Personal page. 7. Community page. 8.
Start to tracking page. 9. Statistic page. 10.
Software setting page 11. Pace counter
1
2
3
4
6 7 8 9 10
11
5
1. Click this Plus in circle button to add post
in Group. 2. Poster’s info 3. Post
location(shows city and country only, viewer
won’t see the detail address for privacy). 4.
Share button. If you like the post you can
share it to your social media.
2
1
4
3
2
1
3
1. Your profile avatar 2. Counting for recent
two months 3. Finds and posts counting.
1. Bar chart of your activity 2. Finds
counting. 3. Total counting of the
distance ,paces and time of you detecting.
1
2
3
APP
Key Functions
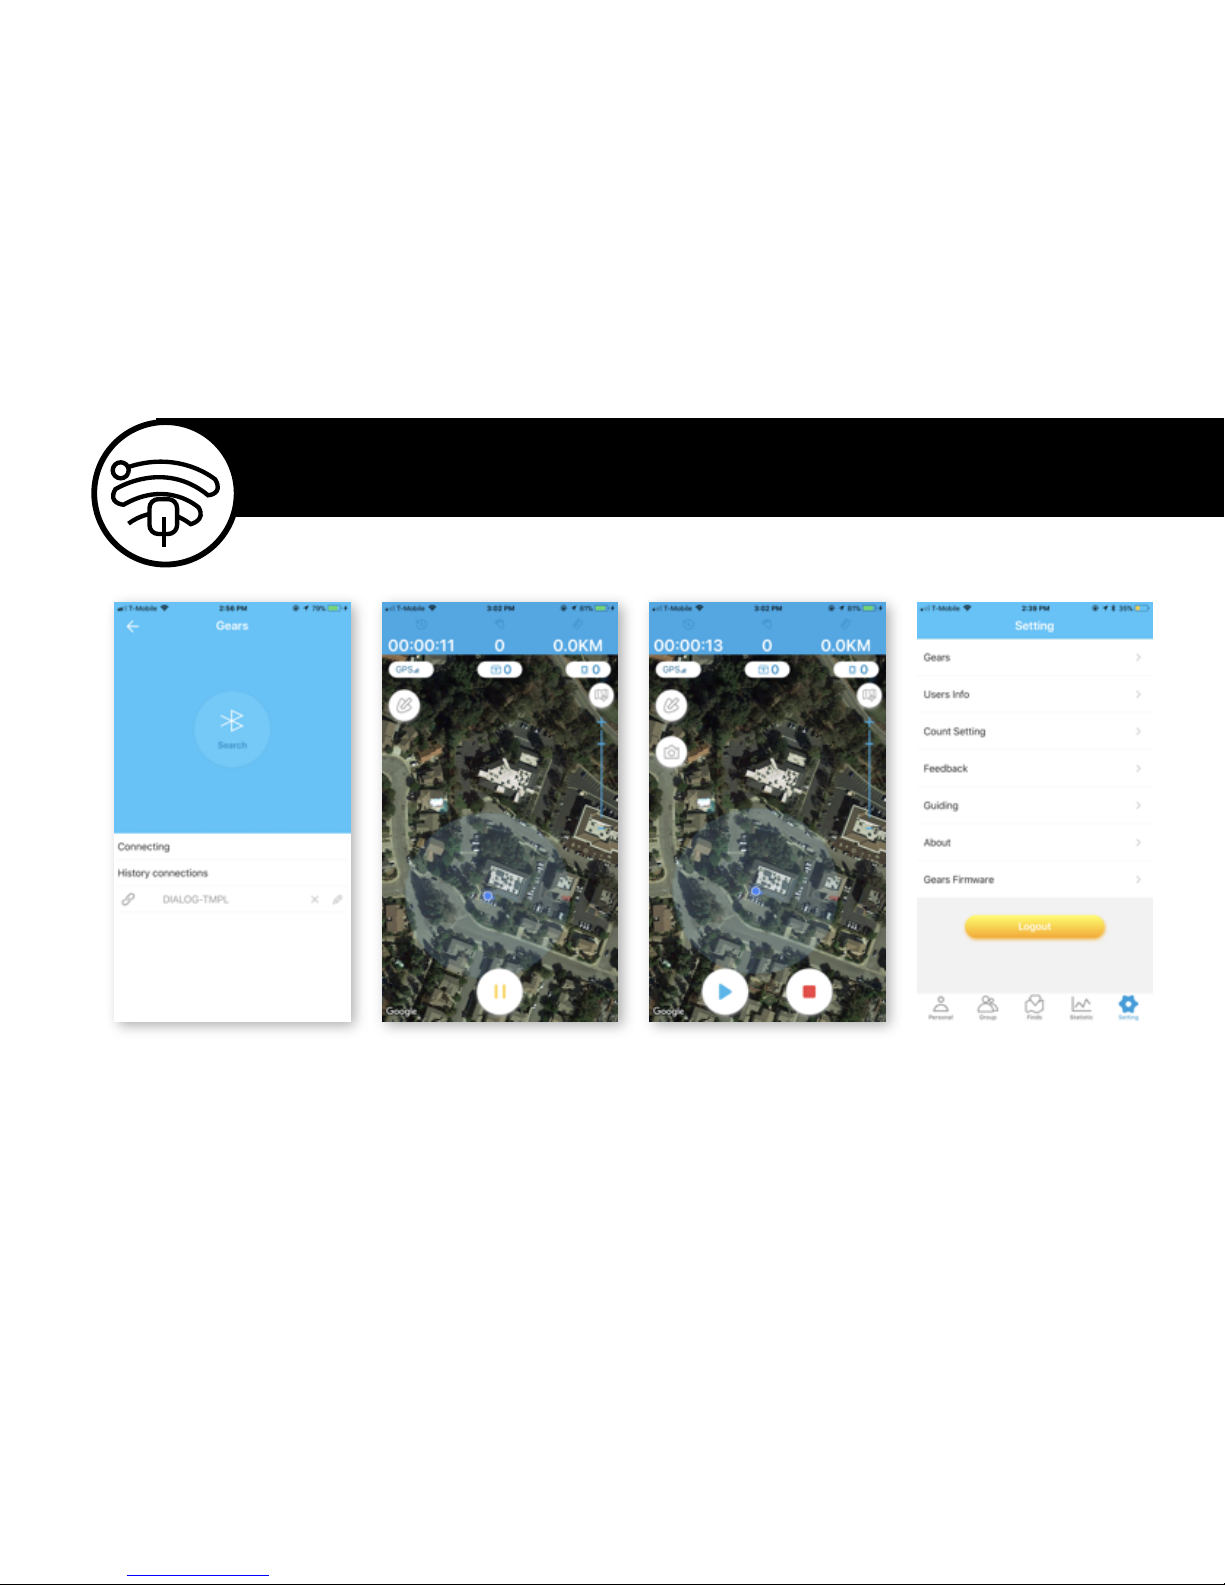
Gears: connect or disconnect smart Quest
products. Users Info: to set or change users
email or facebook account,change password.
Count Setting:unit setting for statistics.
Feedback: sent your voices to us. Guiding.in-
APP users manuals About: about us and this
APP. Gear Firmware: smart Quest products
firmware updating.
To connect your smartphone with the
QuestPro through QuestGo, you need to add
your QuestPro to the APP. Simply open the
Setting---->Gears---->Metal Detector----
>Search(for the first time). The new QuestPro
will show up in the list. Click and add it. Each
QuestPro comes with a unique ID. You can
modify the name after adding it.
When paused, you can continue the session
by click the 1. triangle button to return to
work, or by 2. button to end this session. You
can take pictures for the finds by button 3.
The pictures can be showed upon the map
later when you review your history activities.
Press the START and enter the tracking page.
You’ll be able to find the 1. PAUSE button to
pause the detecting for taking pictures or
mark your find item. 2. your real time
location 3. Digital/Satellite map switch. 4.
finds marker
2
1
3
4
1 2
3

APP
Mapping & Firmware Upgrading
Mapping
The Green Pin Symbol shows the start
point. The Red Pin Symbol shows the
end of the activity.
After connected with the APP the
QuestPro LCD screen will show
QUESTGO symbol in the center right
behind the target ID number.
You can turn the screen of
smartphone off to save power or
leave it on.
The APP will receive real time data
from the QuestPro metal detector by
pressing the Pinpointing button. You
can set the color of the target ID in
the Setting---->Count setting.
The default setting is Blue for low
tone ID, Yellow for middle tone ID
and Red for high tone ID.
Tracking
You can also use the APP without QuestPro
metal detectors. The target ID won’t show
up on the tracking and mapping page.
Firmware upgrading
You can upgrade the QuestPro’s firmware
wirelessly free of cost through your
smartphone.
We will sent you notifications when new
firmware available.
By clicking---->Setting---->Gears Firmware
to find the update. It may takes 20 minutes
for a fully upgrade. Please do not exit the
APP during the process.

APP
Sharing
You can go to Personal----> Find to view your
history quests. Click any one to view the
detail. You can share this activity with the
finds picture to social media such as
Facebook or QuestGo group.
You can share directly on the group page as
well. The post will show up in our QuestGo
community. By clicking the Plus button on te
up-right corner you will be able to snapshot
or select picture from your album.
Your can select the area or drag up or down
to find your best area of the picture. Click
Done of the lower right corner to confirm.
Click Share and the post is added to the
community.
Table of contents
Other Deteknix Metal Detector manuals


Popular Metal Detector manuals by other brands

GOLDEN MASK
GOLDEN MASK 7 user guide

Schonstedt Instrument
Schonstedt Instrument GA-92 XT instruction manual

Bounty Hunter
Bounty Hunter Ultra Mag Sharp Shooter owner's manual

Steinberg Systems
Steinberg Systems SBS-MD-21 user manual

Detech
Detech EDS plus II instruction manual

Harbor Freight Tools
Harbor Freight Tools 62307 Owner's manual and safety instructions


