7
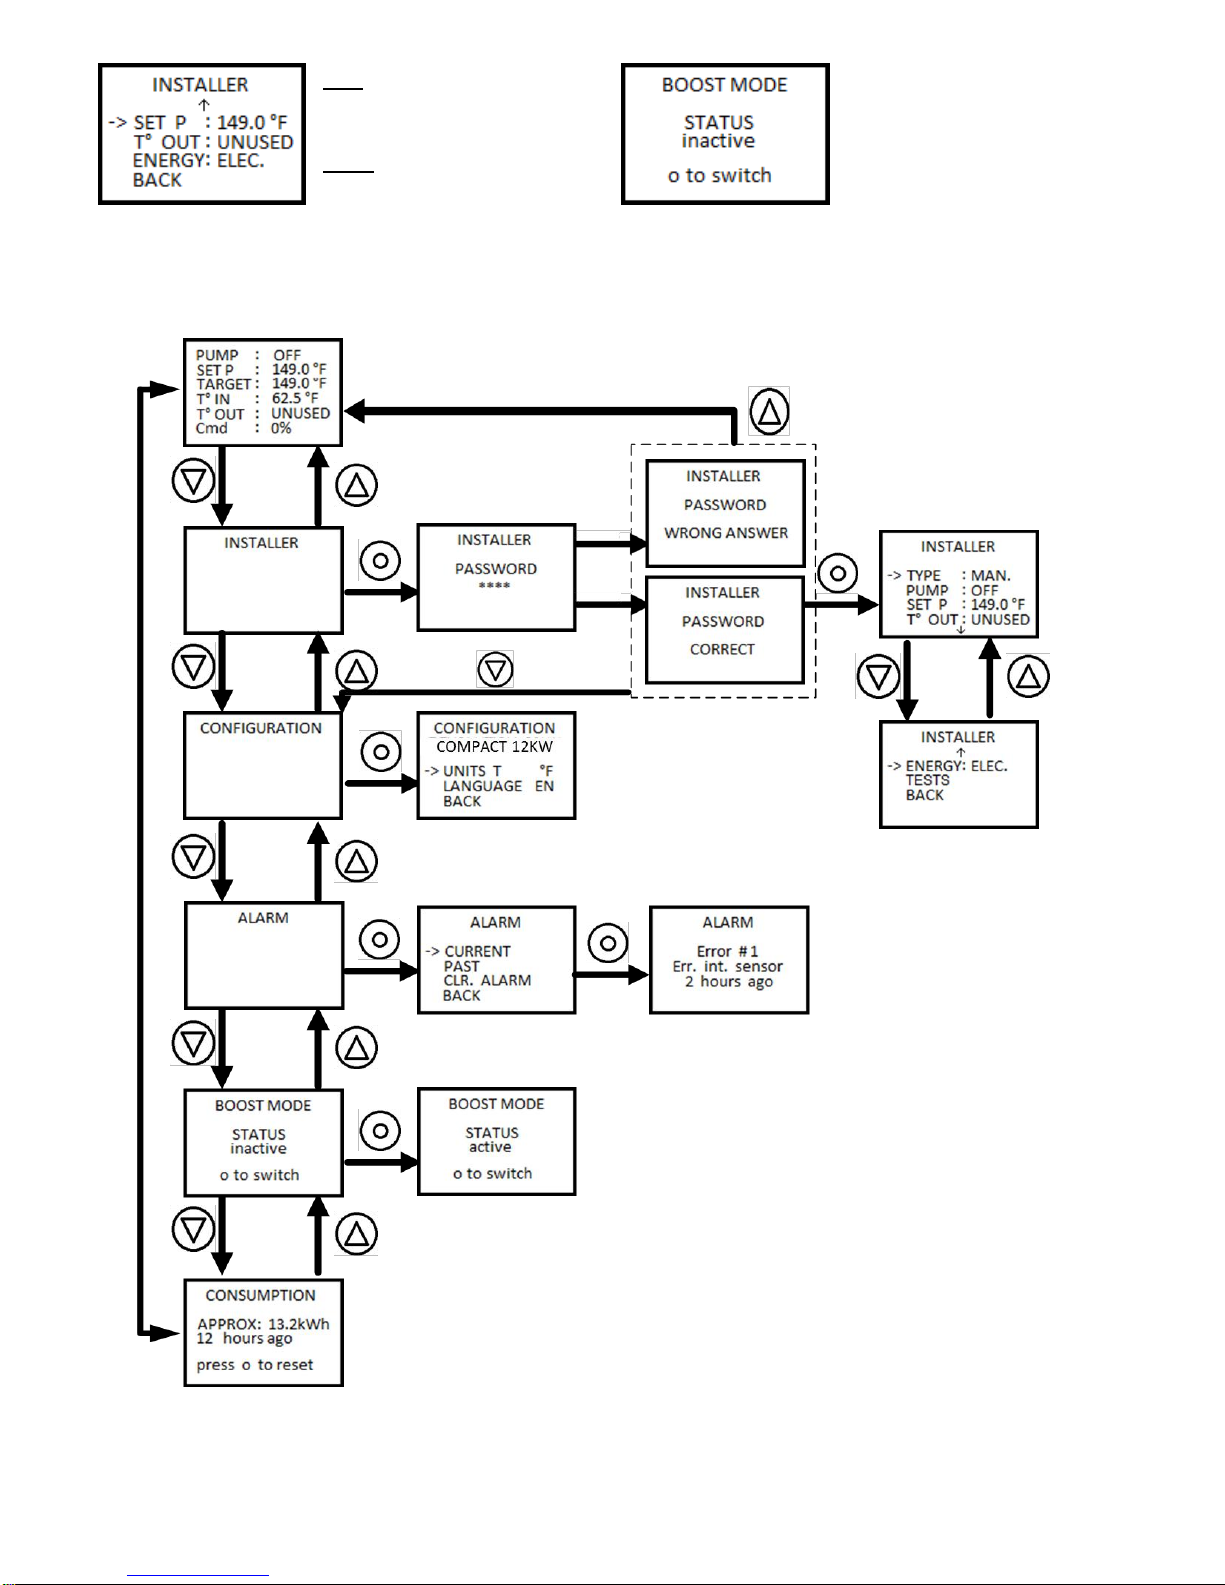
3) ELECTRONIC CONTROL
Display and electrical controller:
Pump: Shows the state of the pump.
Set P: Indicates the temperature set point.
Target: Indicates the target temperature.
T° in: Temperature inside of the device.
T° out: Temperature outside of the
device
Cmd: Indicates the percentage of
power sent to the elements
From this screen and by pressing the
directional buttons, the user can switch from the various menus
available and press the central button to access the desired menu.
These menus are the consumption menu, the alarm menu, the
configuration menu and the installer menu.
Consumption:
The consumption menu shows an approximated value of the power
consumed by the boiler since it was last reset.
Consumption is written in kilowatt
hour and time since last reset is given
in hours or in days.
As shown on the screen, pressing the
central button will reset the time and
power consumed.
Alarm:
Some events may alter the functionality of the device in an
undesired manner. These events trigger alarms in the system that
remains stored in the device’s memory. Reasons for alarms are:
troubles with the internal or the external heat sensor, problems with
elements and overheating.
In case of alarm, the controller’s screen will be illuminated by a
flashing red light. It is strongly advised that you tell an installer about
this issue.
Using the left and right buttons, the arrow on the screen can be
moved and the central button will allow the user to activate the
element pointed by it.
Current: Indicate the alarms
currently afflicting the device.
Past: Shows a history of the alarms
triggered on the device.
Clear alarm: Ends alarms that still
appear active on the device.
The past alarm function allows you to
revisit the previous 25 alarm messages
and an approximated time span since
they happened. The arrow buttons
allow the user to scroll through the
alarm reports and the central button
allows them to return to the alarm
menu.
Configuration:
The configuration menu’s purpose is to allow the user to adjust
settings linked to the interface, such as the temperature’s units and
the language.
Units: allows switching between
Fahrenheit and Celsius degrees.
Language: allows switching the
displayed text between French and
English.
Important: Access to the
Tests tab appearing on the controller’s screen is protected by a
password. Under no circumstances should a user try to access it.
This function is used at the Dettson factory to test the Hydra
Revolution before it is shipped to a distributor. If the user manages
to enter the correct password the machine will be stuck in the test
function. To exit the test function, the machine must be shut down, it
will then return to the main screen after being subsequently turned
on.
Installer:
The installer menu’s goal is to make
the installer’s work easier. This menu
is protected by a password that can
be found on the electrical schematic
glued to the plastic case of the Hydra
Compact.
The password consists of a
combination of characters entered
with the three buttons of the Hydra
(left, center, right then center).
The user shouldn’t try to gain access
to this menu as it is used to program
the behaviour of the device.
Type: Gives a preset value to the
temperature set point. Mass, Plinth,
Light and Cast Iron are preset values
for determining temperature ceil.
Manual allows the installer to
manually choose the set point.
Pump: Choose the way to drive
the pump. Off means the pump will activate only when there is a
demand from the thermostat. “On” means that the pump will always
be active. 20 Seconds indicate that the pump will deactivate 20
seconds following the end of a heating demand from the thermostat.