DEVOLA DV150APQM User manual


Contents
1.
Important safety instructions ........................................ 01
2.
Product Structure ....................................................... 02
3.
Before first use..................................................................... 03
4.
Using the appliance .....................................................05
5.
Filter Replacement ......................................................
0 7
6.
Storage ...................................................................... 09
7.
Environment ............................................................... 09
8.
Troubleshooting .......................................................... 10

01
1. Important Safety Instructions
When using electrical appliances, basic safety precautions should always be followed to reduce
the risk of fire, electric shock, and injury to persons. These precautions include:
1.
Read all instructions before using the appliance.
2.
To avoid fire or shock hazard, plug the appliance directly into correct electrical outlet.
3.
If the Filter is covered by a bag when shipped, remove plastic bag before use.
4.
Keep the cord out of heavy traffic areas. To avoid fire hazard, NEVER put the cord under
rugs, near heat registers, radiators, ovens, or heaters.
5.
To protect against electrical hazards, DO NOT immerse the appliance in water or other
liquids. Do not use near water.
6.
Close supervision is necessary when any appliance is used by or near children, or disabled
persons.
7.
Always unplug the air purifier before moving or cleaning the unit, opening the grill, changing
the filter and whenever the unit is not in use. To disconnect the unit, be sure to pull the plug
and not the cord.
8.
NEVER drop or insert any objects into the openings of the unit.
9.
DO NOT operate any appliance with a damaged cord or plug.
10.
Use the appliance only for intended household use as described in this manual. Any other
use not recommended by the manufacturer may cause fire, electric shock, or injury to
persons. The use of attachments not recommended or sold by manufacturer may cause
hazards.
11.
DO NOT use outdoors.
12.
NEVER place on a soft surface such as a bed or sofa as this could cause the unit to tip over
and block the air inlet or outlet grills.
13.
Keep unit away from heated surfaces and open flames.
14.
DO NOT attempt to repair or adjust any electrical or mechanical functions on this unit. Doing
so will void your warranty. The inside of the unit contains no user serviceable parts. All
servicing should be performed by an authorized electrician or person.
15.
DO NOT place anything on top of unit.
16.
NEVER use detergents, gasoline, glass polish, furniture polish, paint thinner, or other
household solvents to clean any part of the appliance.
17.
Always turn the appliance off before unplugging it.
18.
This appliance should only be used in room with temperatures between 5°C and 43°C.
19.
WARNING: To reduce the risk of fire or electric shock, DO NOT use the appliance with
any solid-state speed control device.
PLEASE READ AND SAVE THESE IMPORTANT SAFETY INSTRUCTIONS
02
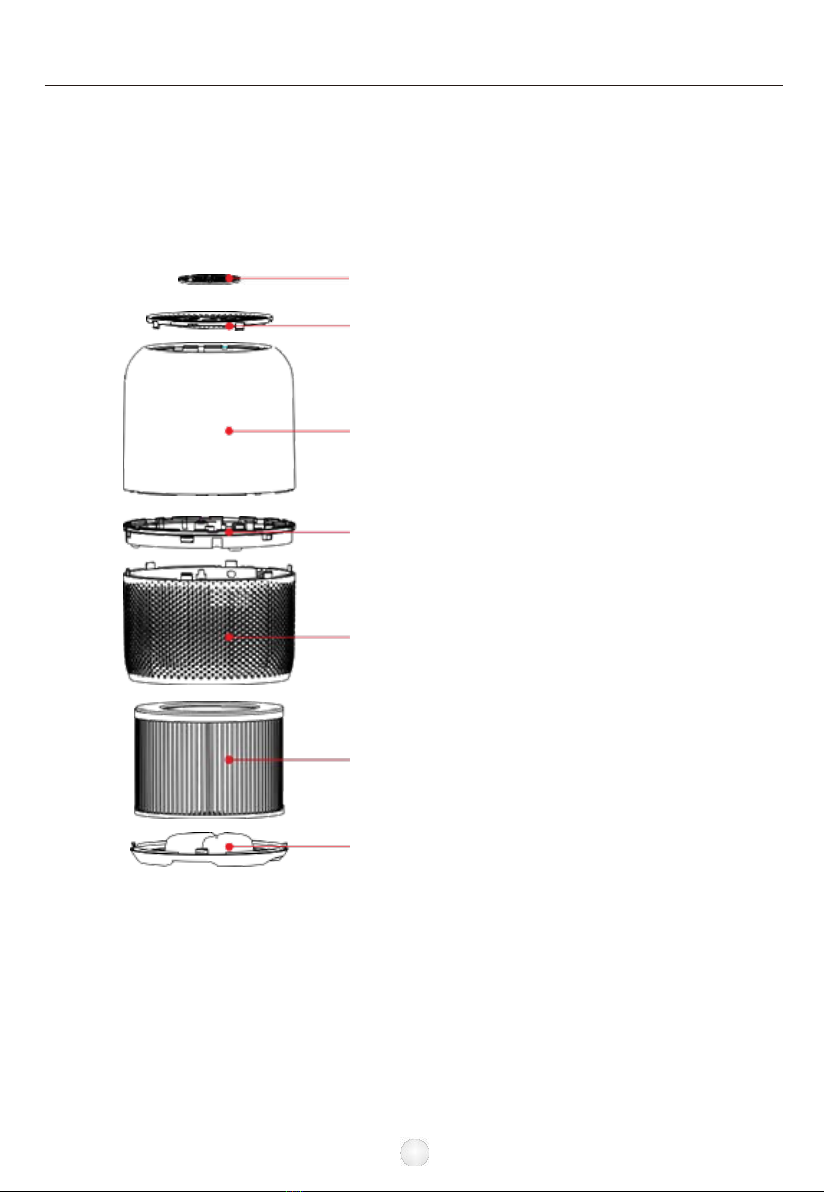
2.
Product Structure
Thank you for purchasing our air purifier, before use please read this manual
carefully to operate the product correctly.
1
2
3
4
5
1.
Control panel
2.
Outlet cover
3. Upper body
4. Decorative ring
6 5. Lower body
6.
Filter
7.
Base cover
7

03
3.
Before first use
Placing the filters
The appliance comes with all filters fitted inside, but you must remove the
packaging of the filters before you can use the appliance. Remove all
filters, unpack them, and place them back into the appliance as described
below.
1.
Put the appliance upside down on a soft cloth to avoid scratching. To
open the base cover, you need to find an arrow point on the base cover
corresponding the LOCK position, turn the base cover counterclockwise
from LOCK to OPEN position, then the lock released.
2.
Remove the base cover and take out the filter.
3.
Remove the packaging material from the filter.
Note: Make sure you insert the filters in the correct position.
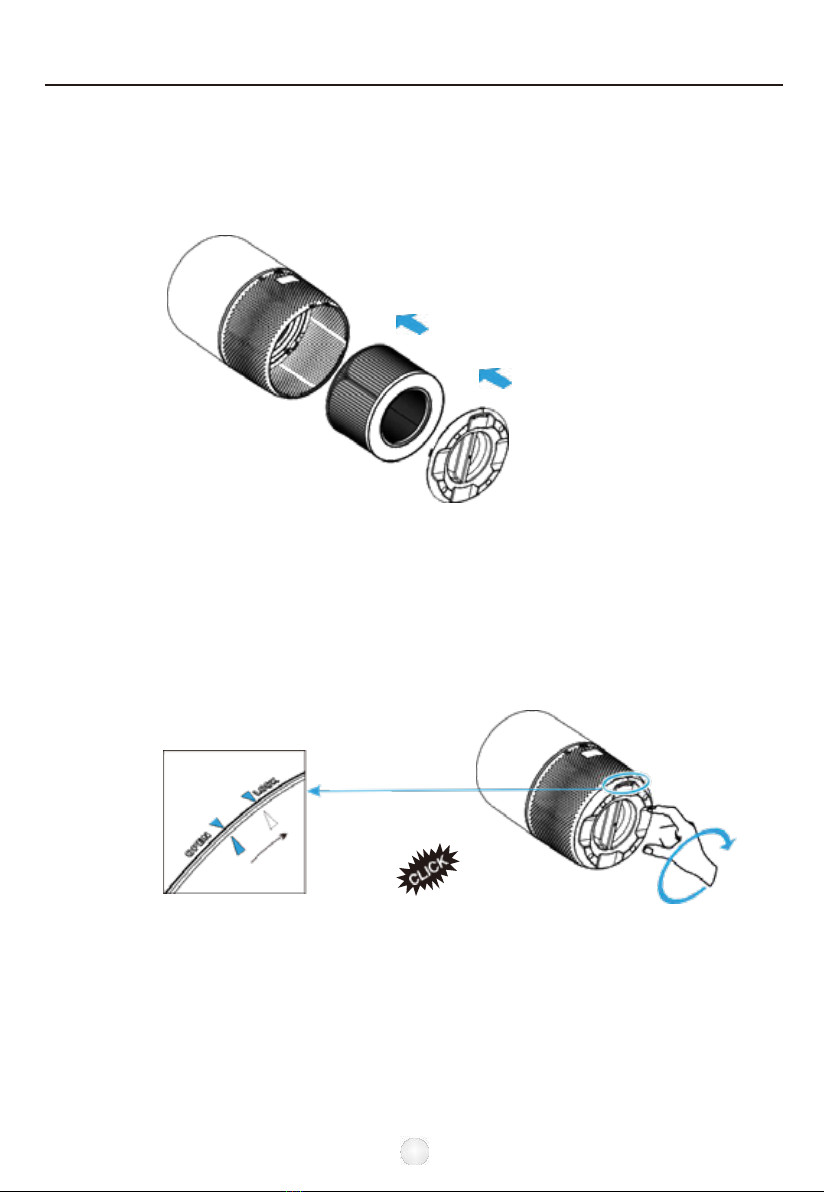
04
4.
Put the filter back into the appliance.
5.
Turn the base cover clockwise from OPEN position to LOCK position,
you will hear a "click" sound, the base cover is fastened.
05
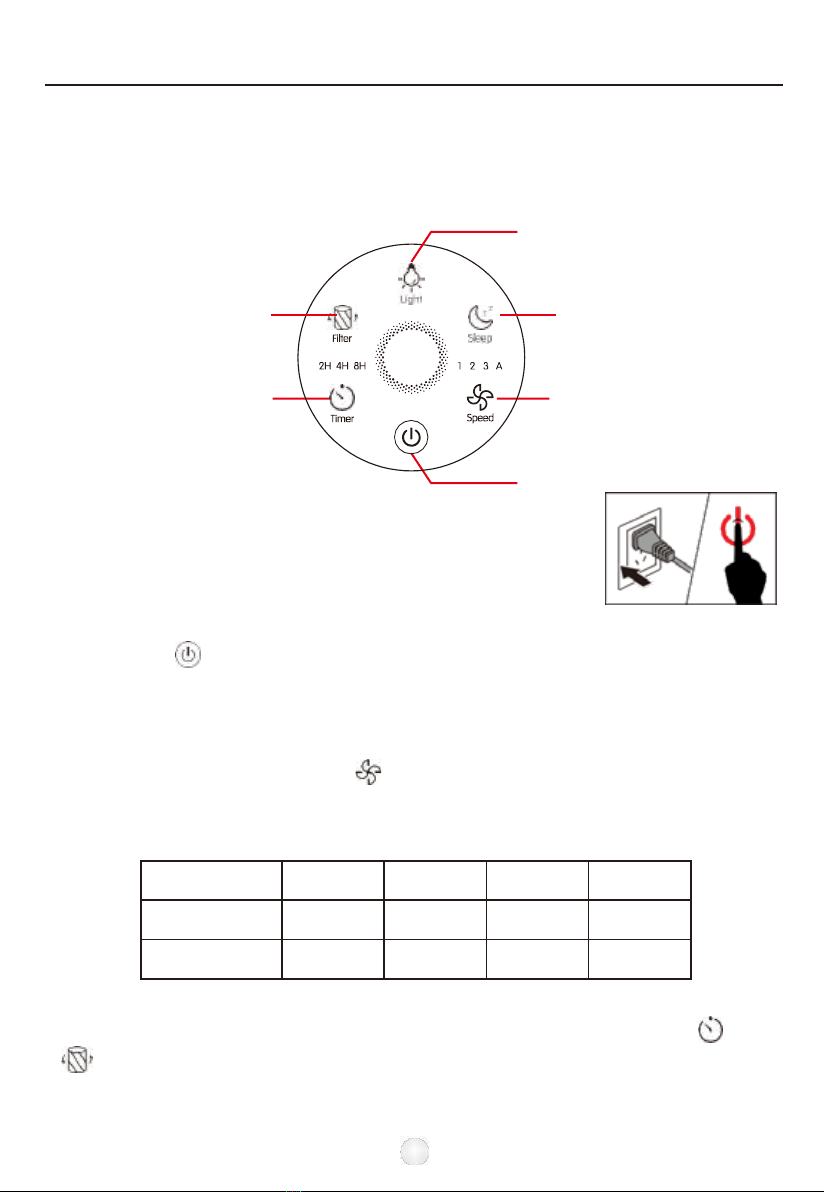
4.
Using the appliance
4.1
About the control panel
Air Quality
& Light
Filter Sleep
Reset
Timer
mode
Speed
1).
Put the plug in the wall socket
The display lights will turn on and you will
hear a beep. The lights then turn off.
On/Off
2).
Press the power button to switch on the appliance.
The power
lights, AQ light on and FAN SPEED 1 light
(Low) on the control panel will turn on.
3).
Fan speed adjustment
The fan speed light indicates the fan speed at which the appliance is
operating.Press Speed button to adjust fan speed level, there are four
levers 1~3 refers to Low, Medium, High level and Auto mode.
At Auto mode, the fan speed will be automatically adjusted according to AQI level
as below:
AQ Colour Blue Green Orange Red
Speed mode Sleep 1(Low) 2(Medium)
3(High)
AQ level Very good Good Unhealthy Hazardous
4).
Sleep mode
When you use the appliance in Sleep mode, it works very quietly. Only the and
light will be on, press any other buttons besides the Timer and Filter Reset
button to exit Sleep mode.

06
5).
AQ Light
Working status (Air quality light)
The air quality light color will automatically change according to the
detecting result of sensor.
Please see the chart on page 5 for colour indicator meaning.
Standby status (Night light mode)
1).
In standby, press button and the amber light will turn on.
2).
Press the button again and the light will dimmer to the half-light
setting. To turn off the night light, just press the button for a third
time. The light cycles as follow, Bright, Half brightness, Off.
6). Setting timer
1.
Press to turn the timer on or off, and to cycle through timer options
(2 hours, 4 hours, or 8 hours).
2.
The air purifier will automatically switch off once the timer is finished.
NOTE: Pressing or unplugging the air purifier will cancel the timer.
7). Filter Replacement Light
When the indicator
light is on, it means that you should check the
filter to see if it needs to be cleaned or replaced.
Note: The filter’s lifetime is based on your house air quality and usage. Using
the appliance in a humid environment will reduce the lifetime of the filter.
8). Memory Function
The air purifier has a setting memory function, meaning that when the
users turn it off, it will return to the last setting once it gets turned back on.
4.2
Cleaning the Air Purifier
Regularly clean the inside and outside of the body to prevent dust from
collecting on the inside and outside.
1).
Wipe away dust with a soft dry cloth from the body of the appliance.
2). Clean the air inlet and the air outlet with a soft dry cloth.
Note : ● Always unplug the appliance before you clean it.
Never immerse the appliance in water or any other liquid.
Never use aggressive or flammable cleaning agents such as
bleach or alcohol to clean any part of the appliance.
The filter is NOT washable.

07
5. Filter Replacement
When Should I Replace the Air Filter?
It is recommended to change the air filter every 6–8 months. However, you
may need to change your filter sooner or later depending on how often you
use your air purifier, the air quality and the humidity of the environment. It is
important to watch out for the following signs of expired filter:
●Increased operating noise
●Decreased airflow
●Clogged filter
●Increased presence of odours
NOTE:
●The environment in which the air purifier is being used can extend or shorten the
lifetime of the air filter. Using your air purifier in an environment of relatively high
pollution may mean you will need to change the air filter more often.
●If the air pollution in your environment is very high, there is a possibility that the
filters may not be completely effective and may need to be replaced before
lights up.
●Remember to reset the air purifier after changing the air filter.
1.
Switch off the appliance and unplug it. (a)
2.
Put the appliance upside down on a soft cloth to
avoid scratching, to open the base cover, you need
to find an arrow point on the base cover
corresponding the LOCK position, turn the base
cover counterclockwise from LOCK to OPEN
position, then the lock released. (b)
(a)
(b)

08
3.
Remove the old filter. (c)
4.
Remove the packaging material of the new
filter. (d)
5.
Put the new filter back into the appliance. (e)
6.
Turn the base cover clockwise from OPEN
position to LOCK position, you will hear a "click"
sound, the base cover is fastened. (f)
(c)
(d)
(e)
(f)
7.
Put the plug in the wall socket and switch
on the appliance again. (g)
(g)

09
8.
Reset Filter's lifetime.
The filter lifetime should be reset if lights up, after
replacing the new filter, you need to reset filter lifetime.
1). Plug in the air purifier and turn it on.
2).
Press and hold for 3 seconds.
3).
Release and the light will turn off, indicating
that the reset is complete.
Filter replacement force mode
(h)
3seconds
When using the air purifier in an environment of heavy pollution, the
lifespan of the air filter may be significantly reduced. You can change the
filters even if does not light up. Follow the steps below to perform a
hard reset.
1). Replace the air filters as mentioned in the Filter Replacement section.
2). Plug in the air purifier and keep in standby mode.
3).
Press and hold for 3 seconds, and it will light up.
4).
Press and hold again for 3 seconds, and it will turn off. The reset
is now complete.
6.
Storage
Unplug the power cord, then wipe the machine clean, put the appliance in
the packing bag,then store in a dry place.
7.
Environment
Do not throw away the appliance with the normal household waste at the end
of its life, but hand it in at an official collection point for recycling. By doing
this, you help to preserve the environment.

10
8.
Troubleshooting
This chapter summarises the most common problems you could
encounter with the appliance. If you are unable to solve the problem with
the information below, contact the Consumer Care Centre in your country.

Unit 1, Reedswood Park Road, Walsall, West Midlands. WS2 8DQ
This manual suits for next models
1
Table of contents


