Devon IT TV2 User manual

Mount the thin client in its vertical orientation for best performance. If it is necessary to
mount the unit horizontally, make sure the unit is properly ventilated. Improper mounting
can cause the unit to overheat and become damaged.
ENGLISH_DIT qu ck start gu de TC2:Layout 1 10/7/08 3:40 PM Page 1
Inspect all parts visually for damage. If anything is damaged, please contact
Devon IT immediately to report the issue. You may use our web form
(http://www.devonit.com/support) to create an inquiry ticket with the
Devon IT Technical Support Department, or contact us by phone at
1-(800)-369-7290. Support Analysts are available 24/7/365.
→→
Unpack
Your thin client terminal is typically
shipped with the following items:
Power Adapter
Stand
Quick Start Guide
Warranty Card
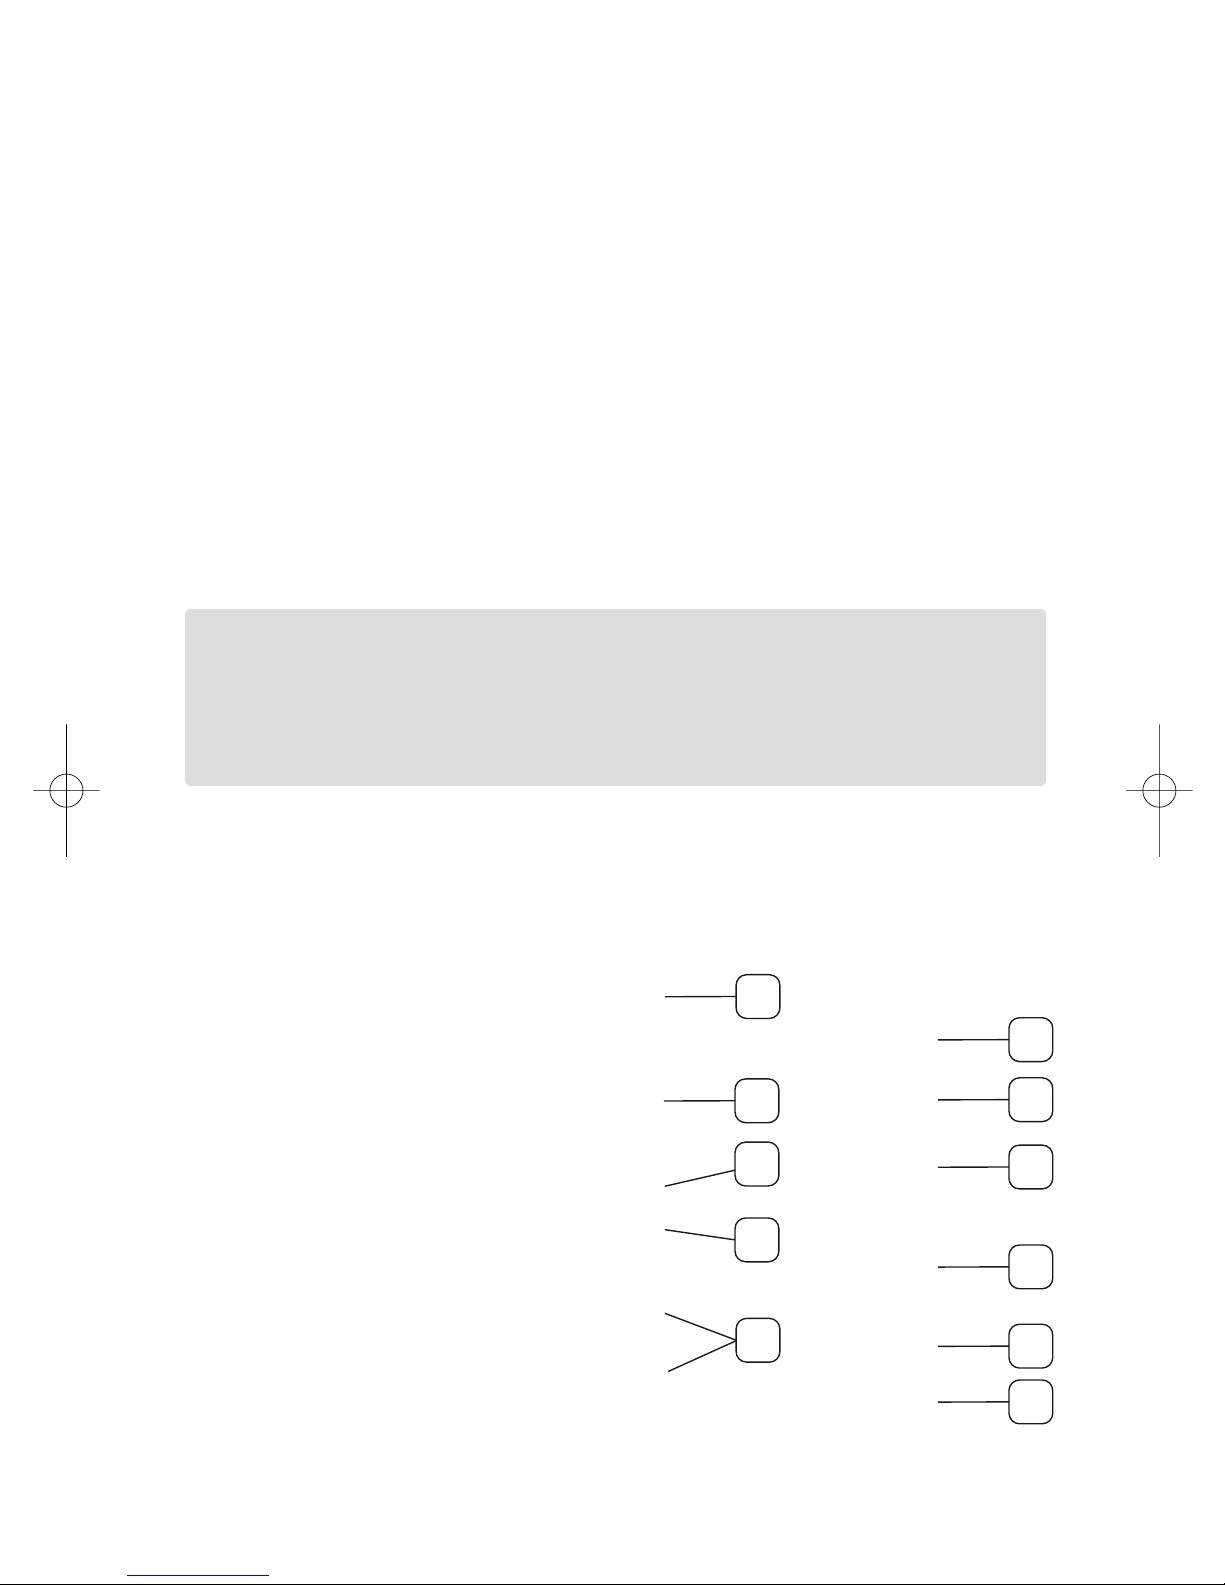
Getting Familiar with the Thin Client
1. Power on/off
2. Network Indicator LED
3. Audio line out
4. Microphone
5. USB 2.0 ports
6. PS2
7. RJ45/Ethernet
8. VGA
9. Power
10. Lock receptacle
Please see the accompanying documents in the package for Warranty Information.
Alternative Desktop Computing
Front Back
1
5
2
4
3
5
6
7
8
10
9
ENGLISH_DIT qu ck start gu de TC2:Layout 1 10/7/08 3:40 PM Page 2

2008 Devon IT, Inc. All Rights Reserved Visit us on the web: http://www.devonit.com
→→
Setup
1. Connect the monitor to the VGA Port on the back of the unit.
2. Connect the mouse and keyboard to the PS/2 or USB ports depending on what
type you have.
3. Connect the network cable to the LAN Port on the unit and the other end
of the cable to your local network.
4. Connect the power supply to the TC2’s power supply port on the back of the unit.
5. Plug the power cord into a surge-protected AC outlet.
6. Power the unit on by pressing the Power button in the front of the unit.
→→
Warnings
• Make all necessary connections before powering unit on. Failure to do so may
make the unit appear as if it is not functioning properly.
• Mount the thin client in its vertical orientation for best performance. If it is necessary
to mount the unit horizontally, make sure the unit is properly ventilated.
Improper mounting can cause the unit to overheat and become damaged.
• Do not shut the thin client down by removing the power cord. Loss of power
can damage the unit.
• It is important to not interrupt the power to the thin client while executing a
firmware upgrade. Loss of power can result in a damaged operating system.
• Do not place anything on or over the terminal.
• Excessive sound pressure from earphones and headphones can cause hearing loss.
Adjustment of the equalizer to maximum increases the earphones and head-
phones output voltage and therefore the sound pressure level.
• Power adapter: Au-79A0n
• Lithium battery Caution: Danger of explosion if battery is incorrectly replaced.
Replace only with the same or equivalent type recommended by the manufac-
turer. Dispose of used batteries according to the manufacturer's instructions.
Do not remove cover, no user serviceable components inside. Take unit to service
center for repairs and servicing.
Devon IT TC2 Terminal
Quick Start Guide
version1
Please see the accompanying documents in the package for Warranty Information.
ENGLISH_DIT qu ck start gu de TC2:Layout 1 10/7/08 3:40 PM Page 3

2008 Devon IT, Inc. All Rights Reserved Visit us on the web: http://www.devonit.com
→→
System Start
1. Press the Power button to turn on
the terminal. The boot process will
take approximately 20-30 seconds,
depending on the exact model and
configuration of your terminal.
2. Once the boot process is finished,
you will be presented with the terminal desktop and launch window. To enter
the terminal Setup, select System Setup from the launch window. The network
configuration is set to DHCP by default.
3. To change the network settings, double-click on the Network icon located on
the left-hand side of the setup window.
→→
Display Settings
To change resolutions:
1. From launch window, select System Setup
2. Click the Display icon on the left-hand side of the setup window
3. Select the desired resolution from the dropdown list named Screen Resolution
4. You may also change the color depth on this screen
5. Click the Save Settings button
6. Click the Quit Setup button
7. Reboot the thin client for the display settings to take effect
→→
Administrator Password
An Admin Password can be set to restrict access to the setup screen in DeTOS.
To set the Admin Password:
1. From launch window, select System Setup
2. Click the Network icon on the left-hand side of the setup window
3. Click the Admin tab along the top of this screen
4. Enter a password in the Admin Password field*
5. Re-enter the same password in the Retry field below
6. Press the Set button to apply
7. Click Save Settings and Quit Setup
*Note: The password must be at least 8 characters long.
Alternative Desktop Computing
ENGLISH_DIT qu ck start gu de TC2:Layout 1 10/7/08 3:40 PM Page 4

2008 Devon IT, Inc. All Rights Reserved Visit us on the web: http://www.devonit.com
Devon IT TC2 Terminal
Quick Start Guide
version1
→→
Network Tools
What is the purpose of Network Tools?
Network Tools allow you to view the terminal’s IP address and MAC Address.
You can do various connectivity testing such as pinging, a Trace Route,
Resolving IP addresses and Netstat.
1. From the launch window, select System Setup
2. Click the Sessions icon on the left-hand side of the setup window
3. Click the Add button (You will now see a list of all available connections
on this thin client.)
4. Double-click the entry called Network Tools
5. Name the session Network Tools or anything that you wish to identify it easily
6. Select OK
7. Select Save Settings
8. Select Quit Setup
9. You will be brought back to the launch window where you will see this newly
created session.
10. You can launch this Network Tools Session by double-clicking it or by highlighting
it and using the LAUNCH BUTTON.
→→
Creating an RDP Session
1. From the launch window, select System Setup
2. Click the Sessions icon on the left-hand side of the setup window
3. Click the Add button (You will now see a list of all available connections
on this thin client.)
4. Double-click the entry called xRDP, Windows Terminal Server.
5. This will display a screen with three tabs: General, Display and Program.
The General tab is selected by default.
6. In the first field called Session Name, enter a name for this RDP connection.
7. In the WTS Address field, enter the IP address or the fully qualified hostname
(if DNS is configured) or the terminal server you wish to connect to.
ENGLISH_DIT qu ck start gu de TC2:Layout 1 10/7/08 3:40 PM Page 5

2008 Devon IT, Inc. All Rights Reserved Visit us on the web: http://www.devonit.com
Alternative Desktop Computing
→→
Creating an RDP Session (continued)
8. The next three fields, (Username, Password and Domain) are optional fields.
If left blank, the user will be prompted for these values upon login.
9. You also have the option of launching this RDP connection automatically when
the terminal is booted. If you would like to enable this feature, click the
checkbox called Autostart.
10. Click the OK button.
11. You will now be returned to the setup screen. Click the Save Settings button to
save the RDP connection you just configured.
12. Click Quit Setup to close the setup window and return to the launch window.
13. Your new RDP connection will now be available in the l aunch window.
→→
Creating ICA Connection
1. From launch window, select System Setup
2. Click the Sessions icon on the left-hand side of the setup window
3. Click the Add button (You will now see a list of all available connections
on this thin client.)
4. Double-click the entry called Citrix ICA
You will now see the setup screen for a new ICA session. You will be on
the Network tab by default.
→→
Launching a Browser
1. From launch window, select System Setup
2. Click the Sessions icon on the left-hand side of the setup window.
3. Click the Add button (You will now see a list of all available connections on
this thin client.)
4. Double-click the entry called Browser
5. The first field on this window is called Session Name. The default name
is called <New_Session .
6. Highlight this field and type in an appropriate name for your session.
ENGLISH_DIT qu ck start gu de TC2:Layout 1 10/7/08 3:40 PM Page 6

2008 Devon IT, Inc. All Rights Reserved Visit us on the web: http://www.devonit.com
Devon IT TC2 Terminal
Quick Start Guide
version1
→→
Launching a Browser (continued)
7. Enter a start URL. This is the homepage you want to appear when the browser
is first launched.
8. If you wish to run the browser in a fixed-fullscreen mode, select the checkbox
Enable Kiosk Mode. Otherwise, leave this field unchecked to launch the browser
normally. Checking this box will reveal additional checkboxes, allowing you to
enable specific properties for the kiosk.
9. To save all the browser configurations you just made, be sure to do the following:
Click the OK button
Click Save Settings button
Click Quit Setup button
You will be returned to the launch window on the DeTOS Desktop. You should
now see a new entry for the browser session you just added. Highlight the entry
and then click the Launch Session button to connect.
→→
Where to Go From Here
Please see the document titled DeTOS 6.0 Administration Manual
for more information about configuring your TC2 thin client terminal.
Download the document at http://www.devonit.com/pdfs/Detos6_Manual.pdf.
Need More Information?
• Please visit our Website at http://www.devonit.com for more information
regarding thin client usage and support.
• Firmware upgrades, troubleshooting and general configuration questions can be
answered by our support department. The best way to reach them is to log a ticket
on our website by visiting http://www.devonit.com/support/support_request_form.php
• Information on management software for the TC2 thin client can be found at
http://www.devonit.com/terminals/thinmanage2_software.php
• Warranty Information and Registration can be found at
http://www.devonit.com/warranty.php
ENGLISH_DIT qu ck start gu de TC2:Layout 1 10/7/08 3:40 PM Page 7

Devon IT, Inc.
1100 First Ave.
King of Prussia, PA 19406
devonit.com
ENGLISH_DIT qu ck start gu de TC2:Layout 1 10/7/08 3:40 PM Page 8
Table of contents
Other Devon IT Server manuals


