Dexcom G6 User manual

LBL014003 Rev 001 Dexcom G6 User Guide
0

LBL014003 Rev 001 Dexcom G6 User Guide
1
Table of Contents
Part 1: Get Started xx
Chapter 1: Begin Your Dexcom G6
®
Continuous Glucose Monitoring System (G6) Journey xx
1.1 Introduction xx
1.2 Resources xx
1.3 Your Dexcom Account xx
1.4 What's Covered and What's Coming xx
Chapter 2: Indications for Use and Safety Statements xx
2.1 Introduction xx
2.2 What Are Safety Statements? xx
2.3 How to Read Safety Statements xx
2.4 Overview of Safety Statements xx
2.5 What's Covered and What's Coming xx
Chapter 3: Risks and Benefits xx
3.1 Risks xx
3.2 Benefits xx
3.3 What's Covered and What's Coming xx
Part 2: Let's G6! The Basics xx
Chapter 4: What is the G6? xx
4.1 Introduction xx
4.2 G6 CGM System xx
4.3 What's New for G6? xx
4.4 G6 Components xx
4.5 What's Covered and What's Coming xx
Chapter 5: Set Up Your Display Devices xx
5.1 Introduction xx
5.1 Choose the App, Receiver, or Both xx
5.3 App xx
5.4 Receiver xx
5.5 What's Covered and What's Coming xx
Chapter 6: Start Your Sensor xx
6.1 Introduction xx
6.2 Prepare to Insert Sensor xx
6.3 Choose Sensor Site xx
6.4 Insert Sensor xx
6.5 Attach Transmitter xx
6.6 Pair and Start Your Sensor xx
6.7 Pairing Tips xx
6.8 What's Covered and What's Coming xx
Chapter 7: Calibrate xx
7.1 Introduction xx
7.2 Calibration Overview xx
7.3 Prepare to Calibrate xx
7.4 G6 Calibrations xx
7.5 Calibrate Only When Prompted (and Exceptions) xx
7.6 Check in with Jake and Kelly xx
7.7 What's Covered and What's Coming xx
Part 3: Next Steps xx
Chapter 8: Home Screen xx
8.1 Introduction xx
8.2 Home Screen Overview xx
8.3 Glucose Information xx
8.4 Navigation and Status Bar xx
8.5 What's Covered and What's Coming xx
Chapter 9: Events xx
9.1 Introduction xx
9.2 Event Overview xx
9.3 Enter Insulin Event xx
9.4 Other Events xx
9.5 Edit and Delete an Event in Your App xx
9.6 View Events xx
9.7 What's Covered and What's Coming xx
Chapter 10: Alarm and Alerts xx
10.1 Introduction xx
10.2 Alarm and Alerts xx
10.3 Check in with Kelly xx

LBL014003 Rev 001 Dexcom G6 User Guide
2
10.4 Confirming Alarm/Alerts xx
10.5 Customizing Your Alerts Overview xx
10.6 Why Customize Alerts? xx
10.7 Check In with Jake and Kelly xx
10.8 App: Alert Schedule xx
10.9 What was Covered and What's Coming xx
Chapter 11: Treatment Decisions xx
11.1 Introduction xx
11.2 Your HCP Is Your Partner xx
11.3 Using your G6 for Treatment Decisions xx
11.4 Check In With Jake and Kelly xx
11.5 You Decide! xx
11.6 What's Covered and What's Coming xx
Chapter 12: Share Information With Your Support Team xx
12.1 Introduction xx
12.2 Share and Follow xx
12.3 Check In With Jake and Kelly xx
12.4 CLARITY Overview xx
12.5 What's Covered and What's Coming xx
Chapter 13: End Sensor and Transmitter Sessions xx
13.1 Introduction xx
13.2 End Your Sensor Session xx
13.3 Remove Sensor xx
13.4 End of Transmitter Battery xx
13.5 Pair New Transmitter xx
13.6 What's Covered and What's Coming xx
Chapter 14: Troubleshooting xx
14.1 Introduction xx
14.2 Alarm/Alerts and Readings xx
14.3 Applicator xx
14.4 App xx
14.5 Receiver xx
14.6 Calibration xx
14.7 Transmitter xx
14.8 Sensor xx
14.9 Share xx
Part 4: Appendices xx
Appendix A: Glossary xx
Appendix B: Need Help? You're Not Alone. xx
B.1 Dexcom Technical Support Team xx
B.2 Dexcom Patient Care Team xx
B.3 Dexcom Sales Support Team xx
B.4 Corporate xx
Appendix C: Go Through Security and Fly xx
C.1 Introduction xx
C.2 Going Through Security xx
C.3 In the Plane xx
Appendix D: Extend Your App xx
D.1 Introduction xx
D.2 Today View (Apple) xx
D.3 Quickl Glance (Android) xx
D.4 Smart Watches xx
Appendix E: Take Care of Your G6 xx
E.1 Introduction xx
E.2 G6 Maintenance xx
E.3 Storage xx
E.4 Checking App and Receiver Information xx
E.5 System Disposal xx
Appendix F: Warranty xx
F.1 Introduction xx
F.2 Receiver Warranty Information xx
F.3 Transmitter Warranty Information xx
F.4 Dexcom's Obligations Under the Limited Warranty xx
Appendix G: Technical Information xx
G.1 Device Performance Characteristics xx
G.2 Product Specifications xx
G.3 FCC Requirements xx
Appendix H: Label Symbols xx
Appendix I: Alarm/Alerts Vibrations and Sounds xx

LBL014003 Rev 001 Dexcom G6 User Guide
3
Index xx

LBL014003 Rev 001 Dexcom G6 User Guide
4

LBL014003 Rev 001 Dexcom G6 User Guide
5
Chapter 1
Get Started:
Begin Your Dexcom G6™Continuous Glucose
Monitoring System (G6) Journey
1.1 Introduction
Welcome to the G6 continuous glucose monitoring (CGM) family!
This User Guide supports you in getting to know your G6. We also have numerous other resources available
to help you to get the most out of your G6.
After this chapter, you’ll be able to:
•
Locate different training resources
•
Explain why you need a Dexcom
®
account
Images in this User Guide are representational and may differ from your system.
1.2 Resources
Tutorial
Our tutorial walks you through your first sensor session, including picking a display device, inserting the
sensor, and using alarm/alerts.
Your First Sensor Session
tutorial is available two ways:
•
Online: dexcom.com/Support
•
USB card: In the receiver package
In-App Videos
Watch the videos in your app to find out more:
•
Overview:
See how your CGM shows where your sensor glucose is now, where it’s going, and where it’s
been
•
Sensor Insertion:
Walks through inserting your sensor
•
Transmitter Attachment:
Walks through snapping your transmitter into place
•
Treatment Decisions:
Learn how to use your G6 to make treatment decisions, like dosing for highs and
treating for lows
You can watch these videos when you set up your app or anytime at Settings > Help > Videos.
Guides
Getting Started Guides
Two guides included in your receiver package:
•
Getting Started: Your First Sensor Session
complements the tutorial by providing the same instructions in
a book. You can use it with the tutorial or on its own!
•
Beyond Getting Started: Everything Else
has information for you to refer to later, like how to troubleshoot
issues and warranty details.
User Guide
This User Guide gives you the most extensive overview of the system, detailing features, important safety
information, and so much more.
To download an eBook of the User Guide visit dexcom.com/guides.
The G6 User Guide is grouped into four parts:
Part 1:
Get Started

LBL014003 Rev 001 Dexcom G6 User Guide
6
•
Chapter 1: Begin Your Dexcom G6 Continuous Glucose Monitoring System (G6) Journey
•
Chapter 2: Indications for Use and Safety Statements
•
Chapter 3: Risks and Benefits
Part 2:
Let’s G6! The Basics
•
Chapter 4: What Is the G6?
•
Chapter 5: Set Up Your Display Devices
•
Chapter 6: Start Your Sensor Session
•
Chapter 7: Calibrate
Part 3:
Next Steps
•
Chapter 8: Home Screen
•
Chapter 9: Events
•
Chapter 10: Alarm and Alerts
•
Chapter 11: Treatment Decisions
•
Chapter 12: Share Information With Your Support Team
•
Chapter 13: End Sensor and Transmitter Sessions
•
Chapter 14: Troubleshooting
Part 4:
Appendices
•
Appendix A: Glossary
•
Appendix B: Need Help? You’re Not Alone!
•
Appendix C: Security and Air Travel
•
Appendix D: Extend Your App
•
Appendix E: Take Care of Your G6
•
Appendix F: Warranty
•
Appendix G: Technical Information
•
Appendix H: Label Symbols
•
Appendix I: Alarm/Alert Vibrations and Sounds
How to Use Your User Guide
Start with the table of contents. The chapters include information that guides you through your sensor
session, from setting it up to taking it off.
All chapters in the G6 User Guide are laid out the same way: The beginning of each chapter lists what you’ll
be able to do after you’ve finished, followed by the chapter’s content. At the end, there’s a recap of what was
covered and what’s in the next chapter.
The appendices have additional information you may want to reference. For example, what do you do with
your G6 at airport security, how to find out about the warranty, and taking care of your device.
1.3 Your Dexcom Account
You’ll need a Dexcom username and password to set up the G6 App (app) and for reordering. If you haven’t
already, go to dexcom.com and set up an account. Or, if you prefer, create your account in the app during
setup.
1.4 What’s Covered and What’s Coming
Now You Can:
•
Locate different training resources
•
Explain why you need a Dexcom
account
What’s Next?
Next you’ll learn when and how to use the G6 safely.

LBL014003 Rev 001 Dexcom G6 User Guide
7
Chapter 2
Get Started:
Indications for Use and Safety Statements
2.1 Introduction
In this chapter, you’ll learn how to use the G6 safely.
Review this chapter before using the G6. You’ll find:
•
How following the safety statements keeps you safe
•
How to interpret safety statements
•
An overview of safety statements
2.2 What Are Safety Statements?
Safety statements are brief explanations meant to keep you and the system safe while using the G6. There
are four types:
•
Warnings:
Describe serious —even life-threatening —situations to avoid when you use the G6
•
Precautions/Cautions:
Are steps you take when using the G6 to prevent minor or moderate harm to you or
the system
•
Indications:
Show who should use the system as well as when, why, and how they should use it
•
Contraindications:
Let you know when not to use the G6. If used in these situations, you may hurt yourself
or the system
2.3 How to Read Safety Statements
You see safety statements in two formats:
•
List: All safety statements are listed in the next section
•
Boxes: Chapters include boxes with the safety statements related to that content
Within chapters, each safety statement is in a box, broken down into four sections, like the example below:
2.4 Overview of Safety Statements
This section reviews all safety statements —what you should or shouldn’t do, why, and what could happen.
The statements are grouped by system function or feature.
Review the safety statements to be aware of the indications, contraindications, warnings, precautions, and
cautions listed below. If you don’t follow these instructions, you could over or under treat because you may
not realize your glucose is very low or high (hypoglycemia or hyperglycemia). And of course, seek medical
attention when appropriate.
General CGM System Safety Statements
Indication
•
Who, What, and Why?
o
Who:
You can use the system if you’re 2 years or older and have diabetes. To get the G6, your healthcare

LBL014003 Rev 001 Dexcom G6 User Guide
8
professional (HCP) writes you a prescription. Don’t share your device. Use one Dexcom account for
each patient.
o
What:
The system tracks your glucose patterns and detects trends while they happen. The G6 is designed to
replace fingerstick blood glucose (BG) testing for diabetes treatment decisions.
o
Why:
Manage your diabetes using the system information —readings, arrows, and alarm/alerts. Every 5
minutes, the sensor reports your sensor glucose reading (reading) on your display device. Over time,
you’ll see trends and patterns. The system shows you your low and high glucose periods so you can
act when needed and create long-term treatment plans with your HCP. These actions and plans help
you spend more time in your target glucose range and reduce your A1C.
Contraindication
•
No MRI/CT/Diathermy –MR Unsafe
Don’t wear your CGM (sensor, transmitter, receiver, or smart device) for magnetic resonance imaging
(MRI), computed tomography (CT) scan, or high-frequency electrical heat (diathermy) treatment.
The system hasn’t been tested in those situations. Magnetic fields and heat could stop readings or
alarm/alerts. Without readings or alarm/alert notifications, you might miss a severe low or high glucose
event.
Warnings
•
Read User Materials
Before you use your G6, carefully read the materials included with it. If you don’t, you might:
o
Not use the system correctly
o
Not understand system information
o
Affect how well it works
•
Don’t Ignore Low/High Symptoms
Don’t ignore how you feel. If your glucose alerts and readings don’t match what you’re feeling, use your
blood glucose meter (meter) to make diabetes treatment decisions or, if needed, seek immediate medical
attention.
When in doubt, get your meter out.
•
No Number, No Arrow, No CGM Treatment Decision
If your G6 doesn’t show a number or arrow, or your readings don’t match your symptoms, use your meter
to make diabetes treatment decisions.
No number, no arrow, no treatment decision. When in doubt, get your meter out.
•
Don’t Use If…
Don’t use the system if you are:
o
Pregnant
o
On dialysis
o
Critically ill
We haven’t tested people in these conditions so we don’t know if these affect accuracy.
Follow system instructions.
If you don’t, you could have a severe low or high glucose event.
Calibration Safety Statements
Warnings
•
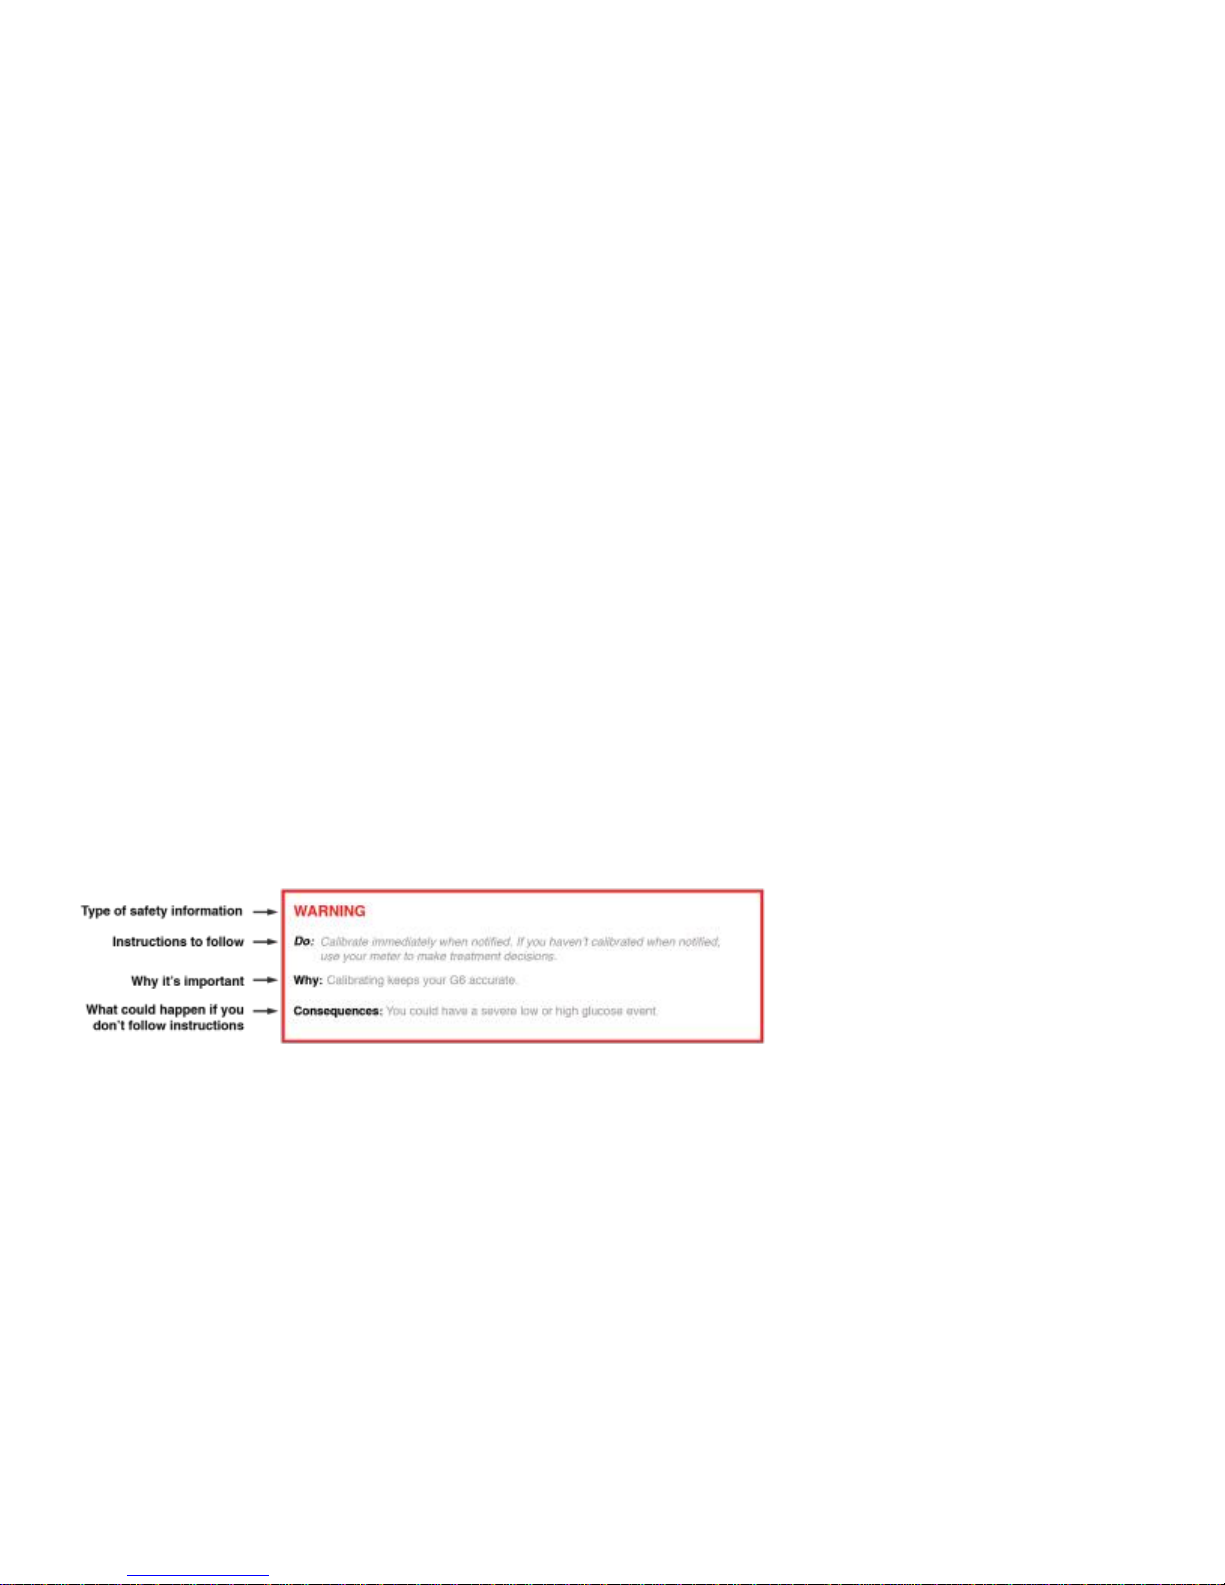
Don’t Wait — Calibrate!
The system needs your meter values every day to provide accurate information. Calibrate immediately
when notified. If you haven’t calibrated when notified, use your meter to make treatment decisions until
you calibrate your G6.
When you insert a new sensor be sure to calibrate as soon as the system notifies you. You’re notified to
calibrate twice, then once more after 12 hours, and again 12 hours later. For the rest of your session, you
are notified at least once every 24 hours.
•
Use Meter During Startup
When you start a new sensor, you won’t get any readings or alarm/alerts until you enter two calibrations.
Use your meter to make treatment decisions during the 2-hour sensor warmup period.

LBL014003 Rev 001 Dexcom G6 User Guide
9
•
Use Fingersticks
Use fingertips to calibrate from your meter. Blood from other places may be less accurate and not as
timely.
Follow system instructions. If you don’t, you could have a severe low or high glucose event.
Precautions
•
Be Accurate, Be Quick
Enter the exact BG value displayed on your meter within 5 minutes of using your meter. Don’t enter the G6
reading as a calibration.
•
Don’t Calibrate When Glucose Rate Is Changing Fast
Don’t calibrate when your trend arrow is up, double-up, down, or double-down because your BG is
changing at more than 2 mg/dL per minute.
Follow system instructions. If you don’t, you could have a severe low or high glucose event.
System/Hardware/Software Safety Statements
Warnings
•
Wire Breaks Off
Don’t ignore broken or detached sensor wires. A sensor wire could remain under your skin. If this
happens, please contact our 24/7 Technical Support.
If a sensor wire breaks off under your skin and you can’t see it, don’t try to remove it. Contact your HCP.
Also seek professional medical help if you have symptoms of infection or inflammation —redness,
swelling, or pain —at the insertion site.
•
Where to Insert: Belly or Behind?
All patients can use their bellies. Patients 2 to 17 years old can also choose their upper behinds. Look for a
place on your belly or upper behind where you have some padding.
The sensor is not tested or approved for other sites. Talk to your HCP about the best site for you.
Ages 2-17 years: Insert in your belly or upper behind
Ages 18 and older: Insert in your belly
•
Where to Store
You can store your sensors at room temperature or in your refrigerator —as long as it’s between 36° F and
86° F. Don’t store sensors in the freezer.
Follow system instructions. If you don’t, you could have a severe low or high glucose event.
Precautions
•
Don’t Use if Expired
Don’t use expired sensors, because they may give incorrect results. Check the package label for the
expiration date. It’s in YYYY-MM-DD format.
•
Check Package
Don’t use sensor if its sterile package has been damaged or opened, because it might cause an infection.
•
Clean and Dry Skin

LBL014003 Rev 001 Dexcom G6 User Guide
10
Clean and dry your hands and your insertion site before inserting your sensor.
Wash your hands with soap and water, not gel cleaners, and then dry them before opening the sensor
package. If your hands are dirty when you insert the sensor, you may get germs on the insertion site and
get an infection.
Clean your insertion site with alcohol wipes to prevent infections. Don’t insert the sensor until your skin is
dry. If your insertion site is not clean and completely dry, you run the risk of infection or the transmitter
holder not sticking well.
Make sure you don’t have insect repellant, sunscreen, perfume, or lotion on your skin.
•
Where to Insert: Things to Check
Keep the safety guard on untilyou put the G6 applicator against your skin. If you remove the safety guard
first, you may hurt yourself by accidentally pushing the button that inserts the sensor before you mean to.
Change your insertion site with each sensor. Using the same site too often might not allow the skin to heal,
causing scarring or skin irritation.
Sensor placement is important. Choose a site:
o
At least 3 inches from insulin pump infusion set or injection site
o
Away from waistband, scarring, tattoos, irritation, and bones
o
Unlikely to be bumped, pushed, or laid on while sleeping
Follow system instructions. If you don’t, you could have a severe low or high glucose event.
Transmitter Safety Statements
Warnings
•
Inspect
Don’t use a damaged or cracked transmitter. A damaged transmitter could cause injuries from electrical
shocks and may make the system not work correctly.
•
Use as Directed
The transmitter is small and may pose a choking hazard. Don’t put it in your mouth or let children hold it
without adult supervision.
Follow system instructions. If you don’t, you could have a severe low or high glucose event.
Precautions
•
Reuse —Don’t Throw Away
When ending a session, don’t throw away the transmitter. The transmitter is reusable until the system
notifies you that the transmitter battery is about to expire.
•
Don’t Share
Never share your transmitter. The system is a prescription-only medical device and is meant for your use
only. The transmitter is tied to the sensor glucose readings. If used by more than one person, the glucose
readings, reports, alarm/alerts, etc., may be wrong.
Follow system instructions. If you don’t, you could have a severe low or high glucose event.
System Safety Statements
Precautions
•
Treatment Decisions
Use your sensor glucose reading and trend arrow to make treatment decisions.
•
Use Correct Transmitter, Receiver, and Sensor
G6 components are not compatible with any previous Dexcom products. Do not mix transmitters,
receivers, and sensors from different generations.
•
Don’t Use When Glucose Rate Is Changing Fast
Your sensor reading may be wrong when your glucose is changing 3 mg/dL or more each minute. This

LBL014003 Rev 001 Dexcom G6 User Guide
11
can happen during exercise or after a meal.
•
Going Through Security Check Point
When wearing your system, ask for hand-wanding or full-body pat-down and visual inspection instead of
going through the Advanced Imaging Technology (AIT) body scanner (also called a millimeter wave
scanner) or putting any part of the system in the baggage x-ray machine.
You can wear the system for the walk-through metal detector. If you do, use your meter for treatment
decisions until you leave the security area.
Because we haven’t tested every x-ray and scanner, we don’t know if they damage the system.
Not sure what kind of machine it is? Be safe —either ask the TSA officer, request hand-wanding, or
request full-body pat-down.
Follow system instructions. If you don’t, you could have a severe low or high glucose event.
Receiver and Smart Device Safety Statements
Precautions
•
Keep Transmitter Close to Display Device
Keep your transmitter and display device within 20 feet with no obstacles (like walls or metal) between
them. Otherwise, they might not be able to communicate. If water is between your transmitter and the
display device -- for example, if you’re showering or swimming — keep them closer to each other. The
range is reduced because
Bluetooth
®
doesn’t work as well through water.
•
Get Alarm/Alerts on Display Device You Use
To get your alarm/alerts, set them on the display device you use. Your receiver won’t get the alarm/alerts
you set on your app. Likewise, your app won’t get the alarm/alerts you set on your receiver.
•
Is It On?
If the receiver or smart device is turned off (shut down), it will not show readings or alarm/alerts. Make sure
your display device is turned on.
Follow system instructions. If you don’t, you could have a severe low or high glucose event.
Smart Device Safety Statements
Warnings
•
Check Settings
When using your smart device, check:
o
Volume/muted/headphones
•
You get a visual notification and a vibration (if your device has a vibration feature). You may not hear
the sound on your first notification.
•
If you don’t clear it within 5 minutes, the alarm/alert repeats at half volume and at full volume after 10
minutes.
•
Your alarm and important alerts sound and display information even when your volume is low or
muted. Specifically, if your smart device is on mute, only these notifications make a sound:
o
Glucose Alarm/Alerts:
▪
Urgent Low
▪
Urgent Low Soon
▪
Low Glucose
▪
High Glucose
▪
Rise Rate
▪
Fall Rate
▪
No Readings Alert
o
System Alerts:
▪
Calibration Required (after 2-hour sensor warmup)
▪
Calibration Error
▪
Sensor Expired
▪
Replace Sensor
▪
Transmitter (not working)
▪
No Storage Error
▪
App Stopped

LBL014003 Rev 001 Dexcom G6 User Guide
12
There’s one exception: On Apple
®
devices, Signal Loss doesn’t sound when your volume is low or
muted.
•
•
When you have headphones connected to your Android
®
, alarm/alerts will sound through the
headphones and the speaker. On your Apple, they will sound only in the headphones.
o
Bluetooth
: Your transmitter talks to your app with
Bluetooth
. Make sure your smart device
Bluetooth
is
on. If not, you will not get alarm/alerts or CGM information.
o
Notifications:
•
Make sure your smart device settings allow Dexcom app notifications to show on your Lock screen.
•
Apple
: During setup, enable Dexcom app notifications or you won’t get alarm/alerts.
o
Battery: The app must always be running in the background and may drain your smart device battery.
Keep the battery charged.
o
Compatibility: Before upgrading your smart device or its operating system, check
dexcom.com/compatibility. Automatic updates of the app or your device operating system can change
settings or shut down the app. Always update manually and verify correct device settings afterward.
o
Time: Let the date and time on your smart device automatically update when you travel across time
zones or switch between standard and daylight saving times. Don’t manually change your smart device
time, because it can make the time on the trend screen wrong and the app may stop displaying data.
Follow system instructions. If you don’t, you could have a severe low or high glucose event.
Precautions
•
Check Accessory Devices
Do you use headphones with your smart device? What about
Bluetooth
speakers or a smart watch?
When using accessories, keep in mind you may get your alarm/alerts on only one device or accessory, not
all. After connecting any accessory devices, make sure that your smart device settings allow you to
continue receiving alarms or alerts.
Follow system instructions. If you don’t, you could have a severe low or high glucose event.
Receiver Safety Statements
Warnings
•
Don’t Use if Damaged
Don’t use a receiver that is damaged or cracked. A damaged receiver could cause injuries from electrical
shocks and may make the system not work correctly.
•
Use Cable as Directed
Use USB cable only as directed, and store safely. Misuse of the USB cable can be a strangulation risk.
Follow system instructions. If you don’t, you could have a severe low or high glucose event.
Precautions
•
Test Speaker and Vibrations
You have to hear or feel alarm/alerts to react to them, so test your receiver speaker and vibrations
regularly.
To make sure the speaker and vibrations work, plug in the receiver to charge. The Speaker Test screen
appears for a few seconds. Follow the directions on the screen to test the speaker and vibrations. If you
hear and feel them, great! But if it doesn’t beep and vibrate -- perhaps it got wet or was dropped -- contact
Technical Support and use your app until the receiver is fixed.
•
Keep Clean and Dry
Don’t submerge your receiver in water and don’t get dirt or water in the USB port. That could damage it.
Follow system instructions. If you don’t, you could have a severe low or high glucose event.
Caution
•
Requires HCP Prescription
U.S. law restricts the sale of the G6 Mobile to sale by, or on the order of, a physician.

LBL014003 Rev 001 Dexcom G6 User Guide
13
Dexcom Share Safety Statements
Important User Information
Dexcom Share (Share) lets you send your sensor information from your app to your Followers’ smart
devices! Read the indications, warnings, and precautions below to find out how you can safely use this app
feature.
Share and Managing Your Diabetes Safety Statements
Indications
•
Keep Followers Informed
Use Share to send your sensor information from your smart device to your Followers’ smart devices.
•
Use as Secondary Notice
The information on your smart device is sent directly from your G6 transmitter. After it is on your device,
Share sends it to your Followers. So your Followers’ information is always older than yours. Use your
current information to manage your diabetes, not your Followers’ possibly outdated information.
Your Followers can use the information they get to reach out to you and support you in managing your
diabetes. The information they get is not meant to be used for treatment decisions, analysis, or teaching.
Followers can’t change your information.
Warnings
•
Use Your G6 to Make Treatment Decisions
Don’t use Share information for treatment decisions, like treating for a low or dosing for a high. Use the
sensor information on your G6 instead.
•
Take HCP Advice
Has your HCP given you self-monitoring tasks? Keep doing them. Having Followers doesn’t replace them.
Follow system instructions. If you don’t, you could have a severe low or high glucose event.
Share Setup and Settings Safety Statements
Warning
•
Followers Must Follow and You Must Share
You have to turn Share on to make it send your sensor information to your Followers. Followers have to
download the Dexcom Follow app to see what you send.
Follow system instructions. If you don’t, you could have a severe low or high glucose event.
Precautions
•
Followers Don’t Manage Your Diabetes, You Do
Don’t rely on your Followers to let you know you need to make a treatment decision. Stay on top of your
diabetes management. Look at your system often. Respond to alarm/alerts. Don’t wait for a Follower to
reach out —they may not be getting your sensor information because of a technical issue.
•
Check Your Smart Device and Your Followers’ Smart Devices
o
Internet access required: Both smart devices need to be connected to the Internet to use Share. Try
sending your follower an email from your device. If your follower gets it on their device, both smart
devices are connected.
o
Batteries charged: Make sure the smart device batteries are charged. If either your or your Followers’
smart device batteries aren’t charged, Share won’t work.
•
Check Your Smart Device
App on: Whenever you power on your smart device, tap the G6 app to open it. If the app isn’t open, Share
won’t work.
•
Check Followers’ Smart Devices
o
Sounds on
:
Followers must keep their smart device volume on, or at least the keep vibration on, so they
can hear and/or feel alarm/alerts. Smart device settings trump Follow app settings

LBL014003 Rev 001 Dexcom G6 User Guide
14
o
Sharing gaps: Followers won’t get your sensor information when their smart device is off, not connected
to the Internet, or in Do Not Disturb or Airplane mode. When the Followers fix those issues, they’ll start
getting the current information but they won’t get the information they missed
o
Cell carrier supports simultaneous voice and data: Most cell service carriers support using voice and
data at the same time. Check yours and have Followers check theirs. If it’s not supported, Share won’t
work during phone calls. Share will restart when the call is over and send any waiting notifications
•
Customize Share So Followers Can Support You
o
Customize Share to make sure your Followers have the information they need to help you manage
your diabetes
o
Delay feature: Your Follower won’t get notified until after the delay time you set
o
Not Share feature: You can stop sharing with a Follower any time by choosing Not Share. That Follower
will stop getting any of your sensor information until you choose to Share again
Follow system instructions. If you don’t, you could have a severe low or high glucose event.
2.5 What’s Covered and What’s Coming
Now You:
•
Can explain how safety statements keep you safe
•
Can explain how to interpret safety statements
•
Have an overview of safety statements
What’s Next?
In the next chapter, you’ll learn the risks and benefits of using the G6.

LBL014003 Rev 001 Dexcom G6 User Guide
15
Chapter 3
Get Started:
Risks and Benefits
When using any medical device, there are risks and benefits. In this chapter, you’ll learn what they are.
3.1 Risks
The risks with using G6 are:
•
Not getting your alarm/alerts
•
Using G6 to make treatment decisions when you shouldn’t
•
Sensor insertion issues
This section covers each of those risks in detail.
Follow system instructions. If you don’t, you could have a severe low or high glucose event.
Not Getting Alarm/Alerts
If you aren’t getting your alarm/alerts, you could have severe low or high glucose without knowing it. Check
your display device:
•
Battery charged: If the display device battery is dead, you won’t get readings or alarm/alerts.
•
App on: Keep the app on so you get readings or alarm/alerts.
•
Alerts on: Leave the alert function on to get alarm/alerts.
•
Volume up: Keep the volume loud enough to hear your alarm/alerts.
•
Speaker and vibrations work: If the speaker or vibrations aren’t working, you won’t hear or feel your
alarm/alerts.
•
In range: Keep your display device no more than 20 feet from your transmitter, with no obstacles between
them. They have to be that close to communicate. If they aren’t in range, you won’t get readings or
alarm/alerts.
•
No System errors: If you get a system error -—such as No Readings, Sensor Error, or Signal Loss -—you
won’t get readings or alarm/alerts.
•
During warmup and after session ends: You won’t get alarm/alerts or readings during the 2-hour warmup
or after a sensor session ends.
See Troubleshooting (Chapter 14), recommended settings (Chapter 5), and notifications that sound while
smart device is silenced/muted (Appendix I) for more information.
Using G6 for Treatment Decisions
You can use your G6 to treat for a low or dose for a high in all but these few situations:
•
No number, no arrow, no CGM treatment decision: If you have a reading and a trend arrow, you can use
those to make a treatment decision. Otherwise use your meter.
•
Don’t wait –— calibrate: If you’ve calibrated immediately when prompted, your G6 is accurate and you can
use it to make a treatment decision. Otherwise use your meter until you calibrate your G6.
•
When in doubt, get your meter out: If you feel like your glucose is low or high but your G6 number is within
your target range, verify with your meter. Likewise, if you care for someone using the G6, watch how they
act. If their symptoms don’t match the G6, use the meter.
•
Use your G6 for treatment decisions, not your Followers: Dexcom Share allows you to share your sensor
glucose information from your smart device to your Followers’. The main risk with Share is
misunderstanding its purpose. The information on your display device is the most current —it comes
straight from your transmitter —so only use yours for treatment decisions. There can be technical issues
and delays in sharing information. Followers can reach out and support you, but don’t rely on them or their
information to manage your diabetes for you.
Some users found accuracy between different sensors varied significantly. When you insert each sensor,
pay attention to its accuracy before deciding to use it for treatment decisions.
For more information on how to make treatment decisions using your G6, see Chapter 11. For more
information on Share, see Chapter 12.

LBL014003 Rev 001 Dexcom G6 User Guide
16
Sensor Insertion Risks
It’s uncommon, but inserting the sensor can cause infection, bleeding, or pain, and wearing the adhesive
patch can irritate your skin. Only a few patients in the G6 clinical studies got slight redness and swelling.
No sensor wires broke; however, there is a remote chance a sensor wire could break or detach and remain
under your skin. Sterile broken sensor wires usually don’t pose a significant medical risk. If a sensor wire
breaks off or detaches and remains under your skin, contact your HCP and Technical Support (24/7):
•
TechSupport@dexcom.com
•
Toll free: 1.888.738.3646
•
Toll call: 1.858.200.0200
3.2 Benefits
Some benefits of using your G6 are:
•
Knowing your trends
•
Making treatment decisions using your G6
•
Managing your diabetes
•
Getting alerted for low and high readings
This section covers each of those benefits in detail.
Knowing Your Trends
The G6 sends you a reading every 5 minutes. It also provides reports and views of your information so you
can detect and reflect on trends, patterns, and how your body responds to different things, like exercise or
pizza. This provides you with a more complete picture of your glucose and lets you see how your daily habits
impact your A1C.
Making Treatment Decisions Using G6
You can use your G6 reading and trend arrow to make treatment decisions —like treating for a low or dosing
for a high. See Chapter 11 for more information on treatment decisions. With G6, there’s no need to confirm
your reading with a fingerstick. This can reduce the pain and burden of excessive fingersticks (Aleppo 2017).
Helping Your Diabetes Management
The alarm/alerts features (Chapter 10) keep you aware of your glucose levels. Alarm/alerts notify you when
your glucose goes outside your target range, goes too low, or is falling too fast. This lets you take action to
prevent glucose from going too low or high (Pettus 2015). Over time, you spend more time in your target
range and less time being too high or too low (Beck 2017; Lind 2017). This gives you more control over your
glucose, may help you improve your A1C, and may reduce your risk of long-term diabetes-related
complications (The Diabetes Control and Complications Trial Research Group 1993).
Some patients gain peace of mind and a better quality of life when using real-time CGM, such as G6
(Polonsky 2017). Share may improve the quality of life and peace of mind for patients, their caregivers, and
their support team because it sends Followers readings and alarm/alerts remotely. Followers can then reach
out when readings go too low or high.
References
Aleppo, Grazia, Katrina Ruedy, Tonya Riddlesworth, Davida Kruger, Anne Peters, Irl Hirsch, Richard
Bergenstal, Elena Toschi, Andrew Ahmann, Viral Shah, Michael Rickels, Bruce Bode, Athena Philis-
Tsimikas, Rodica Pop-Busui, Henry Rodriguez, Emily Eyth, Anuj Bhargava, Craig Kollman, and Roy Beck.
2017. “Replace-BG: a randomized trial comparing continuous glucose monitoring with and without routine
blood glucose monitoring in well-controlled adults with type 1 diabetes.”
Diabetes Care.
40(4):538-545. doi:
10.2337/dc16-2482.
Beck, Roy, Tonya Riddlesworth, Katrina Ruedy, Andrew Ahmann, Richard Bergenstal, Stacie Haller, Craig
Kollman, Davida Kruger, Janet McGill, William Polonsky, Elena Roschi, Howard Wolpert, and David Price for
the DIAMOND Study Group. 2017. “Effect of continuous glucose monitoring on glycemic control in adults
with type 1 diabetes using insulin injections: the DIAMOND randomized clinical trial.”
JAMA
. 317(4):371-378.
doi:10.1001/jama.2016.19975.
The Diabetes Control and Complications Trial Research Group. September 30, 1993. “The effect of intensive
treatment of diabetes on the development and progression of long-term complications in insulin-dependent
diabetes mellitus.”
N Engl J Med.
329:977-986.
Lind, Marcus, William Polonsky, Irl Hirsch, Tim Heise, Jan Bolinder, Sofia Dahlqvist, Erik Schwarz, Arndis
Finna Olafsdottir, Anders Frid, Hand Wedel, Elsa Ahlen, Thomas Nystom, and Jarl Hellman. 2017.

LBL014003 Rev 001 Dexcom G6 User Guide
17
“Continuous glucose monitoring vs conventional therapy for glycemic control in adults with type 1 diabetes
treated with multiple daily insulin injections: the gold randomized clinical trial.”
JAMA.
317(4):379-387.
doi:10.1001/jama.2016.19976.
Pettus, Jeremy, David Price, and Steven Edelman. 2015. ‘How patients with type 1 diabetes translate
continuous glucose monitoring data into diabetes management decisions.”
Endocr Pract.
21(6):613-620. doi:
10.4158/EP14520.OR.
Polonsky, William, Danielle Hessler, Katrina Ruedy, Roy Beck, for the DIAMOND Study Group. 2017. “The
impact of continuous glucose monitoring on markers of quality of life in adults with type 1 diabetes: further
findings from the DIAMOND randomized clinical trial.” Diabetes Care. 40(6):736-741
.
doi: 10.2337/dc17-
0133.
3.3 What’s Covered and What’s Coming
Now You Can:
•
List the risks and benefits of using the G6
What’s Next:
Now let’s take a look at the G6!

LBL014003 Rev 001 Dexcom G6 User Guide
18

LBL014003 Rev 001 Dexcom G6 User Guide
19
Chapter 4
Let’s G6! The Basics:
What Is the G6?
4.1 Introduction
This chapter is an overview of the G6 System.
After this chapter, you’ll be able to:
•
Explain what G6 does
•
List what’s new in G6
•
Explain each component’s function
4.2 G6 CGM System
The G6 is a medical device you use on yourself. It allows you to continually see your readings, updated every
5 minutes for up to 10 days, without the bother of taking constant fingerstick measurement. You’ll see:
•
BG readings: Update every 5 minutes.
•
Trend arrows: Show where your BG is heading.
•
Alarm/alerts: Warn you when you need to take action, for example, when your BG is too high or too low.
•
History: Graphs show the last 1, 3, 6, 12, and 24 hours of your readings.
•
Reports: Web-based reports reflect your glucose trends and patterns. Share reports with your HCP when
developing your diabetes management plans.
4.3 What’s New for G6?
Dexcom’s G6 features include:
•
Treatment decisions: Use your sensor glucose information to make diabetes treatment decisions
•
Calibrate once a day: After you’re set up, you only need to calibrate every 24 hours and when notified
•
Sensor session length: Wear your sensor for up to 10 days
•
Overpatch: Use it to cover the patch and help keep your sensor on
•
Urgent Low Soon: Get an alert when your glucose is quickly heading toward 55 mg/dL
Treatment Decisions
The G6 allows you to make treatment decisions without using your meter.
With the G6 number and trend arrow, you know where your glucose is and where it’s heading. Based on
your G6, you determine if you should dose, eat carbs, or do nothing —no fingerstick needed!
You still need your meter to calibrate and as a backup when your CGM data do not reflect how you feel or if
you don’t have enough information on your home screen. For more information, go to Chapter 11.
Urgent Low Soon Alert
Sometimes glucose levels fall fast. Really fast. The Urgent Low Soon Alert lets you know when yours is
falling so fast it will drop to 55 mg/dL in less than 20 minutes. This gives you time to prevent going too low.
For this alert, it doesn’t matter where your glucose is now; it matters where it is heading. For more
information, go to Chapter 10.
4.4 G6 Components
The G6 has three key parts:
•
Sensor
•
Transmitter
•
Display Device: Dexcom Receiver and/or Dexcom app on your smart device
Other manuals for G6
7
Table of contents
Other Dexcom Personal Care Product manuals
Popular Personal Care Product manuals by other brands

Silk'n
Silk'n FaceTite H2111 user manual

Gio Pelle
Gio Pelle GP-PL-70 Installation, operation & maintenance manual

Puritan Bennett
Puritan Bennett GoodKnight 420G Patient manual

Juzo
Juzo 9662 Instructions for use

Thuasne
Thuasne XLR8 quick start guide

Glow Dreaming
Glow Dreaming Glow Travel Sleep Easy user manual

nCase
nCase SmartCase Quick setup

Vigan Mammoth
Vigan Mammoth Lady Three 769-671 user manual

Daga
Daga CF-100 Directions for use

Advanced Wireless Communications
Advanced Wireless Communications INOVONICS 221121P quick start guide

Oregon Scientific
Oregon Scientific PMP238N instruction manual

Conair
Conair SU1W user manual