DiamaPro Systems WVX-P User manual
OWNER’S MANUAL
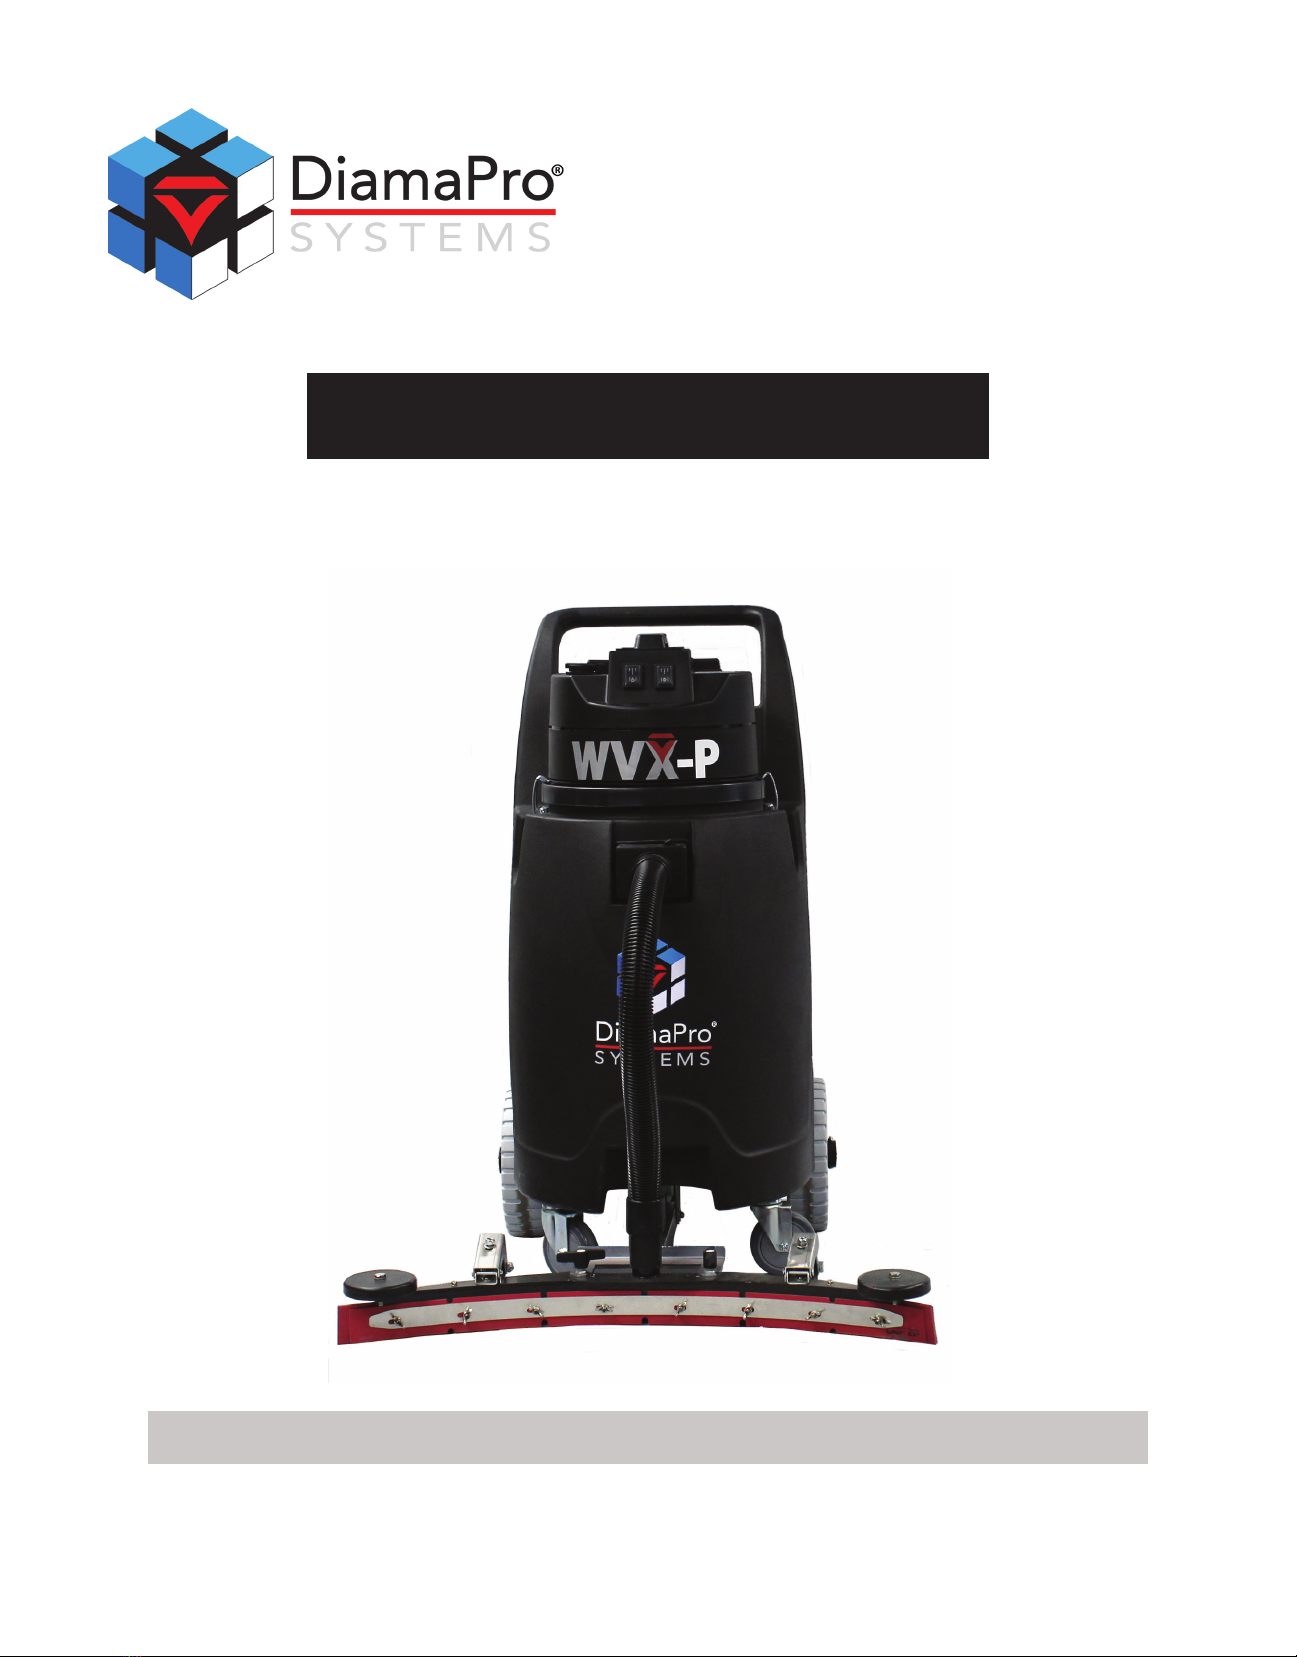
WVX-P
INDUSTRIAL WET VAC
USER & MAINTENANCE BOOK
SAVE THESE INSTRUCTIONS FOR FUTURE REFERENCE

INTRODUCTION
Thank you for your recent DiamaPro® Systems purchase. You have
bought a high quality, long-life commercial vacuum cleaner. For your safety
and continued satisfaction with this product, please read this owner’s
manual carefully before using. For your information, all parts used in the
manufacturing of this vacuum cleaner meet or exceed rigid quality control
standards. We stand behind all our products and are available to assist
you with a knowledgeable and dedicated staff . If we can help you in any-
way, please call Customer Service at 800-622-2048.
We also recommend that you visit our website www.diamaprosystems.com
for the fastest, most effi cient way to complete your product registration
and see other DiamaPro products and accessories to meet your cleaning
needs.
WARRANTY
The vacuum cleaner is warrantied for 1 year from the date of purchase.
Parts not covered under warranty are power cords, fi lters, motor brushes
and squeegee blades. The warranty covers only failure due to defective
parts or workmanship and will be invalidated by improper application
and abuse.
Under no circumstances should you return a failed unit to the factory.
If you experience any problems with your vacuum during the warranty
period, contact the Customer Service Department.
OPERATION
BEFORE EACH USE
(1) This vacuum cleaner is designed for wet only pickup. Please avoid
picking up dry materials.
(2) Make sure the tank is clean, and that there is no debris in the tank that
can impede the action of the pump fl oat mechanism.
(3) Make sure the mesh fi lter bag is installed on the inlet inside the
canister. The bag should be empty, and the slide-on clamp should be
installed on the bottom of the bag. Position the thin, fl at plastic strip
that is attached to the mesh fi lter bag, over the rim of the canister. This
strip helps retain the bag when it fi lls with debris.
(4) Make sure that the fl oat mounted on the underside of the motor head is
able to move freely, and that the fi lter on the outside of the fl oat hous-
ing is clean and properly in place. This fi lter will protect the vacuum
motor from debris.
(5) Attach the motor head to the canister using the two metal clamps
mounted on the side of canister. The pump cord exits the rear of the
canister, near the top. Plug this cord into the electrical outlet on the top
rear of the motor head.
(6) Attach the long discharge hose to the brass fi tting on the rear of the
canister. The fi tting is a ball coupling type. Pull the collar of the female
brass fi tting toward the canister before inserting the hose fi tting.
TO OPERATE
(1) The vacuum cleaner motor is controlled by the switch on the top left
side of the motor head. The pump out feature is controlled by the
switch on the top right side of the motor head. If using the pump out
feature, the pump switch can be left on.
(2) The pump is equipped with a fl oat switch, which will automatically start
the pump when the water level in the canister rises. The fl oat switch
will automatically stop the pump when the liquid level drops.
(3) If the vacuum is being used without the long discharge hose, leave the
pump switch off . The liquid in the canister can also be emptied using
the short, black, corrugated hose attached to the rear of the canister.
Be sure the end of the hose is securely attached to the stationary drain
hose plug after use.
(4) Check the mesh bag frequently for debris. To empty, remove the bag
from the canister and slide off the retaining clip on the bottom of the
bag. Reinstall the mesh fi lter bag before continuing to use the vacuum.
Do not operate the vacuum without the mesh fi lter bag in place
NEVER LUBRICATE THE VACUUM CLEANER MO-
TOR. THE MOTOR BEARINGS ARE PERMANENTLY
SEALED. THIS VACUUM IS INTENDED FOR INDOOR
OR OUTDOOR USE AND FOR WET PICKUP, BUT IT
IS NOT INTENDED TO BE EXPOSED TO RAIN.
SAFETY INSTRUCTIONS
When using an electrical vacuum, basic safety precautions should always
be followed, including the following:
READ ALL INSTRUCTIONS BEFORE USING YOUR
VACUUM CLEANER
WARNING: To reduce the risk of fi re, electrical shock, or injury:
1. Do not leave appliance when plugged in. Unplug from outlet when not in
use and before servicing.
2. Do not expose to rain. Store indoors.
3. Do not allow to be used as a toy. Close attention is necessary when
used by or near children.
4. Use only as described in this manual. Use only manufacturer’s recom-
mended attachments.
5. Do not use with damaged cord or plug. If appliance is not working as
it should, has been dropped, damaged, left outdoors, or dropped into
water, contact Customer Service.
6. Do not pull or carry by cord, use as a handle, close a door on cord, or
pull cord around sharp edges or corners. Do not run appliances over
cord. Keep cord away from heated surfaces.
7. Do not unplug by pulling on cord. To unplug, grasp the plug, not the
cord.
8. Do not handle plug or appliance with wet hands.
9. Do not put any object into openings. Do not use with any opening
blocked; keep free of dust, lint, hair and anything that may reduce air
fl o w .
10. Keep hair, loose clothing, fi ngers and all parts of the body away from
openings and moving parts.
11. Do not pick up anything that is burning or smoking, such as cigarettes,
matches, or hot ashes.
12. Do not use without dust bag and/or fi lters in place.
13. Turn off all controls before unplugging.
14. Use extra care when cleaning on stairs.
15. Do not use to pick up fl ammable or combustible liquids such as gaso-
line, or use in areas where they may be present.
16. This vacuum is for commercial use only.
17. Connect to a properly grounded outlet only. See grounding instructions
This appliance must be grounded. If it should malfunction or breakdown,
grounding provides a path of least resistance for electric current to reduce
the risk of electric shock. This appliance is equipped with a cord having
equipment grounding conductor and grounding plug. The plug must be
inserted into an appropriate outlet that is properly installed and grounded in
accordance with all local codes and ordinances.
Do not modify the plug provided with the appliance - if it will not fi t the
outlet, have a proper outlet installed by a qualifi ed electrician.
This appliance is for use on a nominal 120 - Volt circuit, and has a ground-
ed plug that looks like the plug illustrated in sketch A below. A temporary
adapter that looks like the adapter illustrated in sketches B and C may be
used to connect this plug to a 2-pole receptacle as shown in sketch B if
a properly grounded receptacle is not available. The temporary adapter
should be used only until a properly grounded outlet (sketch A) can be
installed by a qualifi ed electrician. The green colored ear, lug, or the like
extending from the adapter must be connected to a permanent ground
such as a properly grounded outlet box cover. Whenever the adapter is
used, it must be held in place by a metal screw.
NOTE: In Canada, the use of a temporary adapter is not permitted by the
Canadian Electrical Code.
SAVE THESE INSTRUCTIONS - GROUNDING
IMPROPER CONNECTION OF THE EQUIPMENT
GROUNDING CONDUCTOR CAN RESULT IN A RISK
OF ELECTRIC SHOCK. CHECK WITH A QUALIFIED
ELECTRICIAN OR SERVICE PERSON IF YOU ARE IN
DOUBT AS TO WEATHER THE OUTLET IS PROPERLY
GROUNDED.
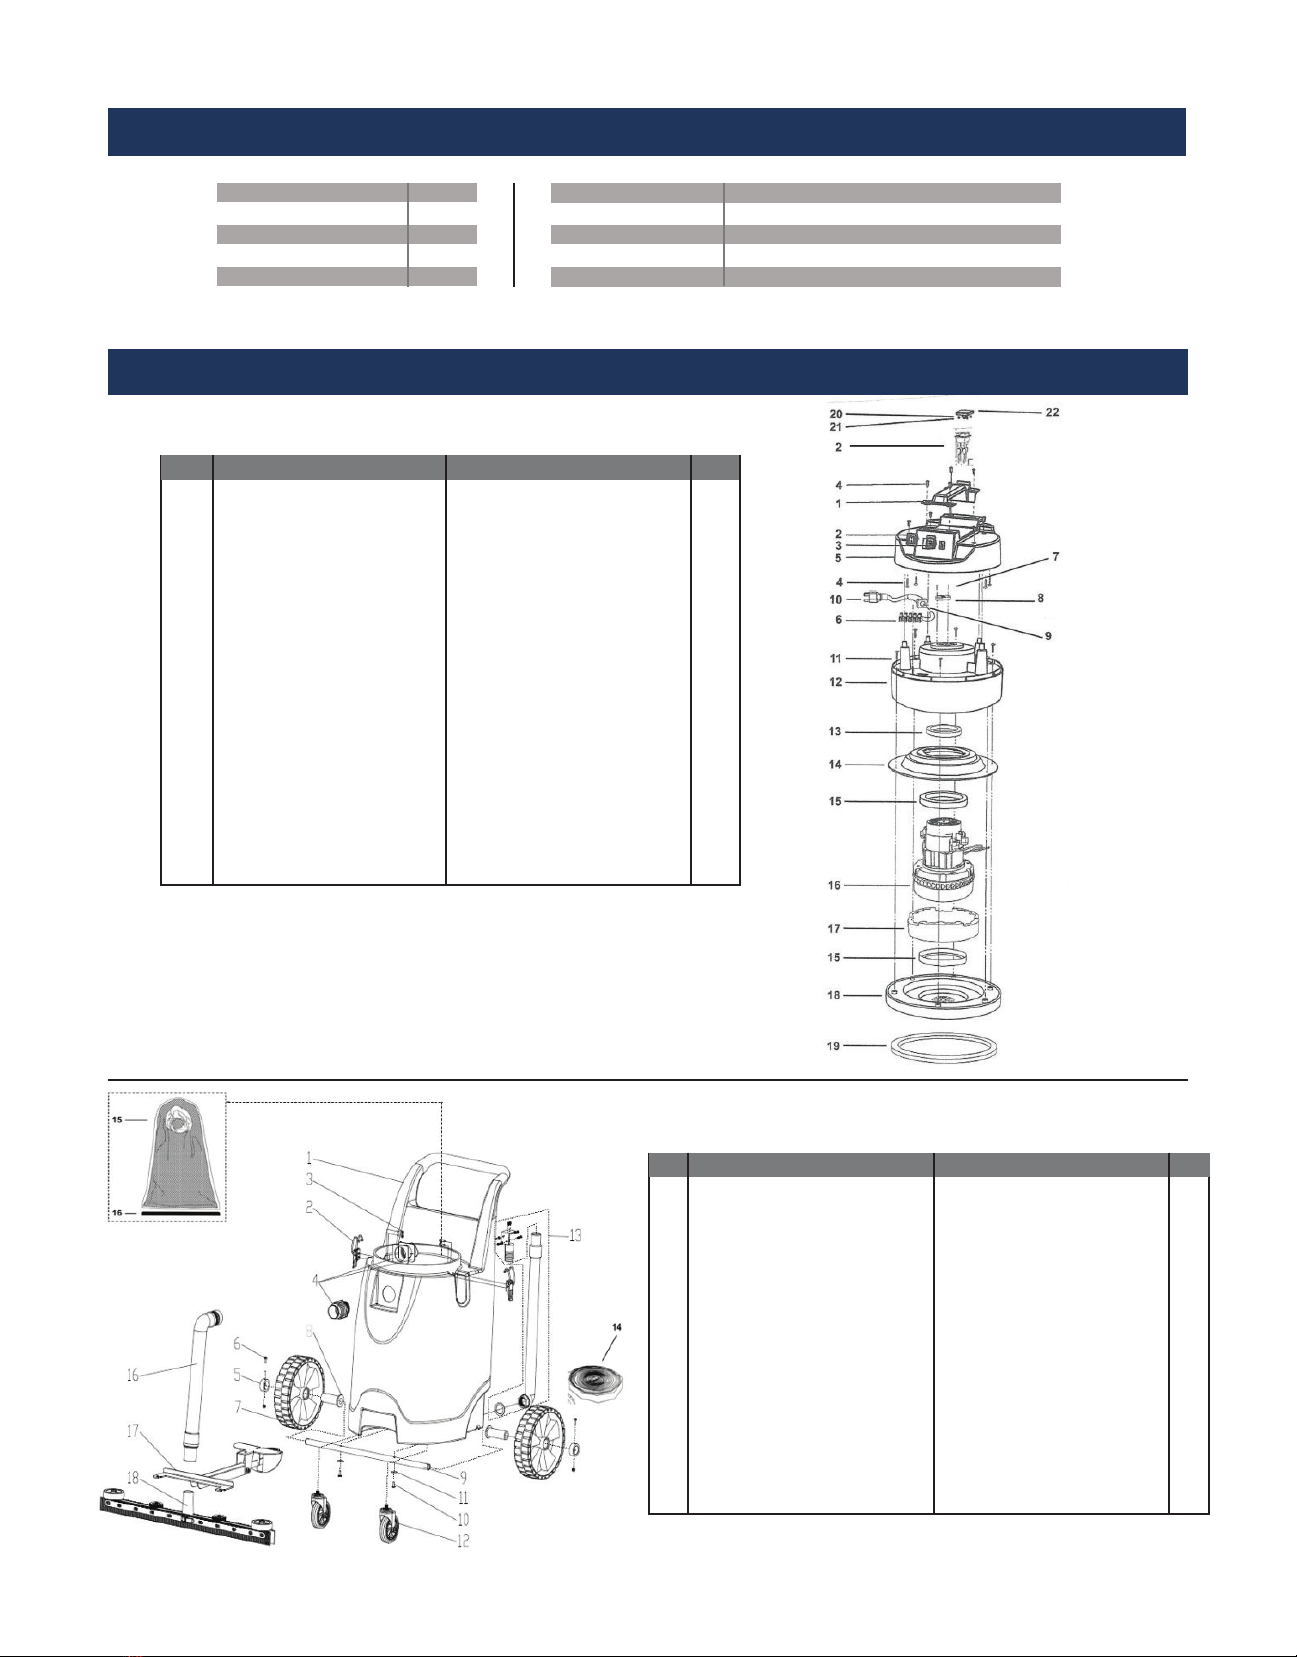
REPLACEMENT PARTS
Ref. Part No. Description Qty.
1
2
3
4
5
6
7
8
9
10
11
12
13
14
15
16
17
18
19
20
21
22
WVX-TOP-HANDLE
WVX-SWITCH
WVX-OUTLET
WVX-SCREW-4.8X15MM
WVX-DOME
WVX-TERMINAL-STRIP
WVX-SCREW-2.9X19MM
WVX-CORD-RESTRAINT
WVX-RUBBER-STRAIN-REL
WVX-16/3-50
WVX-SCREW-4.9X25MM
WVX-BLOWER-CHAMBER
WVX-COOLING-GASKET
WVX-TPMOTOR-ADPT
WVX-HOUSING-GASKET
WVX-MOTOR-120V
WVX-FOAM
WVX-CAN-CAP
WVX-GASKET-CAN-CAP
WVX-SCREW
WVX-LOCK-NUT
WVX-PUMP-OUTLET
TOP HANDLE
SWITCH
OUTLET
SCREW 4.8X15MM
DOME
TERMINAL STRIP
SCREW 2.9X19MM
CORD RESTRAINT
RUBBER-STRAIN RELIEF
CORD SET 16/3-50’
SCREW 4.9X25MM
BLOWER CHAMBER
MOTOR COOLING GASKET
TOP MOTOR ADAPTOR
MOTOR HOUSING GASKET
MOTOR 120V
FOAM
CAN CAP
GASKET CAN CAP
SCREW
LOCK NUT
PUMP OUTLET
1
2
1
8
1
1
3
1
1
1
6
1
1
1
2
1
1
1
1
4
4
1
MOTOR HEAD ASSEMBLY
TANK ASSEMBLY
Ref. Part No. Description Qty.
1
2
3
4
5
6
7
8
9
10
11
12
13
14
15
16
17
18
WVX-20GL-POVTANK
WVX-CLAMP
WVX-SS-SCREW
WVX-HOSE-INLET-WGASKET
WVX-WHEEL-RETAINER
WVX-WHEEL-RETAINER-S
WVX-WHEEL
WVX-WHEEL-BEARING
WVX-AXLE
WVX-AXLE-MOUNT-SCREW
WVX-WASHER
WVX-CAST-COMPLETE
WVX-DRAIN-HOSE-ASSEMBLY
WVX-PUMP-OUT-HOSE
WVX-MESH-FILTER-BAG
WVX-BAG-CLIP
WVX-SQUEEGEE-FRAME
WVX-SQUEEGEE-RUBBER
20 GALLON POV TANK
CLAMP
STAINLESS STEEL SCREW
HOSE INLET W/GASKET
WHEEL RETAINER
WHEEL RETAINER W/SCREW
WHEEL
WHEEL BEARING
AXLE
AXLE MOUNTING SCREW
WASHER
CASTER COMPLETE
DRAIN HOSE ASSEMBLY
PUMP OUT HOSE
MESH FILTER BAG
BAG CLIP
FRAME FOR SQUEEGEE
RUBBER SQUEEGEE
1
2
4
1
2
2
2
2
1
2
2
2
1
1
1
1
1
1
TECHNICAL DATA
*Theoretical
WATERLIFT
CFM*
AMPS (VAC ONLY)
AMPS (VAC/PUMP
PUMP WATTS
105”
110”
10
14.5
550
PUMP GPM
TANK SIZE
WET SHUT-OFF
POWER CORD
WEIGHT
40
20 GALLONS
FLOAT CAGE W/ MESH SCREEN
50’
70 LBS

REPLACEMENT PARTS
Ref. Part No. Description Qty.
1
2
3
WVX-PPLUMBING-PACKAGE
WVX-PUMP-120V/500W
WVX-PCLAMP-RING-ASSEMBLY
PUMP PLUMBING PACKAGE
PUMP 120V/500W
PUMP CLAMP RING ASSEMBLY
1
1
1
PUMP OUT ASSEMBLY
Ref. Part No. Description Qty.
1
2
3
4
WVX-FLOAT
WVX-FILTER-RING
WVX-SCREW-4.8X15MM
WVX-FLOAT-CAGE
FLOAT
FILTER RING
SCREW 4.8X15MM
FLOAT CAGE
1
1
2
1
FILTER ASSEMBLY
Part No. Description Qty.
WVX-WAND
WVX-CRUSHPROOF-W/ENDS
WVX-CREVICE-TOOL
WVX-SQUEEGEE-TOOL
5’ TWO-PIECE WAND
10’ CRUSHPROOF HOSE W/ENDS
17” CREVICE TOOL
SQUEEGEE TOOL
1
1
2
1
TOOL KIT
Other DiamaPro Systems Vacuum Cleaner manuals

DiamaPro Systems
DiamaPro Systems WVX User manual

DiamaPro Systems
DiamaPro Systems SVX3-A User manual

DiamaPro Systems
DiamaPro Systems TVX-A User manual

DiamaPro Systems
DiamaPro Systems SVX3-A User manual

DiamaPro Systems
DiamaPro Systems SVX2-M User manual

DiamaPro Systems
DiamaPro Systems SVX2+A User manual

DiamaPro Systems
DiamaPro Systems SVX2-A User manual
Popular Vacuum Cleaner manuals by other brands


KING
KING VELOX P 226 instruction manual

Shark
Shark Duo Clean APEX Powered Lift-Away AZ1002C quick start guide

Philips
Philips FC6409/61 user manual

MasterCraft
MasterCraft Wide Area Vacuum Safety, operation & maintenance manual

Tower Hobbies
Tower Hobbies VL30 Safety and instruction manual

Midea
Midea B1 instruction manual


