DiaSys SSE-006 User manual

SSE-006 UV Water Sterilizer operator’s manual
SSE-006 UV water sterilizer Operator’s Manual version 04.07.19 Page 1/ 4
FOREWORD
This document includes all the information intended for the authority responsible for the use of the SSE-
006 UV water sterilizer sold by DiaSys. This manual is designed to be a reference for easy operation and
general maintenance and contains detailed descriptions of the features and specifications. The assumption
is made that before making an attempt to operate the device, the operator is familiar with the operation of
the water sterilizer and has read its Operator’s Manual.
Importer:DiaSysTechnologies
1682 rue de la Valsiere 34790 GRABELS,FRANCE
FieldService: ContactyourlocalDiaSysDiagnosticrepresentativeforsupport.
DiaSys Technologies® , DiaSys Diagnostic Systems® are registered trademarks of DiaSys Diagnostic Systems GmbH
1. Table of contents
1. Table of contents................................................................................................ 1
2. Safety .............................................................................................................. 2
3. Precautions to do before using the device ................................................................ 2
4. Maintenance ...................................................................................................... 2
5. Spare parts........................................................................................................ 2
6. Specifications..................................................................................................... 3
7. Content of kit..................................................................................................... 3
8. System Installation .............................................................................................. 4

SSE-006 UV Water Sterilizer operator’s manual
SSE-006 UV water sterilizer Operator’s Manual version 04.07.19 Page 2/ 4
2. Safety
First of all, take care of your skin and your eyes from UV light !!! Never look directly at the light tube
while device is in operation. Do not remove the UV Lamp from the Reactor Chamber when
applying electrical power. Wear SAFETY GOGLES if you need to look necessary.
Basic safety precaution should always be followed to reduce the risk of fire, electric shock. Make
sure the leakage protection switch is installed before use.
Do not touch the UV Lamp directly in case of burning. A pair of gloves would be better when taking
off it.
3. Precautions to do before using the device
a. Water Quality Guidelines
The Ultraviolet Disinfection System is intended for the use with visually clear water, not colored, cloudy or
turbid
•Ambient Water Temperature : 2-45°C
•Iron : < 0.3ppm (0.3mg/L)
•Hardness : < 7gpg (120mg/L)
•Turbidity : < INTU
•Manganese : 0.05ppm (0.05mg/L)
•UV Transmittance : > 75%
b. Recheck the installation before plus the sterilizer into power.
c. Do not proceed to install the equipment when UV Lamp or Sleeve Tube is broken, buy one again and
continue.
d. Ultraviolet Disinfection System is designed for continuous operation and frequent switching will reduce
Ultraviolet radiation and service life. But, if you do not use the equipment for a long time, you can turn
off the power and water supply to save energy.
e. If this unit falls into the water, turn main power off and then retrieve it. Do not attempt to use this
sterilizer if it has been submerged.
f. Do not operate this unit if it has damaged cord or plug, if it is malfunctioning or if it has been dropped or
been damaged in any manner
g. The UV system should be installed after the filter on the return line
h. Always disconnect the water supply and completely drain the water purifier if it will be subjected to
temperatures below freezing for extended periods of time.
4. Maintenance
a. Testing monthly or before each use
b. Lamp replacement is recommended every 8000 hours of operation. After 8000 hours, the lamp may still
light, but the UV intensity has diminished.
c. Cleaning of the quartz sleeve once 3-6 months with alcohol or a mild detergent.
5. Spare parts
6W UV Lamp reference : 959001
SS006 UV lamp sterilizer: 959000

SSE-006 UV Water Sterilizer operator’s manual
SSE-006 UV water sterilizer Operator’s Manual version 04.07.19 Page 3/ 4
6. Specifications
Model
SSE-006
Flow rate at 94% UVT
@30mJ/cm2, 0.5GPM at max., @40mJ/cm2, 0.3GPM at
max.
SS304 chamber size
260mm length, 50.8mm diameter
Grounding wire
NO
Inlet/outlet port size
1/4" female thread
Voltage
220-240V 50/60Hz
Lamp power
6w
Max. working pressure
8 bar
Ambient water temperature
2-40℃
Visual & audible lamp alarm
YES
Visual power on
YES
Lamp replacement reminder
NO
Lamp working life reminder
NO
UV LAMP
Power
6w
Diameter
15mm, T5
type
Installation available
length
212mm
Current
0.425A
Voltage
20V
uvc intensity @254nm
22uW/cm2
Working life
8,000 hours
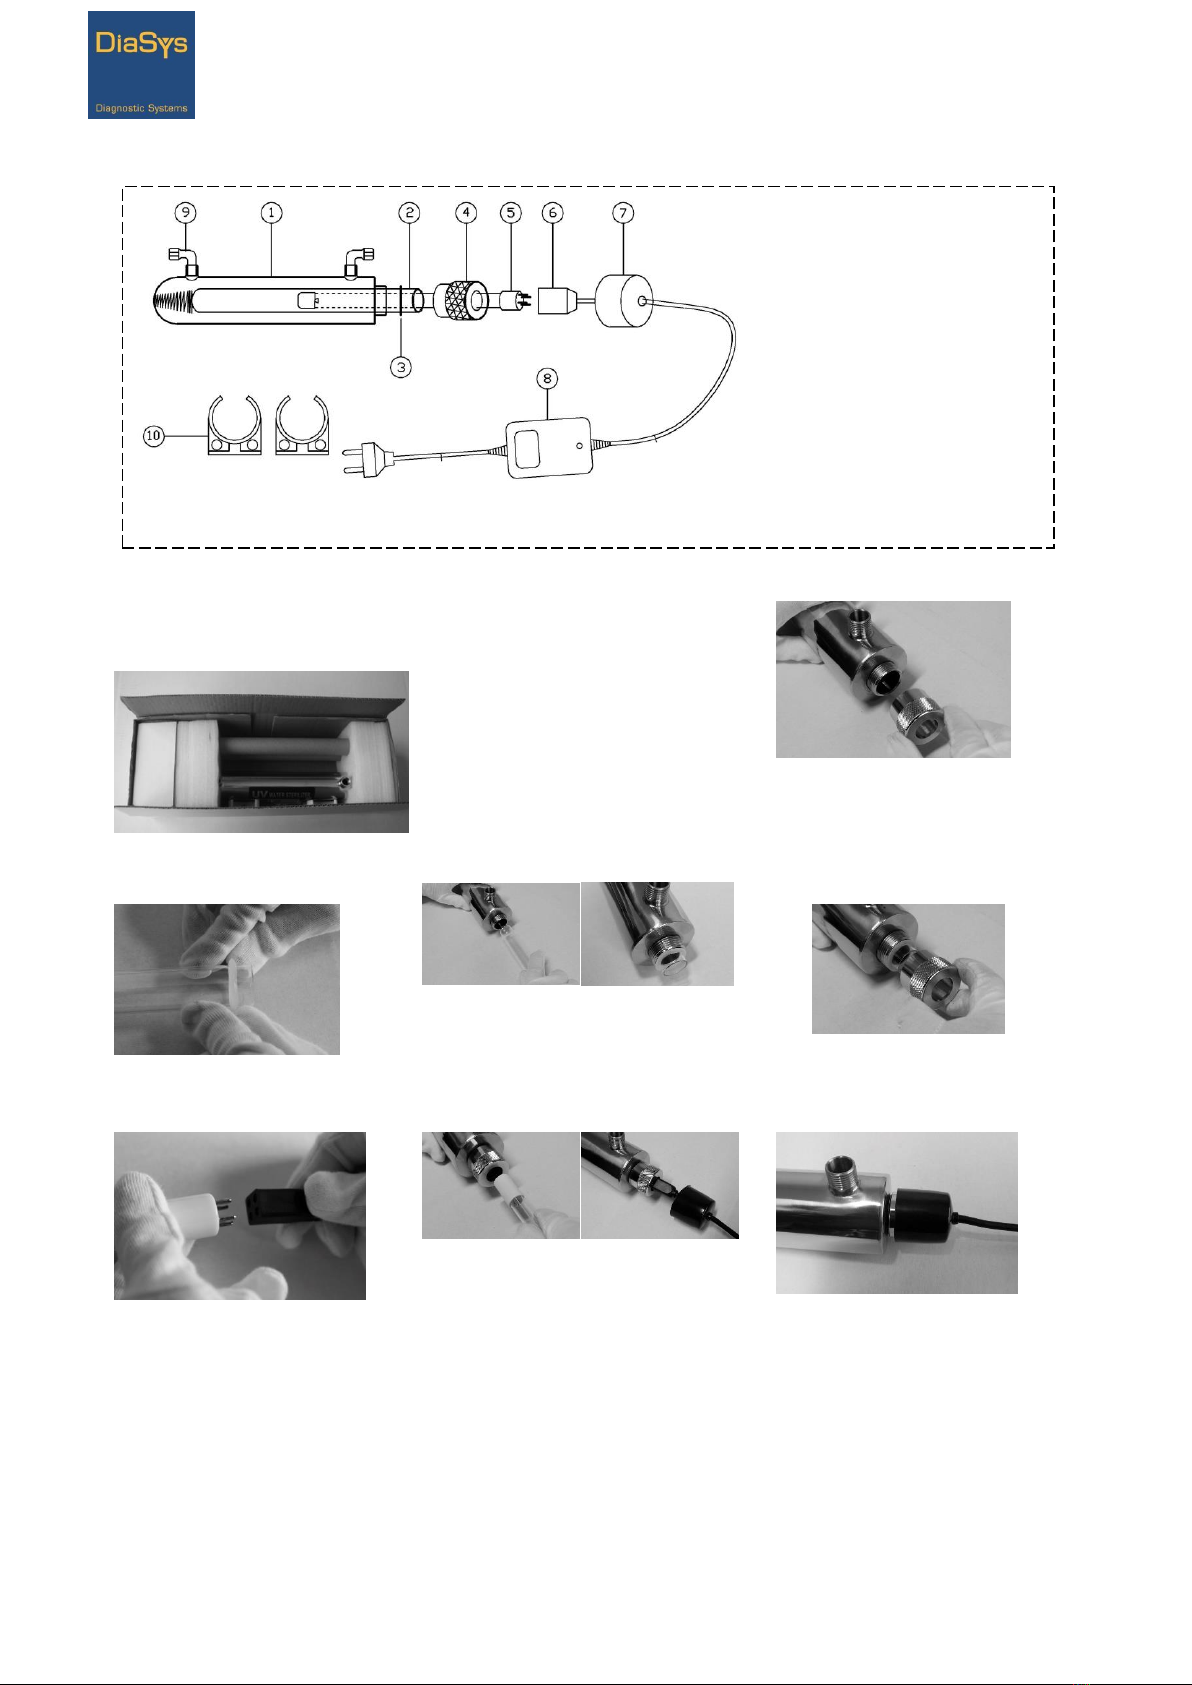
7. Content of kit
Quartz sleeve
UV Lamp
Reactor chamber
Electronic
Ballast
Support, O-ring
and fitting 1/4°
Teflon
SSE-006 UV Water Sterilizer operator’s manual
SSE-006 UV water sterilizer Operator’s Manual version 04.07.19 Page 4/ 4
8. System Installation
Step 1: Open package to check all
components inside: Reactor Chamber,
UV Lamp, Quartz Tube, O-ring,
Electronic Ballast and Support.
Step 2: Make sure the Quartz Tube and UV
Lamp are clean before installation (clean
with alcohol or mild detergent). Wear soft
non-abrasive gloves to keep any finger marks
away from them.
Step 3: Remove End Nut from
Reactor Chamber.
Step 4: Install O-ring onto the open
end of Quartz Tube (12mm from the
edge).
Step 5: Insert the Quartz Tube into the
Reactor Chamber.
Step 6: Hand-screw End Nut on
the Reactor Chamber. To protect
the O-ring, do not over tighten.
Step 7: Connect 4-pin Electrical
Socket with UV Lamp pins tightly.
Step 8: Carefully insert the UV Lamp into
the Quartz Tube through End Nut.
Step 9: Install the Cover Cap and
hand-tighten onto End Nut.
Step 10: Select a readily accessible
and well lit location to fix the system.
The system should always be located
closest to the point of use and can
either be installed horizontally or
vertically.
Step 11: When all plumbing connections are finished, slowly turn on the water
supply and check for leaks.
Step 12: Allow the water to run for a few minutes to clear any air or dust that may
be in the Reactor Chamber.
Step 13: Connect the power for starting up.
1 Reactor Chamber (304SS)
2 Quartz Tube
3 O-ring
4 Open End Nut
5 UV Lamp
6 4-pin Electrical Socket
7 Cover Cap
8 Electronic Ballast
9 Fitting 1/4°
10 Support
Popular Laboratory Equipment manuals by other brands

Four E's Scientific
Four E's Scientific Ironman operating instructions

THORLABS
THORLABS ULN15 Series user guide

Dionex
Dionex ICS-2100 installation instructions

Leica
Leica VT1000S operating manual

ThermoFisher Scientific
ThermoFisher Scientific Thermo Scientific MicroClick instruction manual

LaMotte
LaMotte ColorQ Pro-7 manual


Amsco
Amsco Century Series Routine Maintenance

Binder
Binder FED 400 E2 operating manual

Lotus cooker
Lotus cooker DRC 700 Instruction manual for installation, maintenance and use

ibidi
ibidi Heating System instructions

Ivoclar Vivadent
Ivoclar Vivadent Programat CS4 operating instructions

TRENDnet
TRENDnet TPE-113GI Quick installation guide