diatesse XPER TD-4289B User manual

BLOOD GLUCOSE & KETONES MONITORING SYSTEM
USER MANUAL TD- 4289B
Version 1.0 2018/10
DT091018-01F
Blood glucose
Ketones

Certainty in blood glucose monitoring, we care!
Diatesse XPER Bluetooth® (TD-4289B)
Thank you for purchasing the Diatesse XPER
blood glucose & ketones monitoring system,
including software for measuring your
ketone levels.This manual contains
important information on the correct use of
the meter.
Please read all the information carefully
before using the device.
Regularly checking your blood sugar and
ketone levels can help both you and your
doctor to improve the control of your
diabetes. Thanks to the small size and easy-
to-use functions of the Diatesse XPER blood
glucose & ketones monitoring system, you
can use it to easily measure your own levels,
wherever and whenever you want.
Should you have any further queries
after reading this manual, please contact
customer support or your distributor.
Use
This system is intended for exterior use
(in vitro diagnostic use) in a non-clinical
environment by persons with diabetes and
in a clinical environment by healthcare
processionals as an aid for assessing the
effectivity of a person's diabetes treatment.
It is intended to quantitatively measure
blood sugar (glucose) and β-ketones in fresh
capillary whole blood drawn from a nger
and venous whole blood.
This meter is not designed to diagnose and
screen for diabetes mellitus. Healthcare
professionals can use the meter to test both
capillary and venous whole blood samples.
Only capillary whole blood samples can be
tested at home.

IMPORTANT SAFETY INSTRUCTIONS
READ BEFORE USING TABLE OF CONTENTS
KEEP THESE INSTRUCTIONS
IN A SAFE PLACE
• ONLY use the meter for the purposes set
out in this manual.
• Do not use ANY accessories not specied
by the manufacturer.
• Do NOT use the meter if it is
malfunctioning or damaged.
• This meter is not designed to cure given
symptoms or diseases.The measured
data serve solely as reference values.
Always consult your diabetes physician
and/or GP for the proper interpretation of
the results you have measured.
• Read all the instructions carefully and
practice the procedure a number of times
before actually testing your blood sugar
and/or ketone levels. Perform all quality
checks in accordance with the instructions.
• Keep the meter and all its parts out of
reach of young children. Small parts,such
as the battery cover, the batteries, test
strips, lancets and caps are a potential
choking hazard.
• Use the meter in a dry environment,
especially if synthetic materials are
present (such as synthetic clothing or
carpeting), which can cause a static charge
that could mean incorrect results.
BEFORE YOU START ................................... 7
Important information................................ 7
Meter overview ........................................... 8
Display......................................................... 9
Test strip ...................................................... 9
SETTING UP THE METER..........................10
SETUP MODE............................................11
For blood sugar testing............................. 11
For β-ketone testing.................................. 11
QUALITY CONTROL TEST..........................11
When should you test the device using
control solution? ....................................... 11
Performing a test with the control solution
.. 11
TESTING USING BLOOD SAMPLES .........12
Preparing the lancing device for a blood test
.. 12
Preparing the puncture point................... 12
Performing a blood sugar test .................. 13
METER MEMORY .....................................14
Viewing the test results............................. 14
Viewing the average of blood sugar results
over a number of days .............................. 15
DOWNLOADING YOUR RESULTS
TO A COMPUTER...................................... 15
CONNECTING THE METER TO
A SMARTPHONE ......................................16
Maintenance............................................. 17
Battery....................................................... 17
Replacing the batteries............................. 17
Caring for your meter................................ 18
Caring for your test strips.......................... 19
Important information on the
control solution......................................... 19
READING THE RESULTS ..........................20
For blood sugar tests................................. 20
For β-ketone tests...................................... 20
• Do NOT use the meter near sources of
strong electromagnetic currents, as the
accuracy of the measurement could be
affected.
• Proper maintenance is essential to
the operating life of your meter. If you
are worried about the accuracy of your
measurements, contact customer support
or your distributor for support.
REFERENCE VALUES ................................21
For blood sugar tests................................. 21
For β-ketone tests...................................... 21
TROUBLESHOOTING SYSTEM ISSUES....22
Error messages.......................................... 22
Troubleshooting........................................ 23
INFORMATION ON SYMBOLS.................24
SPECIFICATIONS......................................25
4 5
BEFORE YOU START
Important information
• Extreme dehydration and excessive moisture-loss can lead to results being measured that
are below the actual values. If you suspect you are suffering from extreme hydration, contact
your healthcare professional immediately.
• If your blood sugar or β-ketone levels are lower or higher than normal and you are not
displaying any symptoms of being ill, then repeat the test.If you are displaying symptoms
or if you continue to receive results that are lower or higher than normal, then contact your
healthcare professional and follow their advice.
• Only use fresh whole blood samples for testing your blood sugar and β-ketone levels.
Using any other substances will produce incorrect results.
• If you are displaying symptoms that do not match the test results and if you have followed
all the instructions in this manual, then please contact your healthcare professional.
• We do not recommend that this meter be used for persons with very low blood pressure
or those in a state of shock. Always consult your healthcare professional.
6 7
* control solution is not included in the starter pack.
*
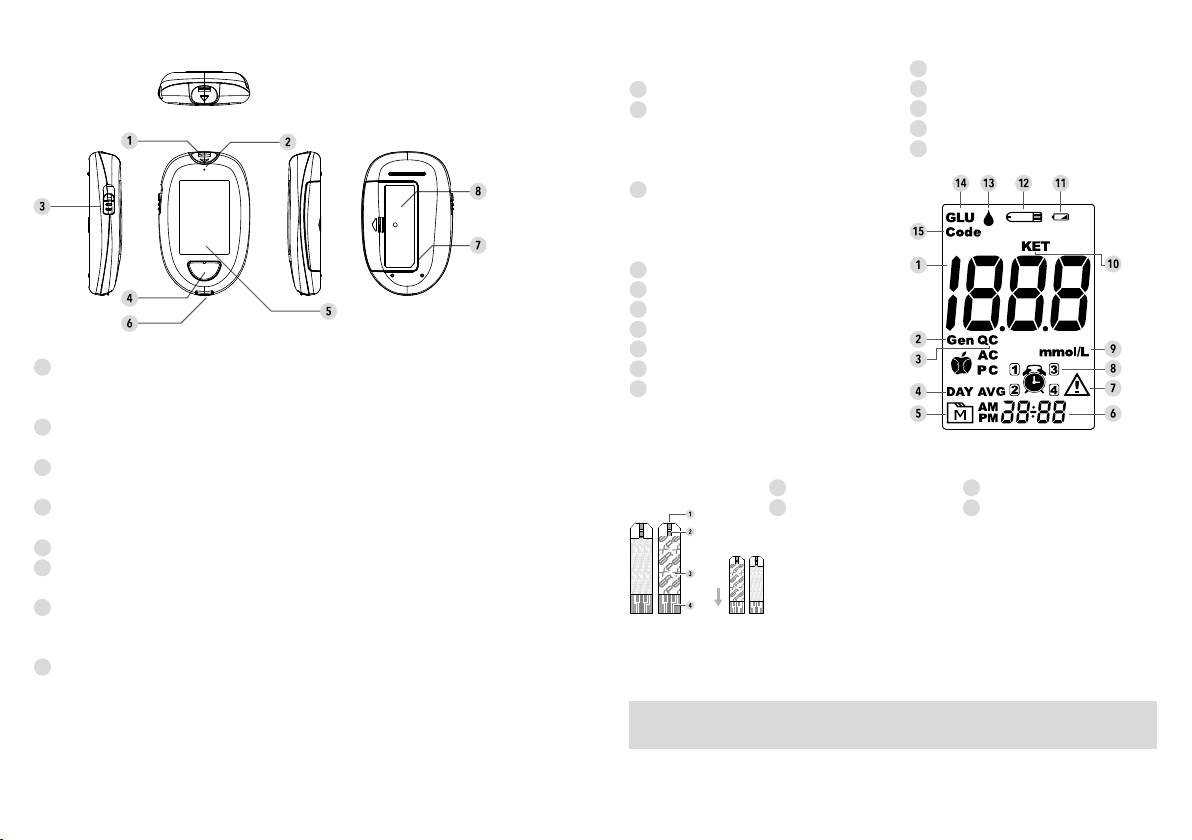
Meter overview Display
Test strip slot and strip indicator light
Insert your test strip, the section containing the contact points, into this slot
(so that it is rmly in place) in order to turn the meter on for your test.
Bluetooth® indicator light
(Bluetooth® can be optionally activated).
Ejecting the test strip
Eject the test strip by pushing this button upwards.
Mains button (M)
Open the memory of the meter and turn off the reminder.
Display
Data port
Download the test results to your computer using a USB cable.
SET button (S)
Input the selected meter settings and conrm them.
The SET button is located in the battery compartment.
Battery compartment
Test result
Measuring mode
Gen – at any time
AC – before meals
PC – after meals
Automatic quality
control mode
QC = Quality control test using
the control solution
Average over a number of days
Memory symbol
Date/Time
Error warning
Alarm symbol
Measurement unit
Ketone symbol
Absorbent opening
Test strip grip
PLEASE NOTE: The front of the test strip must be facing
upwards when you insert the test strip.
The test results could be incorrect and/or inaccurate if that part of the test strip containing the
contact points is not fully and correctly inserted into the test slot.
Control window
Contact points
Low battery warning
Test strip symbol
Blood drop symbol
Glucose (blood sugar) symbol
Code
1
2
3
4
5
6
7
8
1 2
11
12
13
14
15
3 4
3
4
5
6
7
8
9
10
NOTE: Only Diatesse XPER test strips may be used with the Diatesse XPER meter.
Using other test strips with this device could produce inaccurate results.
8 9
1
2

SETTING UP THE METER
Before using your meter for the rst time or
whenever replacing its batteries, check and
adjust the following settings:
Open the setup mode (a)
The meter is switched off (a test strip is not
inserted).Press the button marked Sbeside
the batteries.
1. Setting the date
The sequence for setting the date is
YEAR ➞MONTH ➞DAY. When YEAR/
MOTH/DAY are ashing consecutively,
press the button marked Mto select the
correct setting. Next, press S.
2. Setting the date format
Press the main button Mon the front of
the meter to select the required date
format (12 or 24 hour).Then press S.
3. Setting the time
When HOUR/MINUTE are ashing
consecutively, press the button marked M
until the correct time is displayed.Then
press S.
4. Turning sound effects on/off
For sound effects press the button marked
Mon the display to switch between "On"
and "Off" Then press S.
5. To set a reminder
Your meter has four reminder settings.
The meter displays "ON" or "OFF" and .
If you do not want to set a reminder
notication, then press Sto skip this step.
Otherwise press the button marked Mto
select "ON" and then press S.
Measuring methods:
for blood sugar testing
You can measure your blood sugar levels
in three different ways: General,AC (before
meals) and PC (after meals).You can switch
between the different modes as follows:
1. Start with the meter switched off.
Insert a blood sugar test strip into the slot
to turn the meter on.The display shows ,
" " ashing " " and "GLU".
2. Press M to switch between General,
AC and PC.
For β-ketone testing
3. There is only one option for measuring
your β-ketone levels: Gen.Start with the
meter switched off. Insert a β-ketone test
strip into the slot to turn the meter on.The
display shows " ", a ashing" ", "Gen"
and "KET".
When should you test the device
using control solution?
You do not need to perform a test with
the control solution when rst using the
Diatesse XPER.
• When you think that either the meter or
the test strips are defective.
• When your test results do not match the
way you are feeling, or when you believe
the results are not accurate.
• When performing a test.
• If you have dropped the meter or have
reason to believe it is damaged.
When the hour/minute are ashing, press
Mto select the desired hour/minutes.
Then press Sand continue to the next
alarm setup.
PLEASE NOTE: When the reminder
notication goes off, press Mto switch it
off.The reminder will sound for 2 minutes
and then switch off automatically.
6. Turning on Bluetooth
(Bluetooth® is optional)
When "bt" is visible on the display press
Mand select "ON" or "OFF".Then press S.
PLEASE NOTE: This means that data is
transferred using Bluetooth®.
If you select "ON", then the results are
transmitted immediately after the test.
NOTE:
• ALL of these parameters can be changed
in the setup mode.
• If the meter is not used for a period of
3 minutes while in setup mode,
it switches off automatically.
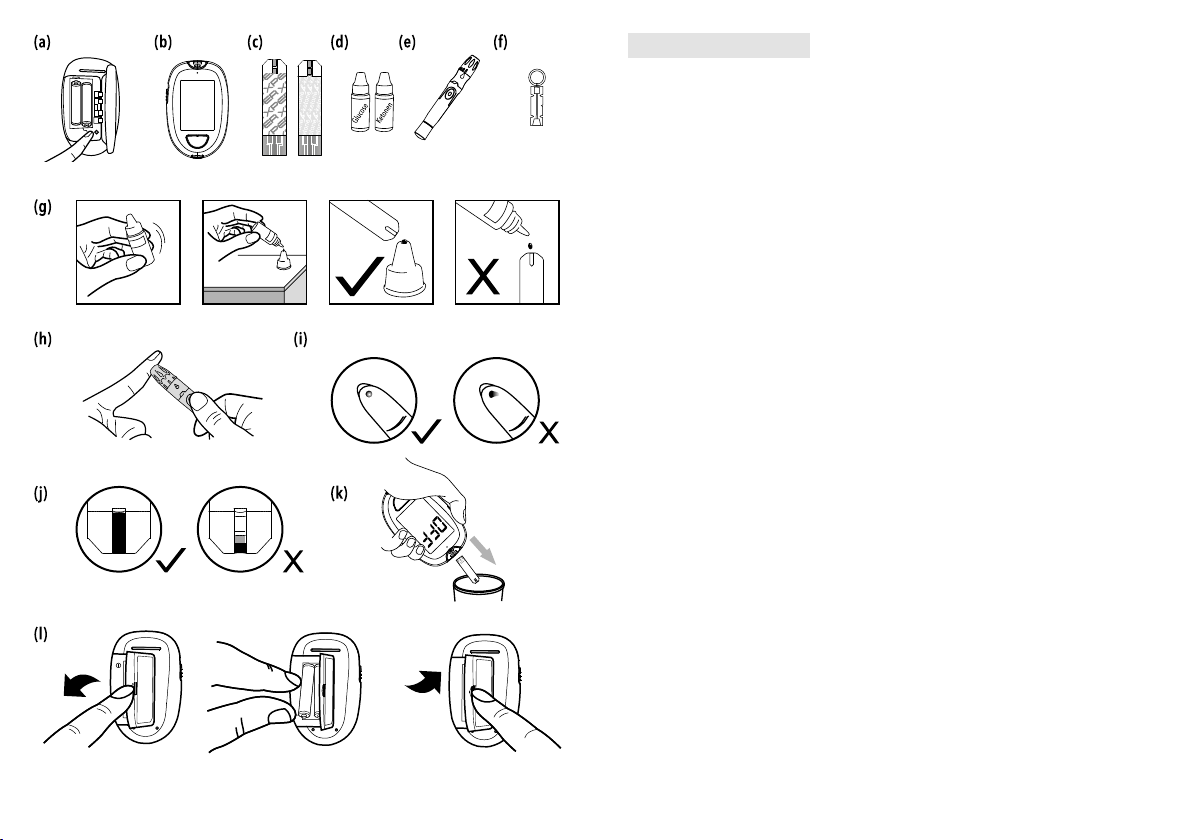
Test strips (c), control solution (d), lancing
device (e) or sterile lancets (f) might not be
included in the kit (please check the list of
contents on your product's packaging).These
articles can be ordered separately. Ensure that
you have a sufcient supply of all the articles
you require for performing tests.
Performing a test with
the control solution.
In order to perform a test with the control
solution, you require (b), (c) and (d).
1. Insert the test strip into the slot to turn
the meter on.
Wait until the meter displays" " and
a ashing " ".
2. Apply the control solution (g)
Shake the bottle of control solution well
before use. Squeeze out the rst droplet
and wipe it off. Squeeze another droplet
onto the point of the bottle's cap. Hold the
meter so that the absorbent opening of
the test strip comes into contact with
the drop and absorbs the control solution.
Once the control window contains
sufcient control solution, the meter starts
an automatic countdown.
QUALITY CONTROL TEST
10 11

3. Read and compare the results
Once the countdown to 0 is completed,
the result of the test using control solution
is shown on the display. Compare the
result with the range stated on the test
strip packaging.The result must be within
this range of values. If that is not the case,
re-read the instructions and repeat the test
with control solution.
We recommend that you perform the
following steps before drawing a drop
of blood:
• Wash and dry your hands before starting.
• Select a puncture point.
• Rub the puncture point for around 20
seconds before inserting the lancet.
• Clean the puncture point with a cotton
swab moistened with a 70% alcohol
solution and allow your skin to air-dry.
• Testing using a ngertip (h)
Firmly press the lancing device against
the underneath part of your ngertip.
Press the release button to puncture your
nger and the device will click when the
procedure is complete.
NOTE:
• Every time you test, use a different
puncture point. Repeatedly puncturing
the same point can cause a sore to
form and callousing.
• We recommend that you wipe away
the rst blood drop, as it could contain
tissue uid that will affect the test results.
Performing a blood sugar test
In order to test your blood sugar levels, you
require the following: (b), (c), (e)
and (f)
1. Insert a test strip into the meter's
test slot to activate it
Wait until ""and "" are displayed
on the meter.
2. Select the required meter mode
by pressing M.
3. Taking a blood sample (i)
Use the pre-set lancing device to puncture
your skin at the selected point. We
recommend that you wipe away the rst
blood drop with a clean tissue/cotton
swab.The size of the blood drop must
be at least as large as (actual size), which
equals around 0.5 microliter (µI) volume
for a blood sugar test and 0.8 microliter
(µl) volume for a β-ketone test. Carefully
squeeze the area around the puncture
point to draw a further blood drop.Take
care NOT to smear out the blood sample.
4. Apply the sample to the test strip (j)
Carefully allow the test strip to come into
contact with the blood drop at an angle.
The control window of the test strip will
be sufciently full once enough blood is
applied. Do NOT take your nger away
before the device beeps.
WARNING:
In order to limit the chance of an infection:
• Never share a lancet or lancing device
with others.
• Always use a new sterile lancet.
Lancets are single-use only.
• Ensure that you do not get any hand
lotion, oil or residual dirt in or on the
lancets or lancing device.
Preparing the lancing device for
a blood test
Follow the instructions on the package
insert of the lancing device for drawing a
blood sample.
Preparing the puncture point
Stimulating blood perfusion by rubbing the
puncture point before taking a sample has
a major impact upon the test results. Blood
extracted from a point that you did not rub
beforehand will return a signicantly different
value than a blood sample extracted from a
point you did rub in advance.
NOTE:
• For blood sugar and ketone tests
the meter will automatically recognise
a test using control solution as
a QC test.
• In order to prevent the control solution
becoming contaminated, never apply
it directly to the strip.
NOTE:
• The range for the control solution that
is stated on the test strip tube is only
valid when control solution is used.
It is not a recommended range for your
blood sugar levels.
• See the section under MAINTENANCE
for important information concerning
the control solution.
TESTING USING
BLOOD SAMPLES
12 13
NOTE:
• Do not press the puncture point
against the test strip and try not to
smear the blood.
• If you do not apply a blood sample to
the test strip within 3 minutes the
device switches off automatically.
Should this happen, remove the test
strip and re-insert it in order to start a
new test.
• The control window must be lled with
blood before the meter automatically
starts to countdown. DO NOT try to
add more blood to the test strip once
the blood drop has lled the control
window. Should that happen,dispose
of the test strip, insert a new test
strip and repeat the test.
• If you struggle to ll the control
window, please contact your healthcare
professional or customer support for
assistance.
5. Reading the test results
Your test results will appear once the meter
reaches 0 in its countdown.The result is
automatically stored in the meter.
6. Eject the used test strip (k)
Eject the test strip by pressing the ejector
button on the side of the device. Use a
specially designated waste container for
disposing of the used test strips. The meter
switches off automatically.
The meter stores the 1,000 most recent test
results together with their dates and times.
In order to access these records, start with
the device turned off.
Viewing the test results
1. Press and release the button marked M.
" " will appear on the display.
Press M again, the rst measurement
displayed is the most recent one, together
with the date, time and meter mode.
2. Press Mto call up the results stored in
the meter.If you keep the Mbutton
depressed, the meter will switch off.
Transmitting data using a cable or
Bluetooth®
You can attach a micro USB cable (Windows
7 and 8) to the meter or activate Bluetooth®
(Windows 10 and up) to view the test results
on a computer using the Health Care Soft-
ware System. For further information on the
Health Care Software System or to acquire a
USB cable, please contact your local customer
support or distributor for assistance.
1. Installing the software
The software can be downloaded from the
website: www.diatesse.nl
2. Connecting the meter to a computer
using a USB cable or (optionally)
wirelessly using Bluetooth®
(Windows 10 and up)
USB cable: Insert the cable in an unused
USB port on your computer.Insert the
other end of the cable in the meter's
data port while the meter is switched
off. "USB" will appear on the meter's
display, indicating that the meter is now in
communication mode. Under the software
options, select the model:TD-4289 (B).
Bluetooth®: Turn the meter on and
immediately switch it off again to activate
Bluetooth® (the indicator light will
ash blue). Next, follow the instructions
contained in the software on your
computer to connect the meter to the
computer using Bluetooth®.
Under the software options, select the
model: TD-4289(B).
Viewing the average of
blood sugar results over
a number of days
1. Press the button marked M(and keep it
depressed for a few seconds) then release
it to open the memory mode and to view
the average results with" "and "DAY
AVG" on the display.
Release the Mbutton and the average
results over 7 days will appear on the
display with the meter in General mode.
2. Press Mto view the average results over
14, 21,28, 60 and 90 days. These results
are stored in each meter mode under Gen,
AC and nally PC.
3. To shut down the meter's memory.
Press the Mbutton repeatedly; the meter
switches off after displaying the most
recent test results.
Always follow the instructions on the
lancing device's package insert for
disposing of the used lancet.
WARNING:
Used test strips and lancets could pose
a biological hazard. Dispose of them
properly in accordance with the local
regulations.
METER MEMORY
NOTE:
• If you want to turn the memory off,
keep the Mbutton depressed for
3 seconds or leave the device alone for
3 minutes, after which it automatically
switches off.
• The results of tests using control
solution are NOT included in the
average daily results.
DOWNLOADING
YOUR RESULTS TO
A COMPUTER
14 15

16 17
1. Transmitting data
Follow the instructions contained in
the software on your computer for
transmitting the data.The results are
transmitted together with their dates and
times. When you disconnect the cable the
meter will switch off automatically.
See also: diatesse.nl/support
Creating a data link using Bluetooth®
(Bluetooth® can be optionally switched
on or off)
Using Bluetooth®, you can create a data
link between your meter and a Bluetooth®-
capable smartphone (iOS or Android).
Download the ProCheck app to your
smartphone from the App Store (iOS) or from
Google Play (Android).The ProCheck app
has been created to assist you simply and
intuitively in monitoring your blood sugar
and ketone levels over an extended period.
For further information,please contact your
local customer support or distributor.You
must link your meter and smartphone using
Bluetooth® before you can transmit data.
Linking your meter and smartphone
(using a security code)
1. Turn on Bluetooth® on your smartphone.
2. Follow the instructions in the ProCheck
app on your smartphone for connecting
to your meter.
3. Use "Search" to nd your meter, which
is called DIATESSE XPER xxxx (xxxx = the
unique four-digit/letter combination of
the Bluetooth® MAC associated with
your meter).
4. Add your meter, press and press "Yes"
to save the settings.
5. Then input your unique code in order to
complete the connection.Your code is the
last 7 digits of the meter's serial number,
excluding the nal digit.
Input these 6 digits then press "Connect".
6. Once the devices are linked,the data in
your meter will be sent via Bluetooth®
to the ProCheck app.
Bluetooth® indicator on your meter:
Battery
Your meter comes with two
1.5 V AAA alkaline batteries.
Low battery warning
The meter will warn you in one of the
following ways when the power is low.
1. The symbol " " appears together
with notications on the display: the meter
is working and the results are still accurate,
but the batteries must be replaced.
2. The symbol " " appears together
with E-b, Error and LOW: There is not
enough power to perform a test.The
batteries must be replaced immediately.
Replacing the batteries
The meter must be switched off when you
replace the batteries.
1. Slide the battery cover to the left to open it.
2. Remove the 2 empty batteries and insert
2 new 1.5 VAAA alkaline batteries.
3. Close the battery cover.
If the batteries are correctly inserted,
the device will beep.
WARNING:
• If your meter and computer are
connected by a USB cable then
your data will be transmitted using
the cable.You can use Bluetooth®
to link the devices without using a
cable, provided that your computer
supports Bluetooth® and Windows
10 or higher is loaded.
• The meter cannot perform a test
while it is transmitting data.
• Ensure that your smartphone or
computer supports Bluetooth® Smart
Technology and that Bluetooth® is
activated before trying to transmit
data. Also make sure that your meter
and the computer or smartphone are
sufciently close together so that they
can link. For the required parameters
for your (mobile) operating system,
check the App Store or Google Play
before downloading and installing
the app.
• Bluetooth® functionality is
implemented in various ways by
different manufacturers.This could
mean that there are compatibility
issues between your meter and the
smartphone.
See, for further information:
diatesse.nl/support
For further information see www.diatesse.nl
WARNING:
You cannot perform tests when the meter
is connected to a computer.
CONNECTING THE METER
TO A SMARTPHONE
MAINTENANCE
BLUETOOTH®
INDICATOR
STATUS
Solid blue light
Flashing
blue light
Bluetooth® is on
and searching for a
connection
Bluetooth® linked

18 19
NOTES
• Replacing the battery will not affect
the test results stored in the device's
memory.
• As with all small parts, the batteries
must be kept out of reach of children.
Alert the emergency services
immediately if a battery is swallowed.
• Batteries can leak chemicals if they are
not used for extended periods.
Remove the batteries if you will not be
using the device of a lengthy period
(i.e. 3 months or more).
• Dispose of used batteries properly,
in accordance with the local
regulations.
Caring for your meter
Cleaning
1. To clean the exterior of the meter, wipe
it off with a cloth that has been lightly
dampened with tap water or a mild
detergent. DO NOT rinse off with water.
2. DO NOT use organic solvents to clean
the meter.
Storing the meter
• Storage conditions: -20 °C to 60 °C
(-4 °F to 140 °F), between 10% and 93%
relative humidity (non-condensing).
• Always store or transport the meter in
its original case.
• Do not drop the meter or subject it
to strong shocks.
• Keep it out of direct sunlight and
high humidity levels.
Disposing of your meter
A used meter must be treated as
contaminated waste that carries a risk of
infection while performing measurements.
The batteries of the meter must be removed
and the meter must be disposed of in
accordance with the local regulations.
The meter does not fall under European
Directive 2012/19EU on waste electrical and
electronic equipment (WEEE).
Caring for your test strips
• Storage conditions: 2 °C to 30 °C and
between 10% and 90% relative humidity
(non-condensing) for blood sugar test
strips and 2 °C to 30 °C and between
10% and 85% relative humidity (non-
condensing) for β-ketone test strips.
DO NOT freeze.
• Keep the tests strips in their original
tube. Do not place in a different tube. For
foil-wrapped test strips: do not unwrap
until required.
• Store the packaging containing the test
strips in a cool and dry place. Keep away
from direct sunlight and heat.
• Reseal the tube immediately after
removing a blood sugar test strip.
• Ensure that your hands are clean and dry
before touching a test strip. Use the test
strip immediately after removing it from
the tube/foil packaging.
• Do not use a test strip after its expiry date,
as the result may be inaccurate.
• Do not bend, cut or alter the blood sugar
test strip.
• Keep tubes and foil packaging containing
test strips out of reach of children.
Immediately alert the emergency services
if one is swallowed.
For further information,see the package
insert for the test strips.
Important information on
the control solution
• Only use TaiDoc (W2) control solution
for your meter.
• Do not use the control solution after its
expiry date or later than 3 months after
opening it. Write the date you opened it
on the control solution bottle and dispose
of any remaining solution after 3 months.
• The recommended room temperature
when performing a test with the control
solution is between 20 °C and 25 °C
(68 °F and 77 °F).
• Ensure that the control solution,
your meter and the test strips are at
the recommended temperature before
conducting a test.
• Shake the control solution well before use
Discard the rst droplet of control solution
and wipe the dispensing tup clean in order
to guarantee a pure sample and accurate
result.
• Keep the control solution properly sealed
at a temperature between 2 °C and 30 °C
(35.6 °F and 86 °F).
DO NOT freeze.

20 21
For blood sugar tests
READING THE RESULTS
< 0.1 mmol/L
0.1 to 8.0 mmol/L
> 8.0 mmol/L
> 44.4 mmol/L (800 mg/dL)
>13.3 mmol/L (240 mg/dL)
< 0,56 mmol/L (10 mg/dL)
Voor β-ketonentesten
Blood Glucose Test
The Blood glucose monitoring plays an important role in diabetes control.A long-term study
showed that maintaining blood glucose levels close to normal can reduce the risk of diabetes
complications by up to 60%.*1 The results provided by this system can help you and your
healthcare professional monitor and adjust your treatment plan to gain better control of your
diabetes.
For blood sugar tests
Your blood sugar measurements are plasma equivalent values and are shown in millimoles of
glucose per litre of blood (mmol/L).
Source: American Diabetes Association. Standards of Medical Care in Diabetes- 2018 Jan;
41(Supplement 1): S1-S2.
For β-ketone tests
Your β-ketone measurements are plasma equivalent values and are shown in millimoles of
ketones per litre of blood (mmol/L).
The β-ketone test measures beta-hydroxybutyrate (βOHB), the most important of the three
β-ketones in your blood.Under normal circumstances, the concentration of βOHB in your blood
should be less than 0.6 mmol/L.1
The βOHB concentration can increase if you are fasting and/or dieting, exercising intensively
or suffer from diabetes and fall ill. If your β-ketone test results in a "Lo", repeat the test using
a new test strip. If you receive the same result or if the result does not match how you are
feeling, then contact your healthcare professional.Always follow the recommendations of
your healthcare professional before making any changes to your diabetes treatment. If the
levels for your β-ketone test are between 0.6 and 1.5 mmol/L, this could be due to an issue
requiring professional medical attention.Carefully follow your healthcare professional's advice.
If your β-ketone test levels are greater than 1.5 mmol/L,immediately contact your healthcare
professional, as this means you could develop diabetic ketoacidosis (DKA).
1: Wiggam Ml, O'Kane MJ, Harper R,Atkinson AB, Hadden Dr, Trimble ER,Bell PM.
Treatment of diabetic ketoacidosis using normalization of blood 3-hydroxybutyrate
concentration as the end point of emergency management.
Diabetes Care 1997; 20:1347-52.
Consult your doctor in order to determine the target range that suits you best.
REFERENCE VALUES
TIME OF DAY NORMAL PLASMA GLUCOSE RANGE
FOR NONDIABETICS
Before meals on an empty stomach
2 hours after meals
< 5.6 m mol/L (100 mg/dL)
< 7.8 m mol/L (140 mg/dL)
MESSAGE WHAT IT MEANS
MESSAGE WHAT IT MEANS
22 23
If you follow the recommended actions but the problem continues, please contact customer
support or your distributor.
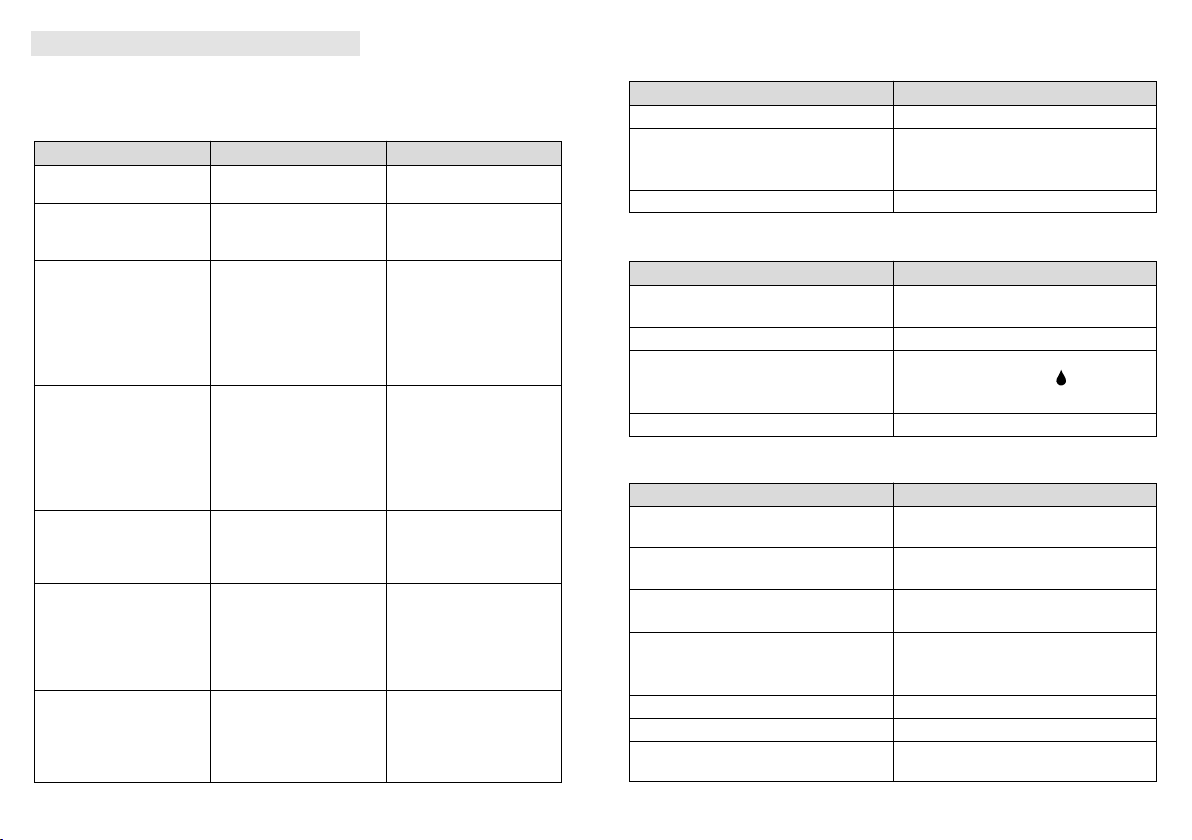
Error messages
Troubleshooting
1. If nothing is displayed on the meter after a test strip is inserted:
2. If the test does not commence after the sample is applied:
3. If the test using the control solution is outside of the specied range:
TROUBLESHOOTING SYSTEM ISSUES
E-b
E-U
E-2
E-t
E-0,
E-A,
E-E,
E-C
E-F
E-8
Displayed when the batteries
are (nearly) drained.
Replace the batteries
immediately.
Displayed when a used test
strip is inserted or incorrectly
used.*
Repeat the test with a new
test strip.
Displayed when the code
chip (ketones) has expired.
Check if the date is
correctly set on the meter
and check the expiry date
on the packaging. If the
issue continues, use a new
code chip.
Displayed when the ambient
temperature is greater than
the operational range of the
device.
The operational range of the
device is between 8 °C and
45 °C (46.4 °F to 113 °F).
Repeat the test when
the meter and the test
strip are within the above
temperature range.
Meter issue. Repeat the test with a new
test strip.
Displayed when the test
strip is removed during
the countdown or where
insufcient blood is present.
Read the instructions
and repeat the test with a
new test strip. If the issue
continues, contact customer
support for assistance.
Displayed when the code
chip is not inserted prior
to testing or if the meter
does not support specic
parameters.
Check that the code chip
has been correctly inserted.
Check that the code
chip used supports the
parameters of your meter.
MESSAGE WHAT IT MEANS WHAT TO DO
Batteries are dead.
Insufcient blood sample.
Test performed incorrectly.
The control solution bottle was not
shaken properly.
The control solution has expired or is
contaminated.
The control solution is too hot or cold.
Defective test strip.
Meter issue.
The meter and test strip are defective.
Sample has been applied after the device
automatically switched off (3 minutes
after the user performed the last action).
Defective test strip.
Defective meter.
Meter or test strips are defective.
The test strip has been inserted upside
down or not full inserted.
Replace the batteries.
Repeat the test using a new test strip.
Use more blood for the sample.
Carefully read the instructions and repeat
the test.
Shake the control solution well and repeat
the test.
Check the expiry date and the date your rst
opened the control solution.
Control solution, meter and test strips must
be at room temperature, 20 °C to 25 °C
(68 °F to 77 °F) when testing.
Repeat the test using a new test strip.
Contact customer support.
Contact customer support.
Repeat the test using a new test strip.Apply
the blood sample when the" "appears on
the display.
Repeat the test using a new test strip.
Contact customer support.
Contact customer support.
Insert the part of the strip containing the
contact points in the meter.The part containing
the control window must be pointing upwards.
POSSIBLE CAUSE
POSSIBLE CAUSE
POSSIBLE CAUSE
SOLUTION
SOLUTION
SOLUTION
*see the user instructions (video) at diatesse.nl/support or read the procedure.
24 25
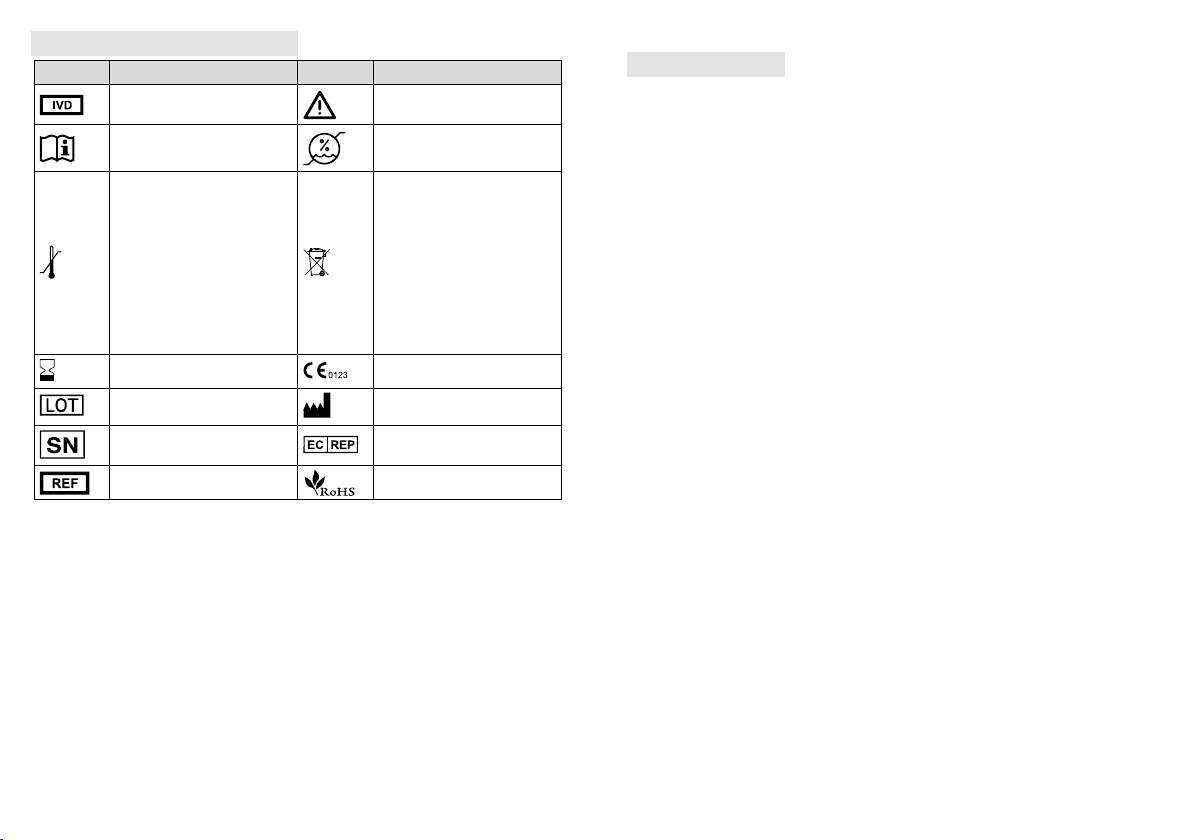
In vitro diagnostic
medical device
See the user manual
Use before
Batch code
Serial number
Catalogue number
Temperature limits
Please note, consult the
accompanying documentation
Humidity limit
CE mark
Manufacturer
Authorised representative in
the European Community
This device may not be
disposed of with domestic
waste but must be
surrendered to a recycling
centre for electrical and
electronic devices. Batteries
must be disposed of at a
collection point (such as at a
supermarket).
SYMBOL SYMBOLREFERS TO VERWST NAAR
INFORMATION ON SYMBOLS SPECIFICATIONS
Model no.: TD-4289B
Dimensions and weight: 90.3 (L) x 52.3 (W) x 18 (H) mm, 58 grams.
Power source: Two 1.5 V AAA alkaline batteries
Display: LCD backlight
Memory: 1,000 test results with associated parameters, date and time.
Export options: USB and Bluetooth®
Automatic blood sample detection
Automatic electrode placement detection
Automatic response time countdown
Automatic switch-off after 3 minutes of inactivity
Temperature warning
Operating conditions: Blood sugar: 8 °C to 45 °C (46.4 °F to 113 °F) and 10% to 90% relative
humidity (non-condensing) β-ketones: 10 °C to 40 °C (50 °F to 104 °F) and 10% to 85% relative
humidity (non-condensing)
Storage/transport conditions for the meter: -20 °C to 60 °C (-4 °F to 140 °F), between
10% and 93% relative humidity (non-condensing)
Storage/transport conditions for the test strips:
Blood sugar test strips: 2 °C to 30 °C (35.6 °F to 86 °F), between 10% and
90% relative humidity (non-condensing)
β-ketone test strips: 2 °C to 30 °C (35.6 °F to 86 °F), between 10% and 85% relative
humidity (non-condensing)
Measuring unit:
Blood sugar tests: mmol/L or mg/dL
β-ketone tests: mmol/L or mg/dL
Range:
Blood sugar tests: 0.6 to 44.4 mmol/L (10 to 800 mg/dL)
β-ketone tests: 0.1 to 8.0 mmol/L
Anticipated lifespan: 5 years
Altitude: up to 2000 m, for use indoors
Degree of contamination: contamination rate 2
This device has been tested for compliance with the electrical and safety requirements of
IEC/EN 61010-1, IEC/EN 61010-2- 707,IEC/EN 6 7 326- 7, IEC/EN 6 7 326-2-6, EN 300 328.
RoHS compliance

26 27
NOTES
---------------------------------------------------------------------------------------------------------------------------------------
---------------------------------------------------------------------------------------------------------------------------------------
---------------------------------------------------------------------------------------------------------------------------------------
---------------------------------------------------------------------------------------------------------------------------------------
---------------------------------------------------------------------------------------------------------------------------------------
---------------------------------------------------------------------------------------------------------------------------------------
---------------------------------------------------------------------------------------------------------------------------------------
---------------------------------------------------------------------------------------------------------------------------------------
---------------------------------------------------------------------------------------------------------------------------------------
---------------------------------------------------------------------------------------------------------------------------------------
---------------------------------------------------------------------------------------------------------------------------------------
---------------------------------------------------------------------------------------------------------------------------------------
---------------------------------------------------------------------------------------------------------------------------------------
---------------------------------------------------------------------------------------------------------------------------------------
---------------------------------------------------------------------------------------------------------------------------------------
---------------------------------------------------------------------------------------------------------------------------------------
---------------------------------------------------------------------------------------------------------------------------------------
---------------------------------------------------------------------------------------------------------------------------------------
---------------------------------------------------------------------------------------------------------------------------------------
---------------------------------------------------------------------------------------------------------------------------------------
---------------------------------------------------------------------------------------------------------------------------------------
---------------------------------------------------------------------------------------------------------------------------------------
---------------------------------------------------------------------------------------------------------------------------------------
---------------------------------------------------------------------------------------------------------------------------------------
---------------------------------------------------------------------------------------------------------------------------------------
---------------------------------------------------------------------------------------------------------------------------------------
---------------------------------------------------------------------------------------------------------------------------------------
---------------------------------------------------------------------------------------------------------------------------------------
---------------------------------------------------------------------------------------------------------------------------------------
---------------------------------------------------------------------------------------------------------------------------------------
---------------------------------------------------------------------------------------------------------------------------------------
---------------------------------------------------------------------------------------------------------------------------------------
---------------------------------------------------------------------------------------------------------------------------------------
---------------------------------------------------------------------------------------------------------------------------------------
---------------------------------------------------------------------------------------------------------------------------------------
---------------------------------------------------------------------------------------------------------------------------------------

For self-testing
TD-4289B
TaiDoc Technology Corporation
Bi.7F,No.127,Wugong 2nd Rd.,
Wugu Dist., 24888 NewTaipei City,Taiwan
MedNet EC-REP GmbH
Borkstraße 10, 48163 Münster, Germany
Import Europa: HT Medical BV
Distributor: GD Medical Pharma BV
Hastelweg 224, 5652 CLEindhoven
The Bluetooth® word mark and logos are registered trademarks
owned by Bluetooth SIG, Inc.and any use of such marks by HT Medical BV
is under license.Other trademarks and trade names are those of their
respective owners.
Table of contents


