Dictaphone Walkabout TOUR User manual

Operating Instructions
Connex™Software and Charging Station
Docking Station
®


Disclaimer
Dictaphone Corporation makes a sincere effort to ensure the accuracy of the material
described herein: however, except as set forth in any license documentation applicable to
each product of Dictaphone Corporation, referred to herein. Dictaphone Corporation
makes no warrant, express or implied with respect to the quality, correctness, reliability,
currentness, accuracy, or freedom from error of this document or the products referred to
herein, and specifically disclaims any implied warranties of merchantability and fitness for
any particular purpose. Dictaphone Corporation disclaims all liability for any direct,
indirect, incidental, consequential, special or exemplary damages resulting from the use of
the information in this document. Mention of any product not manufactured by
Dictaphone Corporation does not constitute an endorsement by Dictaphone Corporation of
that product.
Copyright Notice
This manual is copyrighted 1999 and all rights are reserved by Dictaphone Corporation.
No part of this publication may be reproduced, transmitted, transcribed, stored in a
retrieval system, or translated into any language or computer language, in any form or by
any means, electronic, mechanical magnetic, optical, chemical, manual, or otherwise,
without the prior written consent of Dictaphone Corporation, 3191 Broadbridge Avenue,
Stratford, CT 06614-2559.

i
Contents
Contents
Introduction . . . . . . . . . . . . . . . . . . . . . . . . . . . . . . . . . . . . . 1
System Requirements. . . . . . . . . . . . . . . . . . . . . . . . . . . . . . . . . . . . 1
What’s In The Box . . . . . . . . . . . . . . . . . . . . . . . . . . . . . . . . 2
Installing the Hardware . . . . . . . . . . . . . . . . . . . . . . . . . . . . 3
Installing the Connex Software . . . . . . . . . . . . . . . . . . . . . . 5
If AutoRun is Enabled onYour PC. . . . . . . . . . . . . . . . . . . . . . . . . . 5
If AutoRun is Disabled onYour PC . . . . . . . . . . . . . . . . . . . . . . . . . 5
Using the Connex software . . . . . . . . . . . . . . . . . . . . . . . . . 6
Starting and Stopping the Connex Software . . . . . . . . . . . . . . . . . . . 6
Using the Walkabout TOUR Setup Window. . . . . . . . . . . . . . . . . . . 6
Enabling/Disabling Polling of Parallel Port . . . . . . . . . . . . . . . . . . . 7
Using the Connex Taskbar Icon . . . . . . . . . . . . . . . . . . . . . . . . . . . . 8
Changing or Removing Upload Sound. . . . . . . . . . . . . . . . . . . . . . . 9
Uploading Voice Files. . . . . . . . . . . . . . . . . . . . . . . . . . . . . 10
How Files are Uploaded. . . . . . . . . . . . . . . . . . . . . . . . . . . . . . . . . 10
Uploading Voice Files . . . . . . . . . . . . . . . . . . . . . . . . . . . . . . . . . . 10
Problems Uploading Voice Files. . . . . . . . . . . . . . . . . . . . . . . . . . . 11
Using the Portable and the Docking Station . . . . . . . . . . . 12
Charging the Portable. . . . . . . . . . . . . . . . . . . . . . . . . . . . . . . . . . . 12
Fixing Battery Problems . . . . . . . . . . . . . . . . . . . . . . . . . . . . . . . . 13
Using a Printer . . . . . . . . . . . . . . . . . . . . . . . . . . . . . . . . . . 14
Disabling Polling to Print. . . . . . . . . . . . . . . . . . . . . . . . . . . . . . . . 14
Troubleshooting . . . . . . . . . . . . . . . . . . . . . . . . . . . . . . . . . 15
Error Messages . . . . . . . . . . . . . . . . . . . . . . . . . . . . . . . . . . . . . . . 15
Verifying/Changing Printer Operation and Status . . . . . . . . . . . . . . 16
Verifying/Changing Parallel Port Mode Setting . . . . . . . . . . . . . . . 16
Getting More Help. . . . . . . . . . . . . . . . . . . . . . . . . . . . . . . . . . . . . 16
Appendix . . . . . . . . . . . . . . . . . . . . . . . . . . . . . . . . . . . . . . 17
File Naming. . . . . . . . . . . . . . . . . . . . . . . . . . . . . . . . . . . . . . . . . . 17
Setting Write Protect for Uploaded Files . . . . . . . . . . . . . . . . . . . . 18

1
Introduction
Introduction
Dictaphone’s Walkabout™TOUR Docking Station with Connex™
software is an interface that allows you to automatically upload voice
files from a Dictaphone Walkabout TOUR portable to a PC or network
location. This document explains how to install, setup, and operate the
Walkabout™TOUR Docking Station hardware with Connex software.
System Requirements
To use the Walkabout TOUR Docking Station and Connex software, you
need the following hardware and software:
Required
• 133 MHz Pentium®or higher personal computer
• Microsoft Windows®95, Windows 98,
®or Windows NT®4.0
Workstation with Service Pack 3 or higher
• 20 MB of hard disk space (for Connex™software)
• Windows 95/98: 16 MB RAM (32 MB recommended)
• Windows NT 4.0: 32 MB RAM (48 MB recommended)
• Parallel port (may typically be shared with a printer)
• CD-ROM drive
• Microsoft-compatible mouse
Optional
• Network adapter card (to upload files onto a network device)
• Sound Blaster®compatible sound card (to playback voice files)

2
What’s In The Box
What’s In The Box
The Walkabout TOUR Docking Station consists of the following
components:
• Walkabout TOUR Stand
• AC power adapter
• Upload cable with printer adapter
• Connex software
• 3 AAA rechargeable nickel metal hydride (NiMH) batteries (for
optional use)
Figure 1: Docking Station Components
Rechargeable batteries
Walkabout TOUR Stand
Upload cable
with printer
adapter (25 pin)
AC power adapter
Connex CD-rom
software
3
Installing the Hardware
Installing the Hardware
Figure 4 (on page 4) illustrates all of the Docking Station hardware
properly connected.
1 Shut down the computer.
2 Locate the parallel port at the rear of the computer and disconnect
any printer that is attached.
✎NOTE: The parallel port is the same size and shape as some SCSI
adapter connectors. However, a SCSI adapter will NOT support the
Docking Station.
3 Plug the upload cable connector into the PC parallel port. If
appropriate, reconnect a printer to the printer adapter on the upload
cable (see Figure 2).
4 Plug the stereo-style connector at the other end of upload cable into
the bottom of the Stand (see Figure 3, on page 4).
5 Plug the AC Power Adapter’s connector into the bottom of the Stand
and the other end into an electrical outlet (see Figure 3).
6 Ensure that all connections are secure and turn on the computer.
✎NOTE: If you will be using the Docking Station’s optional battery
recharging function, install the three AAA NiMH batteries in the
portable, observing the polarity (+/-) shown inside the portable’s battery
compartment. If you are not using NiMH batteries, you should install
three AAA alkaline batteries.
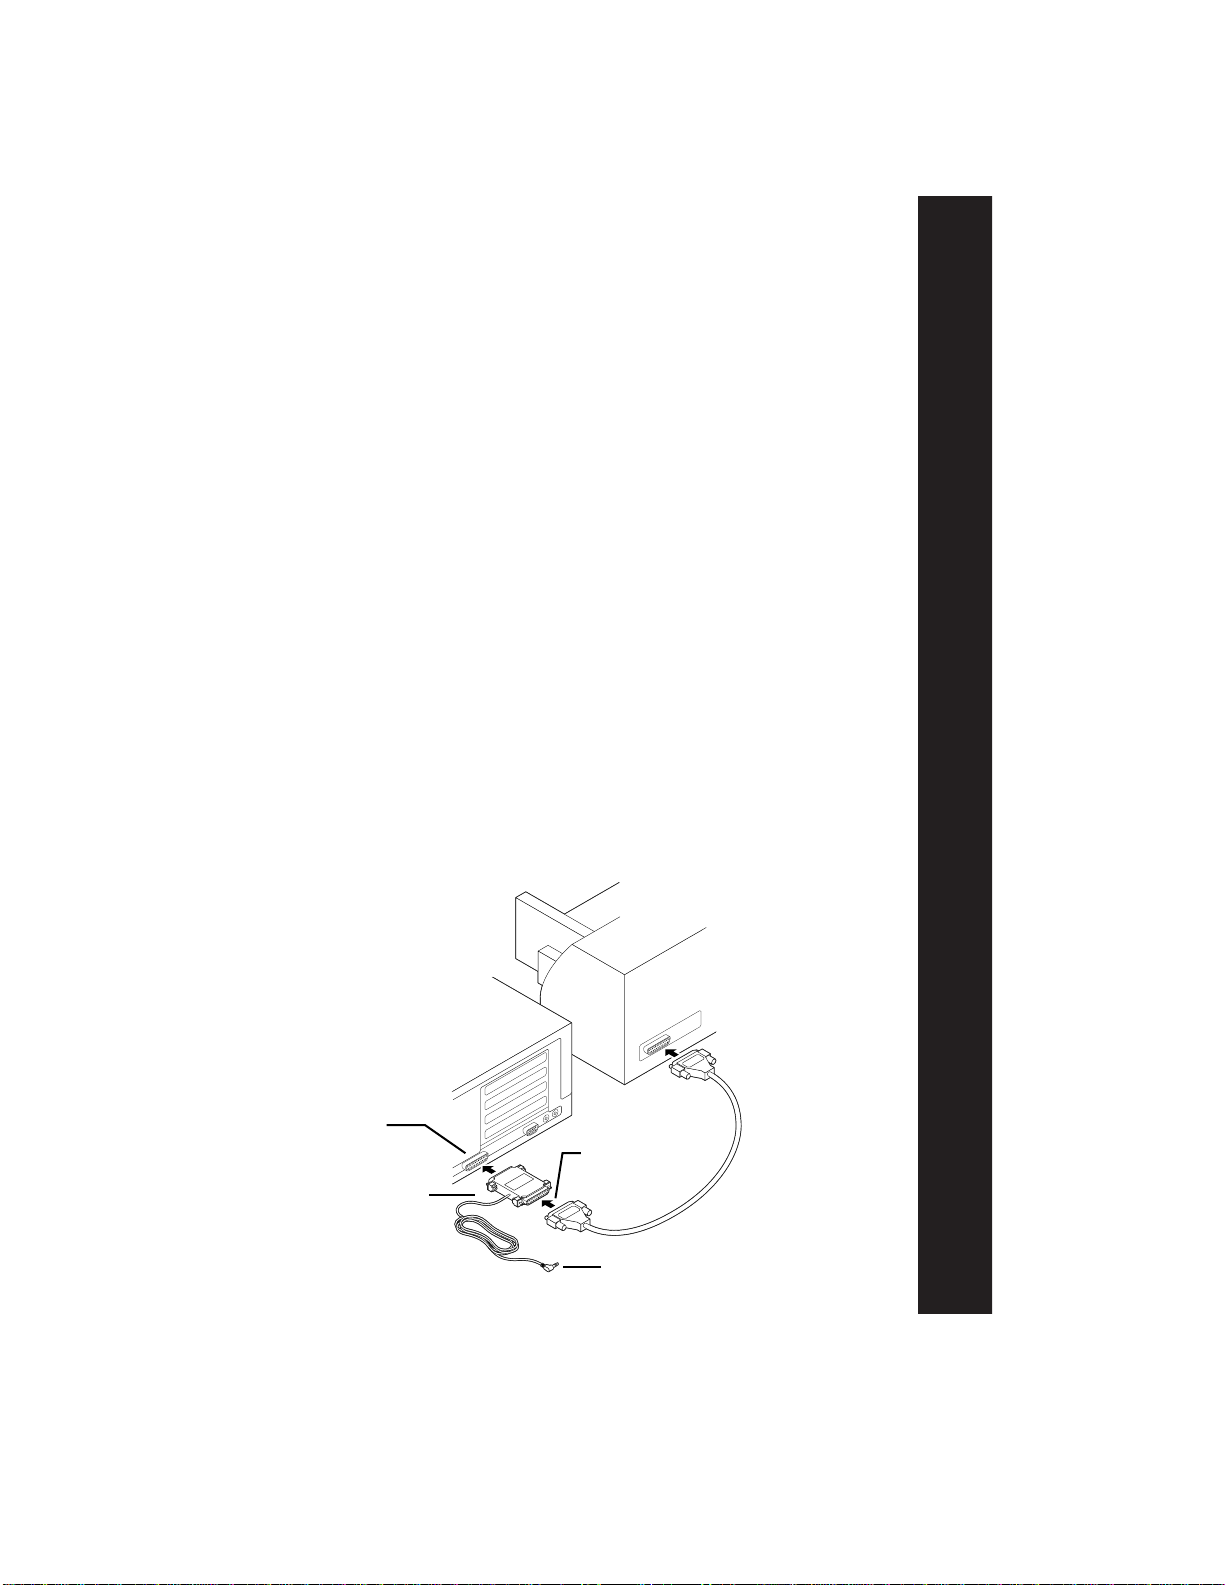
Figure 2: Parallel Port Connections
Parallel port
(25 pin)
Plug upload cable
connector into
parallel
Upload cable’s
printer adapter
Stereo-style connector
(plugs into bottom of Stand)
4
Installing the Hardware
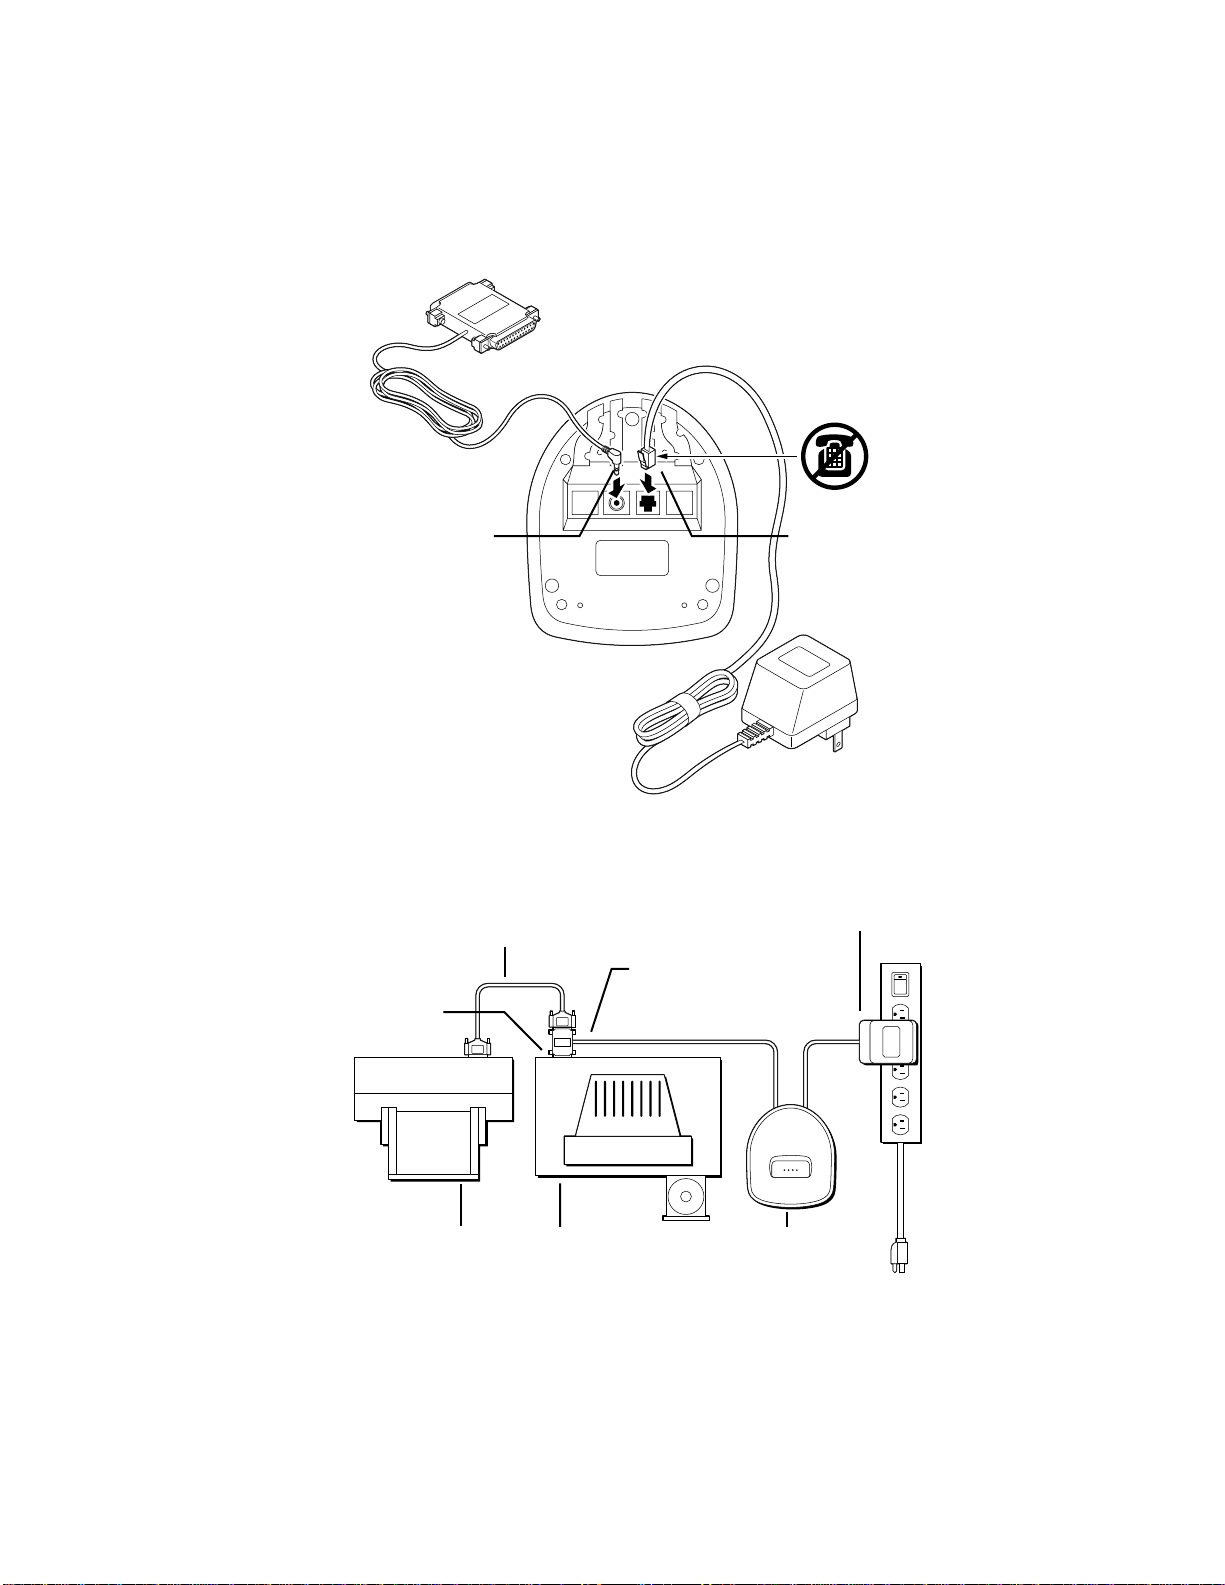
Figure 3:Walkabout TOUR Stand Connections (BottomView)
Figure 4: Docking Station Hardware Configuration (Top View)
Plug upload cable’s
connector into bottom
of Stand.
Plug AC power
adapter’s connector
into bottom of Stand.
Printer cable (optional)
Parallel port
Printer (optional) Personal Computer Stand
AC power adapter
Upload cable with
printer adapter

5
Installing the Connex Software
Installing the Connex Software
If AutoRun is Enabled on Your PC
1 Insert the Connex CD into the computer’s CD-ROM drive.
2 Follow the on-screen instructions.
If AutoRun is Disabled on Your PC
1 Insert the Connex CD into the computer’s CD-ROM drive.
2 Click Start, then Settings, and then Control Panel.
3 Double-click Add/Remove Programs.
4 Click the Install/Uninstall tab.
5 Click Install and follow the on-screen instructions.
The Connex setup program adds a Walkabout TOUR Connex
shortcut to the Windows Startup folder. When you restart the computer,
the Connex taskbar icon, resembling a portable, appears in the Windows
taskbar to indicate that the Connex software is running.
Figure 5: Connex Icon in Windows Taskbar
Connex taskbar icon
6
Using the Connex Software
Using the Connex Software
Starting and Stopping the Connex Software
If you choose the default installation, the Connex software will
automatically start when you turn on your computer. However, you can
close the software at any time and start it again later.
Close the Connex software
1 Right-click the Connex taskbar icon.
2 Select Close Program.
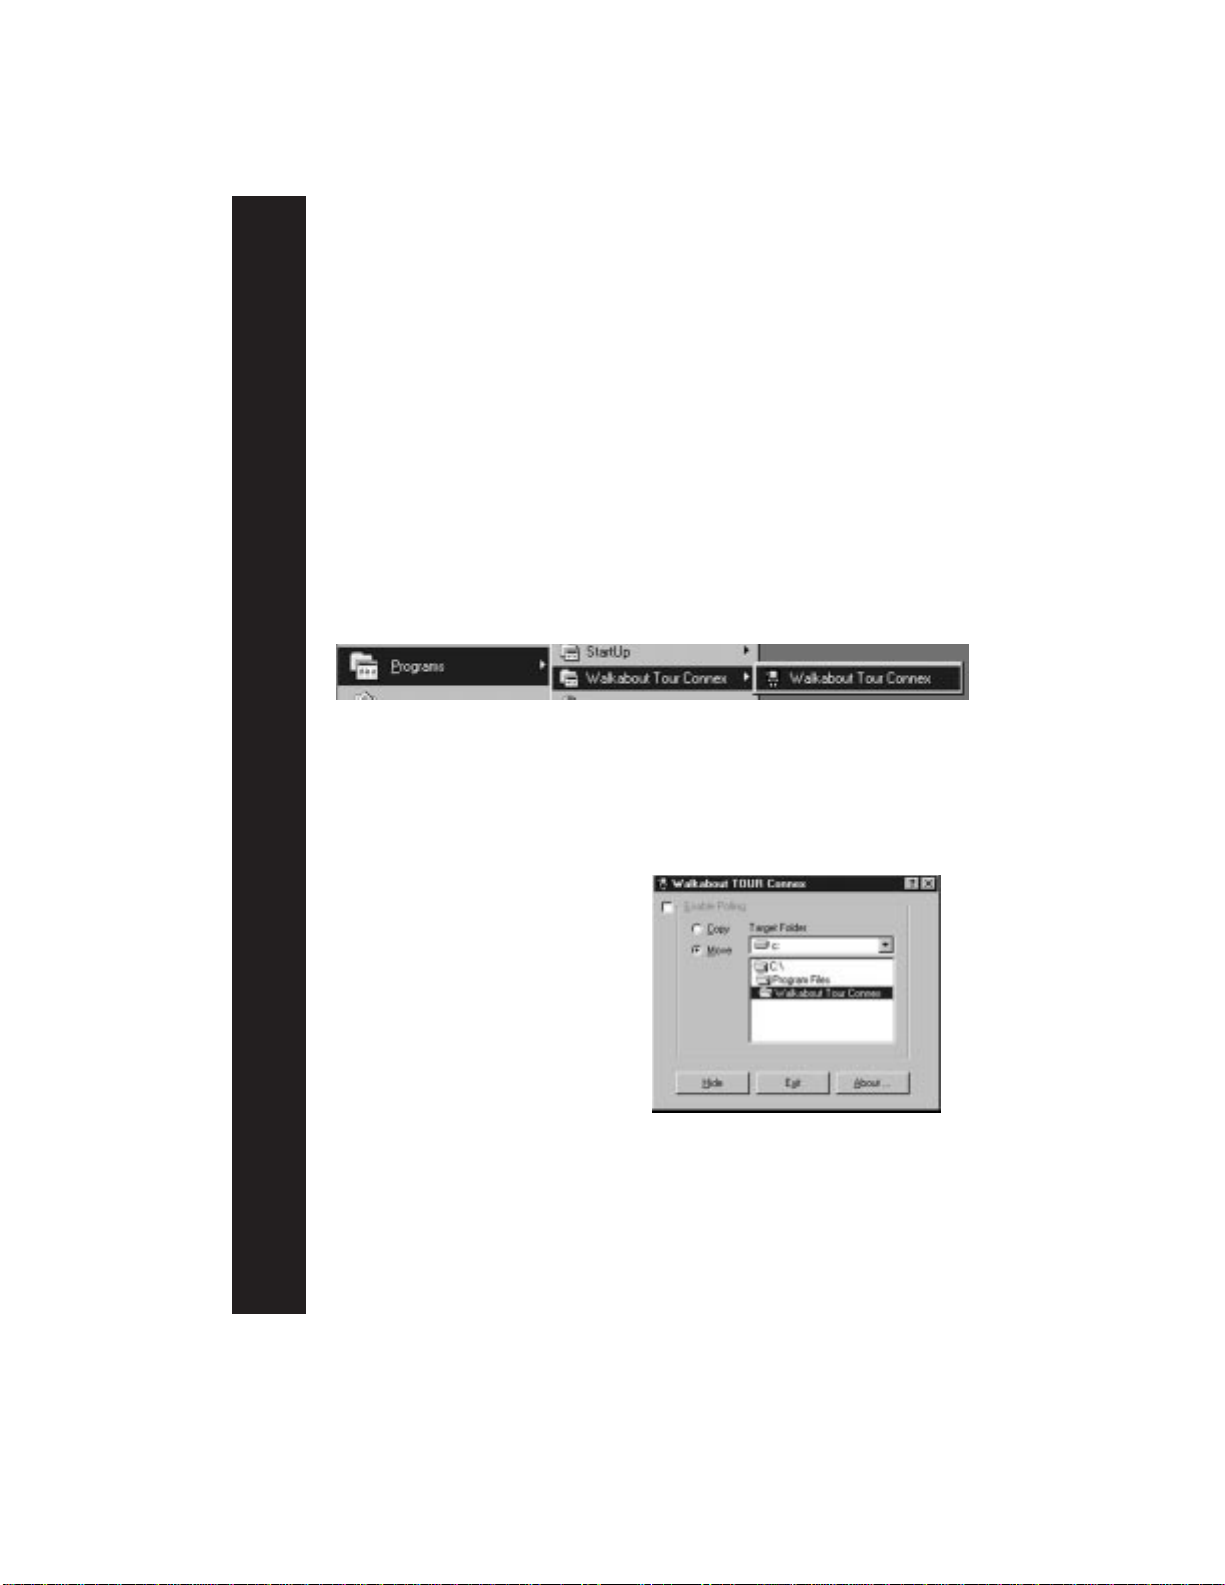
Re-start the Connex software
1 Click Start, select Programs, then Walkabout Tour Connex, and
then click Walkabout Tour Connex.
2 Verify that the Connex taskbar icon appears.
Using the Walkabout TOUR Setup Window
After installation, Connex is active and ready to be used with the default
installation settings. However, you can change any of the defaults at any
time.
Open the Setup Window
• Double-click the Connex
taskbar icon.
Modify Setup
1 Open the Setup window.
2 Disable Polling.
3 Make changes.
•Copy - Leaves the original
files on the Portable’s Voice-
data card after uploading is
complete.
•Move - Deletes the original
files from Portable’s
Voicedata card after uploading is complete.
•Target Folder - Selects the location where your voice files will be
uploaded.
•Exit - Exits and closes the Connex software.
•Hide - Saves changes and hides Main Window.
Figure 6: Starting the Connex Software
Figure 7:
Walkabout Tour Connex Setup Window

7
Using the Connex Software
4 Enable Polling to activate changes.
5 Click Hide.
Enabling/Disabling Polling of Parallel Port
When polling is enabled, the Connex software continually checks (polls)
the parallel port to determine if a Walkabout TOUR portable is present in
the Stand and if voice files need to be uploaded. By default, polling of
the parallel port is enabled when the Connex software is installed.
✎ NOTE: When polling is enabled, the parallel port is dedicated to
that task and not available for use by an attached printer.
Reasons to Disable Polling
You may wish to disable polling when you:
• Do not need to upload voice files for a period of time.
• Want to print from your PC.
When polling is disabled, voice files cannot be transferred from the
portable to the PC. If you place a portable in the Stand while polling is
disabled, the only action that may occur is recharging of the portable’s
batteries.
Disable Polling
✎NOTE: You cannot disable polling while files are uploading.
1 Right-click the Connex taskbar icon.
2 Select Enable Polling. Verify that the check mark (✔) disappears.
3 Verify that the Connex taskbar icon changes status, indicated
by a red STOP icon superimposed over the Connex taskbar icon.
Figure 8: Connex Taskbar Icon Disabled
Connex taskbar icon
when polling is disabled

8
Using the Connex Software
Enable Polling
1 Right-click the Connex taskbar icon.
2 Select Enable Polling. Verify that the check
mark (✔) appears.
3 Verify that the Connex taskbar icon changes status, indicated by a
standard Connex taskbar icon.
Figure 9: Connex Taskbar Icon Enabled
Connex taskbar icon
when polling is enabled
Figure 10: Connex Taskbar Icon Menu
Using the Connex Taskbar Icon
In addition to indicating the operational status of the Connex software,
the Connex taskbar icon allows you to interact with the Connex
software. Right-click the Connex taskbar icon to view the following
menu items:
• Enable/Disable Polling When polling is enabled, a check mark (✔)
precedes the Enable command. When polling is disabled, there is no
check mark.
• Restore Program Open the setup window and view or specify
upload settings.
• Close Program Close the Connex software, remove its icon from
the taskbar, and exit the application.
9
Using the Connex Software
Changing or Removing Upload Sound
For sound-enabled PC’s only
You can change or remove the sound you want Windows to play when
the Connex software completes uploading files.
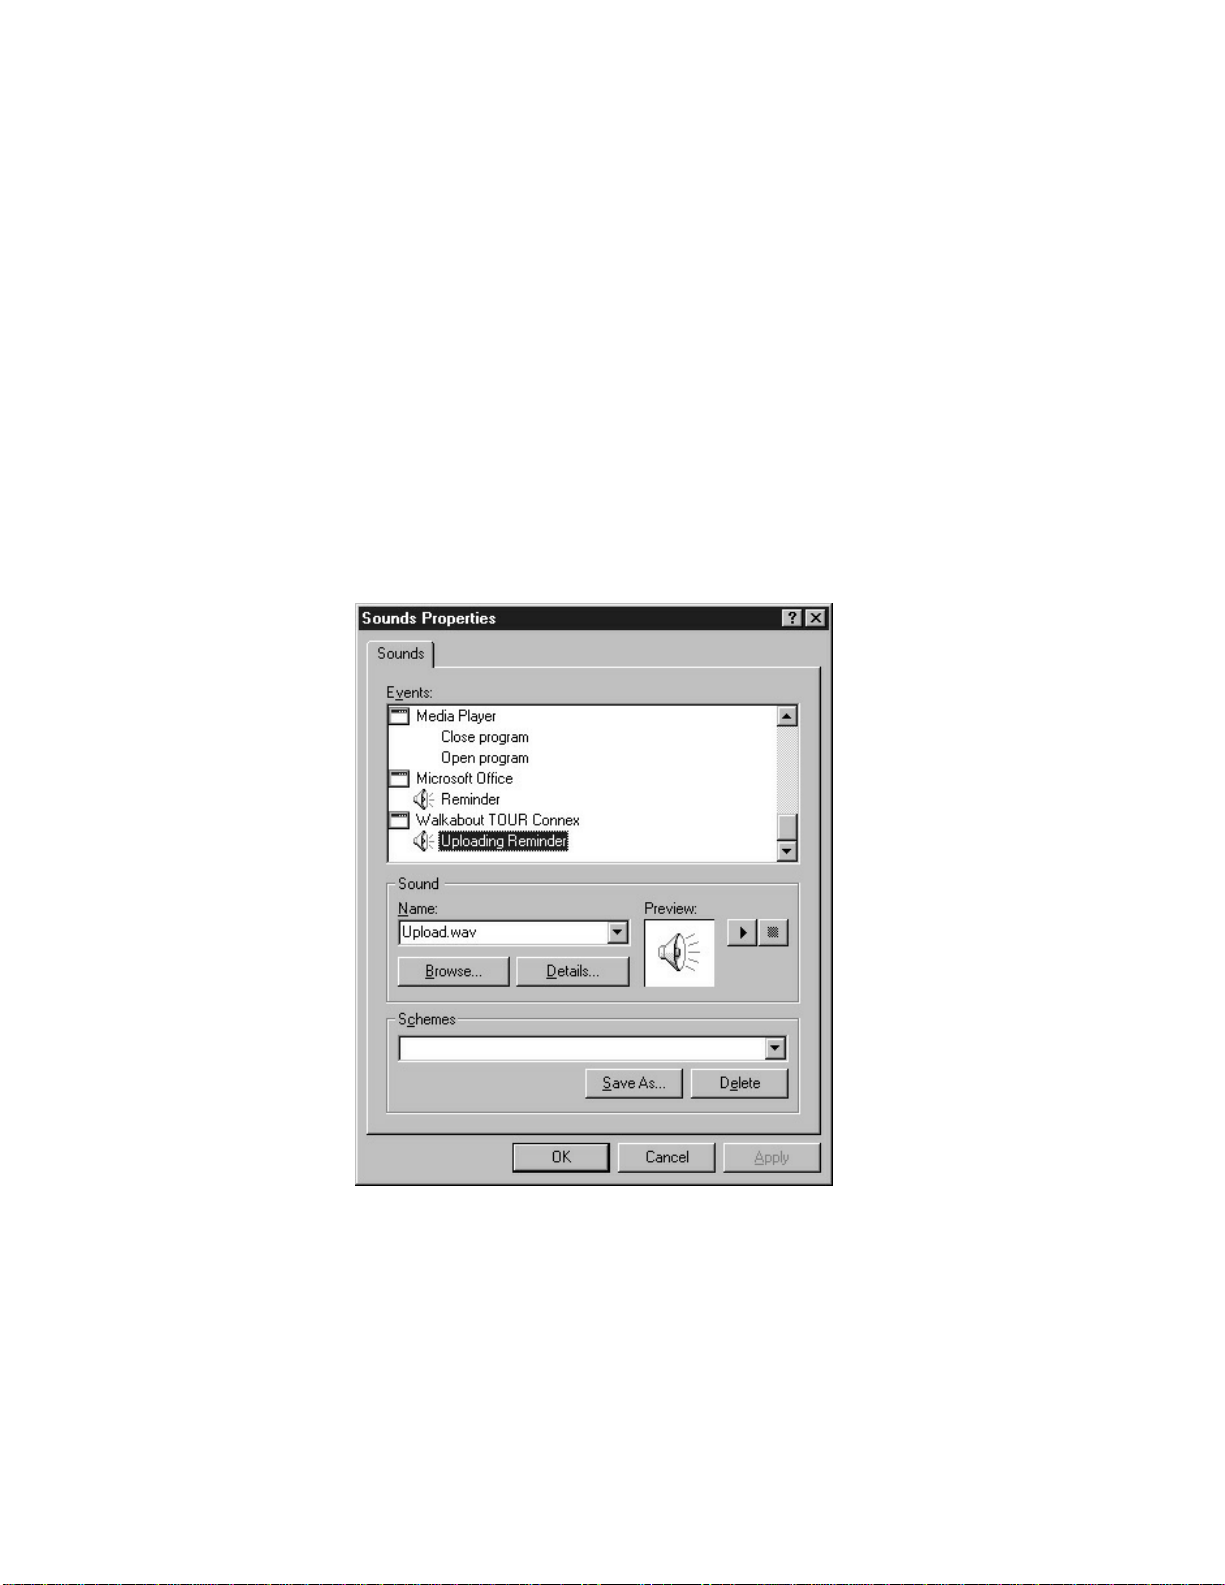
Change Upload Sound
1 Click Start, select Settings, then select Control Panel.
2 Double-click Sounds.
3 In the Events list, scroll to Walkabout TOUR Connex, then select
Uploading Reminder.
4 In the Name list, select a sound or select (None).
5 Click Apply, then click OK.
6 Close the Control Panel.
Figure 11: Sounds Properties Dialog Box

10
Uploading Voice Files
Uploading Voice Files
Once you have installed the Docking Station and Connex software, you
can upload your voice files. To upload voice files, you only need to
insert the Walkabout TOUR portable into the Docking Station. The
Connex software will do the rest.
How Files are Uploaded
During upload, the Connex software creates a temporary folder for
renaming files before they are placed in the target location. For
example, C:\Programs\Walkabout Tour Connex\Tmp. The Connex
software deletes this folder immediately after uploading the files.
Caution: If you see the C:\Programs\Walkabout Tour Connex\Tmp
folder in Windows Explorer, do not attempt to delete it.
For more information about how files are named, refer to the
Appendix on page 17.
Uploading Voice Files
1 Record Voice Files on the portable. (For detailed instructions on
using the portable, refer to the Walkabout TOUR Portable Operating
Instructions.)
2 Place the portable into the Stand. The portable should display
“CONNECTED” and the light should illuminate.
3 Verify that the Connex taskbar icon turns yellow.
✎ NOTE: If a printer attached to the parallel port is currently
printing, uploading may be delayed. The Connex software keeps trying
until the parallel port is
available.
4 Wait until you hear a sound
indicating that uploading is
complete. (For sound-
enabled PC’s only)
Caution: Do not remove the
portable while uploading is
in progress.
5 Verify that the Connex
taskbar icon has returned to
black.
6 If desired, remove the
portable from the Stand.
Figure 12:
Walkabout TOUR Portable in Stand

11
Uploading Voice Files
Problems Uploading Voice Files
You may have problems uploading voice files if either of the following
conditions exists:
• An attached printer is constantly communicating with the
parallel port.
• A printer is attached to the computer’s parallel port whose mode
is set to “bidirectional.”
During routine use, if uploading takes longer than usual-e.g., is
unable to start or finish-remove the portable from the Walkabout TOUR
Stand and re-insert.
For specific instruction for verifying and resetting the parallel port
settings, refer to Troubleshooting on page 15.

12
Using the Portable and the Docking Station
Using the Portable and the Docking Station
This section describes how to use the Walkabout TOUR portable in
conjunction with the Docking Station. For more detailed instructions on
using the portable, refer to the Walkabout TOUR Portable Operating
Instructions.
Charging the Portable
If you are using rechargeable batteries, the docking station will begin to
charge the batteries after uploading is completed. During recharge, the
portable displays a battery charge progress indicator, and the portable’s
light blinks.
When the batteries are fully charged, the Portable’s light turns off
and the battery charge progress indicator shows a full charge. A fully
charged portable operates for up to six hours.
The rechargeable batteries supplied with the Docking Station may
not be fully charged when shipped. Charging fully discharged batteries
takes approximately four hours. During routine use, you should recharge
the batteries whenever the portable’s battery symbol (see Figure 13)
blinks or bAtt EMPtY appears on the portable display. To keep the
portable fully charged, store it in the Stand when not in use.
✎ NOTE: If you are using rechargeable batteries, the Walkabout
TOUR portable may sometimes erroneously indicate low battery charge.
To verify the correct charge status, turn off the portable, then turn it
back on.
Figure 13: Portable’s Battery Charge
Progress Indicator

13
Using the Portable and the Docking Station
Fixing Battery Problems
The Walkabout TOUR portable can display messages indicating battery
problems. Error messages, their meaning, and suggested responses are
summarized in the following table:
This message Means Solution
bAtt EMPTY Batteries are discharged Recharge batteries
bAt MISSING Batteries incorrectly installed Reinstall batteries, observing
correct polarity (+/-)
bAttS dIFF Incorrect batteries installed Use three AAA NiMH batteries or
three AAA alkaline batteries
Alk bAttS* Alkaline batteries installed Use three AAA NiMH batteries or
remove the portable from the
stand after uploading is complete
* Message appears only if portable is in Stand. Portable with alkaline batteries can still
upload files but cannot be recharged.

14
Using a Printer
Using a Printer
This section is only for users who have a printer connected to the
Docking Station upload cable printer adapter.
You can connect the Docking Station and a printer to the same
parallel port by using the upload cable printer adapter. If the Docking
Station and a printer share a parallel port, however, you must disable
polling when you want to print. Once printing in finished, you can re-
enable polling again.
Disabling Polling to Print
✎ NOTE: You cannot disable polling while files are uploading.
1 Right-click the Connex taskbar icon.
2 Select Enable Polling. Verify that the check mark (✔) disappears.
3 Print your document.
4 Right-click the Connex taskbar icon.
5 Select Enable Polling to re-activate the polling.
If you are having problems printing, refer to Troubleshooting
on page 15.

15
Troubleshooting
Troubleshooting
Error Messages
No Files Found
You may receive the message below if no voice files are present on the
Walkabout TOUR portable.
Figure 14: No Files Message Box
Figure 15: Reinsert/Port Setting Message
Reinsert Portable
You may receive the message below under the following conditions:
• The portable is not inserted correctly.
• The parallel port is set to bidirectional. (Refer to Verifying/Changing
Parallel Port Mode Setting below.)
• A portable containing a Voicedata card that was read protected on a
different portable is inserted into the Docking Station. If this is the
case, the portable will display the message rEAd PrO, indicating that
the card is Read Protected.
✎ NOTE: You cannot upload files if the portable displays this message.

16
Troubleshooting
Verifying/Changing Printer Operation and Status
If an attached printer is constantly communicating with the parallel port
(usually indicated by a printer icon in the taskbar), then the parallel port
will not be available to the Docking Station for uploading voice files. To
remedy this condition, you will need to disable the printer.
To make the printer’s parallel port available to the Docking Station:
1 Disable or, if necessary, disconnect the printer from the parallel port.
2 If the parallel port is still not available, check the parallel port’s
mode setting as described under “Verifying/Changing Parallel Port
Mode Setting,” below.
3 If the parallel port is still not available, you may need to install a
second, dedicated parallel port on the PC for use by the Connex
software.
Verifying/Changing Parallel Port Mode Setting
If a printer is attached to the computer’s parallel port and the parallel
port’s mode setting is Bidirectional, then the Docking Station may not
be able to upload voice files. To remedy this condition, change the
parallel port mode to another setting such as Compatible or EPP. The
exact procedure and settings for a computer’s parallel port mode may
vary from one BIOS to another. In the procedure that follows, you may
have to adapt certain details to the operation of your computer.
To check and, if necessary, change the parallel port mode setting:
1 Restart the computer.
2 During startup, press F1 or F2 (or DEL key on some computers)
when prompted, to enter Setup.
3 Select Advanced, then select Peripheral Configuration, then
select Parallel Port Mode.
4 Verify the Parallel Port Mode setting. If it is set to Bidirectional,
change it to a different setting.
5 Press F10 to save and exit.
Getting More Help
For more information on using the Connex software and Docking
Station, refer to the What’s This help on your screen. For
software upgrades and online support, visit the website at
www.dictaphone.com/support/support_index.htm.
Table of contents
Other Dictaphone Docking Station manuals


