Dictaphone Walkbout Express User manual

Operating Instructions
For uploading voice files to Enterprise Express®
™
Infrared Docking Station

i
Overview ................................................................1
What’s In The Box......................................................1
System Requirements................................................1
Where to Go From Here .......................................3
Getting Help...............................................................4
Related Manuals ........................................................4
PC Setup Instructions ..........................................5
Selecting a Parallel Port Setting ................................5
Setting the Transfer Protocol.....................................6
Installing the Docking Station .............................7
Installing the Docking Station
PC Host Software ...............................................10
Using the Docking Station
PC Host Software ...............................................18
Starting and Stopping the Software ........................19
Close Docking Station PC Host ..........................19
Start/Restart Docking Station PC Host ..............20
Configuring the Docking Station PC Host Software 20
Checking the Status of the Docking Station............22
Updating the Docking Station Firmware Software ..25
Using the Docking Station
To Upload Voice Files.........................................27
How to Upload Files ................................................27
Managing Voice Files on the
Host PC After Uploading ...............................31
Recovering From Interrupted Transmissions...........31
Troubleshooting..................................................33
Verifying Docking Station Connections ...................33
Troubleshooting the Docking Station
PC HostSoftware..........................................33
Contents
L-2475-000.book Page 1 Wednesday, February 23, 2000 9:38 AM
To comment on this guide, please contact us at:

1
OVERVIEW
It is so easy to use the Walkabout™Express (WAExpress)
Infrared Docking Station and Docking Station PC Host
software from Dictaphone! Just insert your Walkabout™
Express digital portable into the Infrared Docking Station,
and the Docking Station PC Host software will
automatically upload voice files from the portable to your
PC.
This document explains how to install, setup, and operate
the Walkabout™ Express Infrared Docking Station and the
associated Docking Station PC Host software.
What’s In The Box
Check to make sure you received all of the following items
with this document in the Infrared Docking Station
shipping box:
•Infrared Docking Station (hereafter referred to as
Docking Station).
•Docking Station cable.
•AC Power Adapter.
•Walkabout™Express Docking Station PC Host
software CD.
System Requirements
Your PC must meet the following minimum system
requirements to support Docking Station and Docking
Station PC Host software operations:
•Pentium II 266 processor or higher.
•Microsoft Windows95, Windows98, or
WindowsNT 4.0 workstation with NT Service Pack
3 or higher.
•Windows Multimedia component.
Overview
L-2475-000.book Page 1 Wednesday, February 23, 2000 9:38 AM

2
•200 MB or higher of available hard disk space is
recommended for temporary storage of voice files.
•64 MB of RAM or higher.
•CD-ROM drive.
•VGA monitor adapter or higher.
•Dedicated Parallel Port configured for ECP mode.
•Network Adapter card or modem (to upload files to a
network device).
•MicrosoftMouse or compatible pointing device.
Overview
L-2475-000.book Page 2 Wednesday, February 23, 2000 9:38 AM

3
WHERE TO GO FROM HERE
If you are taking the Docking Station and Docking Station
PC Host software out of the box for the first time, you will
need to complete the following tasks before sending voice
files for the first time. See the referenced pages for detailed
instructions.
1. Configure the host PC (or workstation) that will be
connected to the Docking Station unit by specifying
a parallel port setting. See PC Setup Instructions on
page 5.
2. Connect the Docking Station unit to the host PC and
power source. See Installing the Docking Station on
page 7.
3. Install the Docking Station PC Host software
application from the CD-ROM onto the host PC. See
Installing the Docking Station PC Host Software on
page 10.
4. After installation, the host PC is ready to receive
files. See Using the Docking Station To Upload
Voice Files on page 27.
If the Docking Station unit has been used before, see Using
the Docking Station PC Host Software on page 18, and
Using the Docking Station To Upload Voice Files on
page 27 for instructions on sending voice files.
To monitor the status of file transmission from the Docking
Station to the host PC, see Checking the Status of the
Docking Station on page 22
If you wish to change where the transmitted files are
stored, which port is used, or whether the Docking Station
PC Host application starts automatically when the PC is
turned on, see Configuring the Docking Station PC Host
Software on page 20.
For troubleshooting instruction see page 33.
Where to Go From Here
L-2475-000.book Page 3 Wednesday, February 23, 2000 9:38 AM

4
Getting Help
If questions arise as you use the Walkabout™ Express
Infrared Docking Station, refer to this manual or the
Dictaphone web site. If your computer has Internet access,
then you can visit the Dictaphone web site at:
www.Dictaphone.com
For information on other Dictaphone products or
documentation, please contact your local Customer Care
Center sales representative (CCS) during regular business
hours at:
1-888-483-6266
For service support issues, please contact Dictaphone’s
Quality Service Center – 24 hours a day – at:
1-800-833-7776
Please have your 6 digit serial number (see bottom of unit)
and model number ready for the service representative.
Also, to ensure that you reach the proper Help desk section,
please advise the Dictaphone representative that your call
is regarding a Walkabout™ Express product.
Related Manuals
Manuals for related products include: Operating
Instructions for Walkabout™ Express (L-2411), Quick
Reference for EE System Users (L-2445), Quick Start for
EXV System Users (L-2487), EVA Installation Guide (L-
2481), and Explorer for Enterprise Express® Voice
System (L-2110).
Where to Go From Here
L-2475-000.book Page 4 Wednesday, February 23, 2000 9:38 AM

5
PC SETUP INSTRUCTIONS
You should make sure that your PC is configured to
operate with the Docking Station as described in this
section.
Selecting a Parallel Port Setting
For optimum file transfer performance, select the ECP
mode for the parallel port setting on your PC.
To change the parallel port setting, you must access your
PC’s BIOS (Basic Input/Output System). You can
normally access BIOS Setup windows by restarting your
PC. Check your PC owner’s manual for instructions
describing how to access these windows. You can also
check the PC manufacturer’s web site if you need further
assistance.
In most cases, you can use the following procedure to
change the parallel port setting:
1. Restart your PC.
2. During startup, press F1 or F2 (or the Delete key on
some PCs) to enter the Setup windows as indicated
by a startup prompt.
3. Select the Advanced option (usually at the top of
the first Setup window), then choose Peripheral
Configuration.
4. When the Peripheral Configuration settings appear,
go to Parallel Port Mode and set the mode to ECP.
Note: Except for the EPP mode (which is
not supported), all the other Parallel Port
settings are supported, but provide slower
upload speeds than the recommended ECP
mode.
5. Press F10 to save your changes, and exit from the
Setup windows. (The PC will continue its restart
procedure.)
PC Setup Instructions
L-2475-000.book Page 5 Wednesday, February 23, 2000 9:38 AM

6
Setting the Transfer Protocol
Docking Station PC Host software is configured to
automatically select the optimal transfer protocol (i.e.,
AUTO is displayed in the Transfer Mode text box on the
Configure Docking Station PC Host window). You
should not need to set the transfer protocol.
However, if necessary, parallel port transfer protocols can
be specified (Compatible (Nibble),Bi-directional
(BYTE), and Extended (ECP)).
See Configuring the Docking Station PC Host Software on
page 20 for how to change the transfer protocol.
PC Setup Instructions
L-2475-000.book Page 6 Wednesday, February 23, 2000 9:38 AM

7
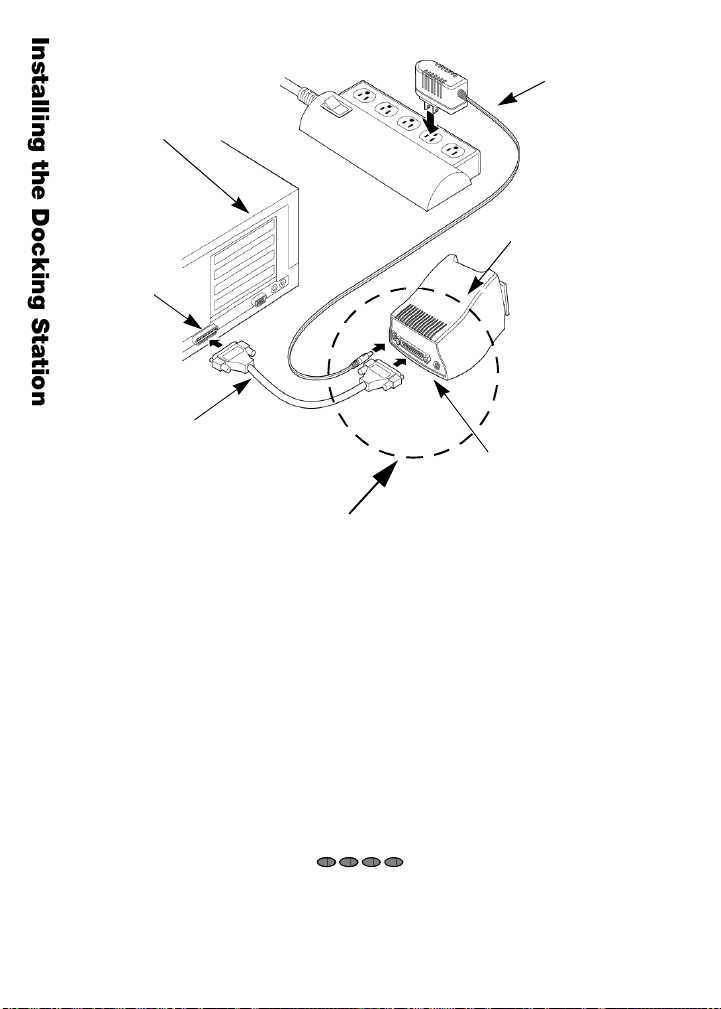
INSTALLING THE DOCKING STATION
Set up the Docking Station to work with your PC as
follows:
1. Shut down the PC.
2. Connect the female end of the 25-pin Docking
Station cable to the “Parallel” connector at the rear
of the Docking Station as shown below.
3. If you are using a local printer that is attached
directly to your PC, and the PC only has one parallel
port (LPT1) shut down the printer and the printer
software, then disconnect it from the parallel port.
4. If you are using a local printer, and your PC
has more than one parallel port, connect the
Docking Station cable to an available
parallel port.
5. Connect the male end of the 25-pin Docking Station
cable to the parallel port on your PC (Figure 1 on
page 8).
Note:The Docking Station should be the
only device connected to the port.
6. Connect the smaller end of the AC adapter to the
connector labeled “Power” at the rear of the
Docking Station as shown in Figure 2 on page 9.
7. To power up the Docking Station, connect the
electrical plug on the AC adapter to an outlet or
power strip.
Installing the Docking Station
L-2475-000.book Page 7 Wednesday, February 23, 2000 9:38 AM
8
Figure 1: Docking Station Cable Connections
8. Use the 4 LED indicator lights on the front of the
Docking Station to monitor activity of the unit.
When the Docking Station is powered up, these
lights will alternate red-green, turn all red, turn all
green, then turn solid amber. The Docking Station
then issues a long beep. When the four LED
indicators are amber, the unit is ready to have the
Docking Station PC Host software installed.
See the following section to continue the setup process that
is, to install the Docking Station PC Host software.
PC
LPT
Port
Docking
Docking Station
cable connector
AC Adapter
Docking
(rear view)
See Figure 2 for
a detailed view
Station
cable
Station
(25 pin)
Parallel
Installing the Docking Station
L-2475-000.book Page 8 Wednesday, February 23, 2000 9:38 AM
9
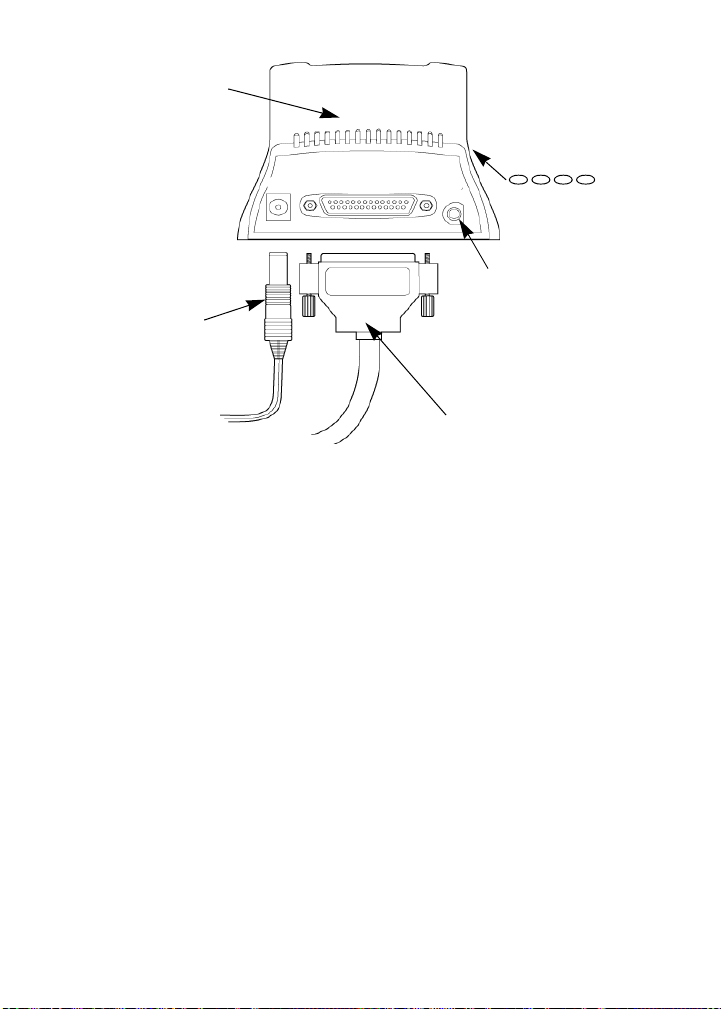
Figure 2: Docking Station Connections – Detailed View
Note: The Docking Station cable is
connected to the “Parallel” connector as
shown. The “Service” connector is used
exclusively by Dictaphone support
personnel.
Docking
AC
cord
Docking Station
cable
Service
Connector
(see Note)
4 LED
lights are
(back side)
front side
Power Parallel Port Service
Adapter
indicator
on the
Station
Installing the Docking Station
L-2475-000.book Page 9 Wednesday, February 23, 2000 9:38 AM

10
INSTALLING THE DOCKING STATION
PC HOST SOFTWARE
This section describes how to install the Walkabout™
Express Docking Station PC Host software.
1. Insert the Walkabout Express™ Docking Station PC
Host software CD into the CD-ROM drive on your
PC. Start the installation program:
i. Click Start ( ) on the Windows
System Tray area, and select Run.
ii. If your CD-ROM is specified as drive D:\,
then enter:
“D:\WAExpress Docking
Station\Setup.exe” (include the quotation
marks). Select the OK button to begin
installation.
OR
You can use the Browse button to locate the
Setup.exe file on the CD-ROM, then select
the OK button to begin installation.
2. The WAExpress Docking Station PC Host
installation window (Figure 3) is displayed and is
immediately followed by the Walkabout™ Express
(WAExpress) Welcome window (Figure 4).
Click or enter information as directed.
Installing the Docking Station PC Host Software
L-2475-000.book Page 10 Wednesday, February 23, 2000 9:38 AM

11
Figure 3: Initial Installation Window
i. Read the Welcome window information and
click the Next button to continue the
installation process.
Figure 4: Walkabout™ Express (WAExpress) Welcome Window
Installing the Docking Station PC Host Software
L-2475-000.book Page 11 Wednesday, February 23, 2000 9:38 AM
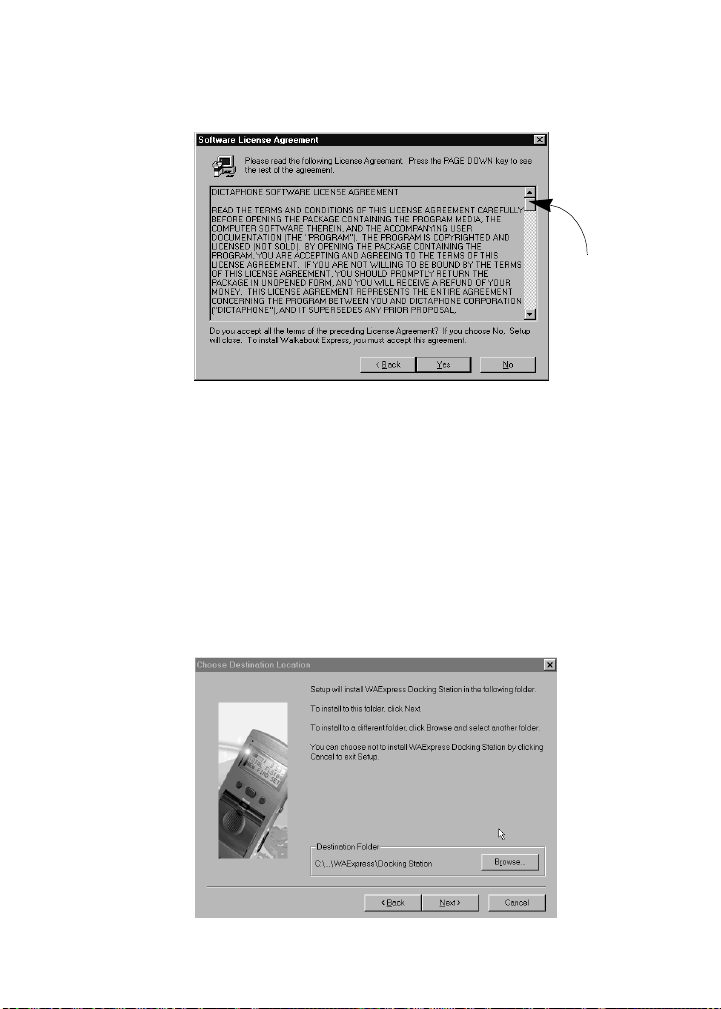
ii. Use the scroll bar to read the entire License
Agreement and click Ye s to accept the terms
of the agreement (Figure 5).
Figure 5: Software License Agreement Window
iii. At the Choose Destination Location window
(Figure 6), click Next to accept the default
destination folder for the Docking Station PC
Host software. Dictaphone recommends that
you accept the default destination folder.
However, you can click Browse to find
another folder and click Next to continue.
Figure 6: Choose Destination Location Window
Scroll
Bar
Installing the Docking Station PC Host Software
L-2475-000.book Page 12 Wednesday, February 23, 2000 9:38 AM
13
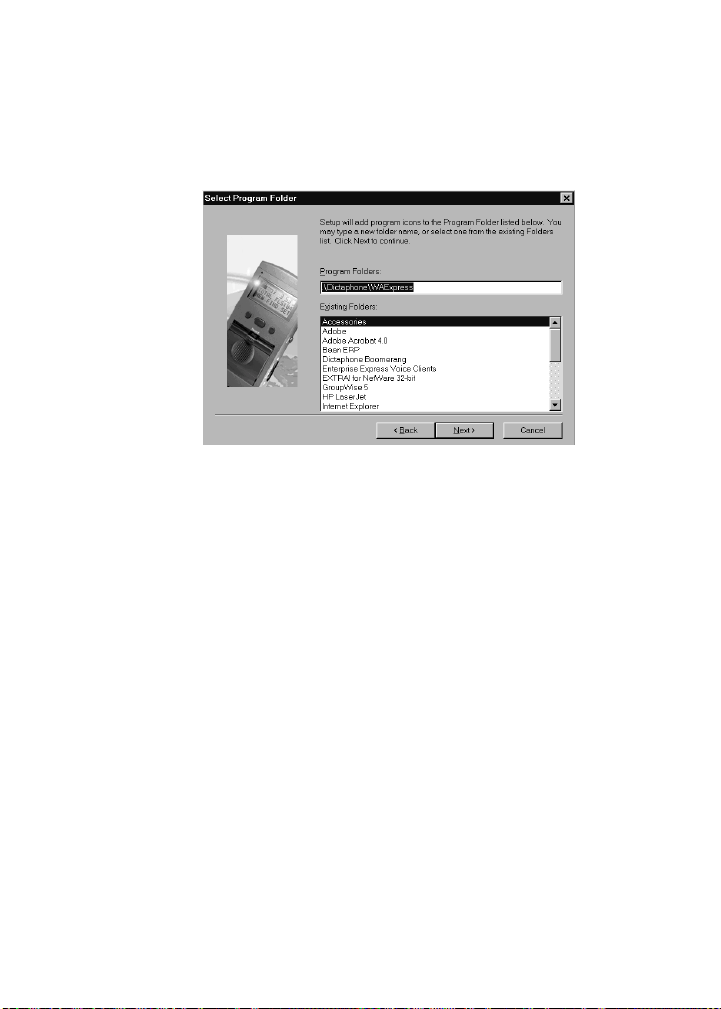
iv. Click Next to accept the default name for the
Windows Program Folder that you will
access to start up the Docking Station PC
Host software (or type in a new folder name)
and click Next.
Figure 7: Select Program Folder Window
v. At the Setup MailBox Directory window
(Figure 8 on page 14) you can enter a
different location or accept the default
‘Mailbox Directory’ by clicking Next. The
“Mailbox Directory” is where the files for
each upload or download operation are stored
on your PC or an attached network device.
Note: You will be prompted to create
a directory if the location you
specify here does not exist. The
location specified can be changed at
any time. See Configuring the
Docking Station PC Host Software
on page 20.
Installing the Docking Station PC Host Software
L-2475-000.book Page 13 Wednesday, February 23, 2000 9:38 AM

14
Figure 8: Setup MailBox Directory Location Window
vi. When the Setup Parallel Port window
appears, click Next to accept the LPT1
default, or select the desired LPT port.
Figure 9: Setup Parallel Port Window
vii. As Docking Station PC Host software files
are copied to your PC, a progress meter is
displayed, until all the appropriate files are
copied (Figure 10).
Installing the Docking Station PC Host Software
L-2475-000.book Page 14 Wednesday, February 23, 2000 9:38 AM

15
Figure 10: Sample File Copy Progress Meter
viii. When the installation is complete, the Setup
Complete window is displayed. Click Finish
to complete the Docking Station PC Host
software installation procedure (Figure 11).
Figure 11: Setup Complete Window
Installing the Docking Station PC Host Software
L-2475-000.book Page 15 Wednesday, February 23, 2000 9:38 AM

16
3. Docking Station PC Host software should
automatically start up, and the Docking Station PC
Host icon should appear in the Windows System Tray
area (see Figure 12). Types of PC Host icons are
shown in Figure 13.
Figure 12: Location of the Docking Station PC Host Icon on the
Windows Desktop
Figure 13: Types of Docking Station PC Host Icons
Docking Station
EVA Icon
Windows System Tray Area
Click (or right-click) on the
icon to use Docking Station
PC Host software PC Host Icon
ERROR Icon
Docking Station
PC Host is ON
Docking Station
PC Host is OFF
(not running)
icon displayed
when there is no
Installing the Docking Station PC Host Software
L-2475-000.book Page 16 Wednesday, February 23, 2000 9:38 AM
17
4. Downloading of the Docking Station application
software to the Docking Station now begins
automatically. LED indicators on the front of the
station change from 4 blinking amber lights to 4
solid green lights when the download is complete.
Figure 14: LED Indicator Lights During Startup
5. During subsequent power ups of the Docking
Station, when the Docking Station PC Host software
is not launched, the LED lights first strobe and blink
through a sequence, then the Docking Station will
beep twice. When the two right side LED indicators
blink amber, the unit is ready for the Docking
Station PC Host application to be started.
Note: If the Docking Station PC Host icon is
displayed as the ERROR icon (icon with a
red “X” through it), refer to Verifying
Docking Station Connections under
Troubleshooting on page 33 to correct the
problem.
Congratulations! You have successfully connected the
Docking Station hardware to the host PC. See the
following section to learn how to use the Docking Station
PC Host software and begin sending voice files for
transcription.
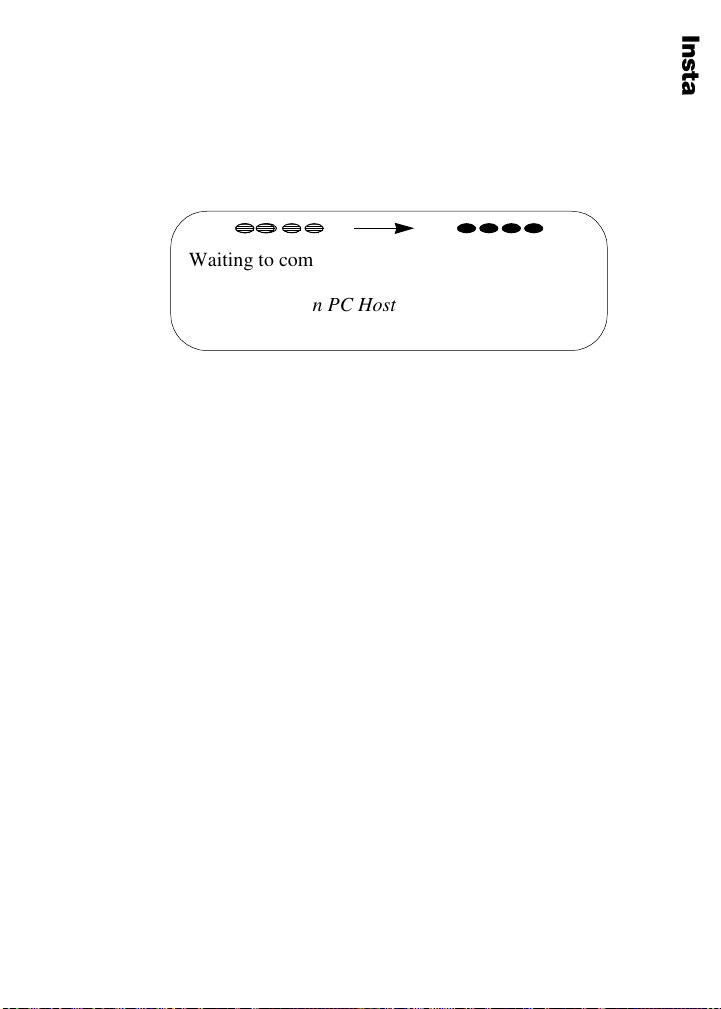
(4 green lights)
connection to
Waiting to complete Ready to transfer files
(4 amber lights)
Docking Station PC Host
Installing the Docking Station PCHostSoftware
L-2475-000.book Page 17 Wednesday, February 23, 2000 9:38 AM

18
USING THE DOCKING STATION
PC HOST SOFTWARE
Docking Station PC Host software is used to upload
dictated voice files from a Walkabout™ Express portable
to a PC, so Enterprise Voice Agent (EVA) software can
send them into the Enterprise Express® Voice System for
translation.
During each upload operation, the Docking Station PC
Host software first uses an infrared transmission technique
to transfer all the files on the Walkabout™ Express
portable to internal memory in the Docking Station. The
files are then uploaded from the Docking Station into an
Inbox folder in the specified Mailbox Directory location
on your PC (Inbox is automatically created the first time
files are transferred, see Note below). During this process,
the files may be renamed using the same basic numeric
naming convention used by the Walkabout™ Express
portable.
Docking Station PC Host software is easy to use. Right-
click on the icon in the System Tray area and select one of
four options (Figure 15):
•About Docking Station PC Host ... – Use to
determine what version of Docking Station PC Host
software is installed and running on your PC.
•Configure Docking Station PC Host... –Opens the
Configure Docking Station PC Host window.
•Docking Station 00... –Opens the WAExpress
Docking Station – Status window. This is the main
window for the Docking Station PC Host software
application. You can also open the WAExpress
Docking Station – Status window directly by
clicking once on the icon. If the window does not
appear, see page 33 to make sure that the station is
properly connected.
•Exit Docking Station PC Host – Use to stop the
Docking Station PC Host software. This option
Using the Docking Station PC Host Software
L-2475-000.book Page 18 Wednesday, February 23, 2000 9:38 AM
Table of contents
Other Dictaphone Docking Station manuals


