Dictaphone Walkabout User manual

Operating Instructions
PC Connection and Battery Charger
for Quest
digital recorder
DOCKING
STATION

Published by Dictaphone Corporation (U.S.) Stratford, Connecticut
Disclaimer
Dictaphone Corporation (U.S.) makes a sincere effort to ensure the accuracy of the material described herein: however,except
as set forth in any license documentation applicable to each product of Dictaphone Corporation, referred to herein.Dictaphone
Corporation makes no warrant, express or implied with respect to the quality, correctness, reliability, currentness, accuracy,or
freedom from error of this document or the products or the products referred to herein, and specifically disclaims any implied
warranties of merchantability and fitness for any particular purpose. Dictaphone Corporation disclaims all liability for any direct,
indirect, incidental,consequential,special or exemplary damages resulting from the use of the information in this document.
Mention of any product not manufactured by Dictaphone Corporation does not constitute an endorsement by Dictaphone
Corporation of that product.
Copyright Notice
This manual is copyrighted and all rights are reserved by Dictaphone Corporation (U.S.). No part of this publication may be
reproduced, transmitted,transcribed,stored in a retrieval system,or translated into any language or computer language, in any
form or by any means, electronic,mechanical,magnetic, optical,chemical,manual, or otherwise , without the prior written
permission of Dictaphone Corporation (U.S.),
3191 Broadbridge Avenue, Stratford, CT 06497.
Copyright © 1998 by Dictaphone Corporation (U.S.)
Stratford, Connecticut, USA
All Rights Reserved
Notices
Accessories
Do not use the head-set and/or microphone accessories while the Walkabout Quest is in the Docking Station.
FCC Statement
This device complies with part 15 of the FCC rules. Operation is subject to the following two conditions: (1)This device may not
cause harmful interference, and (2) this device must accept any interference received,including interference that may cause
undesired operation.
Note:
This equipment has been tested and found to comply with the limits for Class B digital devices pursuant to Part 15 of the FCC
Rules. These limits are designed to provide reasonable protection against harmful interference in a residential installation. This
equipment generates, uses,and can radiate radio frequency energy and,if not installed and used in accordance with
instructions, may cause harmful interference to radio communications. However, there is no guarantee that interference will
not occur in a particular installation. If this equipment does cause harmful interference to radio or television reception, which
can be determined by tuning the equipment off and on, the user is encourage to try to correct the interference by one or more
of the following measures:
• Reorient or relocate the receiving antenna.
• Increase the separation between equipment and receiver.
• Connect the equipment into an outlet on a circuit different from that to which the receiver is connected.
• Consult the dealer or an experience radio/TV technician for help.
Changes or modifications not expressly approved by the party responsible for compliance could void the user’s authority to
operate the equipment. Proper connectors must be used for connections to the host computer and /or peripherals in order to
meet FCC emission limits.
European RFI Statement
This Class B digital apparatus meets all requirements of the European interference-causing equipment regulations.

I
Contents
Contents
Overview. . . . . . . . . . . . . . . . . . . . . . . . . . . . . . . . . . . . . . . . . . . . . . 3
Walkabout Docking Station . . . . . . . . . . . . . . . . . . . . . . . . . . . . . . . . 3
Walkabout Desktop Software. . . . . . . . . . . . . . . . . . . . . . . . . . . . . . . 3
System Requirements . . . . . . . . . . . . . . . . . . . . . . . . . . . . . . . . . . . . 4
PC Setup Instructions. . . . . . . . . . . . . . . . . . . . . . . . . . . . . . . . . . 5
Selecting a Parallel Port Setting . . . . . . . . . . . . . . . . . . . . . . . . . . . . . 5
Checking the PC Configuration Setting . . . . . . . . . . . . . . . . . . . . . . . . 6
Installing the Docking Station . . . . . . . . . . . . . . . . . . . . . . . . . . 7
Docking Station Overview . . . . . . . . . . . . . . . . . . . . . . . . . . . . . . . . . 9
Docking Station Controls and Indicators . . . . . . . . . . . . . . . . . . . . . . . 9
Inserting Your Portable Into the Docking Station . . . . . . . . . . . . . . . . 10
Inserting a Voicedata Card Into the Docking Station. . . . . . . . . . . . . . 11
Recharging Spare Batteries . . . . . . . . . . . . . . . . . . . . . . . . . . . . . . . 12
Installing the Desktop Software . . . . . . . . . . . . . . . . . . . . . . . . 17
Desktop Software Overview. . . . . . . . . . . . . . . . . . . . . . . . . . . . 17
Starting the Software. . . . . . . . . . . . . . . . . . . . . . . . . . . . . . . . . . . . 17
Walkabout Desktop Screen . . . . . . . . . . . . . . . . . . . . . . . . . . . . . . . 18
Walkabout Sync Manager Screen. . . . . . . . . . . . . . . . . . . . . . . . . . . 19
Using Walkabout Setup Options . . . . . . . . . . . . . . . . . . . . . . . 20
Selecting a User Account. . . . . . . . . . . . . . . . . . . . . . . . . . . . . . . . . 20
Selecting an Organizer . . . . . . . . . . . . . . . . . . . . . . . . . . . . . . . . . . 22
Defining Data Transfer Options. . . . . . . . . . . . . . . . . . . . . . . . . . . . . 24
Voice Folders Transfer Setup . . . . . . . . . . . . . . . . . . . . . . . . . . . . 24
Voice EmailTransfer Setup. . . . . . . . . . . . . . . . . . . . . . . . . . . . . . 26
Organizer Transfer Setup . . . . . . . . . . . . . . . . . . . . . . . . . . . . . . . 28
Change Voice Quality Settings . . . . . . . . . . . . . . . . . . . . . . . . . . . 31
Check Data Transfer Settings. . . . . . . . . . . . . . . . . . . . . . . . . . . . 32
Defining Email Setup Options. . . . . . . . . . . . . . . . . . . . . . . . . . . . . . 33
Testing the Docking Station Cradle Connection . . . . . . . . . . . . . . . . . 35

1
Contents
Using the Walkabout Voice Recorder . . . . . . . . . . . . . . . . . . . 36
Checking Audio Settings . . . . . . . . . . . . . . . . . . . . . . . . . . . . . . . . . 36
Recording a Voice File . . . . . . . . . . . . . . . . . . . . . . . . . . . . . . . . . . . 38
Using Walkabout Voice Folders . . . . . . . . . . . . . . . . . . . . . . . . 39
Accessing Voice Folders Data. . . . . . . . . . . . . . . . . . . . . . . . . . . . . . 39
Renaming Voice Folders. . . . . . . . . . . . . . . . . . . . . . . . . . . . . . . . . . 40
Adding a New Voice File . . . . . . . . . . . . . . . . . . . . . . . . . . . . . . . . . 40
Playing a Voice File . . . . . . . . . . . . . . . . . . . . . . . . . . . . . . . . . . . . . 40
Copying a Voice File . . . . . . . . . . . . . . . . . . . . . . . . . . . . . . . . . . . . 41
Moving a Voice File . . . . . . . . . . . . . . . . . . . . . . . . . . . . . . . . . . . . . 41
Deleting a Voice File . . . . . . . . . . . . . . . . . . . . . . . . . . . . . . . . . . . . 41
Emptying a Voice Folder. . . . . . . . . . . . . . . . . . . . . . . . . . . . . . . . . . 41
Sending a Voice Email. . . . . . . . . . . . . . . . . . . . . . . . . . . . . . . . . . . 42
Using Walkabout Voice Email . . . . . . . . . . . . . . . . . . . . . . . . . 43
Checking Sent Items . . . . . . . . . . . . . . . . . . . . . . . . . . . . . . . . . . . . 43
Re-sending a Voice Email . . . . . . . . . . . . . . . . . . . . . . . . . . . . . . . . 44
Playing a Voice Email Item. . . . . . . . . . . . . . . . . . . . . . . . . . . . . . . . 44
Copying a Voice Email Item . . . . . . . . . . . . . . . . . . . . . . . . . . . . . . . 45
Deleting a Voice Email Item . . . . . . . . . . . . . . . . . . . . . . . . . . . . . . . 45
Emptying the Sent Items Folder . . . . . . . . . . . . . . . . . . . . . . . . . . . . 45
Using the Walkabout Organizer . . . . . . . . . . . . . . . . . . . . . . . . 46
Managing Addresses. . . . . . . . . . . . . . . . . . . . . . . . . . . . . . . . . . . . 46
Add a New Address. . . . . . . . . . . . . . . . . . . . . . . . . . . . . . . . . . . 47
Edit an Address. . . . . . . . . . . . . . . . . . . . . . . . . . . . . . . . . . . . . . 47
Delete an Address. . . . . . . . . . . . . . . . . . . . . . . . . . . . . . . . . . . . 47
Managing Appointments . . . . . . . . . . . . . . . . . . . . . . . . . . . . . . . . . 48
Add a New Appointment . . . . . . . . . . . . . . . . . . . . . . . . . . . . . . . 49
Appointment Alarms . . . . . . . . . . . . . . . . . . . . . . . . . . . . . . . . . . 49
Edit an Appointment . . . . . . . . . . . . . . . . . . . . . . . . . . . . . . . . . . 50
Delete an Appointment . . . . . . . . . . . . . . . . . . . . . . . . . . . . . . . . 50
Managing To-do Tasks. . . . . . . . . . . . . . . . . . . . . . . . . . . . . . . . . . . 51
Add a New To-doTask. . . . . . . . . . . . . . . . . . . . . . . . . . . . . . . . . 52
Edit a To-doTask. . . . . . . . . . . . . . . . . . . . . . . . . . . . . . . . . . . . . 52
Delete a To-doTask. . . . . . . . . . . . . . . . . . . . . . . . . . . . . . . . . . . 52

2
Contents
Handling Voice Attachments. . . . . . . . . . . . . . . . . . . . . . . . . . . . . . . 53
Add a New Voice Attachment . . . . . . . . . . . . . . . . . . . . . . . . . . . . 53
Play a Voice Attachment. . . . . . . . . . . . . . . . . . . . . . . . . . . . . . . . 53
Edit a Voice Attachment. . . . . . . . . . . . . . . . . . . . . . . . . . . . . . . . 53
Copy a Voice Attachment . . . . . . . . . . . . . . . . . . . . . . . . . . . . . . . 54
Delete a Voice Attachment . . . . . . . . . . . . . . . . . . . . . . . . . . . . . . 54
Synchronizing Voice/Data Files . . . . . . . . . . . . . . . . . . . . . . . . 55
Using the Walkabout Sync Editor With Microsoft Outlook . . . . . . . . . . 55
Synchronizing Voice/Data on Your Portable and PC . . . . . . . . . . . . . . 57
Synchronizing Voice Files on aVoicedata Card and Your PC . . . . . . . . 58
Appendix A: Common ISP Server IDs . . . . . . . . . . . . . . . . . . 59
Appendix B: Outlook Folder and Walkabout Data . . . . . . . 59
Appendix C: Troubleshooting Information . . . . . . . . . . . . . . 62
Troubleshooting Voice/Data Synchronize Operations . . . . . . . . . . . . . 62
Resolving Problems Sending Voice Emails. . . . . . . . . . . . . . . . . . . . . 63
Resolving Problems Playing Voice Email on an External PC . . . . . . . . 63

3
Overview
1. Overview
Congratulations on your purchase of the Walkabout Docking Station
and Desktop software from Dictaphone! The Docking Station and
software allow you to transfer both voice and data from your Walkabout
Quest Portable to your PC and the Internet.
Walkabout Docking Station
After you set up the Docking Station and software, place your Quest
Portable into the Docking Station and press a single button to exchange
voice and data with your PC.You may also use the Card Reader on the
Docking Station to exchange voice files with your PC.
Walkabout Desktop Software
Walkabout Desktop allows you to manage voice recordings, send or
receive voice e-mail, and enter Personal Information Management
(PIM) data such as addresses, appointments and to-do tasks on your
PC. Included with the software, the Sync Manager component
performs the exchange of voice files and PIM data between your Quest
Portable and PC.
Sample Walkabout Desktop Screen

Hardware:
• Multimedia Pentium PC, running at 166 MHz or higher
• 32 MB of RAM (64 MB recommended for best performance)
• 30 MB of available hard disk space for application
• CD-ROM drive
• Mouse (Microsoft®-Compatible)
• Network Adapter card or modem for voice file transfer
• Creative Labs™ SoundBlaster®or 100% compatible, or Mwave
Sound card with Mic, Line In, Line Out and Speaker jacks properly
installed and configured
Software:
• Microsoft®Windows®95 or 98 (Windows NT Workstation is not
supported)
• Any Internet e-mail INSTALLED and CONFIGURED using
SMPT/POP3 protocols or Microsoft Outlook 97 or 98.
4
Overview

PC Setup Instructions
You should also make sure that your PC is configured to operate
with the Walkabout system.
Selecting a Parallel Port Setting
The Walkabout Docking Station connects to the parallel port on
your PC to transfer voice files and data between your Quest Portable
and PC. This port may also be used by a printer, and can be set up to
transfer data at different speeds. The Docking Station will transfer
data to/from your PC at a very high rate of speed if you select the
ECP mode for the parallel port setting. If your PC does not support
the ECP mode, try the EPP mode, or you may select the slower
Compatibility mode found on every PC.
To change the parallel port setting, you must access your PC’s
BIOS (Basic Input/Output System). You can normally access BIOS
Setup screens during your PC’s startup procedure. Check your PC
owner’s manual for instructions describing how to access these
screens. You may also check the PC manufacturer’s web site if you
need further assistance.
5
PC Setup Instructions

Checking the PC Configuration Settings
Verify that your PC is configured to operate with your Walkabout
system as follows:
1. Click Start on the Windows taskbar, and select Settings and
Control Panel.
2. Check the following settings on the Control Panel:
To check... Double-click Select tab Examine this:
Sound Card Audio or Audio
Preferred device:
Devices If the Playback and
Recording sections are
grayed-out, you will need
to set up the sound card
(see manufacturer’s
instructions).
Memory Performance
Memory:
You should see “32.0 MB
of RAM” or higher.
Volume Control Windows Setup
Details:
& Check Make sure that the
Multimedia “Check box” is white
and selected.
Parallel Port Device Manager
Printer Port (LPT1):
Tab & Double You should see the
Click Ports “ECP Printer Port.”
6
PC Setup Instructions
Installing the Docking Station
Set up the Walkabout Docking Station to work with your PC as
follows:
1. Shut down your PC. If you are using a local printer (attached
directly to the PC) and the PC only has one parallel port, shut
down the printer.
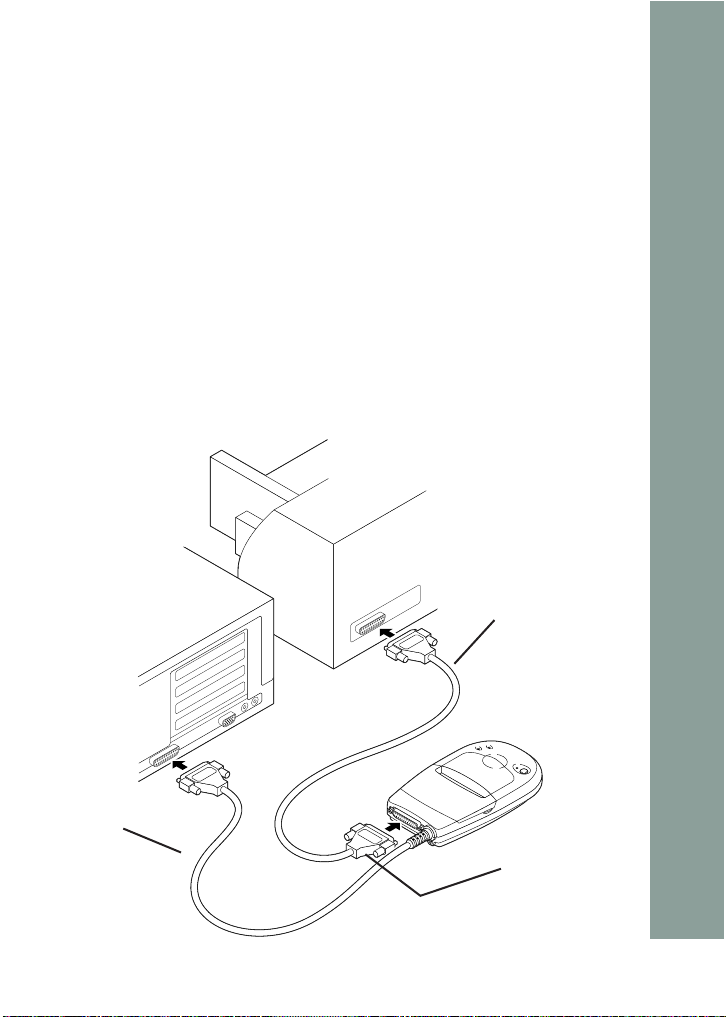
2. If you are using a local printer and your PC only has one
parallel port, connect the printer cable to the Printer Pass-
Through Connector on the Docking Station, as shown below.
3. Connect the Docking Station cable to a parallel port (often
referred to as a “LPT” or “printer port”) on your PC, as shown.
Note: If you are using a local printer and your PC has two parallel
ports, connect the Docking Station cable to the second parallel port
(LPT2).
7
Installing the Docking Station
Printer Cable
Docking
Station
Cable Printer
Pass-Through
Connector
Docking Station Cable Connections

4. Connect one end of the AC adapter to the back of the Docking
Station, as shown.
5. Connect the electrical plug on the AC adapter to an outlet or
power strip.
6. Start up your PC.
Note: If a local printer is attached to the printer pass-through
connector on the Docking Station, you must keep the Docking Station
powered up to use the printer.
Congratulations you have successfully installed the Walkabout
Docking Station!
8
Installing the Docking Station
AC AdapterAC Adapter
Docking Station Power Connections

Docking Station Overview
You may use the Docking Station for a variety of functions as
described in this section.
Docking Station Controls & Indicators
The Docking Station controls and indicators are listed below. Also
note the location of the card reader and battery compartment.
Synchronize button - Press to exchange voice/data between your
Portable and PC, or voice files between the card reader and PC.
Synchronize indicator - This indicator light is normally green when
the Docking Station is powered up. The light will turn orange when
data is being exchanged between your Portable and PC.
Portable Charging indicator - This indicator light will turn on when
you insert your Portable in the Docking Station. If you are using
Nickel Cadmium batteries in the Portable, the light will turn red while
charging and then green when the batteries are fully charged.
Spare battery Charging indicator - If you recharge Nickel Cadmium
batteries in the spare battery compartment, this indicator light will turn
red while charging and green when the batteries are fully charged.
9
Docking Station Overview
Portable
Battery
Synchronize
Synchronize
Button
Synchronize
Indicator
Voicedata S
Card Reader
Portable Charging
Indicator
Spare
Battery
Charging
Indicator
Spare Battery
Compartment
Docking Station Controls, Indicators, & Components

Inserting Your Portable into the Docking Station
1. Insert your Quest Portable firmly into the Docking Station
cradle as shown below. You should hear a snap when the Portable
is seated properly.
2. The Portable Charging indicator light should be illuminated and
turn green to indicate that the Portable has been properly inserted
into the Docking Station.
Note: If you are recharging Nickel Cadmium batteries in the Portable,
the Portable indicator light will turn red when you insert the Portable
into the Docking Station and green when the batteries are charged.
Note: Avoid contacting the connection pins on the Docking Station
10
Docking Station Overview
Portable
Indicator
Inserting the Portable into the Docking Station
Inserting a Voicedata Card into the Docking Station
If your Quest Portable is inserted into the Docking Station, remove
the Portable before you insert a Voicedata S card as follows:
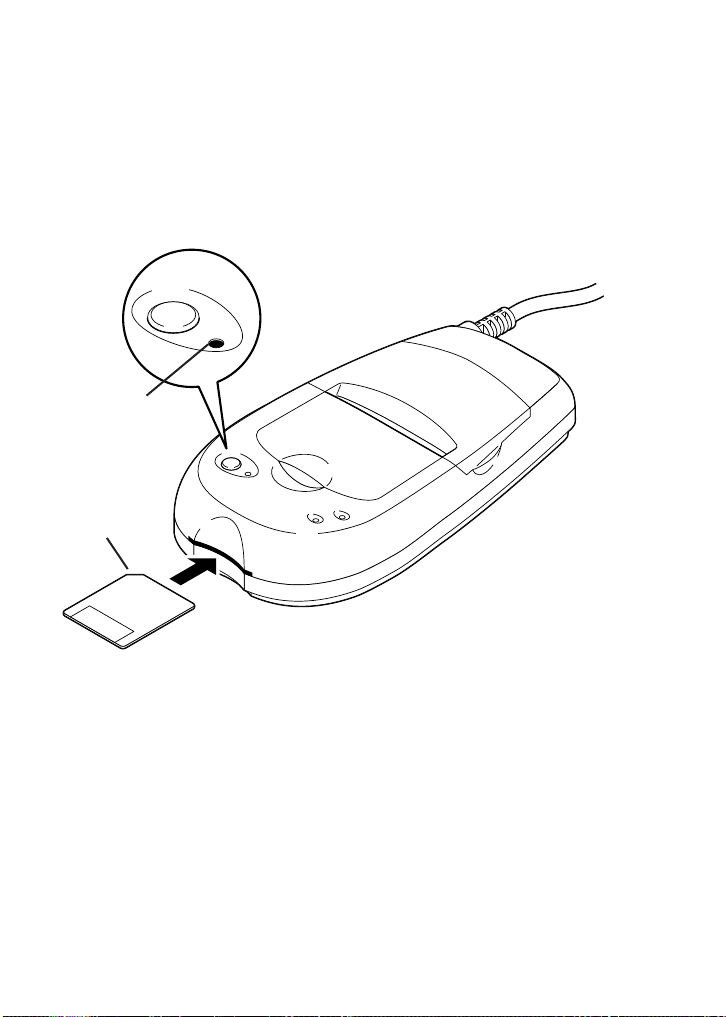
1. Insert the Voicedata S card into the Card Reader on the front of
the Docking Station as shown below. Note that the angled corner
of the card is inserted on the left side of the Card Reader. Hold the
card with the gold label down.
2. The Synchronize indicator light on top of the Docking Station
will remain illuminated green. Note that the Portable light on the
top front of the Docking Station should not be illuminated.
Recharging Spare Batteries
If you have Nickel Cadmium batteries, the Docking Station can
recharge one set in the Portable and a spare set in the battery
compartment. You may recharge the spare set as follows:
11
Docking Station Overview
Synchronize
Angled Corner
of Card
Synchronize
Indicator
Inserting the Voicedata Card into the Card Reader

Note: The batteries provided with the Portable are alkaline batteries
and are not rechargeable.
1. Verify that the Docking Station is plugged into a power source,
and open the battery compartment as shown.
2. Insert the two batteries according to the label inside the battery
compartment, then close the compartment and recharge for 12
hours. The Battery indicator light will turn red while recharging
and green when recharging is complete.
12
Docking Station Overview
Portable
Battery
Spare Battery
Recharging
Indicator
Recharging the Spare Batteries in the Docking Station
Installing the Desktop Software
This section describes how to install the Walkabout Desktop
software on your PC.
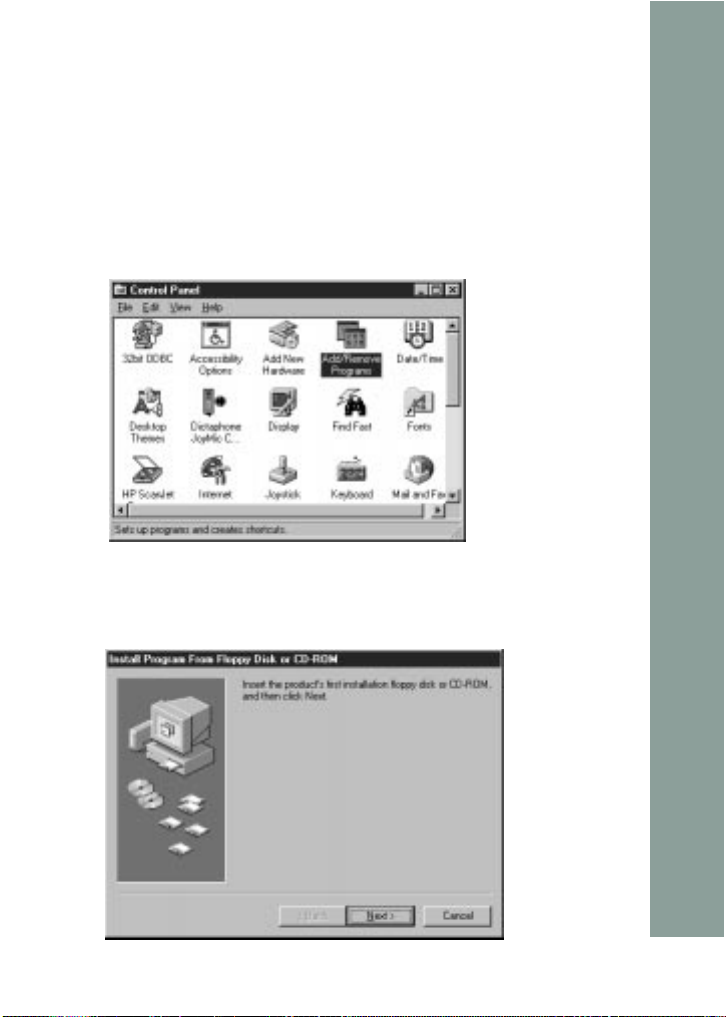
1. Insert the Walkabout Desktop Installation CD into the CD-
ROM drive on your PC.
2. Click Start on the Windows taskbar, and select Settings and
Control Panel.
3. Double-click the Add/Remove Programs icon.
4. Click Install under the Install/Uninstall tab and follow the
screen instructions, clicking Next to continue.
13
Installing the Desktop Software
Sample Windows Control Panel
Initial Software Installation Screen
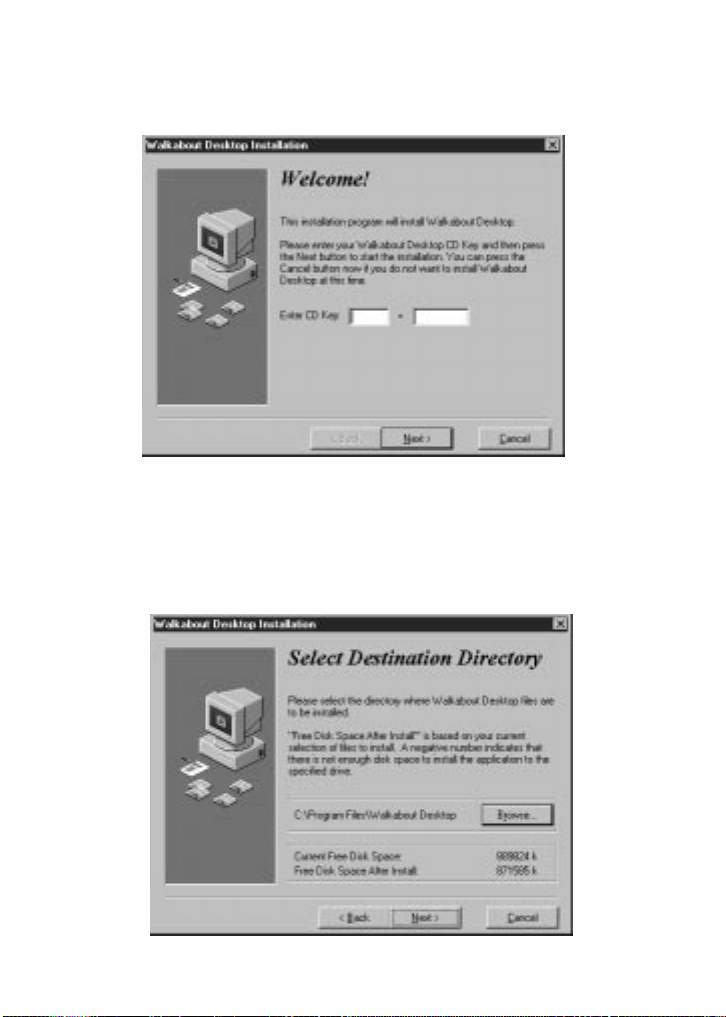
5. Type the first four characters of your Walkabout Desktop CD Key
(printed on the CD jacket) in the first field, press Tab to go to the
second field and enter the remaining characters, then click Next.
6. Click Next to accept the default destination directory for the
Walkabout Desktop software, or click Browse to find another
directory and then click Next.
14
Installing the Desktop Software
Walkabout Desktop Welcome Screen
Destination Directory Screen

7. As the installation process copies the software files to your PC,
it will display a progress meter on the screen, until all the
appropriate files are copied.
8. After all the files are copied to your PC, you will be prompted to
enter your name to set up a user account for the Walkabout
Desktop software. Type your name in the space provided, and
click OK to continue.
9.
15
Installing the Desktop Software
Sample Progress Meter Boxes
Enter Your Name
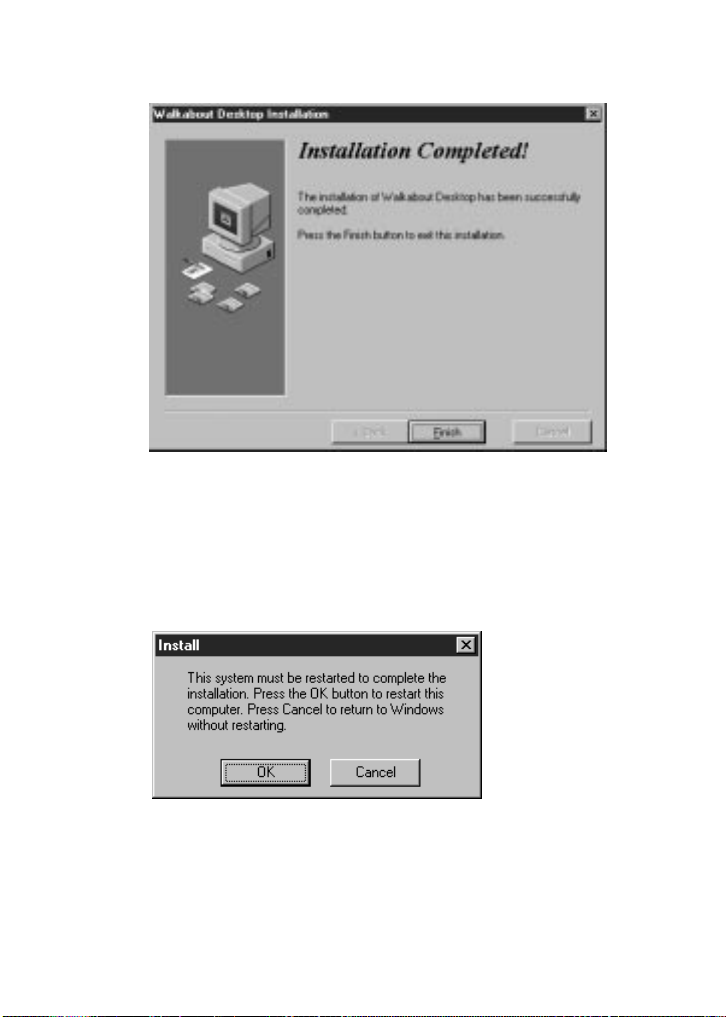
When you see the following message, click Finish to exit the
installation wizard.
10. The Walkabout Desktop program will appear in the Programs list
accessed from the Windows Start menu after you restart your PC.
Click OK to restart your PC and complete the installation process.
16
Installing the Desktop Software
Software Installation Completed Screen
Final Software Installation Step

Desktop Software Overview
Quest Walkabout™ Desktop software will help you manage your
voice files and data on your PC, and synchronize the exchange of both
voice and data between your Quest Portable and PC.You may use the
Walkabout Desktop software to:
• Manage digital voice files in up to 14 folders.
• Record, copy, play, or edit voice files.
• Send, receive, and verify transmitted voice e-mail.
• Enter detailed organizer data including address, appointment, and to-
do task data.
• Synchronize the exchange of voice files, voice e-mail and organizer
data between your Quest Portable and PC.
• Synchronize the exchange of voice files and voice e-mail between
a Voicedata S card inserted into the Docking Station and your PC.
• Set up multiple User Accounts to allow a number of Quest Portables
to exchange data with a PC through a single Docking Station.
• Synchronize the exchange of Outlook e-mail and organizer data
between your Quest Portable and specific Outlook™folders on
your PC.
Starting the Software
To start the Walkabout Desktop software:
1. Click Start on the Windows taskbar.
2. Select Programs from the Start menu.
3. Select the Walkabout Desktop program.
4. Click the Walkabout Desktop icon to start the software.
Note: Perform the first three steps and click this icon to request
the Walkabout Sync Manager screen.
17
Desktop Software Overview
Other manuals for Walkabout
2
Table of contents
Other Dictaphone Docking Station manuals


