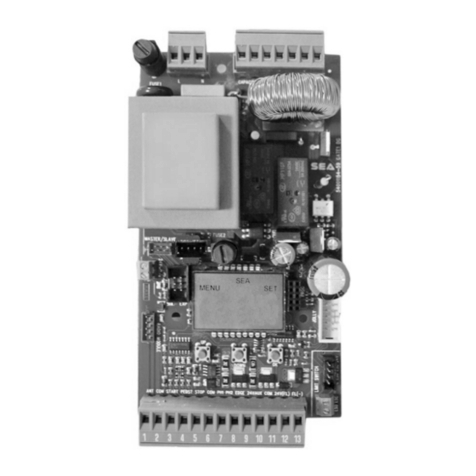
AUT/MANUAL (Step-by-Step /Manual operation) CLOSE:
The control unit is supplied by the manufacturer with the manual “User Present” operation mode
disabled. To enable the function proceed as follows: use the SEL button (1 second) to navigate to
the LED F4 UOMO/CH when flashing and press the SET button: the LED F4 UOMO/CH will then
remain lit in a fixed manner and programming is complete (The acoustic signal indicates the success
of the operation).
In this mode, using both the radio control and thelow voltage keypad to control the gate, thefollowing
operation is obtained: the control is constantly enabled so that the gate or shutter can be moved as
necessary (CLOSE). The movement stops immediately when the control is released. Repeat the
operation to restore the previous configuration.
WARNING: this function is incompatible with automatic reclosing, therefore
activating it will automatically deactivate the automatic reclosing. In order to activate
automatic reclosing, first deactivate the dead man function.
AUT/MANUAL (Step-by-Step /Manual operation) OPEN:
The control unit is supplied by the manufacturer with the manual “User Present” operation mode
disabled. To enable the function proceed as follows: press the SEL key for 1 second (to enter the
configuration mode), use the SEL button to navigate to the LED F5 UOMO/AP when flashing and
press the SET button: the LED F5 UOMO/AP will then remain lit in a fixed manner and programming
is complete (The acoustic signal indicates the success of the operation).
In this mode, using both the radio control and thelow voltage keypad to control the gate, thefollowing
operation is obtained: the control is constantly enabled so that the gate or shutter can be moved as
necessary (OPEN). The movement stops immediately when the control is released. Repeat the
operation to restore the previous configuration.
Acoustic signal Programming (BEEP)
Acoustic signal programming (BEEP)
The control unit has the default sound signal (BEEP) active.
To disable the function press the SEL key for 1 second (to enter the configuration mode) at this
point press the SEL key 5 times until the F6 BEEP LED flashes at this point press the SET key for
one second until you see the LED F6 BEEP off accompanied by an acoustic signal indicating the
success of the operation.
Flashing / courtesy light:
(Selection of the flashing light or the courtesy light).
The central has a 230 Vac output, for connection to a flashing light or a courtesy light. The central
is supplied by the manufacturer with the flashing function predisposed. If you wish to set up the
courtesy light function, proceed as follows:
Press the SEL key for 1 second (to enter the configuration mode). Go to the SEL button, when the
LED F7 LAMP / CORT light flashes then press SET, at the same time the LED F7 LAMP / CORT
light will down permanently. Repeat the operation if you wish to put the previous configuration back
into operation. (The acoustic signal indicates the success of the operation).
Flashing function:
The 230 Vac output will be activated each time that the automation is moving, for the duration of the
motor time. In cases where the time of pause is memorised, the flashing light will also be active
during the pause (The acoustic signal indicates the success of the operation).
Functioning of the Courtesy light:
The 230 Vac output will be activated for the entire duration of 3 minutes, each time that an
ascent command is given.
MOTOR OPERATING TIME (Programming the motor operating time max. 4 minutes)
The control unit is factory supplied with a working time motor predefined equal to 30 sec.
If a reprogramming of the motor operating time is needed, it must be effected through the closed
frame in the following manner:
press the SEL key for 1 second (to enter the configuration mode) and set the SEL button on the
LED F2 T. MOT. flashing led, then continuously press the SET button. The rolling shutter will start
the opening; when you have reached the required height, release the SET button key and at the
same time the motor time storage will be completed and the LED F2 T. MOT. led will remain lit and
fixed (The acoustic signal indicates the success of the operation).
If you want an infinite motor time, using the SEL task when the LED F2 T. MOT. is flashing press
for less than 1 second the SET button, at the same time the Led will shut off and the operation will
be completed.
It is advisable to memorise a time that is a few seconds longer after the frame has
reached the end.
T. PAUSE: (Maximum programmed automatic wing closing 4 minutes)
The manufacturer furnishes the board with an automatic closure (pause time equal to 15 sec).
If a reprogramming of the automatic closing time is needed, it must be effected in closed frame in
the following manner:
press the SEL key for 1 second (to enter the configuration mode) press the SEL button until the LED
F3 T. PAUSA flashes, then press and hold down the SET button for a period equal to the desired
pause interval between closing and opening operations, at the expiry of the desired time leave the
SET button, at the same time the memorisation of automatic closing time will be determined and the
LED F3 T. PAUSA will be lit (The acoustic signal indicates the success of the operation).
If decided not to have the automatic closing, take position on the flash of the LED F3 T. PAUSA
after press the SET task for less than a second, at the same time the Led will shut off and the
operation will be concluded (The acoustic signal indicates the success of the operation).
WARNING: the “User Present" function in closing is incompatible with the automatic reclosing
function, therefore activating the “User Present" function will automatically deactivate the automatic
reclosing, instead to be able to activate the automatic reclosing you must first manually deactivate
the “User Present" function.
END RUN CONTROL FUNCTION
The END-RUN control function is provided ACTIVATED (LED F8 ON)
To disable the function press the SEL key for 1 second (to enter the configuration mode). Go to the
SEL button, when the LED F8 F.C. light flashes then press SET, at the same time the LED F8 F.C.
light will down permanently.
RESET:
If it necessary to reset the program board to its default values, that is with no memorised data, press
both SEL and SET buttons continuously (3 seconds), all the RED LEDs will flash at once
Note:
Before starting the opening or closing maneuver, the control unit will emit 2 flashes / beeps indicating
that the engine is about to start. With the door open, by pressing the opening key (in the 2-key radio
control) the control unit will emit an acoustic signal that warns the user that sliding doors and rolling
shutters, it is already totally open.
Caratteristiche generali CENTRALE
Power supply: 230 Vac 50-60Hz 4W
Flashing light output: 230 Vac 40 W
Motor output: 230 Vac 1200 W
Button input: N. OPEN
Safety device input: N. CLOSE
Working temperature: da -30 a +50 °C
Radio receiver: 433.92 Mhz
TX max. codes in memory: 75
Aux. power output: 12 Vac 1W max.
Dimension of panel: 160 x 110 x h70
Container: ABS V-0 ( IP43)
CENTRALINE DESIGNED AND BUILT IN ITALY


