DieselBoss DB5 Dual User manual

2794 Three Lakes Road Suite 170, Albany Oregon 97322, 66- 51-2346, Storekeeper@dieselboss.com
1
DB5 Dual / Single Dash Cam User Manual
Thank you for your purchase of the DieselBoss DB5 model professional dash / windshield camera
system. This product combines industry-leading wide dynamic digital seamless loop recording with 150° ultra-wide-angle viewing and
recording. This camera combines WiFi connectivity, ultra HD (4K) with WDR, GPS position, shock sensing, and 2
nd
camera capabilities.
It can be purchased either with or without the extra waterproof exterior camera.
otes and Precautions: (improper usage will void the warranty)
◆
Oils from your fingers can cause the picture to become blurry if you smudge the lens. Only clean the lens and screen with non-ammonia,
mild glass or screen cleaners. For example, TV screen or computer screen cleaners work well.
◆
Use only the included standard charger cord, as too much voltage can cause device failure. If you need to hard-wire the power, use a
female cigarette lighter hard wire pigtail, or call DieselBoss for advice first.
◆
There are no user-serviceable parts inside. Disassembly will void the warranty.
o. ame User buttons and interface description (match the numbers above to the chart below)
1 Power button Long press for power on / off,
Short press to turn on / off the screen backlight once it is on.
2 Mode switch key (plus
panic button)
Switches modes between video recording / photo / playback functions, short press this button
during video recording to lock the current video file (this will prevent automatic overwriting of the
current video segment.)
3 OK button Recording / photo / confirmation button. Short press this button to start video recording, and
short press again to stop recording.
In camera mode, press to take pictures. (also functions as “Ok” button in menus.)
4 UP button Functions as an up-function button in menus. Also switches the screen between main cam and
2
nd
cam view when in standby or video recording mode.
5 Menu button Short press to enter the “Setup” menus when in Standby
6 Down button Functions as down button in the menus.
Also is a shortcut button to turn on / off audio recording when in video mode.
7 Display screen 4-inch high-definition IPS display screen
8 Reset button Used to reboot the device when the device in the event of a lock-up. (use paperclip)
9 Rear View In Rear View Camera (10 0P) interface input socket (if 2
nd
camera is owned)
10 TF card slot Memory card slot (use quality Class 10 cards up to 256 GB in size)
11 GPS interface Used to connect the GPS receiver antenna
12 USB interface Used with the included USB cable to connect a PC for video or picture transfer

2794 Three Lakes Road Suite 170, Albany Oregon 97322, 66- 51-2346, Storekeeper@dieselboss.com
2
Camera installation
1. Inserting the memory card: Make sure to insert SD Card in the correct orientation and press until the click is heard.
Note: Make sure to format the SD Card before using the camera for the first time.
2. Removing the memory card: press the memory card in until click is heard, then let go.
Note: Do not remove or insert a memory card while the device is powered on to prevent damage to the memory card.
3. Camera should be installed close to the top center of the windshield. Split windshields usually to right of split. Use the included
suction cup mount or the optional bolted mount (sold separately at dieselboss.com.)
4. Connect the power supply cord to the camera and the cigarette light socket in the rig.
5. Equipment on / off
6. Secondary camera. If you are connecting a second camera, route the wire in the truck such that it does not get kicked or caught by
movement. Plug it into the 2
nd
cam socket on top of the camera before powering up.
Setting up the camera
Setting date and time:
1. Press Menu button twice, select the date / time by ▲ or ▼, then press OK to enter the setting
2. Press the ▲ or ▼ button to adjust the value, then press the OK button to move to the next field, set your date and time, and then
press Menu button to exit.
Video Recording Operations:
1. When the engine is started, the device will automatically turn on and start recording if it is connected to a switched cigarette lighter
power socket. In this case, when the engine is turned off, it will automatically stop recording and turn off in about 15 seconds. If
connected to an “ALWAYS on” socket, then the camera will remain on or off until you press the power button manually.
2. Depending on the video segment time you have set, the device will record in 1, 3, 5, or 10-minute seamless segments and with
AUTOMATICALLY loop over the oldest videos from the beginning continuously. (You can also set Segment time to “OFF” which will allow
the camera to record one long video until the SD Card is full.) If set to “Off” the camera will NOT loop and will stop recording until you
clear old videos manually.
3. G-sensor emergency triggered video will also not be overwritten and must be manually deleted.
Using Dash cam to take pictures as a 12 MP still camera
1. Short press the M key to switch to camera mode. The upper left corner of the screen shows the camera icon.
2. Short press the OK button to take pictures. The screen will flash briefly when the picture has been captured.
Video & photo playback operation
1. Short press the M key, to switch to playback mode
2. Short press ▲ ▼ key to switch between videos.
3. Short press OK button to play the selected video file, and short press OK again to pause playback.
Menu operation
1. Recording must be stopped before you can access the menus.
2. Press the key
目
目目
目
once to open the settings menu or press twice to go to the next menu.
3. Pressing the ▲ or ▼ key will allow you to change the settings.
4. Select the settings you want to change and press the OK button to enter the change.
5. Short press
目
目目
目
to exit.
Special features:
G-sensor
When large enough shock is detected the device can be configured to automatically start recording.
Sensitivity can be adjusted to High - Medium - Low – Off in the menu. The factory default is medium. G-sensor videos will not be
over-written and need to be manually deleted.
Locking Videos
Press the M button while recording to lock the video (so it can’t be automatically overwritten.)
Parking monitor
1 When parking monitoring is turned on and the vehicle receives any external vibration (while the vehicle is off) the camera will
automatically record a 10-15 second video segment at that moment.
2. Parking Monitoring triggered videos work like G Sensor videos and must be manually deleted.

2794 Three Lakes Road Suite 170, Albany Oregon 97322, 66- 51-2346, Storekeeper@dieselboss.com
3
Note: The parking guard function does not work when the camera is configured to turn on/ off manually. It works only when the
camera shuts down automatically with the ignition.
Motion detection
When motion detection mode is on, the device will remain in standby until movement is detected. When movement is detected,
recording will be triggered (for 10 seconds) and a small yellow dot will appear in the upper right-hand corner of the screen.
Menu Options Description Available options
Video Quality Sets the resolution of video files. Higher
resolutions use memory faster. Dual-cams
requires the last option.
UHD-4K (2 0×2160) @ 24 fps, QHD-2K (2560×1440) @ 30 fps,
FHD (1920×10 0) @ 60 fps, FHD (1920×10 0) @ 20 fps, HD
(10 0×720) @ 120 fps, 60 fps, or 30 fps, OR FHD P30
+
FHD P30
10 0P front plus 10 0P 2
nd
cam (set this when both cameras in
operation.)
Loop recording Sets the video segment time 1 minute, 3 minutes, 5 minutes, 10 minutes, or Off
Shrink video
recording
Set the number of video frames 100MS, 200MS, 500MS, off
WDR Wide dynamic range: automatic adjustment of
lighting
On, Off
Exposure
compensation
Brightens or dims the video. Default is 0.
Positive is brighter. Negative is dimmer.
+2.0, +5/3, +4/3, +1.0, +2/3, +1/3, + 0.0, -1 / 3, -2/3, -1.0, -4/3,
-5/3, -2.0
Motion Detection Automatically record when detecting movement
(in standby mode.)
On, Off
Video, audio Record audio or not On, Off
Time watermark Watermark of the date and time On, Off
G-sensor Shock video is saved separately High, Medium, Low, Off
Parking
monitoring
When the car is stopped and the cam is in
standby, dash cam will start recording if any
vibration is detected.
On, Off
License plate
number
You can input license plate number of the car and
display it in the video file
Enter the number
ADAS Lane departure and object warning On, Off
Date / time Date and time Can set year, month, day, hour, minute, second
Automatic
shut-down
Auto turn off cam after vehicle is shut off 1 minute, 2 minutes, 3 minutes, 5 minutes, 10 minutes
Button sound the button sound when operating system On, off
language settings The language of the operation menu Set your language. Default is English.
TV mode Video output standard (USA is NTSC) NTSC, PAL
Light source
frequency
USA is 60 Hz 50HZ, 60HZ
Screen protector Option to turn off the screen but NOT stop
recording
Off, 1 minute, 3 minutes
Format Delete the data on the memory card TF card
Default setting Restore factory settings Cancel, Confirm
Version Factory software version Software version number
Product Specification Sheet:
File formats Video: MP4 / Photo: JPG
Video resolution 4K, 2K, 10 0p, 720p, or Dual 10 0p
Processor Dual core with WDR technology and 1GB Ram

2794 Three Lakes Road Suite 170, Albany Oregon 97322, 66- 51-2346, Storekeeper@dieselboss.com
4
Uninterrupted loop recording Seamless loop recording supported
Auto on/off Supports auto on/off when connected to switched socket
Date / Time stamp Supported (on / off)
Lens aperture F2.0
Collision & Motion detection Supported
Storage card TF card (maximum support 256GB)
Reverse image Supported
Microphone (Audio) Supported
Built-in speaker Supported
Night vision / low light Starlight night vision supported / Variable exposure option
Current frequency 50HZ / 60HZ
USB function Supported
Power interface Cigarette lighter 12 – 24 Volt DC
Battery Built-in battery
Updating Firmware: (RARE: only needed if directed by DieselBoss)
1. Download the firmware to your computer & unzip the files to an SD Card (use main directory alongside the DCIM folder.)
2. Insert SD Card into camera and turn on.
3. Camera lights will begin blinking. When update is completing the blinking will speed up and turn into a solid blue light (at which
point the camera will boot up.) Remove the card and erase the firmware files from it.
Troubleshooting
A. Screen goes blank after 1-3 mins of recording.
The screen saver is probably on. With recording stopped, press the MENU button (button 5) twice and go down to the option that says
“Screen Saver” (Button 3,) select off, and press OK to save your changes. Some people like this function so that the screen does not distract
them, especially at night. In that case, choose 1 or 3 minutes. Recording does not stop when screen saver is active.
B. I have two cameras but only one is recording.
In single cam operation, there are many different resolution quality modes to choose from; however, to enable dual camera operation, you
must choose the FHD P30x FHD P30 (1080p resolution both cameras) setting. If only using one camera you can choose higher resolutions (up
to 4K) or lower down to 720p for extended card times.
C. Device won’t turn on.
Check power to cord to the device. Many trucks have loose power sockets. If you are sure that 12 volts is flowing then perform the “Reset”
procedure below. Call or email DieselBoss.com if you need a new power cord.
D. Camera automatically stops recording as soon as recording starts and / or it doesn’t overwrite old videos.
High-definition video requires a quality high-speed SD Card. For the camera to function correctly, the SD Card must be Class 10 or higher. If
the card has been in use for a while it may need to be “formatted” in the MENU.
Since G Sensor and other sensor videos are automatically locked, those can also cause the overwriting function to malfunction if the card is full.
Check the card to see if there are many sensor recordings. Format the card to erase, or save those videos to a computer or mobile device and
then format if they are important.
E. Videos are unclear or fuzzy.
Inspect the lens of the camera and make sure that there is no grime or debris. Clean camera lens or windshield as necessary.
F. Video segment time setting is different than actual video lengths.
Check whether the motion detection function is enabled, because when motion detection is triggered, segment time settings aren’t applied.
G. The quality or lighting of video recording varies from video to video at different locations or times of day.
Background lighting can drastically affect the quality of recorded video. Video will always be best when recorded in a well-lit area. The camera
will record even in low light but cannot record in pitch blackness. Use the exposure setting in the menu to brighten or dim the video.
H. Camera has crashed or appears frozen.
Power down device using the power button. Power on. To perform a “RESET” if the camera will not respond, unplug the power cord from
the vehicle and press in the small reset button inside of the reset hole for 15 seconds. Plug back into power a retry.
2794 Three Lakes Road Suite 170, Albany Oregon 97322, 66- 51-2346, Storekeeper@dieselboss.com
5
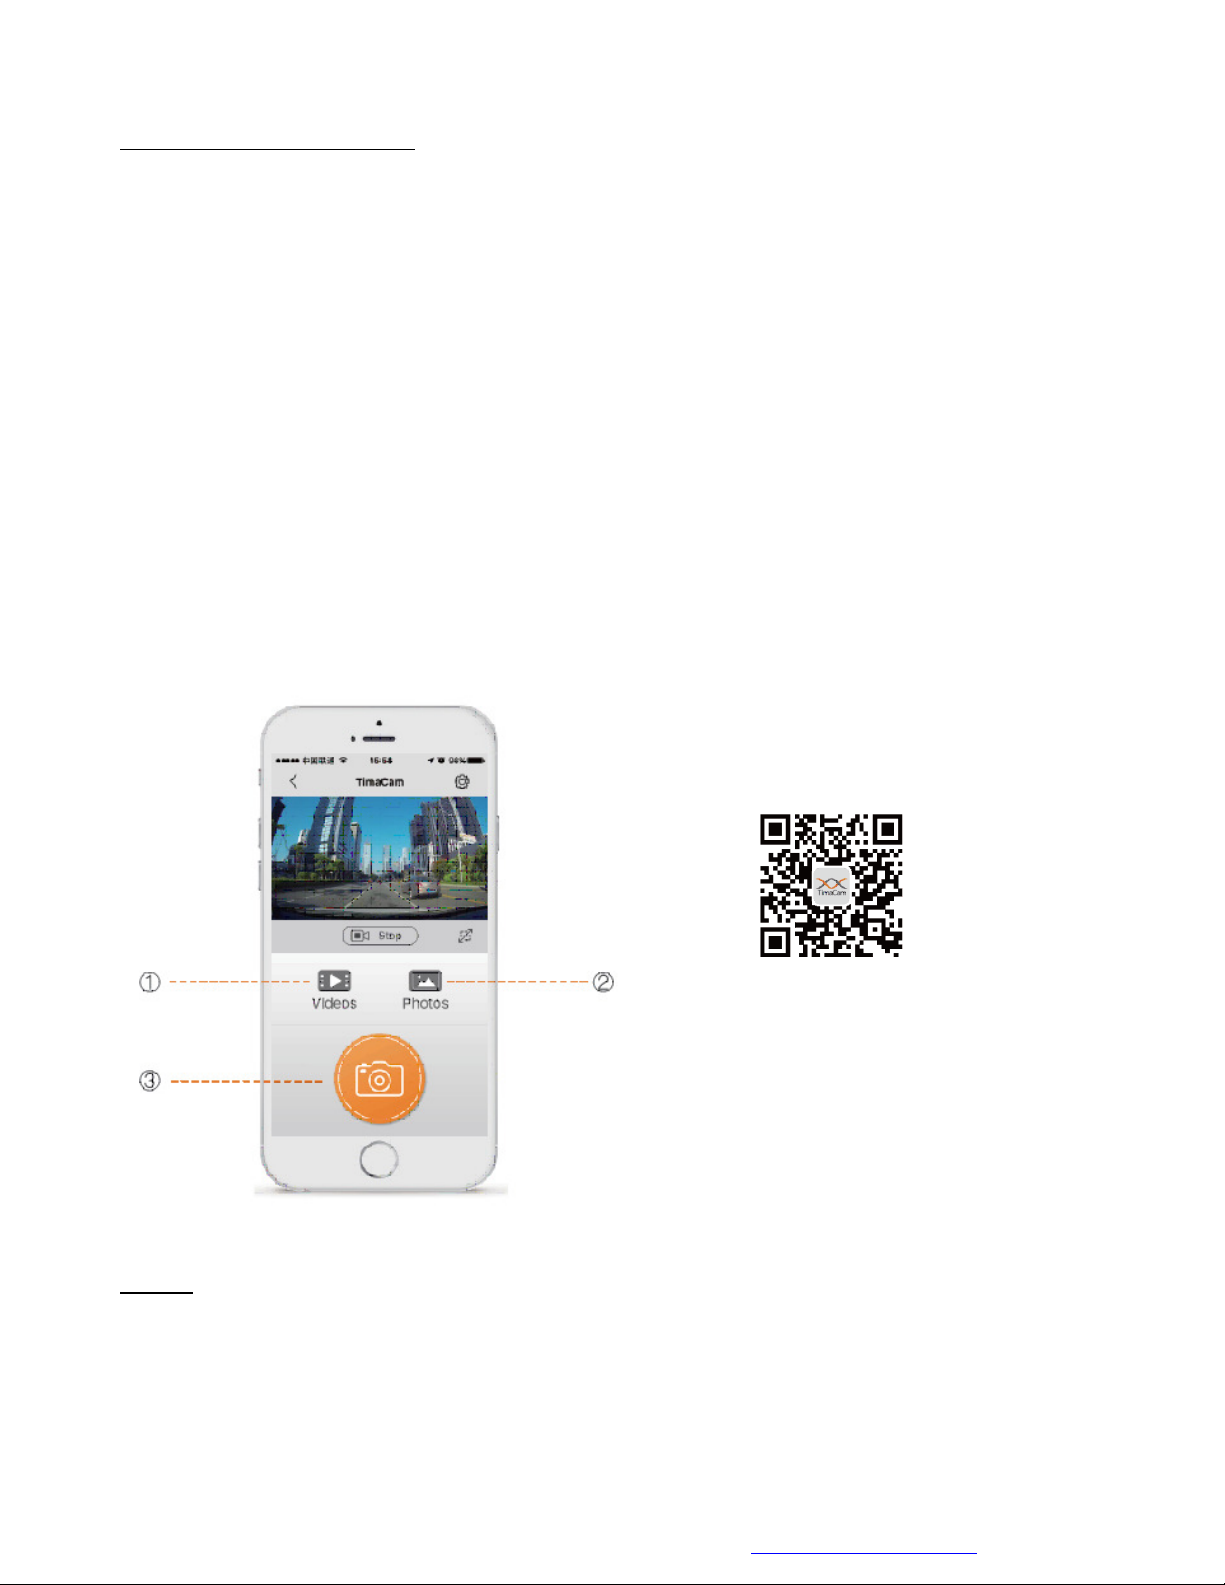
Using the Android / Apple iOS camera app
◆ Search for and install the app called “TimaCam” from the Apple or Google play app store to your mobile device. You can also use the QR
code below with most mobile cameras to open the app download page.
◆ Open the TimaCam app and tap “Recorder” to connect to your camera or “Local Albums” to view past videos that you have previously saved
to this phone or tablet through the app.
◆
◆◆
◆ To connect to the camera after tapping “Recorder” you will see the app automatically search for nearby WiFi devices.
Your camera will be named “ VT_CARDVxxxxx” The X’s will be your serial number of your unit. Tap that device to connect
and use “12345678” (without the quotes) as the default password.
◆ NOTE: Certain Android Versions may require you to turn off mobile data before being able view/ download videos.
If you are connected to the camera via Wi-Fi but get a “Connect Failed” message swipe down at the top of your screen to pull down the
quick-access menu of your mobile device. There you will see a button that says “Mobile Data.” Tap on the icon to turn it off and press OK to
confirm. Try connecting again with mobile data disabled. Reenable mobile data wen finished.
◆ Once connected to your camera with the app, you will see options to Live view, or Save stored videos and pictures across to your phone or
tablet. Remember that many phones an tablets do not have the storage space to copy an entire contents of the camera over.
◆ In the event of an accident, the best way to remotely store or transfer video to someone back home or away from you will be either to
upload it to a cloud service, or upload the video to YouTube/ Vimeo, or use the included MicroSD adapter to plug the SD Card into the card
reader of your computer, or plug the camera directly in to your computer (using included mini USB Cable) and pull the videos off directly.
◆ ote: Uploading HD video to a web site, email, or cloud service can use a great deal of mobile data!
Disclaimer
We are not responsible for any loss caused by file corruption, data loss, etc. when dash cam is malfunctioning for any reason.
As always, CALL or email us with questions or concerns! We are here to help during daytime working hours Mon-Fri
via phone and 24/7 via email. Thanks for your business, from the DieselBoss family.
866-851-2346, or email storekeep[email protected]om
Table of contents
Other DieselBoss Dashcam manuals


