Digistar TMR3610 User manual

D4023-EN Rev B June 1, 2016
TMR3610
Operators Manual

2 TMR3610 Operators Manual D4023-EN
Digi-Star LLC
W5527 Hwy 106
Fort Atkinson, WI 53538
USA
Tel: 800-225-7695
Digi-Star International
Digi-Star Europe B.V.
J.F. Kennedylaan 235
NL-5981 WZ Panningen
The Netherlands
Tel: +31 (0)77 462 92 64
D4023-EN TMR3610 Operators Manual Rev B LAC
All rights reserved. Reproduction of any part of this manual in any form whatsoever without Digi-Star’s
express written permission is forbidden. The contents of this manual are subject to change without
notice. All efforts have been made to assure the accuracy of the contents of this manual. However,
should any errors be detected, Digi-Star would greatly appreciate being informed of them. The above
notwithstanding, Digi-Star can assume no responsibility for errors in this manual or their consequence.
© Copyright 2016 Digi-Star Fort Atkinson (U.S.A.)

D4023-EN TMR3610 Operators Manual 3
Table of Contents
1.0 INTRODUCTION................................................................................................................. 5
2.0 TMR3610 SPECIAL FEATURES........................................................................................ 6
3.0 ACCURACY STATEMENT ................................................................................................. 7
4.0 TECHNICAL SPECIFICATIONS......................................................................................... 8
5.0 SAFETY DURING USE....................................................................................................... 9
6.0 FEED MANAGEMENT SOFTWARE................................................................................. 10
7.0 INDICATOR OVERVIEW .................................................................................................. 11
8.0 OPERATION ..................................................................................................................... 13
8.1 Turn on Scale................................................................................................................. 13
8.2 Zero Balance Indicator................................................................................................... 13
8.3 Tare and Net Gross ....................................................................................................... 14
8.4 Print Key ........................................................................................................................ 15
9.0 DATA TRANSFER............................................................................................................ 16
9.1 USB Drive Mode ............................................................................................................ 16
9.2 RF Datalink Modes ........................................................................................................ 16
10.0 INDICATOR DATA FORMATS....................................................................................... 17
10.1 Loading And Feeding Complete Loads Mode.............................................................. 17
10.2 Resize Recipe Weight.................................................................................................. 18
10.3 Loading Recipe............................................................................................................ 19
10.4 Unloading to Pens........................................................................................................ 19
10.5 Recipe and Pen List Mode........................................................................................... 20
10.6 Loading Recipe............................................................................................................ 21
10.7 Unloading Pens........................................................................................................... 21
11.0 ADVANCE COMMANDS ................................................................................................ 22
11.1 Unload Partial Pens ..................................................................................................... 22
11.2 Go Back to Skipped Ingredient .................................................................................... 22
11.3 Change Feeding Number............................................................................................. 23
11.4 Clear Scale Memory..................................................................................................... 23
11.5 Re-Use Recipe/Pen Data............................................................................................. 24
11.6 Mixer Time................................................................................................................... 24
11.7 Rotation Counter.......................................................................................................... 25
11.8 Drive Ratio................................................................................................................... 25
11.9 Maintenance Message................................................................................................. 26
11.10 Add a Pen to Pen List ................................................................................................ 27
12.0 COMMONLY USED DIRECT ACCESS NUMBERS (D.A.N.)......................................... 28
12.1 Pre-Alarm..................................................................................................................... 28
12.2 Manual Pen Advance................................................................................................... 28
12.3 Auto Ingredient Advance.............................................................................................. 28
12.4 Tolerance..................................................................................................................... 29
12.5 Pen Tolerance.............................................................................................................. 29
12.6 Batch Advance Delay.................................................................................................. 29
12.7 Scale ID or Truck ID..................................................................................................... 30
12.8 Scale Number.............................................................................................................. 30
12.9 Resize Option .............................................................................................................. 30
12.10 Change Time ............................................................................................................. 31
12.11 Change Date.............................................................................................................. 31
Table of Contents

4 TMR3610 Operators Manual D4023-EN
13.0 MANUAL PROGRAMMING OF RECIPES ..................................................................... 32
13.1 Switch to Manual Programming................................................................................... 32
13.2 Change Entry Method.................................................................................................. 32
13.3 Ingredient Re-name ..................................................................................................... 33
13.4 Print Ingredients Names............................................................................................... 33
13.5 Enter New Recipe........................................................................................................ 34
13.6 Edit Recipe................................................................................................................... 36
13.7 Erase a Recipe ............................................................................................................ 37
13.8 Review a Recipe.......................................................................................................... 38
13.9 Printing Single Recipe.................................................................................................. 38
13.10 Printing All Recipes.................................................................................................... 39
13.11 Loading a Recipe....................................................................................................... 39
13.12 Unloading to Pens...................................................................................................... 39
14.0 OTHER FUNCTIONS...................................................................................................... 40
14.1 Hold.............................................................................................................................. 40
14.2 Using Dimmer Option................................................................................................... 40
15.0 DIRECT ACCESS NUMBERS (D.A.N.) .......................................................................... 41
15.1 Options Changed by User............................................................................................ 41
16.0 INSTALLATION .............................................................................................................. 55
16.1 Indicator Mounting ....................................................................................................... 55
16.2 Cable Connections....................................................................................................... 57
16.3 Connecting Load Cells in Junction Box........................................................................ 59
16.4 Load Cell Direction....................................................................................................... 59
17.0 OPTIONAL EQUIPMENT................................................................................................ 60
17.1 Cab Controls (Wireless)............................................................................................... 60
17.2 Data Transfer Options.................................................................................................. 60
17.3 Transmitter/Receiver.................................................................................................... 60
17.4 Remote Indicators........................................................................................................ 61
17.5 Rotation Counter Sensor (Kit p/n: 408088).................................................................. 61
18.0 TROUBLESHOOTING.................................................................................................... 62
19.0 DECLARATION OF CONFORMITY................................................................................ 64
20.0 NOTES............................................................................................................................ 65

D4023-EN TMR3610 Operators Manual 5
1.0 INTRODUCTION
Thank you for your purchase of a Digi-Star TMR3610 scale indicator. Your TMR3610 is the
culmination of more than 30 years of agricultural weighing engineering and expertise. With
proper operation and preventative maintenance, the TMR3610 will last for many years.
The Digi-Star TMR3610 is primarily designed for weighing agricultural animal feed products
during the loading and unloading of mobile and stationary feed mixers. The TMR3610 can
also be used on feed delivery boxes, forage wagons, grain carts, and animal scales.
The TMR3610 is not for use with applications for which the TMR3610 is not intended, or as
outlined in this manual.
Use of the TMR3610 outside of its intended purposes may result in inaccurate weight
measurement or damage to instrument.
Introduction

6 TMR3610 Operators Manual D4023-EN
2.0 TMR3610 SPECIAL FEATURES
Preset Weight
The TMR3610 indicator provides simple to use and very useful Preset Weight feature. Using
the numeric keypad the operator can enter the desired weight of product that the operator
wants to load or unload. Once loading or unloading begins the TMR3610 will count down to 0
(zero). As the weight approaches 0 the audio and visual alarms will begin to pulse with the
frequency of the pulses increasing the closer the preset weight gets to 0. At 0 the alarm light
and buzzer will sound continuously.
See section 10.3 for details.
Rotation Counter / Timer
The Rotation Counter / Timer provides the useful benefit of monitoring mix revolutions or mix
time and a warning light, buzzer, or external signal will indicate when the desired mix
revolutions or time has been achieved. For this the TMR3610 uses an optional Rotation
Counter Sensor (See Option Equipment Section: 17.0) which is fitted to the drive line of the
feed mixer. See section 11.7 for details.
Maintenance Message
The Maintenance Message is available with the Machine Hour Meter function noted above and
provides the ability for the equipment manufacturer or equipment owner to utilize the TMR3610
to display a specific Service or Maintenance message after a predetermined period of
operation similar to a Change Oil message in an automobile.
See section 11.9 for details.
Machine Hour Meter
The TMR3610 when fitted with the Rotation Counter Sensor can be configured to record hours
of operation. The Machine Hour Meter can provide valuable information to aid the user in
determining when maintenance and upkeep is required.
See section 11.6 for details
TMR3610 Special Features

D4023-EN TMR3610 Operators Manual 7
3.0 ACCURACY STATEMENT
READ THIS SECTION BEFORE USING THE SCALE SYSTEM
Digi-Star Scale Systems are designed and manufactured to provide the greatest accuracy
possible. However, proper installation and use are required in order to obtain the highest level
of accuracy.
When using the scale system, the following must be considered in order to realize the best
possible performance and accuracy.
Load cells must be installed with the proper orientation. Most Digi-Star load cells have a
label indicating either the “TOP” or bending direction of the load cell. Inspect load cells to
determine if the load cells are installed correctly. Incorrect installation of load cells will
result in inaccurate measurement.
Load cells should not be subjected to any strains or loads other than the weight of the load.
Stress or strain caused by misalignment or other factors when accurate weight readings
are desired will negatively affect the accuracy.
The weighing unit should be stationary with minimum movement, and on a level surface, to
insure that weight readings are as accurate as possible.
oThe effect of movement on accuracy depends on the speed and roughness of the
ground and application. Rougher terrain and faster and/or greater movement increases
the degradation of accuracy.
oA level surface is defined as being less than a 5” (13cm) change in rise over 10’ (3.0m)
of run. As the slope of the terrain increases, degradation of accuracy will also increase.
Accuracy Statement

8 TMR3610 Operators Manual D4023-EN
4.0 TECHNICAL SPECIFICATIONS
SIZE
10.25” long x 8.0” high x 4” wide (260mm x 190mm x 105mm)
WEIGHT
4.5 lbs. (2.04 Kg)
HELP MESSAGES
Context sensitive help messages in 10 languages, Long messages are scrolled
LOAD CELL EXCITATION
8 volts D.C. Nominal, Capable of driving ten 350 Ohms transducers, Short circuit
proof
AUTO TEMPERATURE
COMPENSATION
Of internal circuitry for high accuracy weighing measurements
LOAD CELL SIGNAL
Compatible with Load Cells with greater than 0.25 mv/v
CONNECTORS
AMP plastic weather resistant circular connector. Gold plated contacts.
POWER REQUIREMENTS
10.5 to 16.0 V.D.C. 160 mA nominal with four 350Ω L.C.
SET UP AND CALIBRATION
Via front panel or saved when downloading the setting files.
GROSS RANGE
999,999 max-display
LOW BATTERY WARNING
Enabled at 10.5V nominal
POUND/KILOGRAM
Selectable
DISPLAY
6 Digit Chip On Glass LCD 1.7” high
DISPLAY RESOLUTION
.01, .02, .05, .1, .2, .5, 1, 2, 5, 10, 20, 50, 100
DISPLAY UPDATE RATE
Selectable: 1, 2, 3, 4 times/sec.
MAX. DISPLAY
RESOLUTION
Adjustable to 40,000 counts max.
ZERO TRACKING
Selectable, On/Off
SPAN ACCURACY
±(.1% + .005%/ °F) or (.1% + 0.009% °C) full scale ± 1 output count
MOTION DETECTION
Selectable, On/Off
ZERO ACCURACY
(.005%/ °F) or (0.009% °C) full scale ±1 output count for 0.5 mv/v transducer
ENVIRONMENTAL
ENCLOSURE
IP65, IEC 529
WEIGH ALGORITHM
3 internally selectable digital filters to optimize performance (General, Slow, and
Fast)
HOLD MODE
Used in mobile applications to stabilize displayed weight while moving the scale
NON-VOLATILE MEMORY
Standard
OPERATING TEMP
-29°C to 60°C -20°F to 140°F
2 REMOTE INPUTS
(Power/Remote ports)
Tare /Print / Hold / Net Gross / M+ / Zero / TR Hold / Re-enter Preset / Switch/
INGRED
Technical Specifications
D4023-EN TMR3610 Operators Manual 9
5.0 SAFETY DURING USE
Danger: Indicates an imminently hazardous situation that, if not avoided, could
result in death or very serious injury.
Warning: Indicates a potential hazardous situation that, if not avoided, may result
in death or very serious injury.
Caution: Indicates a potential hazardous situation that, if not avoided, may result
in a minor injury.
NOTE!
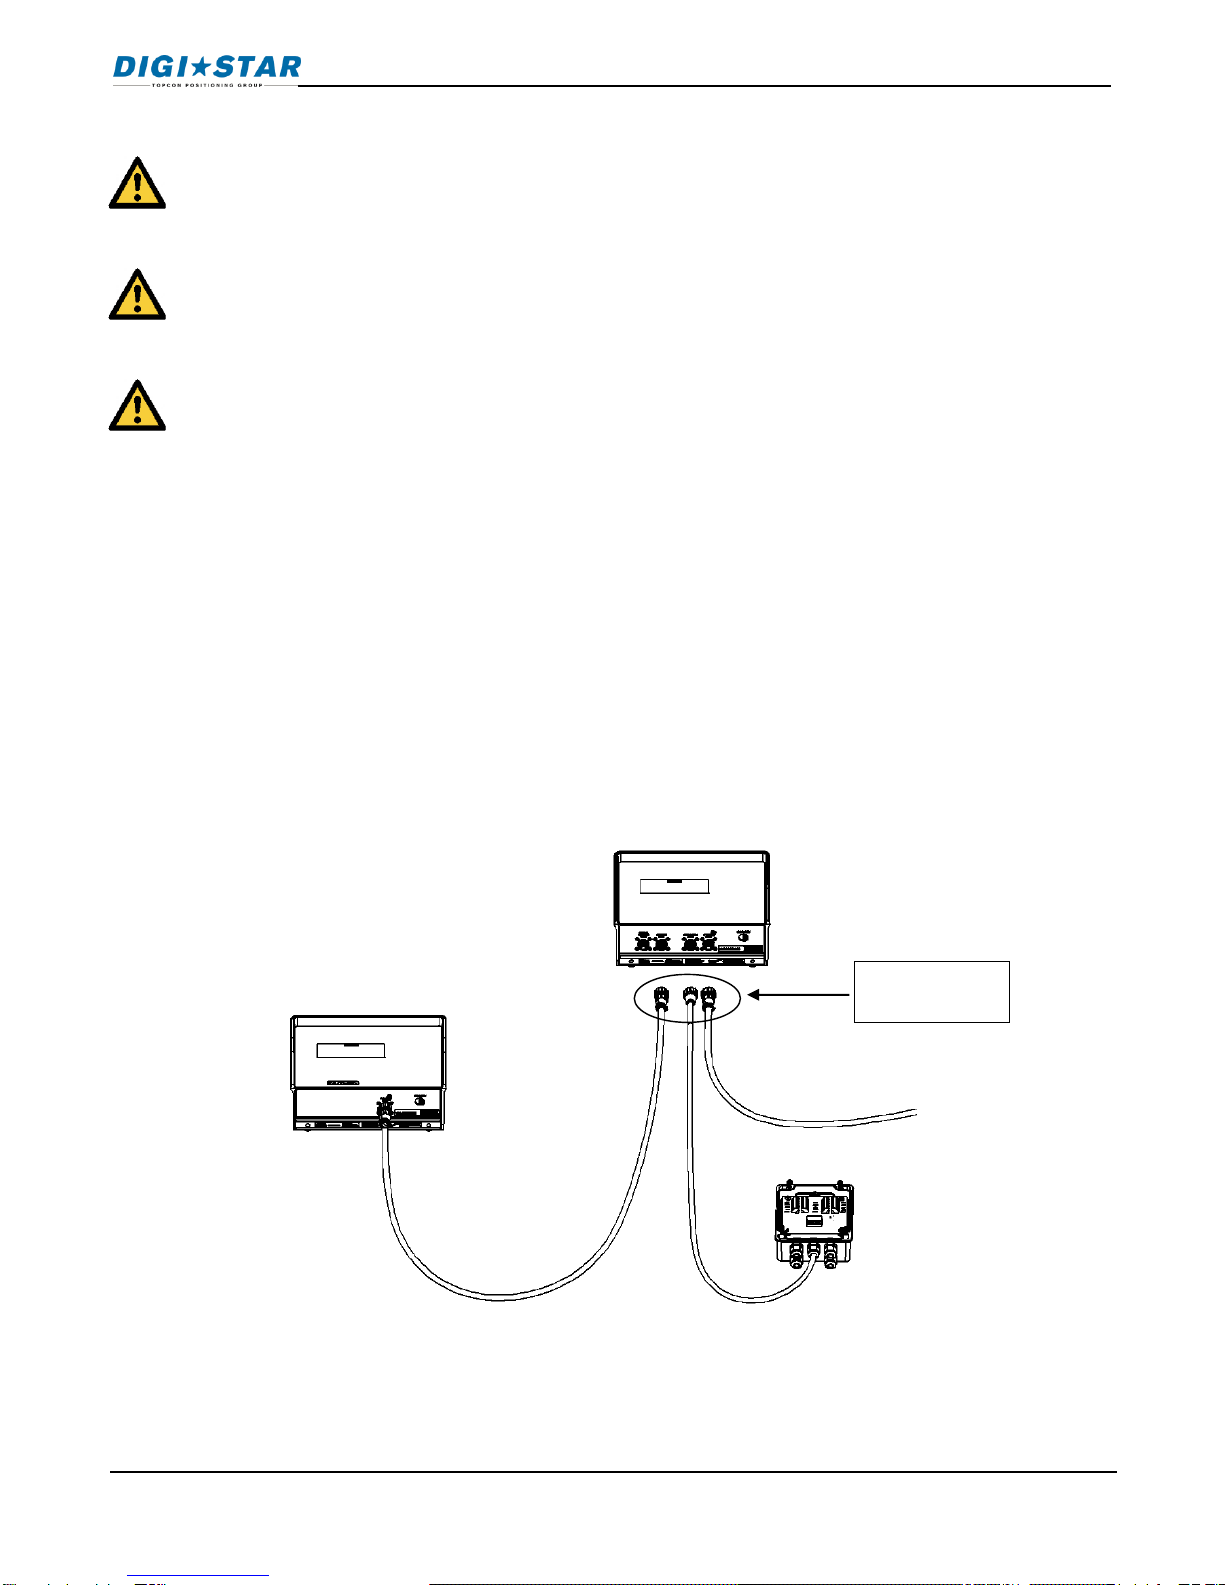
Cleaning: Do not use running water, pressure washer or hoses to clean the indicator or
touch screen.
Charging Battery: Disconnect all cables from the indicator and touch screen before charging
the battery or welding on the machine. If cables are left connected, the
indicator, touch screen and connected load cells could be damaged
Scale Indicator
Remote Display
Optional
J-Box
Disconnect
all cords
Safety During Use

10 TMR3610 Operators Manual D4023-EN
6.0 FEED MANAGEMENT SOFTWARE
TMR Tracker is a full-featured Windows based feed management system. TMR tracker also
offers operators additional management tools including: Operator control, pen review, on line
feed data exchange with nutritionists, ingredient tracking and numerous reports. TMR Tracker
is an indispensable management tool for forward thinking operations.
For additional information go to www.tmrtracker.com
Feed Management Software
D4023-EN TMR3610 Operators Manual 11
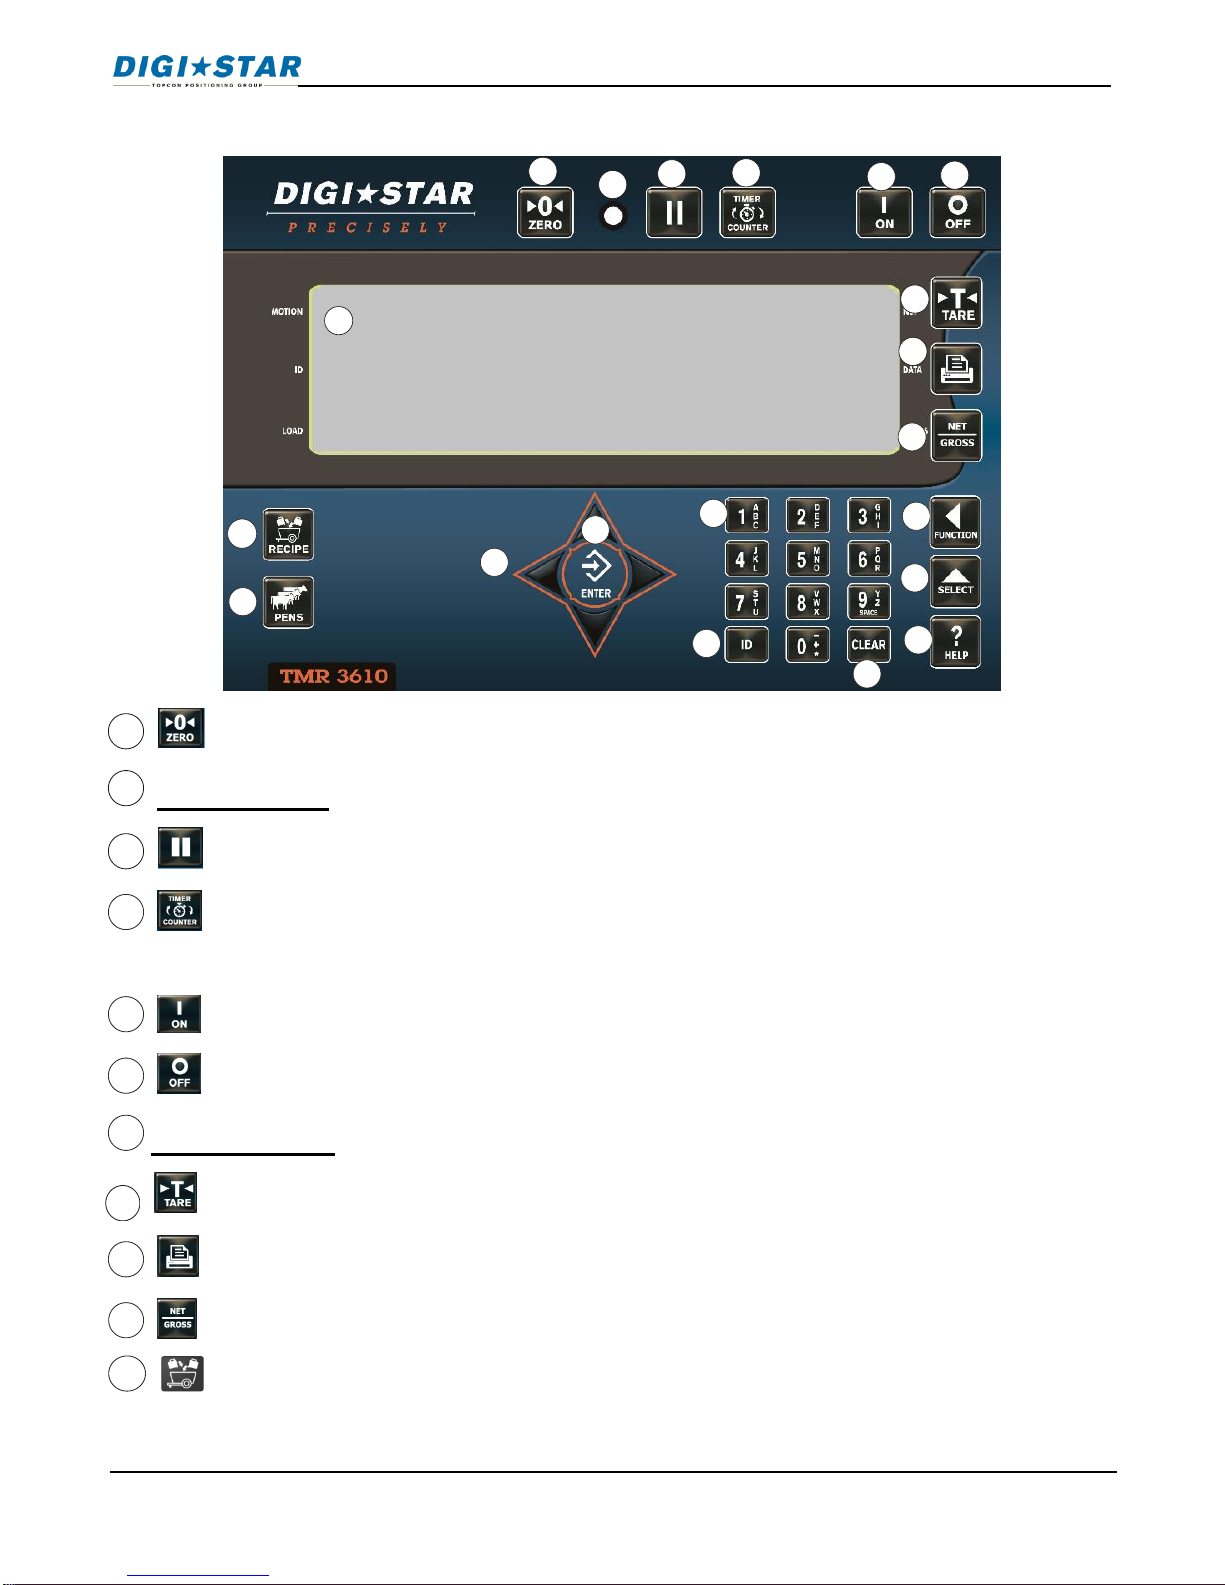
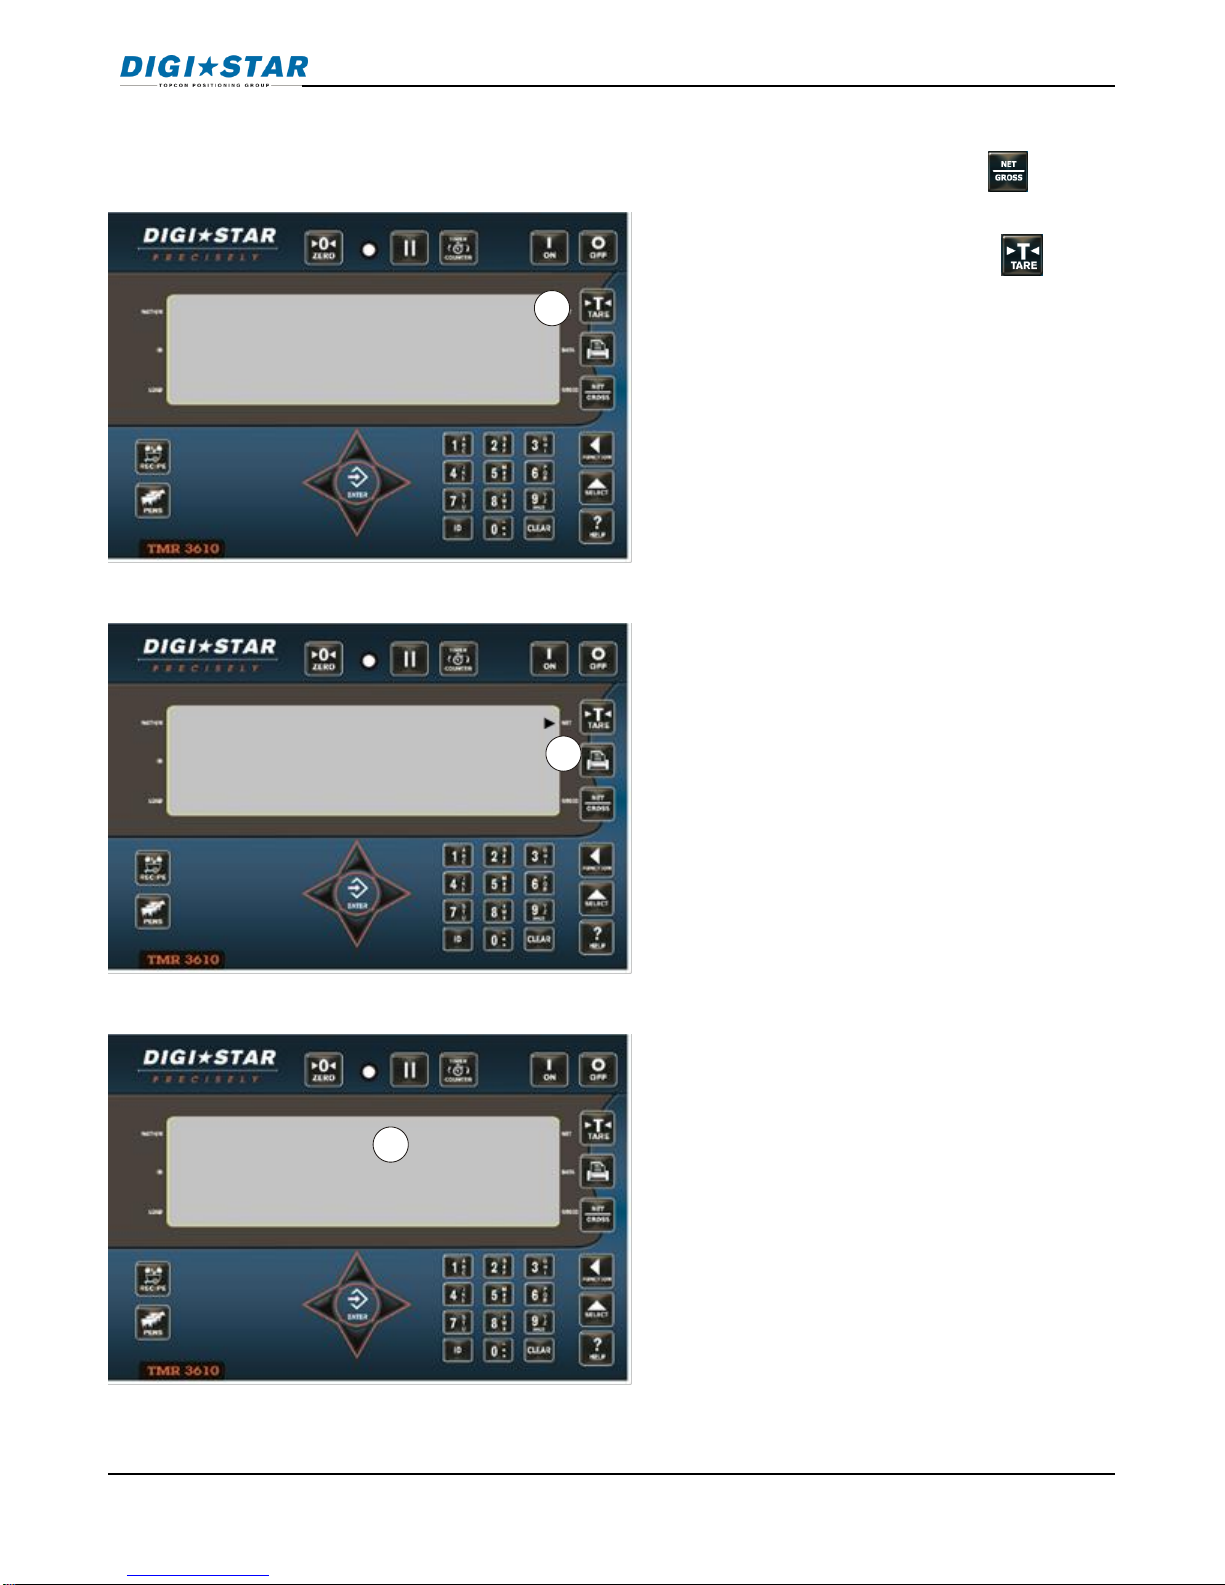
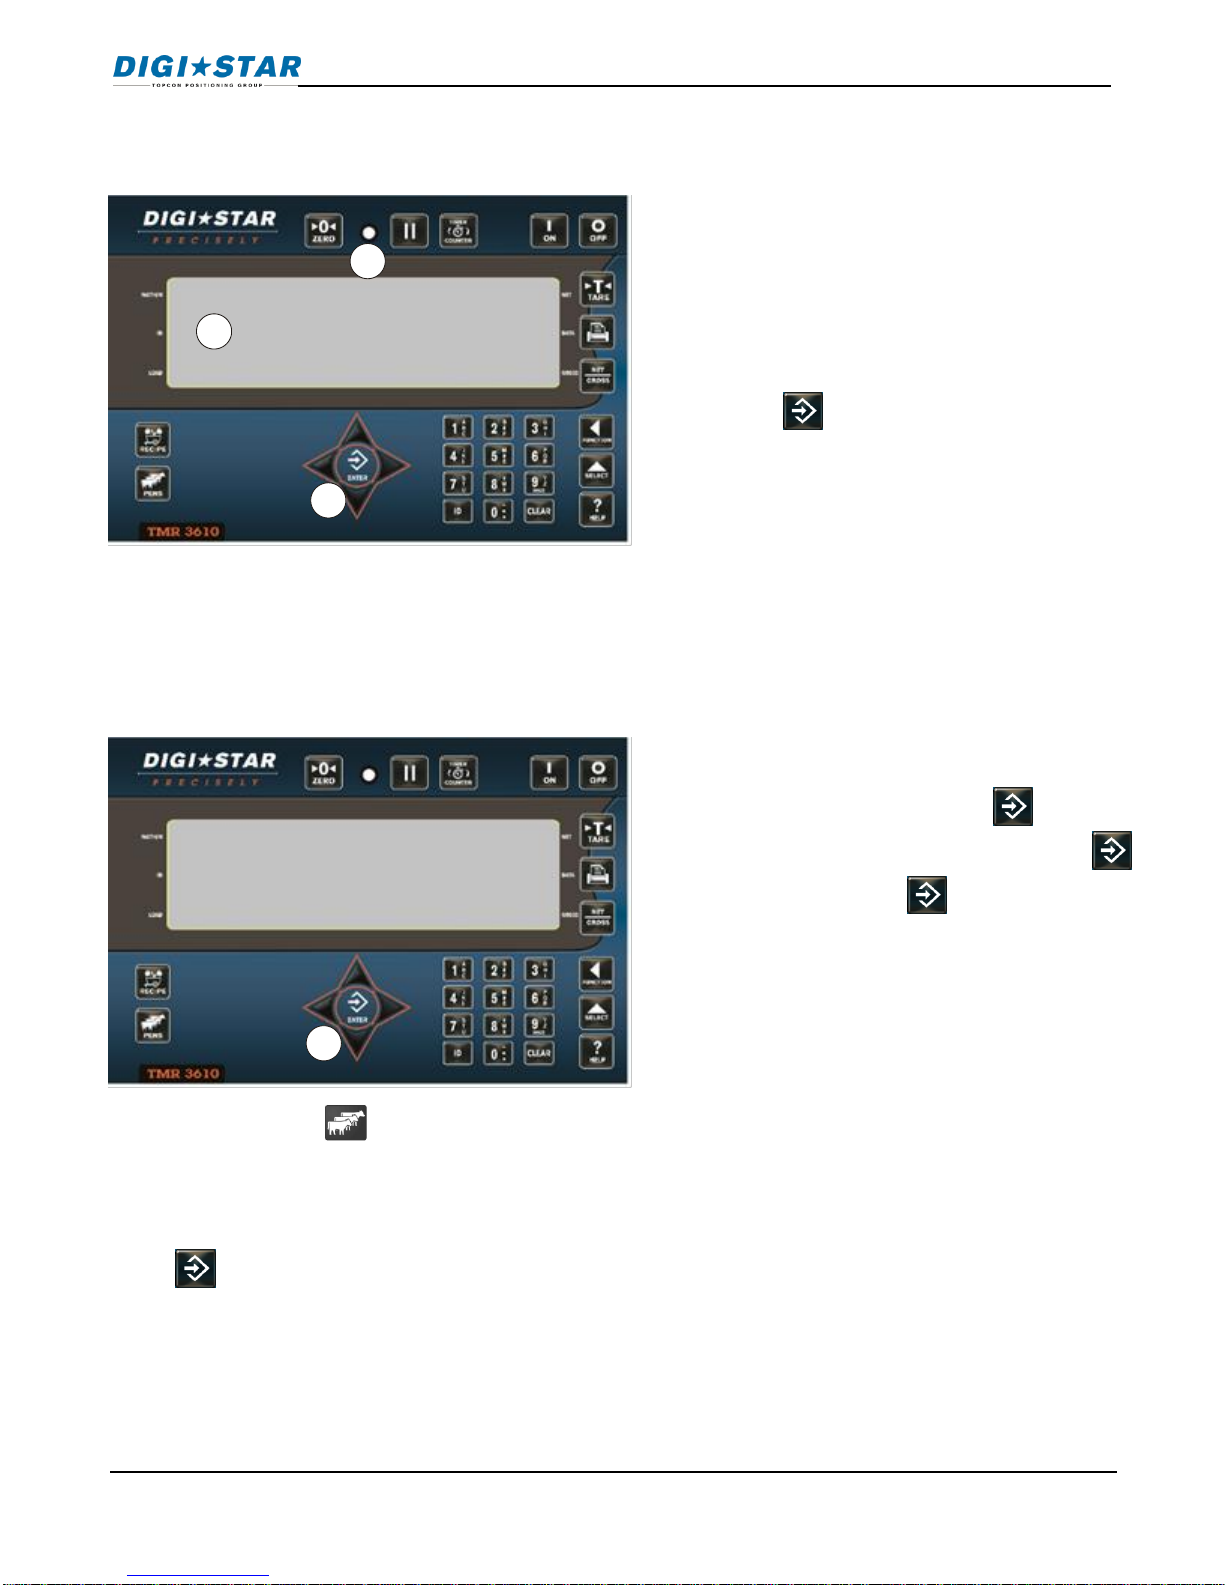
7.0 INDICATOR OVERVIEW
- Press and hold for three seconds to zero balance.
Re-Alarm Light - Starts flashing and alarm sounds when weight is within preset limit.
–Holds displayed weight when moving machine
–Mixing timer runs down, alarm sounds / Rotation counter is added to count shaft
rotations, alarm sounds.
–Turns indicator on. Pressing while on will run self-test.
–Turns scale indicator off.
Display Window –Displays current actions.
–Press TARE button for temporary zero when adding more weight.
–Records to memory or prints displayed weight.
–Toggles between NET and GROSS weights.
–Selects recipes in memory
1
2
3
4
5
6
7
9
10
11
1
2
3
4
5
6
7
8
9
10
11
12
13
14
15
16
17
18
19
20
8
Indicator Overview
12 TMR3610 Operators Manual D4023-EN
–Enter user’s ID number and feeding ID number when using the keypad.
–Clear the charactors on LCD (backspace)
–Press in list mode to begin pen unloading.
–Accepts change or proceeds to next item.
Directional Arrows –Moves through list of information. Left arrow (-) and right arrow (+)
Keypad –Input numbers or letters
–Performs tasks displayed when using the select button
–Display additional tasks for the user.
–Shows additional information for last key pressed.
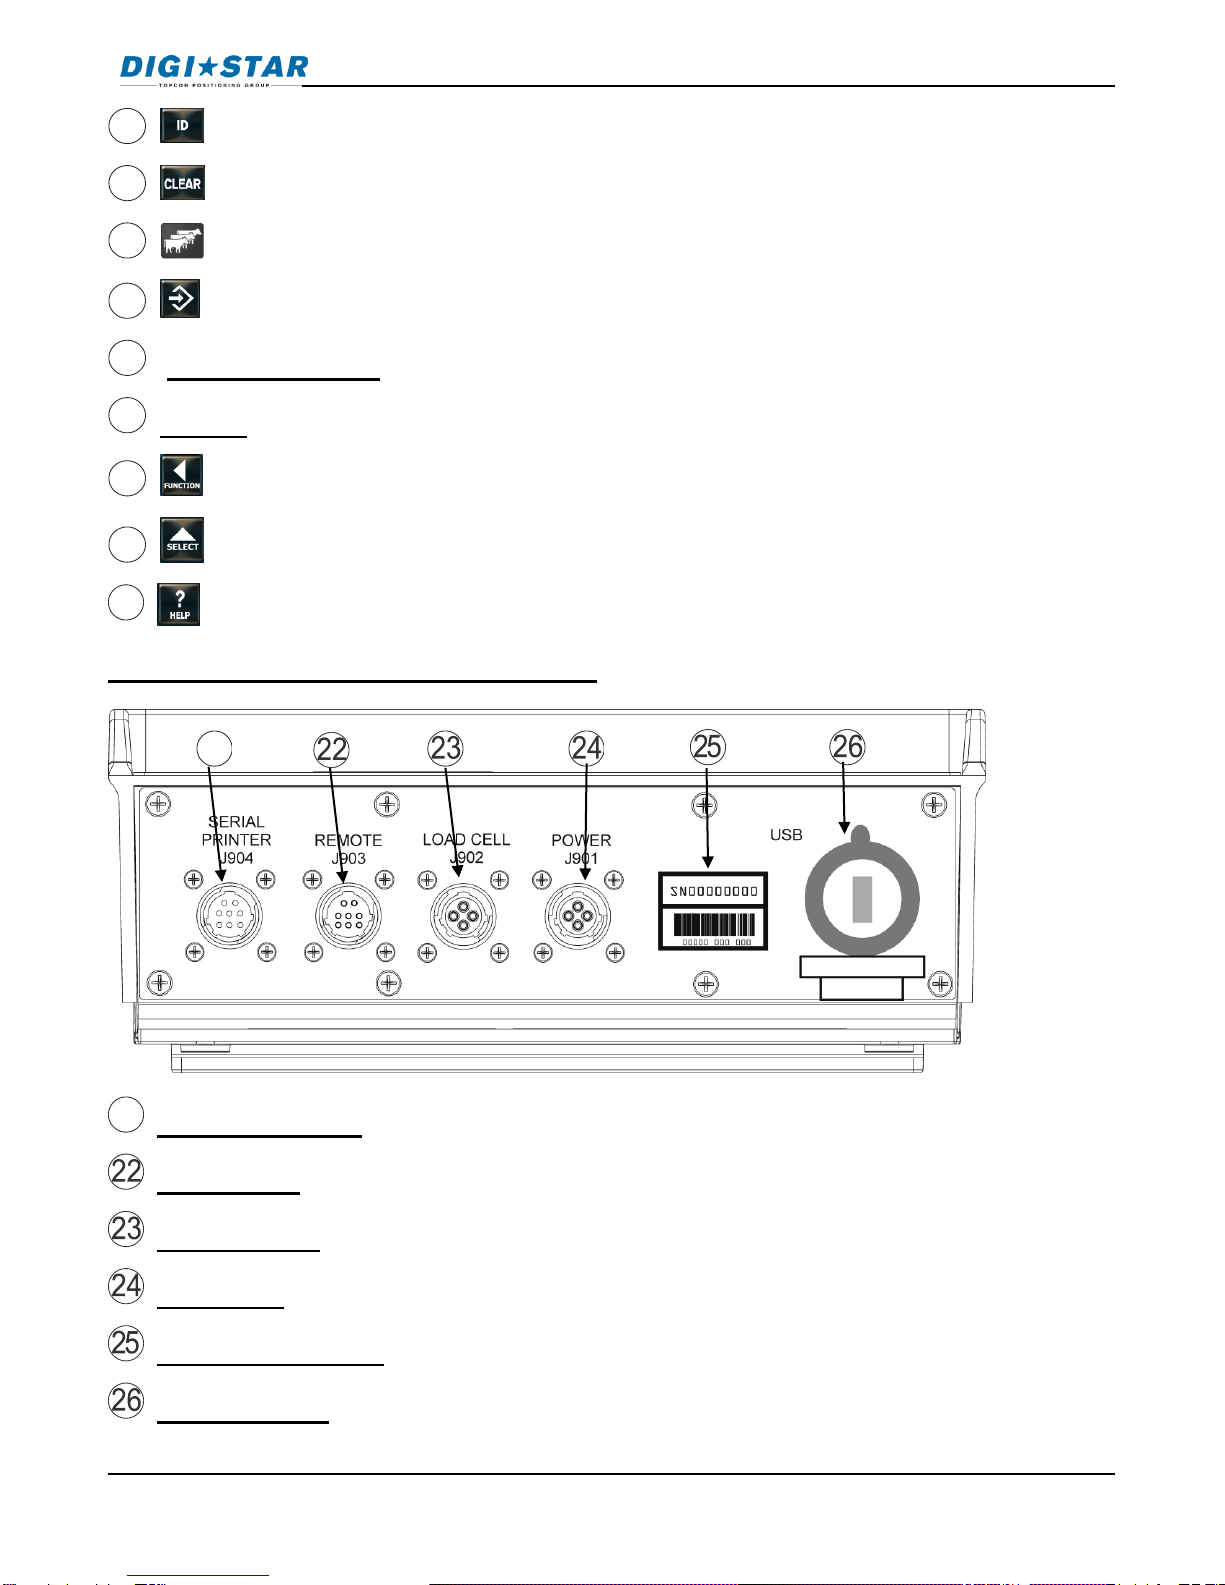
Indicator Connections Overview
Serial/Printer Port –Communicate with computer and other digital input/output devices.
Remote Port –Optional remote display.
Load Cell Port –For J-Box Cord.
Power Port –For Power Cord.
Serial Number Plate –Serial Number of Indicator.
USB Drive Port –Insert USB Drive to upload/download data
12
13
14
15
16
17
18
19
21
20
21
Indicator Overview
D4023-EN TMR3610 Operators Manual 13
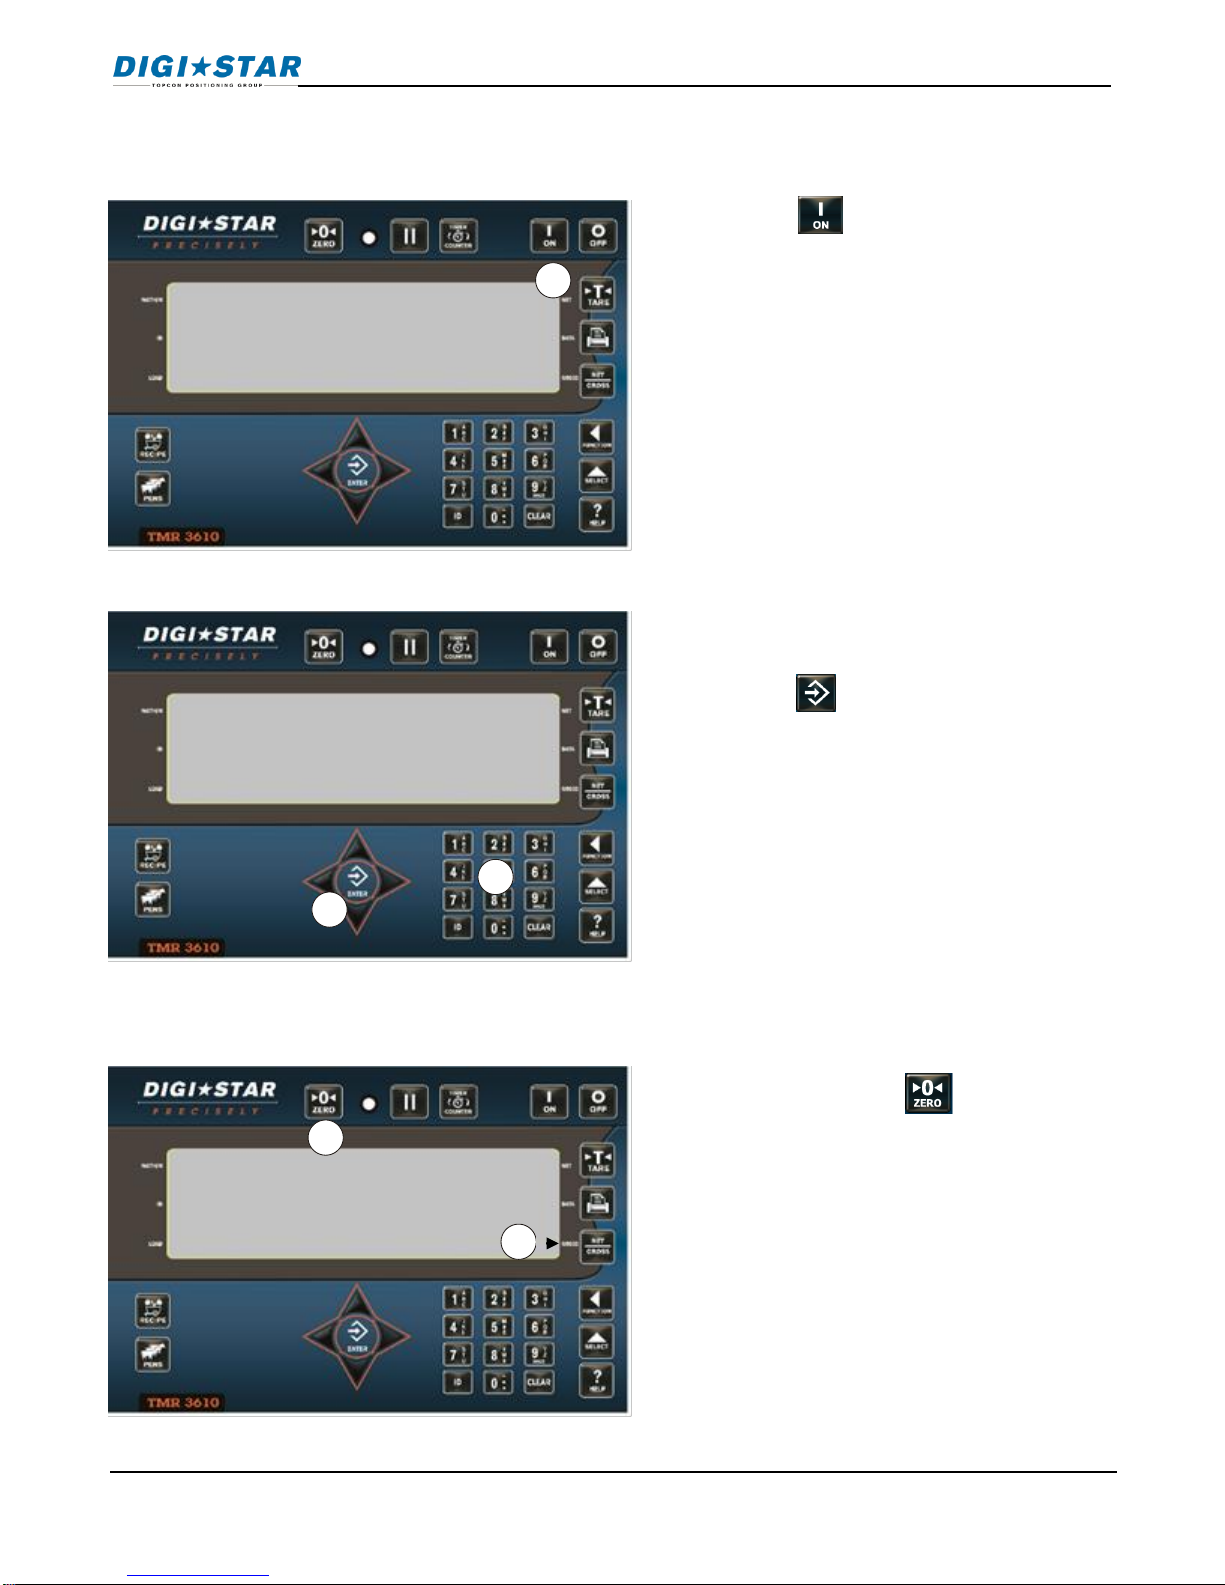
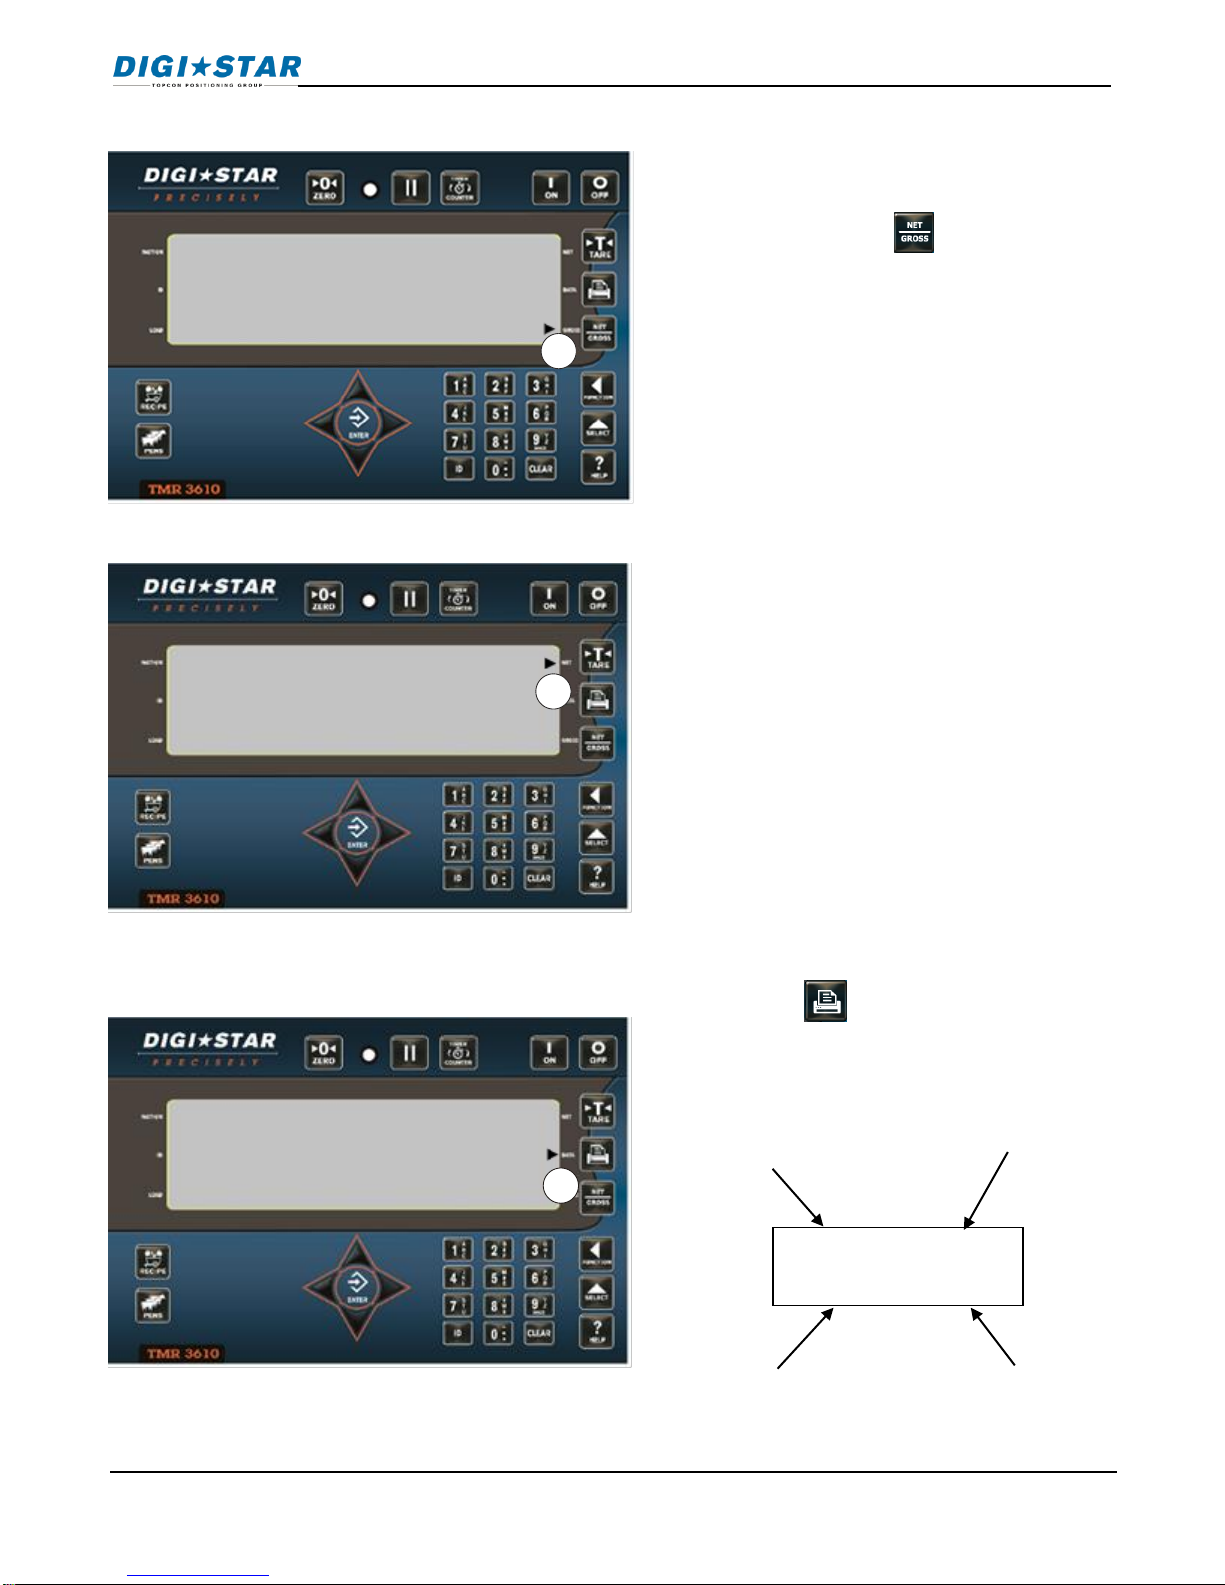
8.0 OPERATION
8.1 Turn on Scale
8.2 Zero Balance Indicator
1. Press .
1. Enter User ID Number if required.
2. Press .
1
hello
o
1
2
1. Press and hold for three
seconds to zero balance scale.
2. Flashing arrow on side of display
points to gross next to the display
window, scale is ready to weigh.
o
1
Operation
2
14 TMR3610 Operators Manual D4023-EN
8.3 Tare and Net Gross
Tare is a temporary zero (Net Weight) to display total weight (Gross Weight, Press .
1. Weight displayed, Press sets
zero weight.
2. Display reads zero and flashing
arrow on side of display points to
NET.
3. Add more weight and display
reads added weight value.
400o
o
30o
1
2
3
Operation
D4023-EN TMR3610 Operators Manual 15
8.4 Print Key
4. To show total of original weight of
4000 pounds plus added 300
pounds, press flashing arrow
on side of display points to
GROSS.
5. Display reads zero and flashing
arrow on side of display points to
NET.
1. Press . Indicator sends data
to printer or PC. Flashing arrow
on side of display points to DATA.
430o
o
430o
4
5
1
10JA08 12:01P
4300 LB GR
4300 LB GR
Date in ddmmyy
format
Time
Gross (GR) or
Net (NET)
Weight
Operation
16 TMR3610 Operators Manual D4023-EN
9.0 DATA TRANSFER
9.1 USB Drive Mode
9.2 RF Datalink Modes
Operation
Message
DataLink connects with indicator
PC
DataLink sends data to indicator
DLIN
Indicator receives data
ALL FEED LINES RECEIVED -PRESS RECIPE KEY TO
CONTINUE
Data complete, indicator sends data to
DataLink
PC
Data sending
DLOUT
To send data to PC if operator does not
complete all feeding at end of feeding
schedule. Press until display shows
message (right column), press to
perform transfer.
EZPC
The indicator marks uncompleted data as completed and sends feeding data to
DataLink.
NOTE: Indicator may also be manually programmed.
To upload data:
Insert USB Drive.
1. Press or .
Note: If indicator displays, Warning—unused
recipes found in EZ—Press to load new
recipes from USB drive –Press to exit.
Remove USB drive when complete.
To download data:
Insert USB Drive, indicator automatically sends
data to USB Drive. Remove USB Drive.
Data Transfer

D4023-EN TMR3610 Operators Manual 17
10.0 INDICATOR DATA FORMATS
Data sent to indicator sent in two formats:
Complete Loads Mode: Each load built by PC software. It assigns pens to recipe and builds
exact load for pens.
Recipe and Pen List Mode: PC software sends recipe data and pen data in two different
fields. Operator selects recipe to build and pen deliveries.
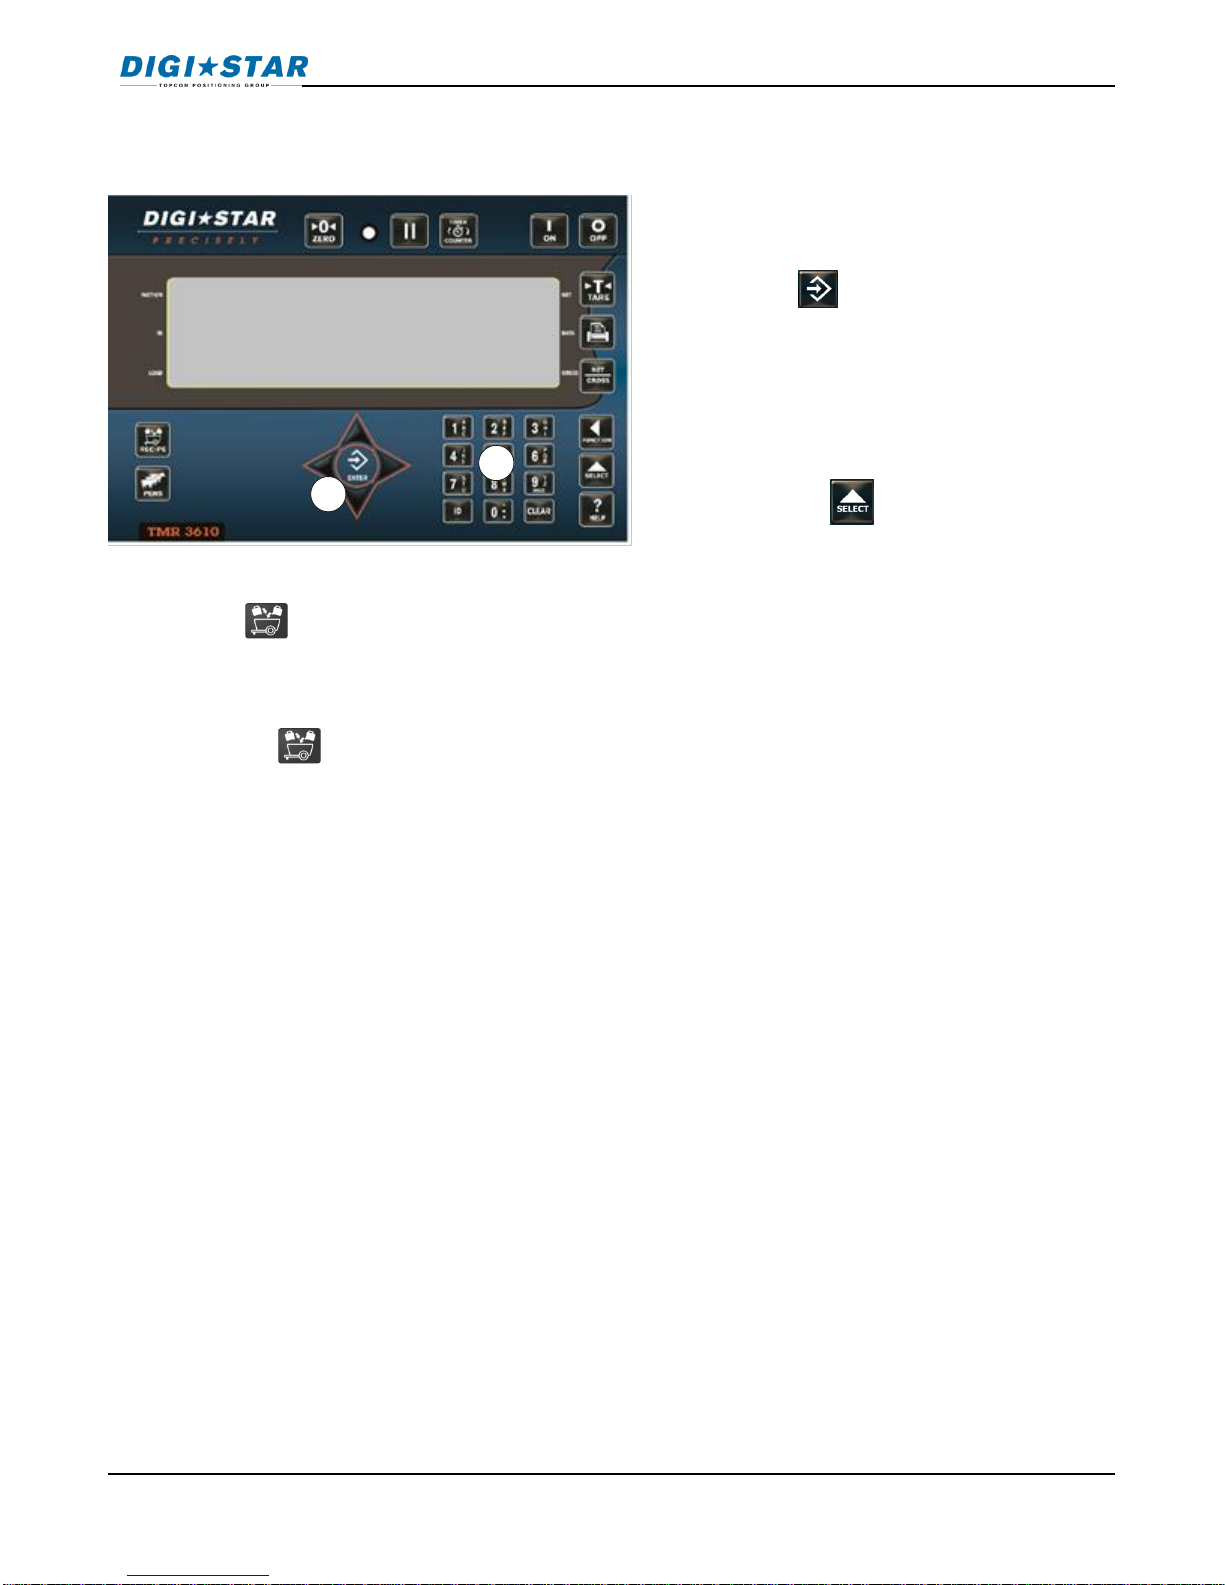
10.1 Loading And Feeding Complete Loads Mode
Starting a Recipe
Pen-1
1. Press .
1. Scrolls feeding number, first
recipe and pen number.
2. Press UP and DOWN arrows to
find desired recipe.
3. Desired recipe in display line,
press .
1
1
2
3
Indicator Data Formats
2
18 TMR3610 Operators Manual D4023-EN
10.2 Resize Recipe Weight
Indicator gives option to resize pen load weight.
Note: Press to accept pen values without resizing.
Note: If indicator warns resized amount is over capacity, this may damage the mixer. To
continue, press to override.
1. Enter new weight or keep original
weight.
2. Press .
Note: Press to resize by number of
head in pen.
23000
1
2
Indicator Data Formats
D4023-EN TMR3610 Operators Manual 19
10.3 Loading Recipe
10.4 Unloading to Pens
Note: Do Not Press . (List Mode Only).
Note: If different pen needed press UP or DOWN arrows to find desired pen.
Press for pen delivery.
1. First ingredient weight flashes in display.
Load ingredient.
2. Weight approaches zero, alarm will flash
and sound.
3. Manual Advance: Weight reached,
press again to start next ingredient.
OR
Auto Advance: When preset weight
reached, indicator advances to next
ingredient.
Note: Press to resize by number of
head in pen.
Ingredients loaded, indicator displays first
pen to unload.
1. Manual Advance: Press to go to
pen. When weight reached, press
to accept. Press again to start
next pen.
OR
Auto Advance: When preset weight
reached, indicator advances to next
pen. Last pen completed, indicator
displays recipe complete.
Dry hay
start
1
1
2
3
Indicator Data Formats
20 TMR3610 Operators Manual D4023-EN
10.5 Recipe and Pen List Mode
Starting a Recipe
Resize Recipe Weight
Indicator will display: RESIZE, then resize weight.
Note: Indicator warns resized amount over capacity, press to override.
1. Press .
2. Display reads:.
Example:
Recipe drycow tot-2500
3. Press UP and DOWN arrows to select
recipe, to start.
1. Enter desired recipe weight using key
pad.
2. Press , indicator resizes ingredients
to recipe’s total weight and displays first
Ingredient to load.
recipe
resize
1
1
2
2
3
Indicator Data Formats
3
Table of contents
Other Digistar Accessories manuals


Popular Accessories manuals by other brands


Chef's Choice
Chef's Choice Chef's Choice AngleSelect DC 1520 instructions

wattstopper
wattstopper DSW-100 manual

Silvercrest
Silvercrest SFS 52 B2 instructions

HIK VISION
HIK VISION DS-KB6403-WIP user manual

Avtech
Avtech RMA-AF1-SEN Installation note

Master cool
Master cool ADA51 Installation & operation manual

H.Koenig
H.Koenig BW1890 instruction manual

HANYOUNG NUX
HANYOUNG NUX PB Series instruction manual

BLACK DECKER
BLACK DECKER BDC24L manual

Lenord, Bauer
Lenord, Bauer MiniCODER GEL 244 Series Mounting instructions

Silvercrest
Silvercrest SSE 6 B2 Operation and safety notes

Closet Maid
Closet Maid In-Cabinet Trash Pull-Out 3185 Use and care guide