DIGITAL YACHT WL60 Datasheet

QUICK START WL60- VR1.00
Installation & Quick Start Guide
WL60 Wireless Adaptor/Antenna

DIGITAL YACHT
WL60 Quick Start Guide
1. Introduction
Congratulations on the purchase of your WL60 Wireless Adaptor/Antenna. This unit is designed for quick and simple DIY
installation on a yacht or power boat. The mounting brackets and suction pads are NOT designed for safe fixing of the
antenna whilst a vessel is moving or for extended exposure to the extreme environmental conditions found at sea. It is
strongly recommended that your Wireless antenna is removed and placed inside the vessel when in motion or not in use.
Before operating the unit you should familiarise yourself with the complete user manual supplied with the
product.
2. Before you start
The WL60 comes complete with a CD-ROM that includes all necessary drivers for the following operating systems;
Microsoft Windows XP®, Windows Vista®and Windows 7®
Apple Mac OS X 10.4, 10.5, 10.6, 10.7 and 10.8
Do not plug in the WL60 to the USB port of your computer until you have inserted the driver CD-ROM.
3. Mounting the WL60 Antenna
The WL60 should be mounted outside, with the best possible line of sight of the wireless hotspot antenna that you wish to
connect to. There are two methods of mounting the WL60 using the kit of parts included in the box;
Sucker Cup Mount
Pole Mount
Neither of these two mounting methods should be used when the vessel is in motion.
Sucker Cup Mounting
The most common mounting method is to use the four sucker cups
to temporarily stick the WL60 to the outside of the boat.
First, feed the USB cable through the two aluminium tube clips and then
place one tube clip at the bottom of the WL60 tube body and one tube clip
towards the top of the tube body just touching the pan head screw –see
photo. Secure the clips by gently tightening the fixing bolts –do not over-
tighten
Insert and secure a sucker cup in each of the four holes in the aluminium
tube clips, using the supplied clear plastic thumb nuts.
After first ensuring that the surface of the GRP where you wish
to mount the WL60 is clean, lightly moisten each sucker cup and
then gently push the antenna on to the boat’s side until the sucker
cups are flat.
This method of mounting is ideal for yachts and power boats and
the WL60 can stay mounted in this manner for many days. Removal is quick
and simple by gently inserting a finger nail under each sucker cup and
levering them off one by one.

DIGITAL YACHT
WL60 Quick Start Guide
Pole Mounting
For a more permanent mounting arrangement or when you need to use a pole to get more height, it is possible to mount
the WL60 using the U bolts, nuts and washers supplied.
The diagram below shows the three steps to mounting the WL60 on a suitable pole (up to 50mm in diameter). Please
note that the mounting pole is not supplied.

DIGITAL YACHT
WL60 Quick Start Guide
4. Installing the WL60 on Windows
The WL60 is supplied with Windows compatible drivers that allow it to be used as a second Wireless Network Adaptor on
your laptop. You can either; install the drivers and use the normal Windows Wireless Connection function to scan, select
and connect to a wireless hotspot or you can use the free Realtek Wireless Lan Utility software which is also supplied on
the CD-Rom.
It is very important that you do not plug the WL60 in to a USB port on your computer unless you have the WL60 Drivers
CD-Rom inserted in your PC. By plugging in the WL60 you will initiate the Windows “Found New Hardware Wizard” which
will not be able to complete correctly without the Drivers on the CD-Rom being present. The installation process varies
depending upon which Operating System your computer has, so please ensure that you follow the correct procedure.
Installation for Windows Vista and Windows 7 (On-Line)
By far the easiest method of installation, if your PC is running
Windows Vista or Windows 7, is to connect the PC to the internet, as
you would normally do, using the internal wireless adaptor and then
plug the WL60 in to a spare USB port on the laptop.
Windows will detect the new hardware and display the message
shown in Figure 1. It will then automatically search the on-line
Windows Update server for the correct drivers. Depending upon the
speed of your PC and internet connection this should take between 20
seconds and a couple of minutes to complete.
You can click on the message and the Window in Figure 2 will be
displayed giving you the status of the driver installation.
After the correct driver has been found, downloaded and installed the
Window in Figure 3 should be displayed. The drivers are now installed
correctly and you are ready to use the WL60 to find and connect to a
wireless hotspot. Proceed to the “Operating WL60 on Windows Vista
and Windows 7” section.
Installation for Windows XP, Vista and Windows 7 (Off-Line)
If you cannot connect to the internet, you can
install the drivers from the supplied Digital
Yacht CD-Rom. If you do not have a CD-Rom
drive on your computer, you will need to copy
the contents of the CD to a USB memory
stick.
Insert the CD-Rom (or memory stick) in to the
PC. The CD should Autorun but if it does not,
open the CD and double click on the
Menu.Exe file as shown in Fig 4.
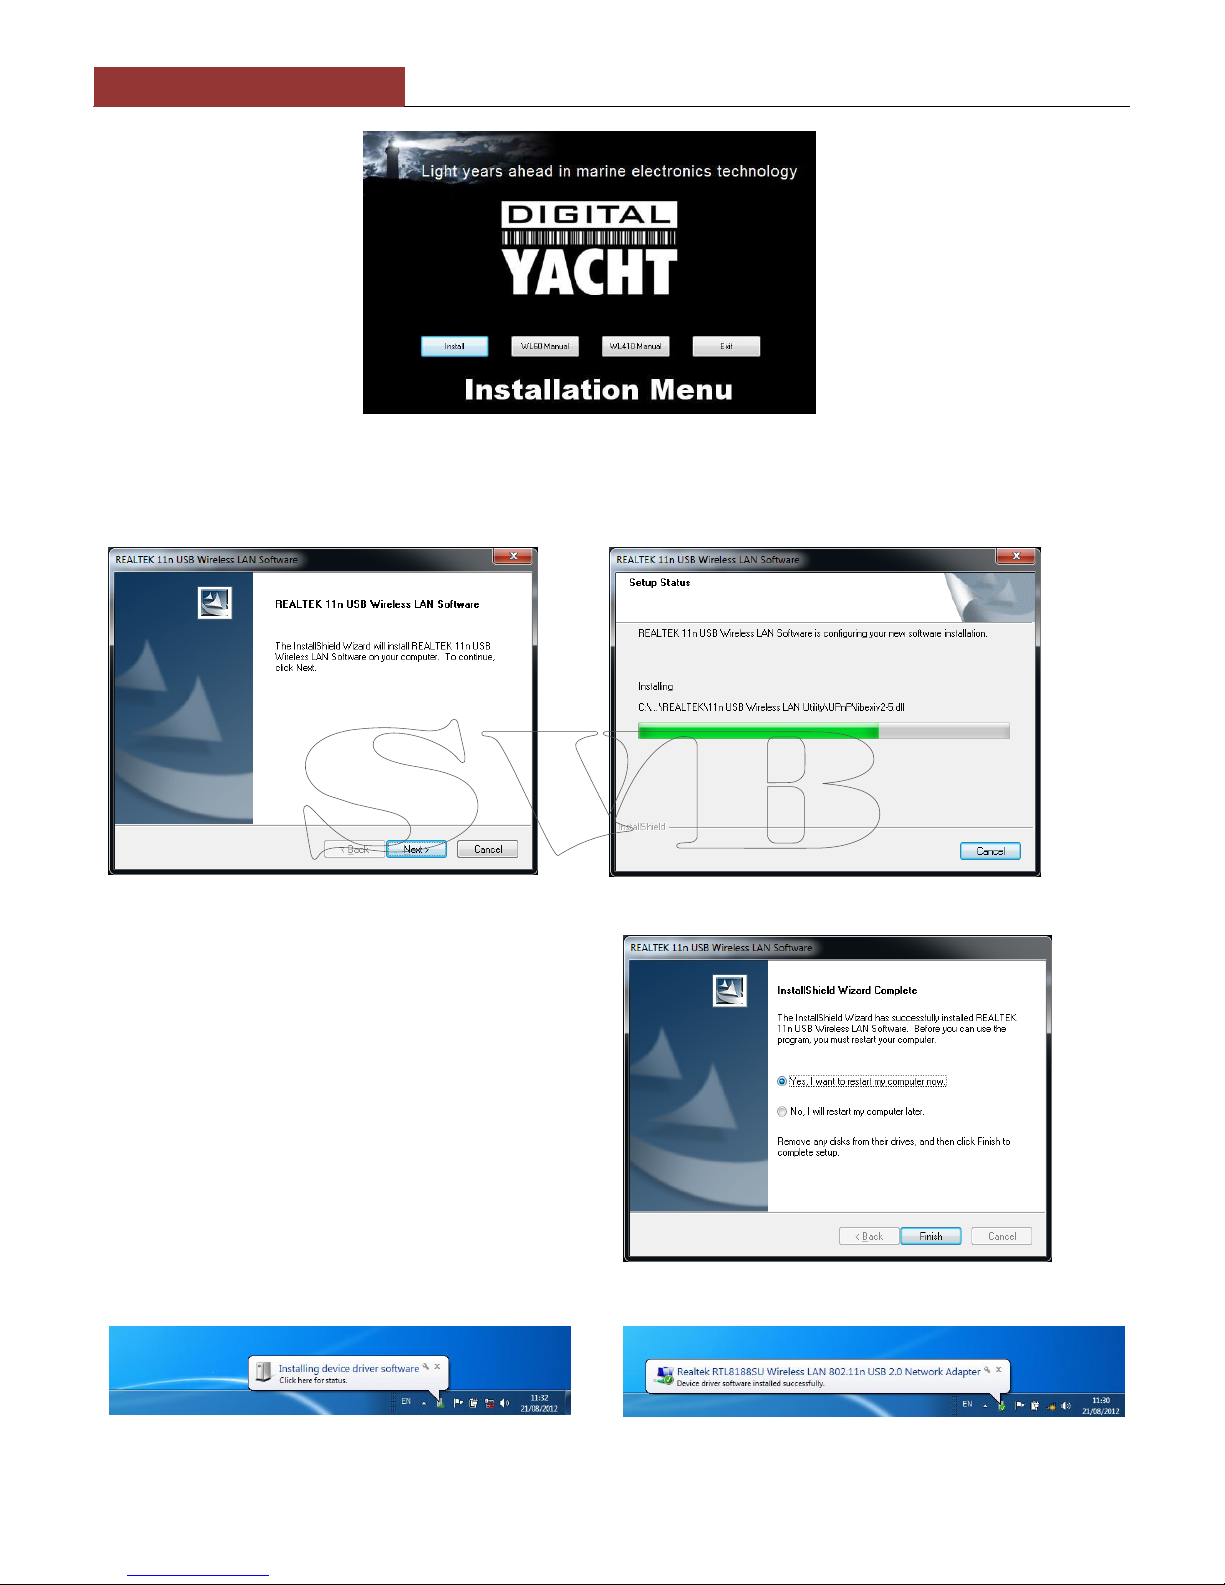
You should now see the Installation Menu
shown in Fig 5. Click the “Install”button and
the driver installation should start.
Figure 1
Figure 2
Figure 3
Figure 4
DIGITAL YACHT
WL60 Quick Start Guide
.
The drivers are supplied by Realtek who manufacture the wireless chipset that we use in the WL60. The installation is
very simple, just click “Next”when prompted and the progress is shown by a green status bar as shown below.
When the installation is finished you will be told that the
computer now needs a Restart as shown in Fig 8.
If you have any other important programs or documents
opened, save any work and close them, then click “Finish”
and the computer will restart.
Once the computer has fully rebooted, plug in the WL60,
the new hardware function will start and a pop up window
appear saying that it is Installing the drivers as shown in
Fig 9.
When completed the pop up will change to the one shown
in Fig 10, saying that the device software has been
installed successfully. The WL60 drivers and Realtek
Wireless LAN utility are now installed.
Figure 5
Figure 6
Figure 7
Figure 8
Figure 10
Figure 9
Table of contents
Other DIGITAL YACHT Antenna manuals


Popular Antenna manuals by other brands

DAVIS
DAVIS Windex AV 3160 installation instructions

Belden
Belden Hirschmann BAT-ANT-N-14G-IP23 Mounting instruction

Vtronix
Vtronix YHK Fitting instructions

KVH Industries
KVH Industries TracVision 6 Technical manual

Leica Geosystems
Leica Geosystems GS10 user manual

Sirio Antenne
Sirio Antenne Gain-Master manual


Feig Electronic
Feig Electronic ID ISC.ANTH200/200 Series manual

TERK Technologies
TERK Technologies TV44 owner's manual

TERK Technologies
TERK Technologies SIR3 owner's manual

Directive Systems & Engineering
Directive Systems & Engineering DSE2324LYRMK quick start guide

HP
HP J8999A instructions

MobilSat
MobilSat MSP-S Mounting instructions