DigiVac Bullseye Precision Gauge Pirani User manual

105 B C h u r c h S t , M a t a w a n , N J 0 7 7 4 7
732-765- 0 9 0 0
s a l e s @ d i g i v a c . c o m w w w . d i g i v a c . c o m
Copyright 2015, DigiVac, Inc., All rights reserved.

3
105 B C h u r c h S t , M a t a w a n , N J 0 7 7 4 7
732-765- 0 9 0 0
s a l e s @ d i g i v a c . c o m w w w . d i g i v a c . c o m
Copyright 2015, DigiVac, Inc., All rights reserved.
The Bullseye Precision Gauge®Pirani is a rugged, portable vacuum measurement instrument that is
highly accurate. The Bullseye Pirani is a sensitive vacuum gauge instrument that suits the demands of
field use. The design features include an LCD graphical display, white backlight, large numerical font,
and digital graphics to display line graphs and time horizons from 2 minutes to 2 hours.
Rugged design for field use
Dimensions: 6.2” x 3.7” x 1.3”
Only requires 4 AA or Micro-B USB
Range of 1 millitorr to 50 Torr
Accuracy from 50 millitorr ~ 30 Torr, +/- 7%
Calibration points of 5mt, 50mt, 1T, and 30T
Sensor resolution of +/- 2.5mt; display resolution of 0.1mt
Number of Units: 12: microns, millitorr, Torr, mbar, Bar, kPa, pascals, PSIA, mmHg, inHg,
mmH2O, inH2O
Scientific notation or decimal display
Battery life of 2800mah/25ma, or 127 hours ~ 5 days
Vacuum Interface of ⅛” NPT, KF16, KF25
CE & RoHS compliant
Simple, easy-to-use design
On/Off soft switch
LCD graphical, white backlight display
Large numerical font
Digital graphics to display line graphs and time horizons of 2 minutes to 24 hours
7-foot sensor cable length
Sensor electrical interface: M12
4
105 B C h u r c h S t , M a t a w a n , N J 0 7 7 4 7
732-765- 0 9 0 0
s a l e s @ d i g i v a c . c o m w w w . d i g i v a c . c o m
Copyright 2015, DigiVac, Inc., All rights reserved.
While this vacuum instrument has many features, it is very simple to use. First, unpack the unit to verify
you've received everything you've ordered.
Vacuum instrument with white backlight and black rubber boot
Attached: 7' sensor cable with keyed connector designed to thread directly into the sensor
Pirani vacuum sensor, part number SEN-PIR, SEN-PIR-KF16, or SEN-PIR-KF25, batteries, and
charger
Quick Start guide or (this) user manual
Remove protective boot
Install batteries or attach a Micro-B USB, press the POWER button, and verify that the display
lights up
Plumb Pirani vacuum sensor into the system to be measured, taking care to differentiate
between the threaded end and the end connecting the sensor to the cable
Thread sensor cable into sensor (cable connector is keyed)
Power on the device by pressing the PWR/EXIT button. It will take about 5 seconds to fully
power up and for the reading to settle.
If need be, turn on the backlight. The backlight does not affect gauge reading or accuracy.
Read vacuum!
Verify that the readings make sense. For example, if the BPG Pirani is plumbed into a chamber
exposed to atmosphere, it might have a reading of “Range”

5
105 B C h u r c h S t , M a t a w a n , N J 0 7 7 4 7
732-765- 0 9 0 0
s a l e s @ d i g i v a c . c o m w w w . d i g i v a c . c o m
Copyright 2015, DigiVac, Inc., All rights reserved.

6
105 B C h u r c h S t , M a t a w a n , N J 0 7 7 4 7
732-765- 0 9 0 0
s a l e s @ d i g i v a c . c o m w w w . d i g i v a c . c o m
Copyright 2015, DigiVac, Inc., All rights reserved.
This Pirani sensor is a thermal gauge that contains a mems device which is suspended in the gas within
the system and thus within the sensor. The chip loses heat to the gas as the molecules collide with the
resistor chip and remove heat, thus altering the resistance of the filament. If the pressure within the
system is decreased, the amount of molecules will decrease proportionally, and the chip will disperse
heat more slowly. In order to read vacuum, we measure the heat loss of the chip resistor, which is an
indirect indication of pressure.
Most DigiVac instruments incorporate a more traditional thermocouple sensor, using heated, dissimilar
conductors that make contact and create a temperature differential, which in turn produces a voltage
later translated into a vacuum reading.
Inexpensive
Largely interchangeable
Measures a wide range of vacuum
Susceptibility to damage from impact
Non-isolated sensors may be contaminated with oil, coolant, or debris
Power consumption
Increased accuracy within a smaller span
Increased resistance to burnout and impact
Significantly less power consumption
The Bullseye is available with either variety of sensor depending on your specific application. Please
contact DigiVac for technical support in identifying which sensor will best fit your needs.

7
105 B C h u r c h S t , M a t a w a n , N J 0 7 7 4 7
732-765- 0 9 0 0
s a l e s @ d i g i v a c . c o m w w w . d i g i v a c . c o m
Copyright 2015, DigiVac, Inc., All rights reserved.
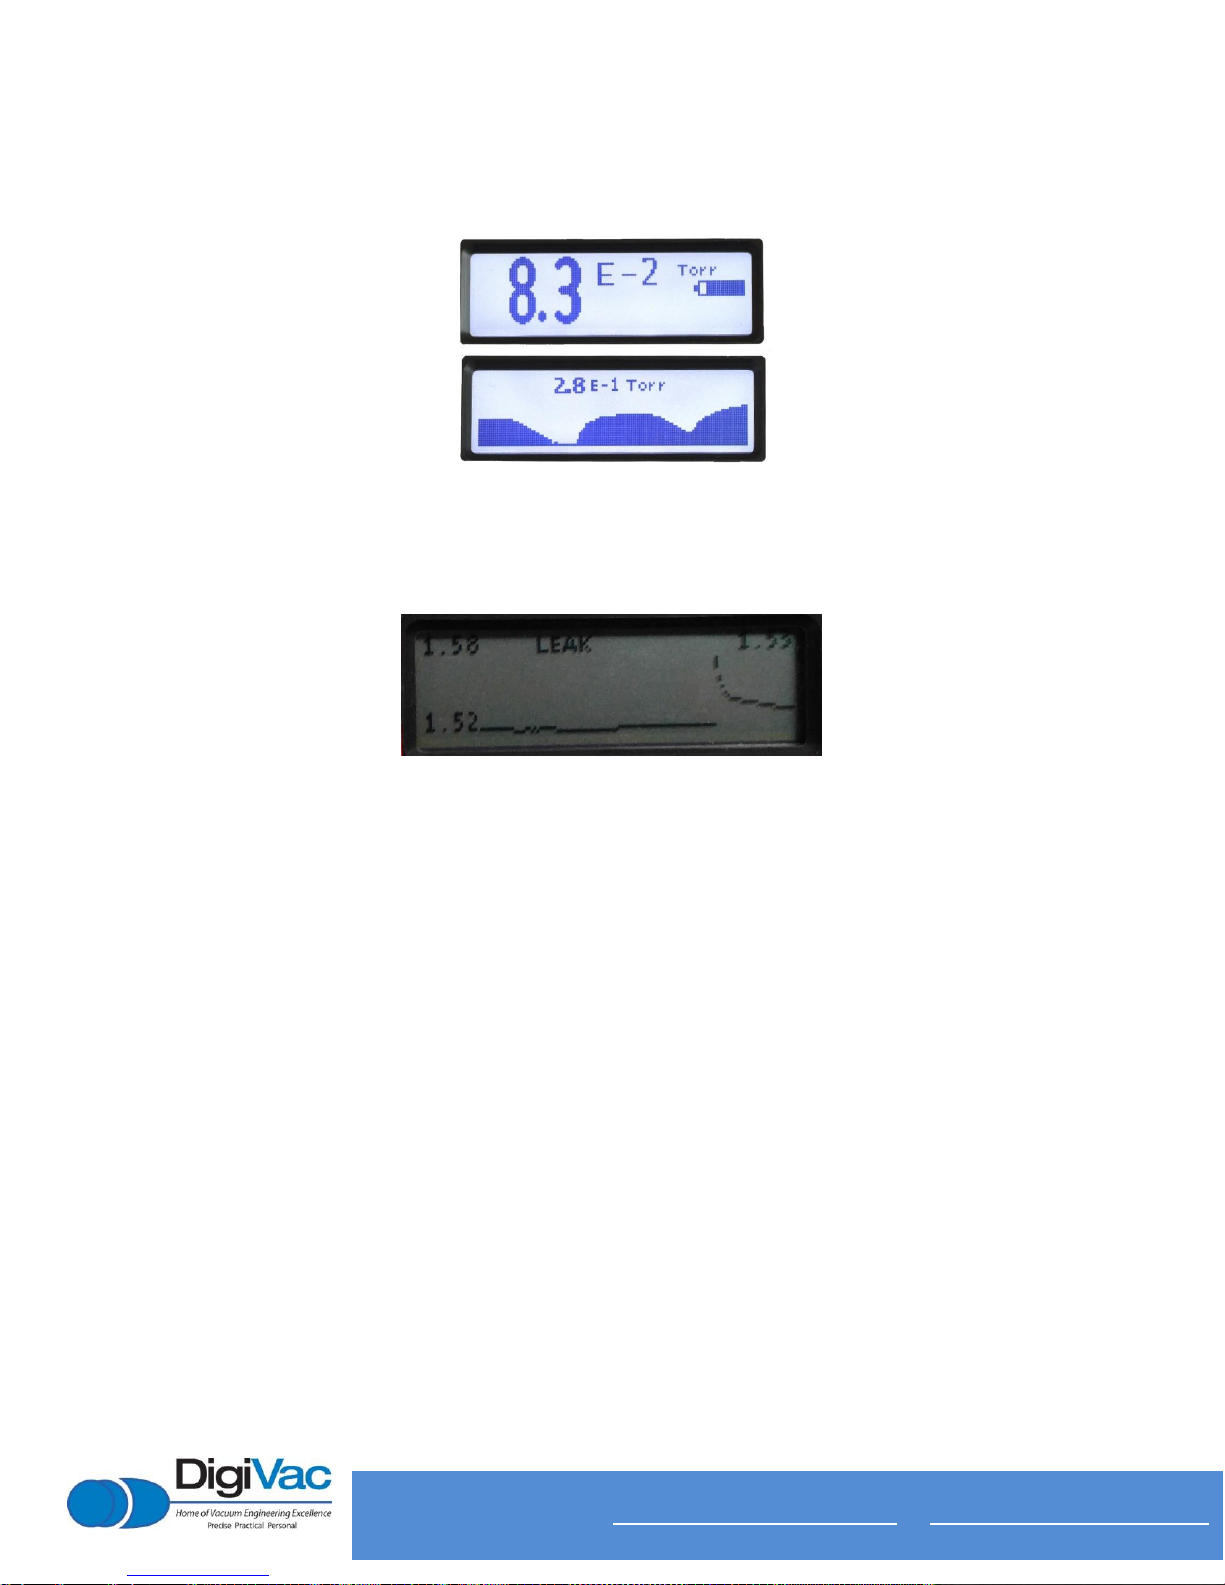
The Bullseye Pirani has two modes of display: numeric and graphical. The graphical display mode
features a line graph with time horizons of 2 minutes to 24 hours.
Display Options
The numeric display has three numeric formats: Low Resolution, High Resolution and Scientific
Notation.
Display modes are selected from the display menu Display, and numeric formats are selected from the
Setting option “Display”. The SEL button enters and traverses the Settings menu.
The numeric display shows the currently configured units. In these examples, the vacuum pressure units
are “microns” or “torr”.
In any display mode, the UP and DOWN buttons turn the backlight on and off (respectively), the SEL
button enters the configuration menu, and the ENT button turns the gauge on or off.
The bar graph visualizes the current sensor reading with a stepped bar.
8
105 B C h u r c h S t , M a t a w a n , N J 0 7 7 4 7
732-765- 0 9 0 0
s a l e s @ d i g i v a c . c o m w w w . d i g i v a c . c o m
Copyright 2015, DigiVac, Inc., All rights reserved.
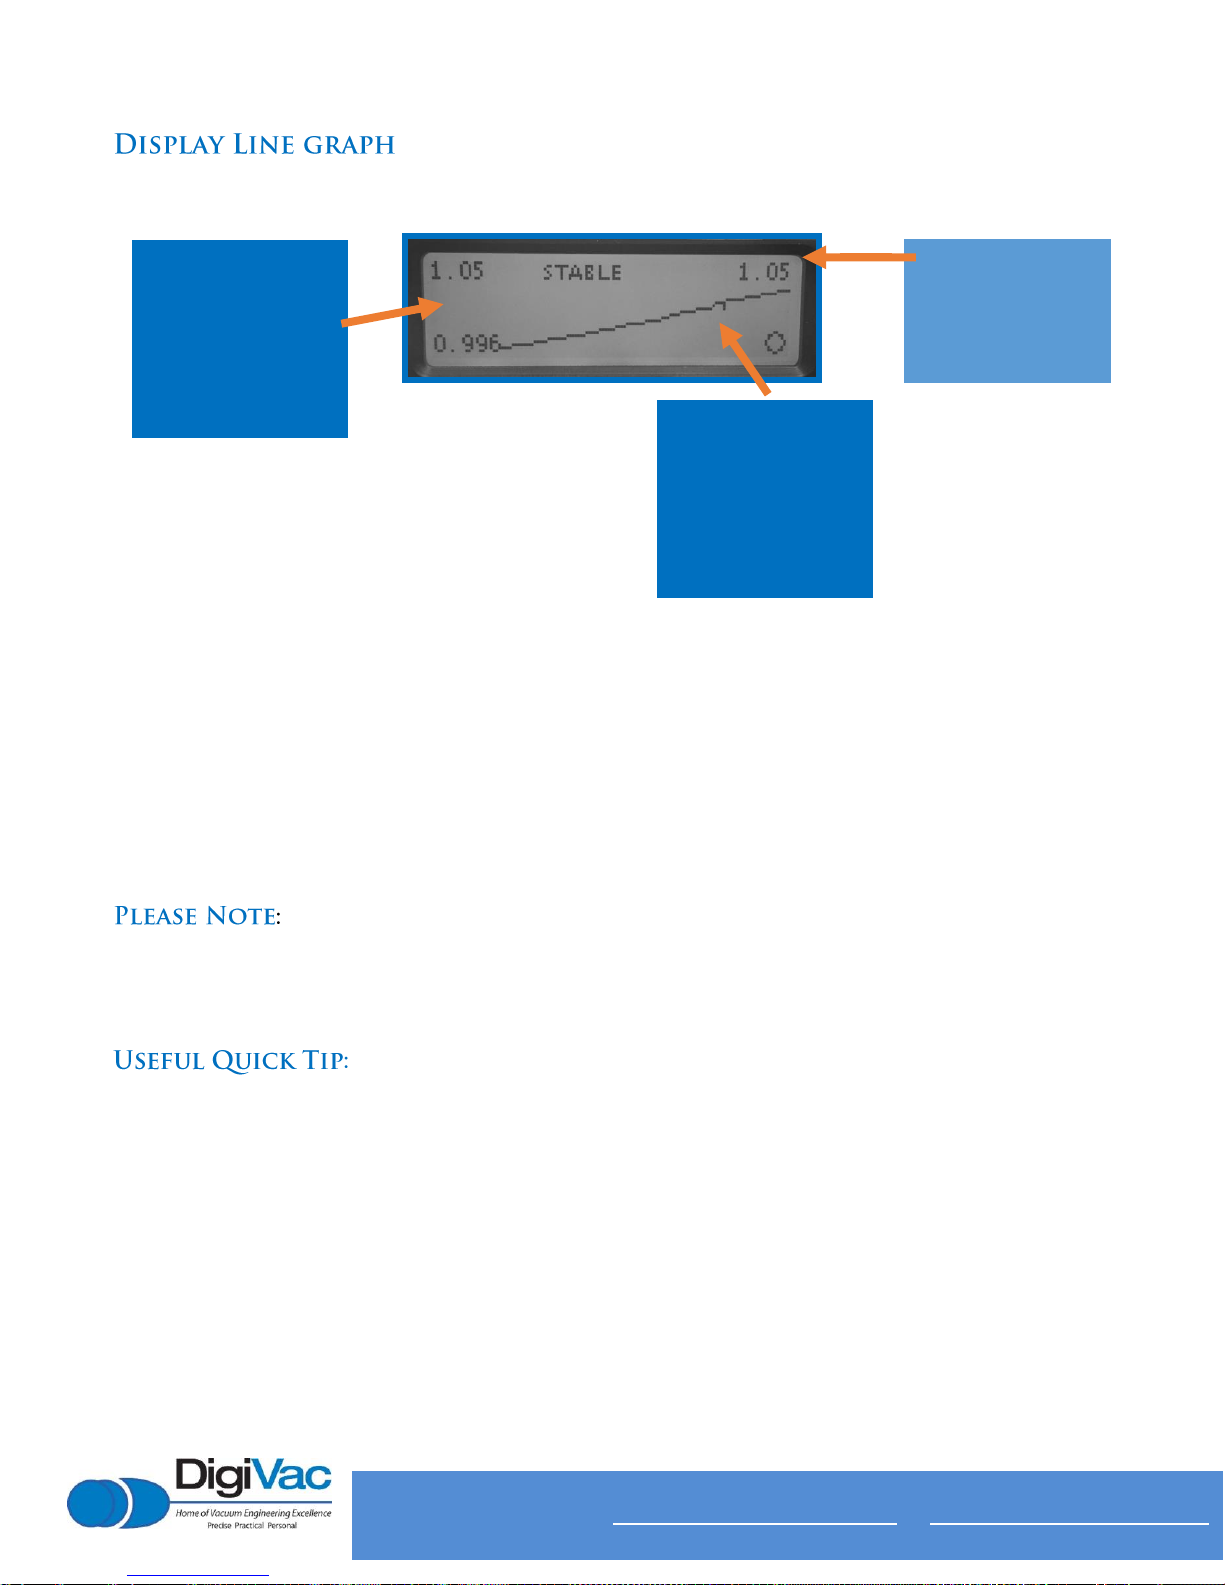
The pumpdown graph plots time horizontally and log pressure vertically. The vertical pressure scale is
logarithmic, indicating order of magnitude from one micron to atmosphere.
The autoscaling (or, autoranging) time graph (AKA the line graph setting) is a
microscope
into the
pump down data.
In this mode, the pump down graph is shown with a linear pressure scale that is fit to the pressure
range of the data set. The height of the graph display is the pressure range of the data set in a linear
scale (not log). The top left figure is the maximum value in this range, and the bottom left figure is the
minimum value in this range.
Sometimes this visualization is not useful, showing noise. This noise comes from the instrument’s
process of measurement, as well as the vacuum system under measurement.
The auto scaling graph is a data visualization microscope, in this sense.
The top right figure is the current or most recent value in the instrument.

9
105 B C h u r c h S t , M a t a w a n , N J 0 7 7 4 7
732-765- 0 9 0 0
s a l e s @ d i g i v a c . c o m w w w . d i g i v a c . c o m
Copyright 2015, DigiVac, Inc., All rights reserved.
High Resolution
The High Resolution format has three digits of precision. For example, an internal vacuum value of 1234
microns (μm Hg) would be displayed as 1.23 torr in the Precision numeric format with torr units.
Additionally, this format gives the raw vacuum measurement data which may be useful for trending, but
may result in a noisier reading.
Low Resolution
The Low Resolution format has two digits of precision. For example, an internal vacuum value of 1234
microns (μm Hg) would be displayed as 1.2 torr in the Low Resolution numeric format with torr units.
This number format also gives a filtered number depending on the accuracy of the gauge in the
pressure range of measurement, which results in a ‘quieter’ gauge.
Scientific
The scientific format has two digits of precision with a base ten exponent following conventional usage.
For example, an internal vacuum value of 1234 microns (μm Hg) would be displayed as 1.2 x 10+3. For
any resolution below 10-3 Torr/mbar, the scientific format must be used.
10
105 B C h u r c h S t , M a t a w a n , N J 0 7 7 4 7
732-765- 0 9 0 0
s a l e s @ d i g i v a c . c o m w w w . d i g i v a c . c o m
Copyright 2015, DigiVac, Inc., All rights reserved.
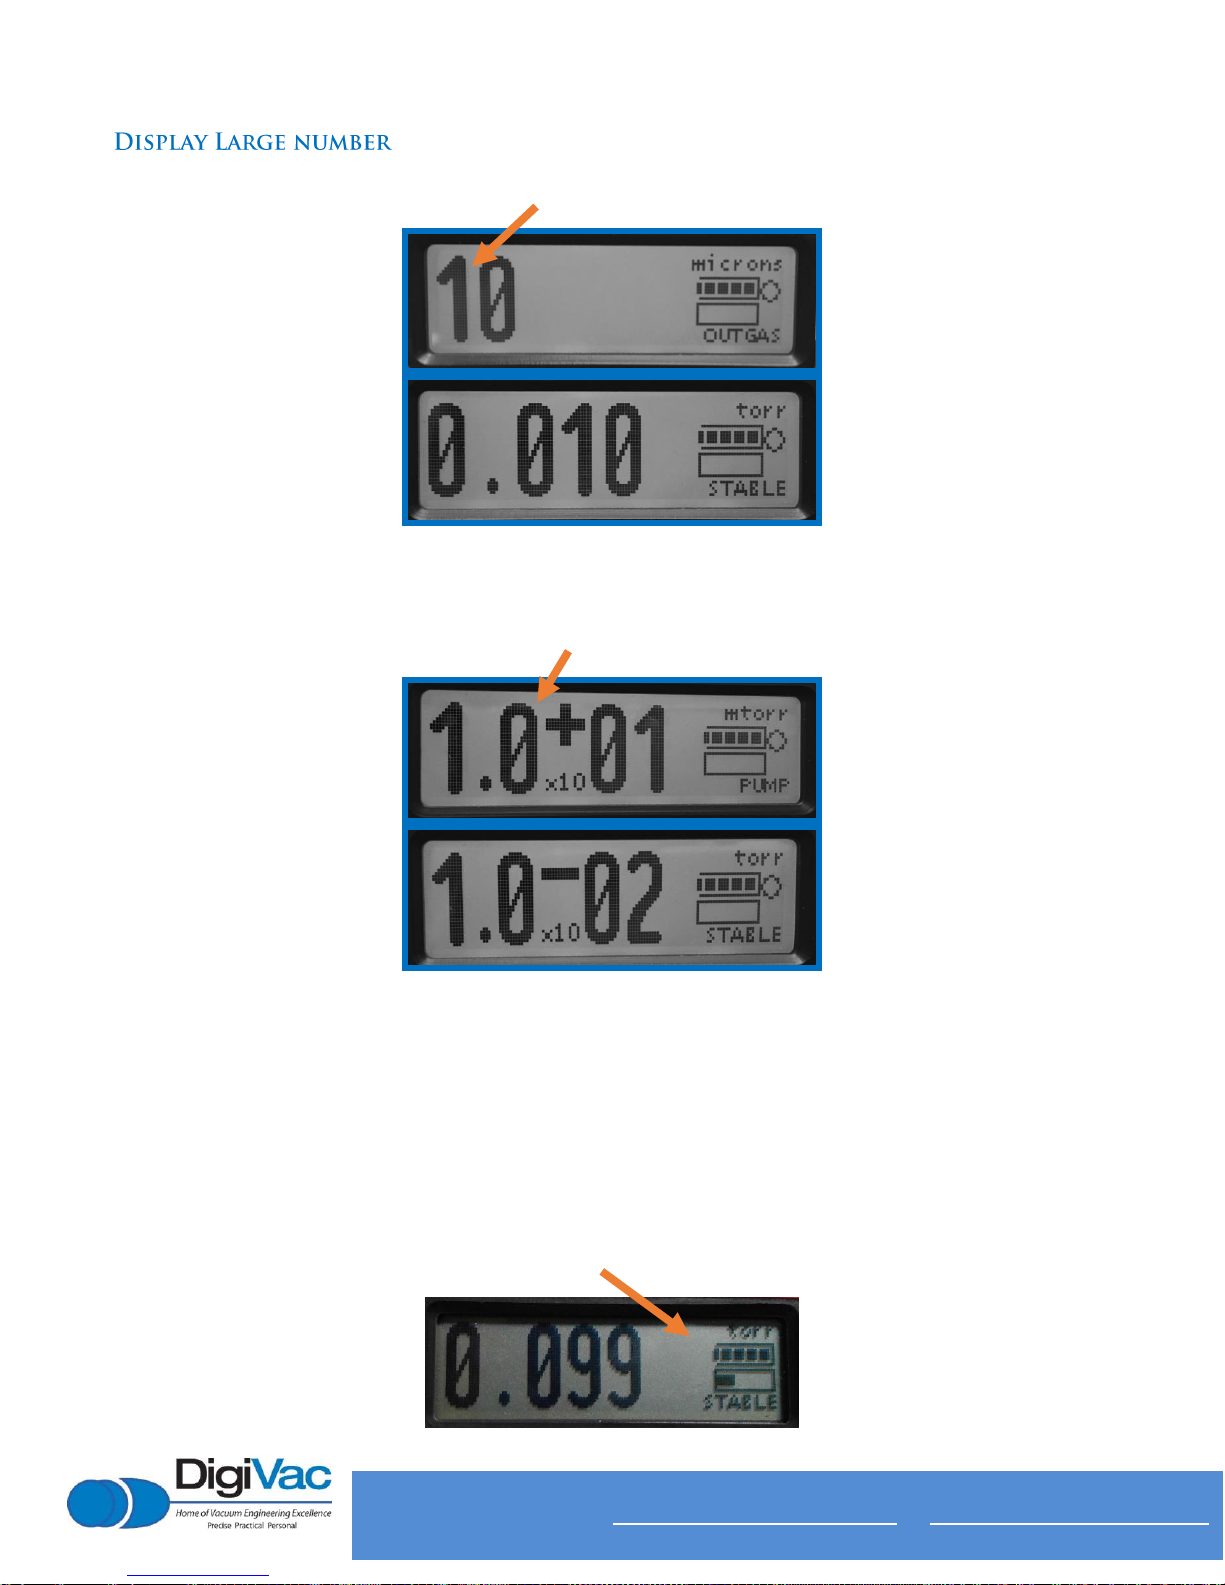
Numeric display with the “High Resolution” format
Large number display with the “scientific” format
The numeric display shows the currently configured units; in these examples the vacuum pressure units
are “microns” or “torr”.
In any display mode, the UP and DOWN buttons turn the backlight on and off (respectively), the SEL
button enters the configuration menu, and the ENT button turns the gauge on or off.
The battery indicator shown at full strength

11
105 B C h u r c h S t , M a t a w a n , N J 0 7 7 4 7
732-765- 0 9 0 0
s a l e s @ d i g i v a c . c o m w w w . d i g i v a c . c o m
Copyright 2015, DigiVac, Inc., All rights reserved.
In practice, this indicator changes based on the current level of pressure.
The numeric display shows when the vacuum sensor is disconnected, failed or when an over-range
condition exists (pressure above 50 Torr).
The numeric display shows “OVERRANGE” when the vacuum sensor tube is disconnected, failed or
when an over-range condition exists (pressure above 50 Torr).
The bar graph visualizes the current sensor reading with a 6-stage stepped bar
12
105 B C h u r c h S t , M a t a w a n , N J 0 7 7 4 7
732-765- 0 9 0 0
s a l e s @ d i g i v a c . c o m w w w . d i g i v a c . c o m
Copyright 2015, DigiVac, Inc., All rights reserved.
Current or most
recent pressure
The auto-scaling (or, auto-ranging) time graph is a
microscope
into the pump down data.
In this mode, the pump down graph is shown with a linear pressure scale that is fit to the pressure
range of the data set.
The height of the graph display is the pressure range of the data set in a
linear scale
(not log). The top
left figure is the maximum value in this range, and the bottom left figure is the minimum value in this
range. The top right figure is the current or most recent value in the instrument.
Sometimes this visualization is not useful, showing noise. This noise comes from the
instrument’s process of measurement, as well as the vacuum system under measurement. The auto
scaling graph is a data visualization microscope, in this sense.
This visualization can show a very small climbing or descending trend.
Maximum &
Minimum value
is measured
range
Line graph of
vacuum readings

13
105 B C h u r c h S t , M a t a w a n , N J 0 7 7 4 7
732-765- 0 9 0 0
s a l e s @ d i g i v a c . c o m w w w . d i g i v a c . c o m
Copyright 2015, DigiVac, Inc., All rights reserved.
In many cases, a sensor may become fouled with oil or other foreign matter. It is often possible to
restore the functionality of contaminated probes with cleaning. If the contaminant is known, the sensor
should be filled with a fluid that is known to be a solvent to that contaminant. As an example, ether is
often effective in removing residues of some oils. Commercial carburetor cleaners are very powerful
solvents and are highly effective against some contaminants.
After cleaning with solvents, the gauge tube should be completely dried or flushed with a volatile
solvent to assure that it is dry prior to reinstalling it.
If this is not done, contamination of the system may
result.
14
105 B C h u r c h S t , M a t a w a n , N J 0 7 7 4 7
732-765- 0 9 0 0
s a l e s @ d i g i v a c . c o m w w w . d i g i v a c . c o m
Copyright 2015, DigiVac, Inc., All rights reserved.
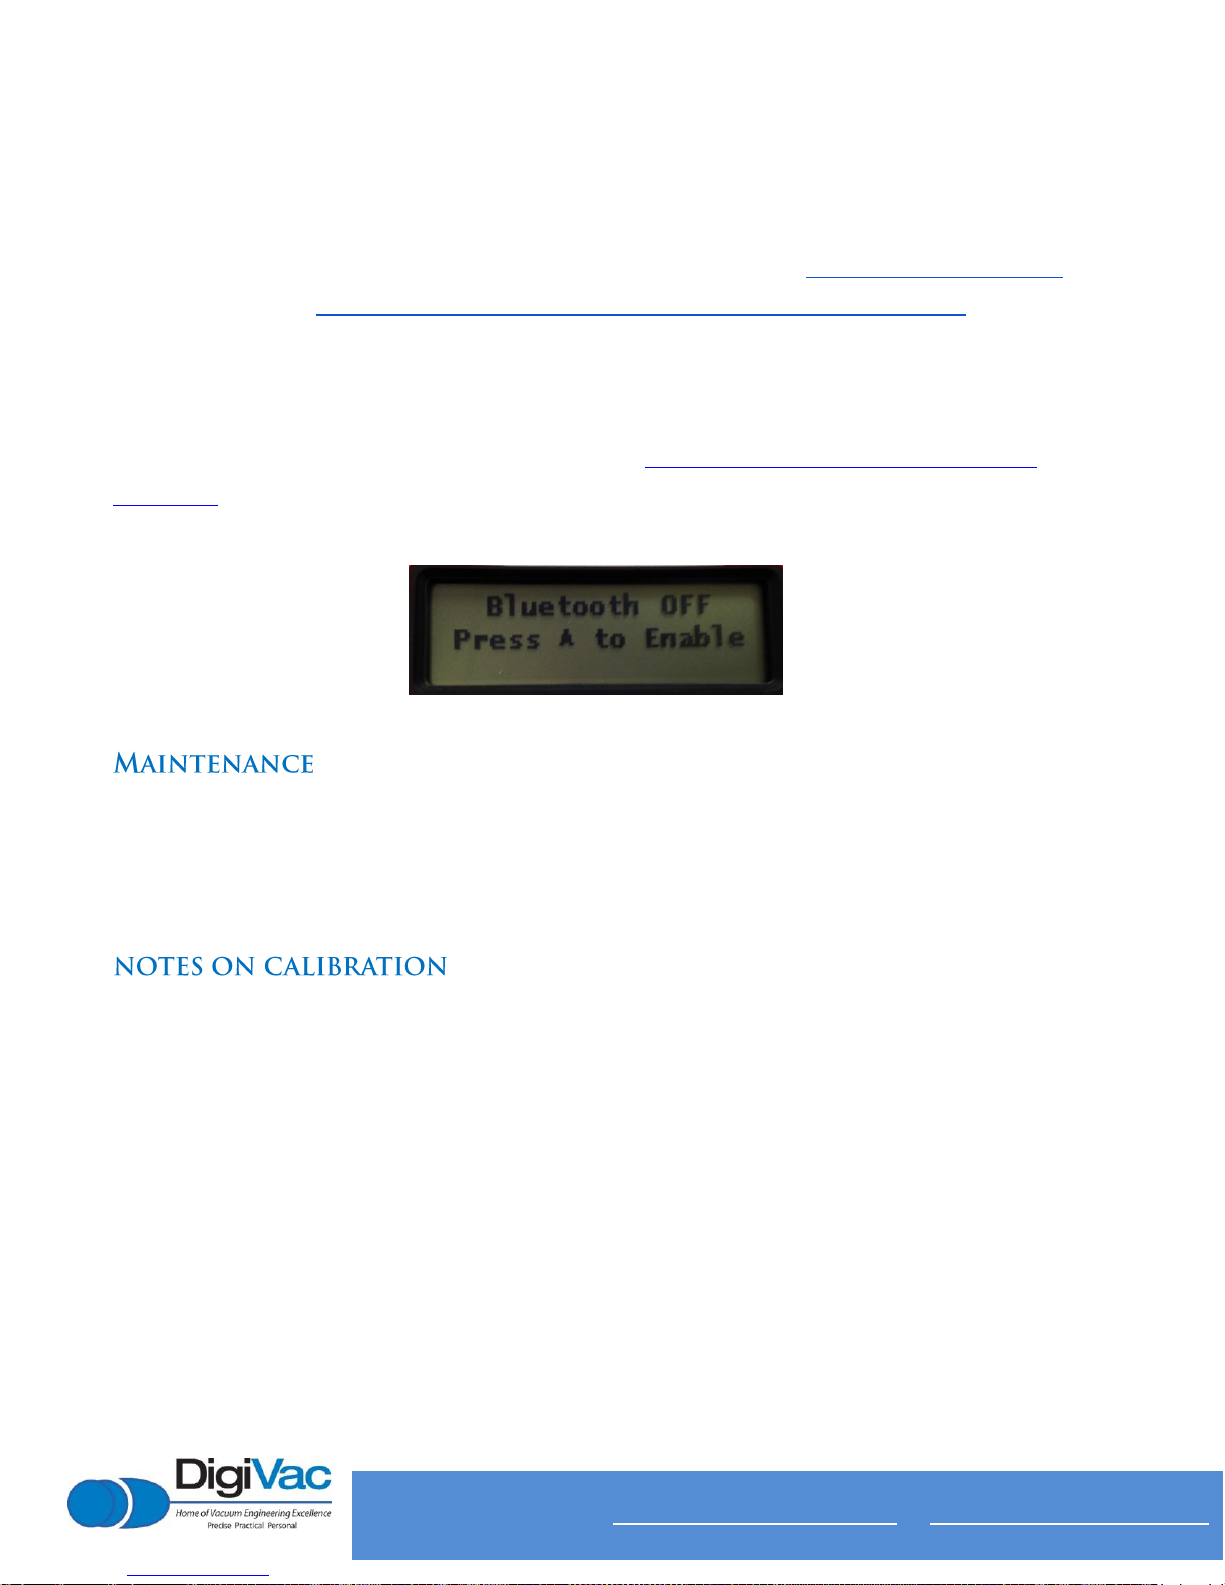
Bluetooth Operation
The Bullseye Pirani comes equipped with a Bluetooth module, which interfaces with the Vacuum Gauge
Application for remote, real-time vacuum monitoring via Apple Store at https://appsto.re/us/B1Ix5.i ,or
Google Play Store at https://play.google.com/store/apps/details?id=com.digivac.bullseye ranging up to
300 feet under ideal conditions.
To enable Bluetooth monitoring, scroll to the menu section marked Bluetooth, and enable or disable
the signal with the up or down arrow. See the included Vacuum Gauge Application instructional
addendum to enable app functioning.
Your vacuum instrument should give you many years of trouble-free service. There are no regularly
scheduled maintenance intervals. If consistent accuracy is required, it is recommended that the gauge,
tube, cable and power supply be returned for a yearly calibration check.
The instrument is calibrated in nitrogen, which has thermal properties virtually identical to air. Other
gasses will affect the readings by an amount proportional to the thermal conductivity of the gases. In
most cases, the gases present in a vacuum system will be air, nitrogen, or oxygen, and no appreciable
errors will occur.
Certain other gases, however, have thermal conductivity significantly greater than air and will cause the
instrument to read higher than the actual amount of pressure.
Examples of such gases are water vapor, fluorocarbon refrigerants, and acetone. Conversely, other
gasses have thermal conductivity significantly lower than air and will cause the instrument to read lower
15
105 B C h u r c h S t , M a t a w a n , N J 0 7 7 4 7
732-765- 0 9 0 0
s a l e s @ d i g i v a c . c o m w w w . d i g i v a c . c o m
Copyright 2015, DigiVac, Inc., All rights reserved.
than actual pressure. Examples of such gases include helium, oxygen and to a lesser extent, CO2.
When interpreting readings using gasses other than air, it should be borne in mind that the Bullseye
Pirani reads absolute pressure—that is the opposite of vacuum. Thus, a lower numerical reading
actually is a higher vacuum.
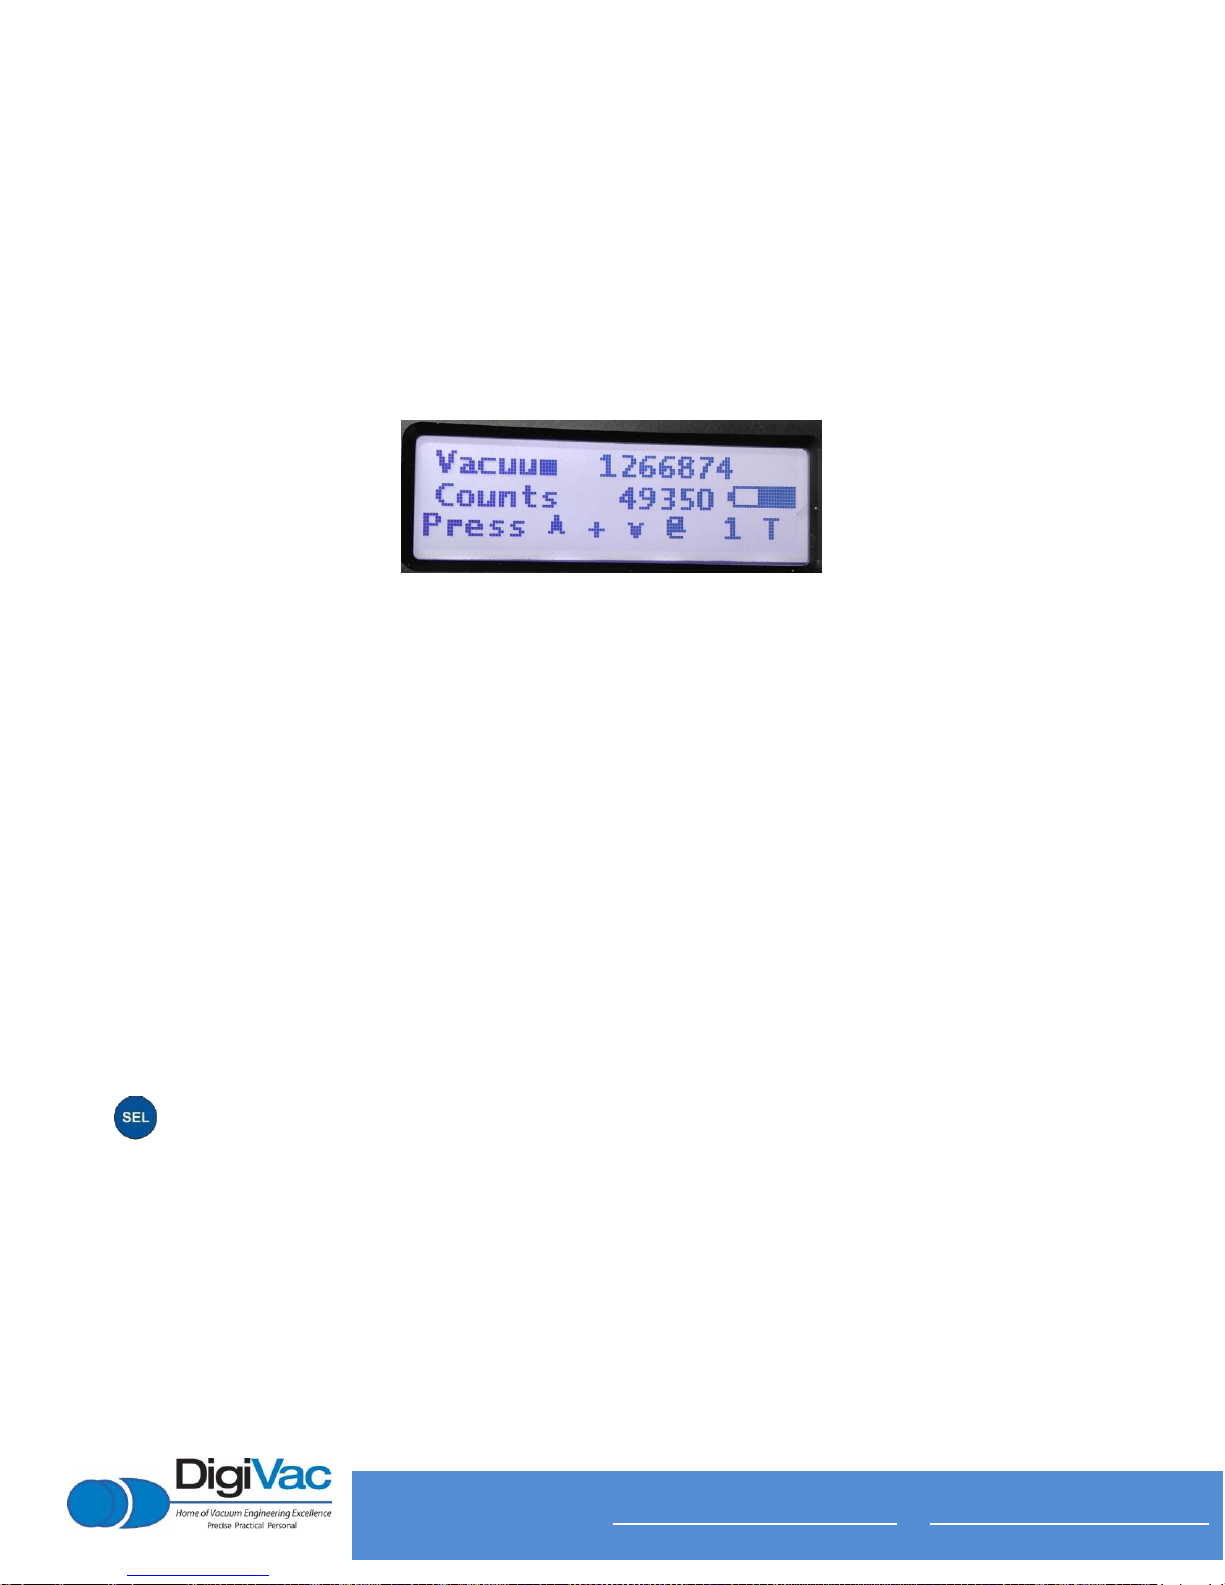
Vacuum Calibration
The calibration screen contains the numbers necessary to calibrate the gauge to a known good
standard. The “Vacuum” number on top is microns x 10. The next number, counts, which is an internal
number that literally represents what is coming into the microcontroller’s analog-to-digital converter,
and is a useful diagnostic. The calibration points are:
30 Torr –the Atmospheric pressure calibration number
1 Torr Mid –The middle calibration number. This number literally represents the calibration
curve pivot point between the high and low variables
50mT Vac –The vacuum or low pressure calibration number
5mT –The lowest pressure calibration number
These numbers on the bottom represent the digital calibration points to be adjusted in order to achieve
optimal calibration. You have two ways to calibrate: Manually and Automatically. Press the Select button
to cycle through the calibration presets.
Automatic Calibration Procedure:
Press the arrow button once so the bottom of the screen reads “Press up or down @ 1 Torr”.
Then pump the vacuum system down to exactly 1 Torr, and press the UP and DOWN buttons
simultaneously so the unit reads exactly “ Torr, or 1000 0”
Press the arrow button once so the screen reads “Press up or down @ 5 mT”.

16
105 B C h u r c h S t , M a t a w a n , N J 0 7 7 4 7
732-765- 0 9 0 0
s a l e s @ d i g i v a c . c o m w w w . d i g i v a c . c o m
Copyright 2015, DigiVac, Inc., All rights reserved.
Then pump the vacuum system down to exactly 5 millitorr, and press the UP and DOWN
buttons simultaneously so the unit reads exactly 5 millitorr, or 50 0
Press the SEL button once so the screen reads “Press up or down @ 50 mT”
Then pressurize the vacuum system to exactly 30 Torr, then press the up and down buttons
simultaneously so the unit reads exactly 50 mT, or 500 0
Press the SEL button once more so the screen reads “Press up + down to Store”, then press up
and down button simultaneously. Screen will flash black and calibration offsets will be saved.
Press the arrow button once so the screen reads “Press up or down @ 30 Torr”.
Then pressurize the vacuum system to exactly 30 Torr, then press the up and down buttons
simultaneously so the unit reads exactly 30 Torr, or 30000 0
Press the SEL button once more so the screen reads “Press up + down to Store”, then press up
and down button simultaneously. Screen will flash black and calibration offsets will be saved.
Pump manifold down to 1 micron, and check unit reading at different points while slowly
decreasing pressure to ensure successful calibration. Recommended points to check are:
30 Torr
20 Torr
10 Torr
5 Torr
1 Torr
500 microns
100 microns
50 microns
1 micron
Manual Calibration Procedure:
Press the select button until the 1 Torr variable is capitalized
Pump the vacuum system down to exactly 1 Torr, and maintain that pressure
Press the UP and DOWN buttons appropriately to move the calibration number up and down so
the unit reads exactly “1 Torr, or 1000 0”
Press the select button until the 5mtorr variable is capitalized
Pump the vacuum system down to exactly 5 millitorr, and maintain that pressure
17
105 B C h u r c h S t , M a t a w a n , N J 0 7 7 4 7
732-765- 0 9 0 0
s a l e s @ d i g i v a c . c o m w w w . d i g i v a c . c o m
Copyright 2015, DigiVac, Inc., All rights reserved.
Press the UP and DOWN buttons appropriately to move the calibration number up and down so
the unit reads exactly 5 millitorr, or 5 0
Press the select button until the 50mt variable is capitalized
Pump the vacuum system down to exactly 50 mT, and maintain that pressure
Press the UP and DOWN buttons appropriately to move the calibration number up and down so
the unit reads exactly “50 mT, or 500 0”
Press the select button until the 30 Torr variable is capitalized
Then pressurize the vacuum system to exactly 30 Torr and maintain that pressure
Press the UP and DOWN buttons appropriately to move the calibration number up and down so
the unit reads exactly 30 Torr, or 30000 0
Press the select button until the screen reads “Press up + down to Store”, then press up
and down button simultaneously. Screen will flash black and calibration offsets will be saved.
Note: If field calibration is required at a later date, calibration offsets should be deleted first. This
is done by pressing the arrow button and observing the ATM, MID and VAC will be capitalized
when selected. Press up and down buttons simultaneously to zero out the offsets.
Pump manifold down to 1 micron, and check unit reading at different points while slowly
decreasing pressure to ensure successful calibration.
At pressures above 50 Torr, the unit may display the text “Overrange”; this is typical as this is the
sensor's highest rated pressure range. For optimal accuracy, readings above 50 Torr, if displayed at all,
should not be used for precision readings.
This instrument, and many similar instruments use microns or “millitorr”, as the primary unit of
measurement. But what are microns, and how do we relate microns to other measures of pressure and
vacuum? Microns are not really a measure of vacuum at all, but rather of absolute pressure.
The pressure of the atmosphere on Earth is 14.696 or approximately 14.7 pounds per square inch at sea
level. This pressure is due to the weight of all of the air in the earth's atmosphere above any particular
square inch. This 14.696 PSI is equivalent to the pressure produced by a mercury column of
approximately 29.92 inches high or .76 meters (about ¾ of a yard) or 760 millimeters of mercury.
Atmospheric pressure varies greatly with altitude. It decreases approximately 1 inch of mercury per

18
105 B C h u r c h S t , M a t a w a n , N J 0 7 7 4 7
732-765- 0 9 0 0
s a l e s @ d i g i v a c . c o m w w w . d i g i v a c . c o m
Copyright 2015, DigiVac, Inc., All rights reserved.
thousand feet of altitude. It also varies widely with local weather conditions. (Variations of one-half inch
in a single day are common.) The word vacuum means pressure lower than atmospheric or “suction”,
but, in describing negative pressure, the atmosphere is only a satisfactory reference if we are dealing
with values of vacuum down to about 27 inches of mercury. Below that, it is much more useful to talk in
terms of absolute pressure, starting from absolute zero. The Bullseye Pirani and all similar instruments
do just this.
One Torr, a commonly used unit, is an absolute pressure of one millimeter of mercury. A millitorr is
equal to one thousandth of a Torr. A micron is the same as a millitorr.

19
105 B C h u r c h S t , M a t a w a n , N J 0 7 7 4 7
732-765- 0 9 0 0
s a l e s @ d i g i v a c . c o m w w w . d i g i v a c . c o m
Copyright 2015, DigiVac, Inc., All rights reserved.
20
105 B C h u r c h S t , M a t a w a n , N J 0 7 7 4 7
732-765- 0 9 0 0
s a l e s @ d i g i v a c . c o m w w w . d i g i v a c . c o m
Copyright 2015, DigiVac, Inc., All rights reserved.
Table of contents
Other DigiVac Measuring Instrument manuals


