Digoo DG-PC809 User manual

DG-PC809

Contents
1. Introduction .................................................................................................................1
2. Packing list ..................................................................................................................1
3. Product description.......................................................................................................1
3.1 Overview.................................................................................................................1
3.2 Intended use............................................................................................................2
3.3 Principle..................................................................................................................2
3.4 Features...................................................................................................................3
3.5 Components............................................................................................................3
3.6 Product structure.....................................................................................................4
3.7 LED display description.........................................................................................5
4. Warnings and precautions.............................................................................................5
5. Direction for use...........................................................................................................7
5.1 Take your forehead temperature.............................................................................7
5.2 Take your ear temperature......................................................................................8
5.3Recall the memories..............................................................................................10
5.4℃and ℉conversion............................................................................................10
5.5Turn on or off the buzzer/speaker/vibration..........................................................11
5.6Set threshold for low fever....................................................................................11
5.7Set threshold for highfever...................................................................................12
5.8Turn off.................................................................................................................12
5.9 Replace the battery................................................................................................12
6. Temperature taking tips..............................................................................................13
7. Cleaning and disinfection...........................................................................................14

7.1 cleaning.................................................................................................................14
7.2 disinfection............................................................................................................15
8. Troubleshooting..........................................................................................................16
9. Specification...............................................................................................................17
10. Symbols description..................................................................................................17
11. Maintenance..............................................................................................................18
12. After-sale service .....................................................................................................18
13. Declaration ...............................................................................................................18
14. Appendix A:EMC Information-Guidance andManufacturer’s Declaration.........19
15. Manufacturer information.........................................................................................23

1
1. Introduction
Dear customer, thank you for purchasing our Medicalinfrared thermometer, the
thermometer can be used to measure the human body temperature by detecting infrared
energy emitted from the forehead or the eardrum.
In order to get accurate readings, please to read the manual before using.
Keep this manual so that you may read it at anytime when necessary.
The models suitable for this manual and their differences are as follows:
Model
Difference
PC809 At the end of the temperature measurement, the buzzer give a ‘beep’cue.
PC809E
V
At the end of the temperature measurement, the speakers broadcast the
temperature in English.
PC809V At the end of the temperature measurement, the instrument emitsvibration
feedback.
In addition to the above differences, the expected use of the three models are exactly
the same.
Note: Ear temperature measurement can only be applied to people who are over
3 months old.
2. Packing list
Medicalinfrared thermometer1 pc
Storage bag1 pc
User’s manual 1 pc
AAA dry battery (optional) 2 pcs

2
3. Product description
3.1 Overview
Infrared thermometer measures the body temperature based on detecting the infrared
energy emitted from the eardrum or the forehead. Users can quickly get measurement
results after positioning properly the temperature probe in the ear canal or on the
forehead.
Normal body temperature hasa range. The following table shows that this normal
range also varies by measuring different site. Therefore, readings from different site
should not be directly compared. Tell your doctor what type of thermometer you used
and what part of body you measured are very important. Also keep this in mind if you
are diagnosing yourself.
Measuring site Normal range of temperature
Forehead 36.1℃to 37.5℃(97.0℉ to 99.5℉)
Ear 35.8℃to 38.0℃(96.4℉ to 100.4℉)
Mouth 35.5℃to 37.5℃(95.9℉ to 99.5℉)
Anus 36.6℃ to 38.0℃ (97.9℉ to 100.4℉ )
Axilla 34.7℃ to 37.3℃ (94.5℉ to 99.1℉ )
3.2 Intended use
The multifunctional infrared thermometer is intended for measuring the human body
temperature, it has two measurement modes, the forehead mode is indicated for people
of all ages and the ear mode is indicated for people above three months old.

3
3.3 Principle
The infrared temperature sensor collects infrared energy emitted by the eardrum in
the ear canal or the skin of forehead. After being focused by a lens, the infrared energy
is converted into a temperature reading by the thermopiles and measurement circuits.
Fig. 1 Fig. 2
3.4 Features
Quick measurement, only 1 second
Accurate and reliable
One button design, easy to operate
Both forehead and ear measurement mode
32 sets of memory, easy to recall
Switch degrees Celsius (℃) and Fahrenheit (℉)
Turn on or off thebuzzer/speaker/vibrationfunction
Lighting an orange LED, intelligent low fever alarm
Lighting a red LED, intelligent high fever alarm
Automatic shutdown, energy saving
3.5 Components
The infrared thermometer consists of a shell, a LED display screen, a button, a
4
buzzer/speaker/vibration motor, a probe with infrared sensor inside, a microprocessor, a
circuit board and measuring software.
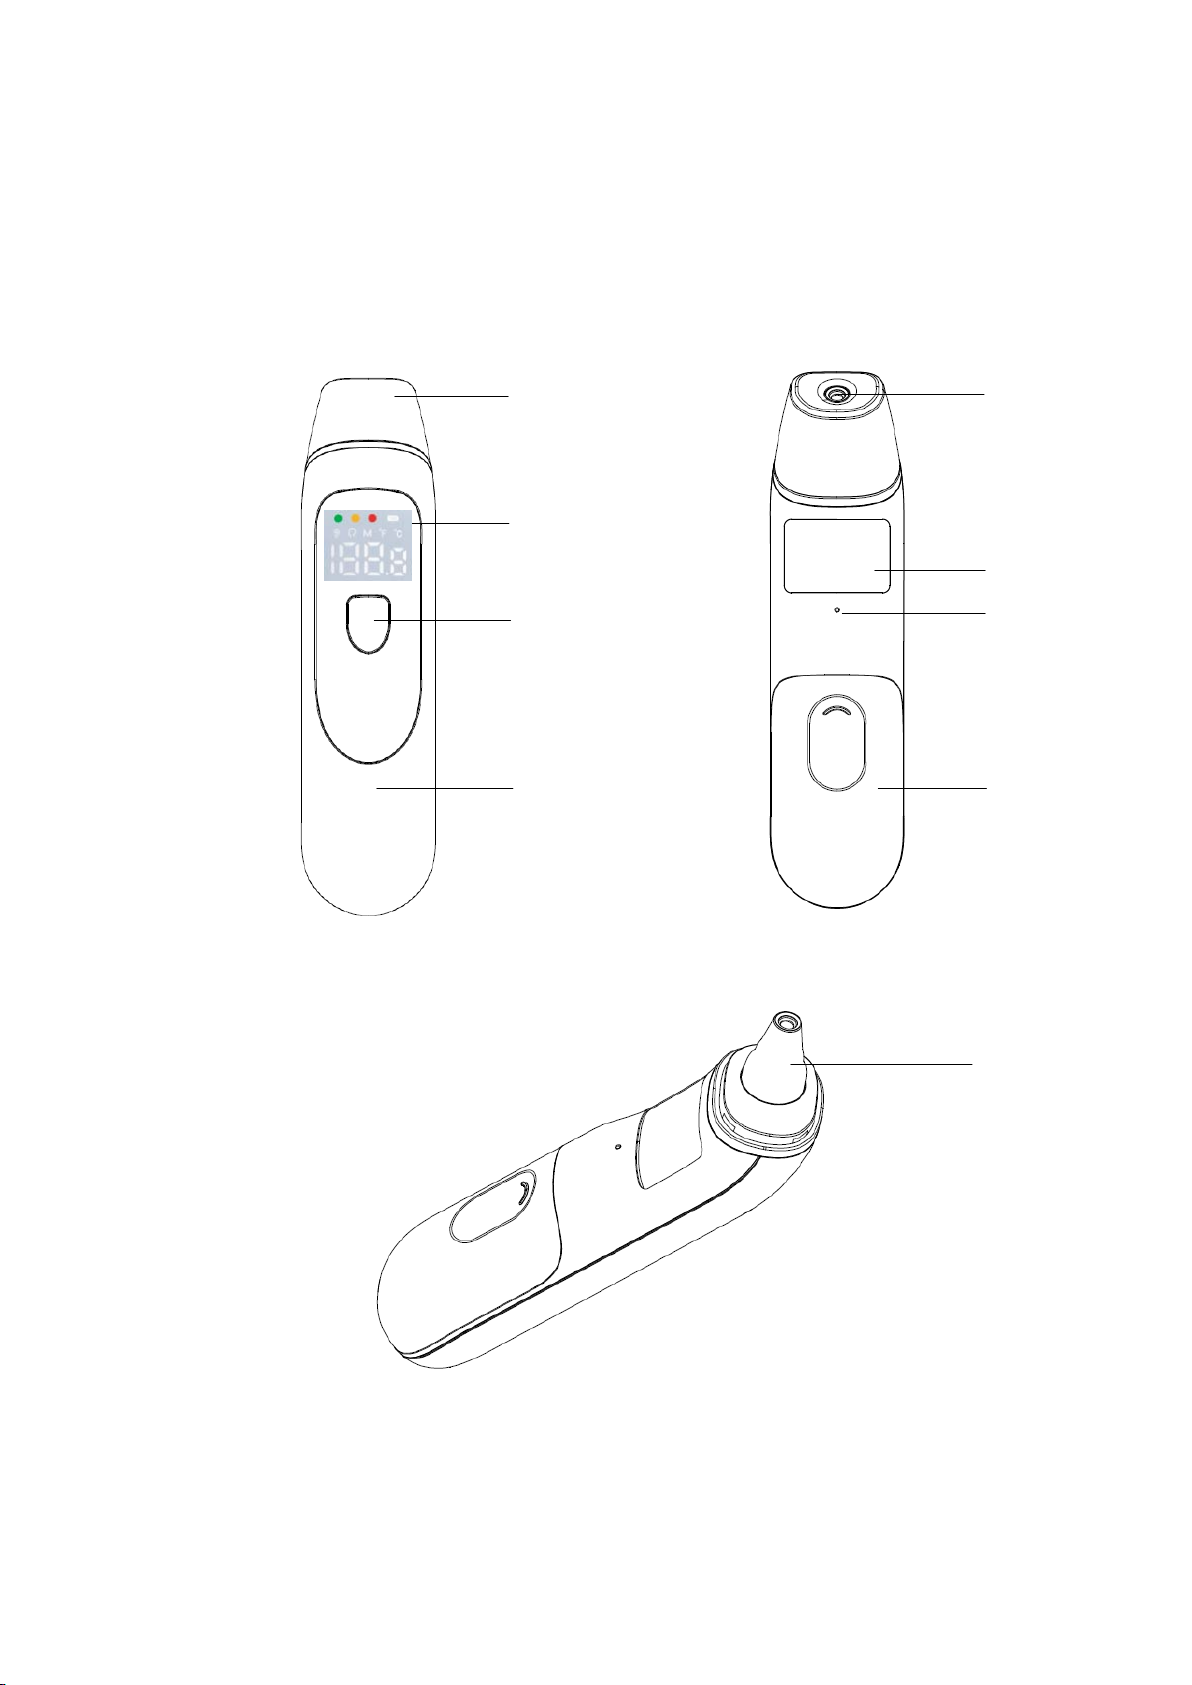
3.6 Product structure
①⑤
②
⑥
③⑦
④⑧
Fig. 3Fig. 4
⑨
Fig. 5 (remove probe cover)
5
①Probe cover (remove it when measuring ear temperature)
②LED display screen ③Power/Measure/Set button
④Top Cover ⑤Infrared sensor
⑥Label ⑦Buzzer/Speaker hole
⑧Battery cover ⑨Probe
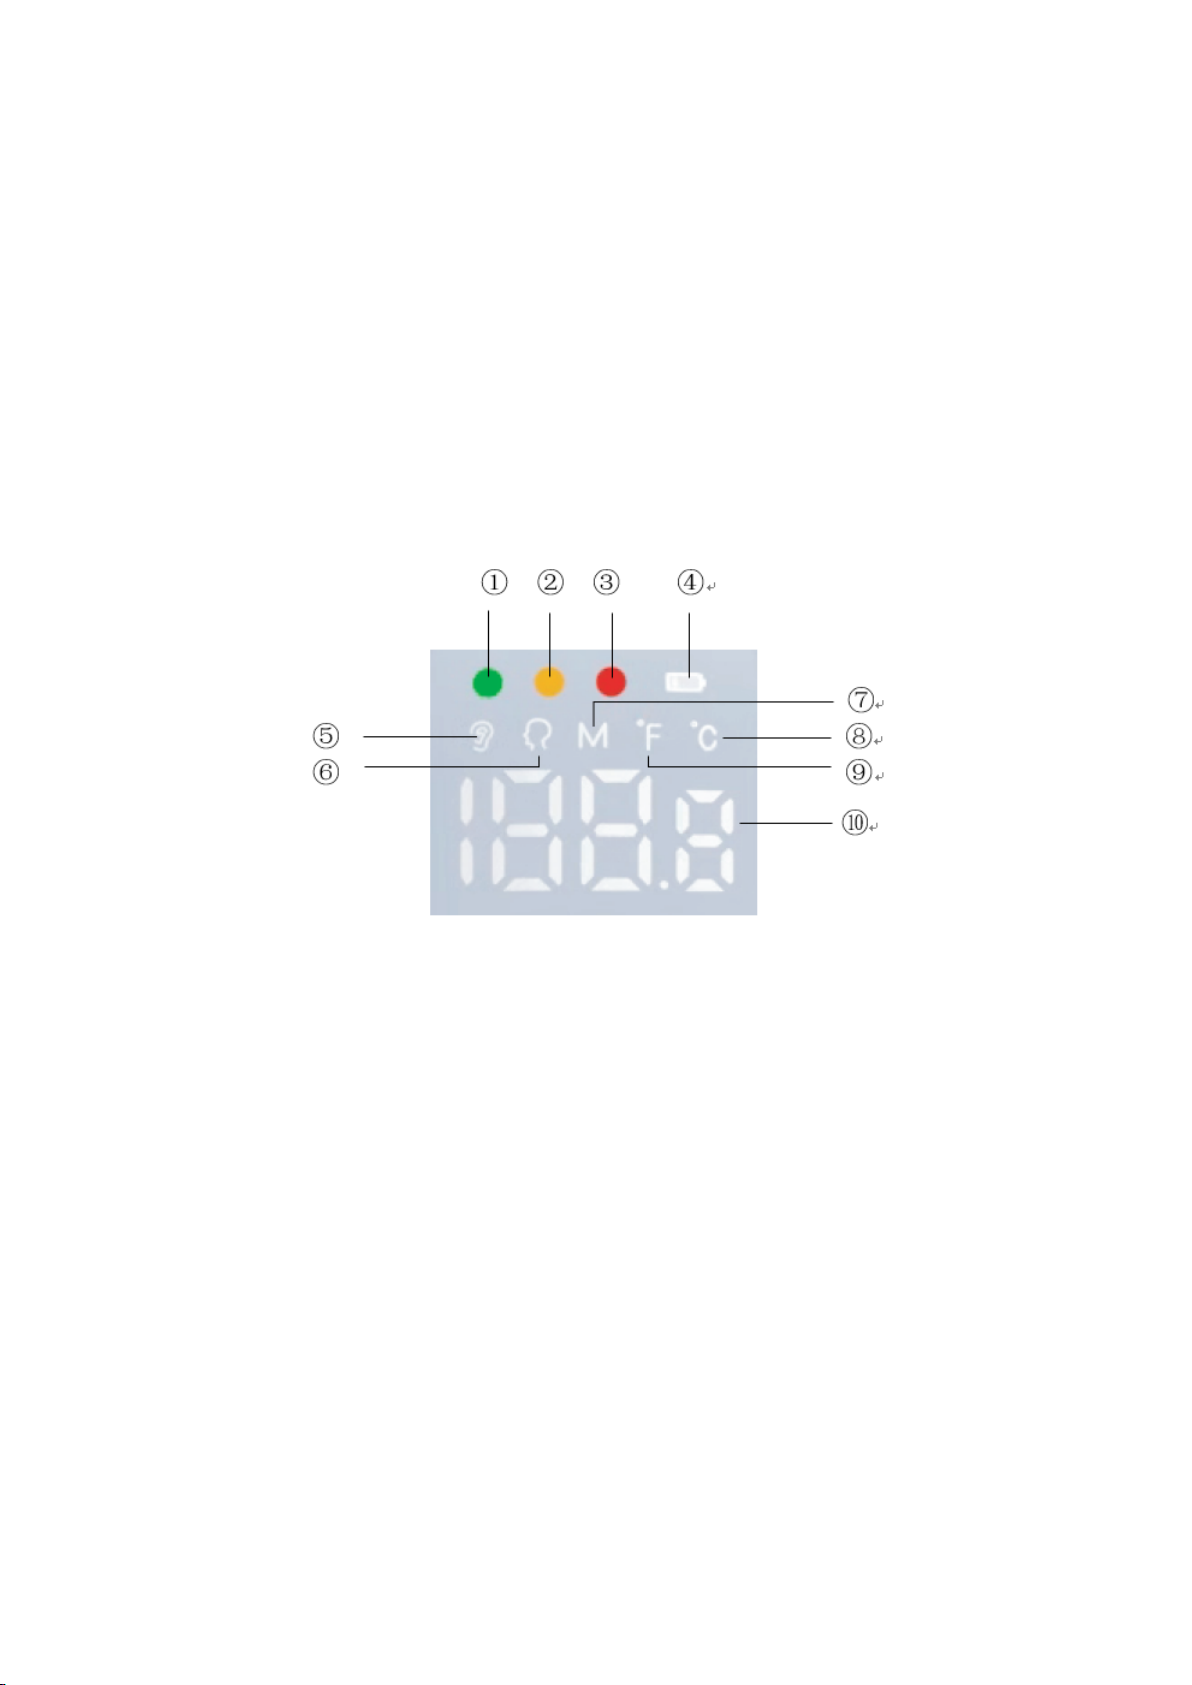
3.7 LED display description
Fig. 6
①Green status light ②Orange status light
③Red status light ④Low battery indicator
⑤Ear temperature mode ⑥Forehead temperature mode
⑦Memory mode ⑧Degree Celsius
⑨Degree Fahrenheit ⑩Temperature value
4. Warnings and precautions
1) Keep out of reach of children under 12 years.
2) Never immerse the thermometer into water or other liquids (not waterproof). For

6
cleaning and disinfecting please follow the instructions of ‘Cleaning and
disinfection’section.
3) Never use the thermometer for purposes other than its intended use. Please follow
the general safety precautions when using on children.
4) Keep the thermometer away from direct exposure to the sun and keep it in a
dustfree, dry area, wellventilated place at a temperature between10.0℃/50.0℉-
40.0℃/104.0℉. Do not use the thermometer in high humidity environment (>85%
RH).
5) Do not use the thermometer if there are signs of damage on the infrared sensor lens
or on the instrument. If damaged, do not attempt to repair the instrument! Please
contact the dealer or manufacturer.
6) Thisthermometer consists of highprecision parts. Do not drop the instrument,
protect it from severe impact and shock, do not twist the instrument or the infrared
sensor.
7) Please consult your doctor if you see symptoms such as unexplained irritability,
vomiting, diarrhea, dehydration, changes in appetite or activity, seizure, muscle
pain, shivering, stiff neck, pain when urinating, etc., even in the absence of fever.
8) Even in the absence of fever, those who exhibit a normal temperature may still need
to receive medical attention. People who are on antibiotics, analgesics, or
antipyretics should not be assessed solely on temperature readings to determine the
severity of their illness.
9) Temperature elevation may signal a serious illness, especially in adults who are old,
frail, have a weakened immune system, or neonates and infants. Please seek
professional advice immediately when there is a temperature elevation and if you

7
are taking temperature for whom are:
Over 60 years of age (Fever may be blunted or even absent in elderly patients)
Having diabetes mellitus or a weakened immune system (e.g. HIV positive,
cancer, chemotherapy, chronic steroid treatment, splenectomy)
Bedridden (e.g. nursing home patient, stroke, chronic illness)
A transplant patient (e.g. liver, heart, lung, kidney)
10)This thermometer is not intended for premature babies or smallforgestational age
babies. This thermometer is not intended to interpret hypothermic temperatures. Do
not allow children to take their temperatures unattended.
11)Use of this thermometer is not intended as a substitute for consultation with your
physician or pediatrician. It is for household use only.
12)Clean the thermometer probe after each use.
13) Do not use the thermometer on newborns or continuous temperature monitoring
purposes.
14) Do not take a measurement while or immediately after nursing a baby.
15) Patients should not drink、Eat、have a bath or do Physical activity unless 30 minutes
in advance. During eating, some organs have to work, such as Stomach、intestinal tract
etc, so there is extra heat to affect temperature accuracy.
5. Direction for use
Please load the batteries before using the thermometer at the first time and take out
the batteries when you don’t use the thermometer for a long time, such as over one
month.
Additionally, refer to the part 3 of Fig. 3, this thermometer is one button design, so

8
actually it is the same thing when we describe ‘the Power button’, ‘the Measure button’
and ‘the Set button’in subsequent instructions.
5.1 Take your forehead temperature
Press the Power button to power on.
Keep the probe cover touch the middle of your forehead, then press and release the
button. About 1 second later, beep will be heard, at that time you can get the readings.
In Forehead Mode, the symbol shows on screen.
Fig. 7
Note: The forehead measurement is an indicative reading. The measured forehead
temperature can fluctuate up to 0.5℃/1℉from your actual body temperature. Please be
aware of the factors that influence the accuracy as described in the sections of
‘Temperature taking tips’and ‘Warnings and Precautions’.
In order to improve the accuracy, please make sure your forehead is not covered
by hair, sweat or dirt.
Make sure the probe sensor is clean before using the thermometer.
Before using the thermometer, ensure that both the user and the thermometer
remain in the same room with stable airflow and room temperature is between10.0℃

9
/50.0℉and 40.0℃/104.0℉for at least 30 minutes.
5.2 Take your ear temperature
Press the Power button to power on.
Take off the probe cover, fit the probe snuggly into the ear canal. Press and release
the button, about 1 minutes later, beep will be heard, at that time you can get the
readings. In Ear Mode,The symbol shows on screen.
Fig. 8
Please make sure that your ear is clean, without earwax or obstructions.
The temperature is slightly difference between left ear and right ear. So please do
not to compare the readings of left ear and right ear directly and keep the same ear to
measure the temperature each time.
Do not force the thermometer probe into the ear canal. Otherwise, the ear canal may
get hurt.
Be careful when taking ear temperature on a child, whose ear canal is small.
When taking the ear temperature for a child aged over 1 year or an adult, gently pull
the ear up and back to make the ear canal become straight, so that the probe can receive
an infrared ray from the eardrum.

10
5.3 Recall the memories
The thermometer can store 32 sets of measurement data, when the data is full, the
last one will always replace the first one.
If you want to review the previous measurement data, in the state of Thermometer
shutdown, pressing setting button for About 3 seconds until you see the ‘M’
symbolFlicker on the screen, release the button.
Press the button, you can see the number ‘1’ appears on the right side of screen, it
means the first memory, then the number ‘1’ disappears quickly and pop up the first
remembered temperature value. Press the button one by one, so you can see all the
remembered temperature values in turn for all of memories.After review the memory
data, press the button for about 5 seconds, thermometer will shutdown and save the
setting automatically.
5.4℃and ℉conversion
If you want to convert ℃to ℉or ℉to ℃, in the state of thermometer shutdown,
pressing the Setting button for about 6 seconds until you see the‘℃’ s y m b o l or the ‘℉’
symbolflicker on the screen, then release the button. Press the button again, then
the ℃symbol or the ℉symbol will be converted to another.
Don`t release the button when “M” Symbol appearing, only release when “C” or “F”
appearing. After finish conversion, Press the button for about 5 seconds, thermometer
will shutdown and save the setting automatically.
5.5 Turn on or off the buzzer/speaker/vibration
The three PC809, PC809EV, PC809V models are different in how they interact with
users at the end of the measurement: the PC809 uses a buzzer to ‘beep’, the PC809EV

11
communicates the temperature over a speaker, and the PC809V vibrates through a
motor.Please to check the thermometer model from back side label.
If you want to turn on or off the buzzer/speaker/vibration, in the state of thermometer
shutdown, press the setting button for about 9 seconds until you see the ‘ON’ symbol
or the ‘OFF’symbol appears on the screen, then release the button and press the setting
button again, then the ‘ON’symbol or the ‘OFF’symbol will be converted to another.
After selection, Press the button for about 5 seconds, the thermometer will shutdown
and save the setting automatically.
5.6Set threshold for low fever
This thermometer has preset 37.5℃/99.5℉as an alarm temperature for low fever.
However, 37.5℃/99.5℉is only a reference value, at this temperature, different people
feel different, some feel uncomfortable but others feel fine, so if you don’t agree with
this low fever threshold, you can manually change it to suityourown situation after
consulting your doctor.
In the state of shutdown, hold pressing the Set button 12 seconds until you see the
orange status light on the screen, release the button. Don't care about the other
symbols that appear in the process.
Press the Set button, you can increase 0.1℃/0.2℉for this threshold every time, the
adjustment range is from 37.5℃/99.5℉to37.9℃/100.2℉. Once it reaches the Max.
value, press the button again, it will go back to the Min. value, then repeat the cycle.
After setting done, Press the button for about 5 seconds, the thermometer will
shutdown and save the setting automatically.

12
5.7Set threshold for highfever
This thermometer has preset 38.0℃/100.4℉as an alarm temperature for high fever.
However, 38.0℃/100.4℉is only a classic reference value, at this temperature, different
people feel different, some feel bad but others feel not too bad, so if you don’t agree
with thishigh fever threshold, you can manually change it to suityourown situation after
consulting your doctor.
In the state of shutdown, hold pressing the Set button 15 seconds until you see the
red status light on the screen, release the button. Don't care about the other symbols
that appear in the process.
Press the Set button, you can increase 0.1℃/0.2℉for this threshold every time, the
adjustment range is from38.0℃/100.4℉to 38.9℃/102.0℉. Once it reaches the Max.
value, press the button again, it will go back to the Min. value, then repeat the cycle.
After setting done, Press the button for about 5 seconds, the thermometer will
shutdown and save the setting automatically.
5.8 Turn off
When the thermometer is turned on, the thermometer will shut down automatically
afterit is not used for 30 seconds,or you can hold down the Power button for 5 seconds
to shut down the machine manually.
5.9 Replace the battery
When the low battery indicatoris lighting on the screen, downward slide the
battery cover off the shell, take out two old batteries with insufficient power, properly
mount two new AAA batteries into the battery bin according to the marked polarity

13
symbols, close the battery cover, the thermometer can be restored to normal use.
Take out the batteries if the thermometer will not be used for more than one month.
6. Common sense of temperature measurement
1) It is important to know each individual normal temperature when they are well.
This is the only way to accurately diagnose a fever. Record readings twice in a day,
early morning and late afternoon. Take the average of the two temperatures to
calculate normal oral equivalent temperature. Always take the temperature in the
same location, since the temperature readings may vary from different locations on
the forehead.
2) The normal temperature of a child can be as high as 37.7℃/99.9℉or as low as
36.1℃/97.0℉, please note that this thermometer reads 0.5℃/0.9℉lower than a
rectal digital thermometer.
3) External factors may influence ear temperatures, including when an individual has:
a) been lying on one ear or the other
b) earwax
c) been exposed to very hot or very cold environment
d) been just swimming or bathing
In these cases, return to normal condition by wait quietly 30 minutes prior to taking a
temperature.
Use the untreated ear if prescription ear drops or other ear medications have been
placed in the ear canal.
4) Users will be measured and the thermometer should stay in a steady-state room
condition for at least 30 minutes.

14
5) Before place the thermometer probe on your forehead, remove the hair, dirt, or
sweat of the test area. Wait 10 minutes after cleaning before measuring temperature.
6) Use an alcohol swab to carefully clean the sensor and wait for 5 minutes before
taking a measurement on other people. Wipe your forehead with a warm or cool
cloth may affect the reading. It is advised to wait 10 minutes before taking a
reading.
7) In the following situations it is recommended that measure 3-5 times with the same
location and take the highest one as the reading:
a) Newborn infants in the first 100 days;
b) Children under 3 years of age with compromised immune
c) When the user is learning how to use the thermometer for the first time until
he/she has familiarized himself/herself with the instrument and obtains consistent
readings.
7. Cleaning and disinfection
7.1 Cleaning
Wipe the thermometer body with a slightly damp soft cloth, and gently dry the body
with a piece of tissue paper, take care not to scratch the surface of LED display screen.
Can only use cotton swabs dip in anhydrous ethanol to clean the infrared sensor
lens.

15
Fig. 9
Keep water off the infrared sensor lens during the cleaning process. Otherwise,
the lens may be damaged.
The infrared sensor lens may be scratched if it is cleaned with a piece of tissue
paper, resulting in inaccurate readings.
Do not touch the infrared sensor lens with hard objects.
Never use abrasive cleaning agents, thinners or benzene for cleaning.
Never immerse anypart of the thermometer into liquid,or allow liquid to enter
thethermometer.
7.2 Disinfection
Disinfect the thermometer body and the area around the probe with a soft cloth
slightly moistened with 75% medical alcohol, not to disinfect the infrared sensor lens.
Because 75% medical alcohol contains water, which may damage infrared sensors.
Do not use hot steam or ultraviolet radiation for disinfection.Otherwise,the
thermometer may be damaged or quickly aged.

16
8. Troubleshooting
Symptom
Possible Cause
Solution
Failed to
power on
The battery level is too
low
Replace new batteries.
Polarities of the batteries
are reversed
Ensure the batteries are mounted right.
The thermometer is
damaged Contact the dealer or manufacturer.
Reading is
too low
The infrared sensor lens
of the probe is dirty
Use cotton swabs dipped in anhydrous
ethanol to clean infrared sensor lens.
The distance between the
probe and the target
under test is too far
Let the probe cover touch your
forehead, or put the probe into your
ear canal.
You have just come from
a cold environment
Stay in a room between 10.0
℃
/50.0
℉
and 40.0℃/104.0℉for at least 30
minutes before taking a temperature
measurement.
Reading is
too high
You have just come from
a hot environment
Stay in a room between 10.0
℃
/50.0
℉
and 40.0℃/104.0℉for at least 30
minutes before taking a temperature
measurement.
You are exposed to hot
air generated by an air
conditioner or heater
Leave the environment for at least 30
minutes before starting to take your
temperature.
Low battery Replace new batteries.
Hi Human body
temperature over
42.9℃/109.2℉
1.Firstly make sure the probe is clean
and no dirty on it.
2.If it`s the enviroment tempertature
out of range, then patient and
thermometer should both stay in a
room between 10.0℃/50.0℉and
40.0℃/104.0℉for at least 30 minutes
before taking a temperature
measurement.
3.If the problem persists after trying
the above method, please to contact
the dealer or manufacturer.
Lo
Human body
temperature below
32.0℃/89.6℉.
1.Firstly make sure the probe is clean
and no dirty on it.
2.If it`s the enviroment tempertature
out of range, then patient and
thermometer should both stay in a
room between 10.0
℃
/50.0
℉
and

17
40.0℃/104.0℉for at least 30 minutes
before taking a temperature
measurement.
3.If the problem persists after trying
the above method, please to contact
the dealer or manufacturer.
Err
Environment
temperature is not in
10℃to 40℃or 50℉
to 104℉range.
1.Firstly make sure the probe is clean
and no dirty on it.
2.If it`s the enviroment tempertature
out of range, then patient and
thermometer should both stay in a
room between 10.0℃/50.0℉and
40.0℃/104.0℉for at least 30 minutes
before taking a temperature
measurement.
3.If the problem persists after trying
the above method, please to contact
the dealer or manufacturer.
9. Specification
Product name
Medical infrared Thermometer
Product model
PC809/PC809EV/PC809V
Applicable
regulations and laws
ASTM E 1965 / EN12470-5 / GB/T 19146
Power supply
DC 3.0V (2 pcs of AAA battery)
Battery life
More than 2000 measurements
Low battery indicator
Appears on screen when the voltage is below 2.6V±0.1V
Measurement mode
Forehead& Ear
Measurement time
1s
Temperature units
℃
&
℉, c o n v e rtib le
Measurement range
32.0
℃/89.6℉ to 42.9℃/109.2℉
Accuracy
±0.2
℃/0 . 4 ℉
Display resolution
0.1
℃/℉
Automatic shutdown 30s±1s
Memory
32 sets of measurement
Operation environment
Temperature: 10.0
℃
/50.0
℉
~ 40.0
℃
/104.0
℉
Humidity: 20%-85% RH, non-condensing
Atmospheric pressure:86kPa ~ 106kPa
Storage & shipping
environment
Temperature: -20
℃
/-4
℉
~ 55
℃
/131
℉
Humidity: 20%-93% RH, non-condensing
Atmospheric pressure:86kPa ~ 106kPa
Date of manufacture
See the label
This manual suits for next models
3
Table of contents
Other Digoo Thermometer manuals


