DIHL KA-SM-126 User manual
1
Mini Stand Mixer
KA-SM-126
USER GUIDE
2
Contents
Technical Data ............................................................... 3
Overview of Components............................................ 3
General Safety Instructions .......................................... 4
Setting up Your Mixer..................................................... 5
Operating Your Mixer .................................................... 6
Recipe Suggestions........................................................ 7
Cleaning Your Mixer .................................................... 10
Support and Disposal Information ............................ 10

3
Technical Data
Model: KA-SM-126
Rated voltage: 220–240 V ~ 50/60 Hz
Power consumption: 800 W (max. power 1260 W)
IEC protection class: II
Maximum operating time: 6 minutes
This device has been tested according to all relevant current CE guidelines, such as electromagnetic
compatibility and low voltage directives, and has been constructed in accordance with the latest safety
regulations.
Subject to technical changes without prior notice!
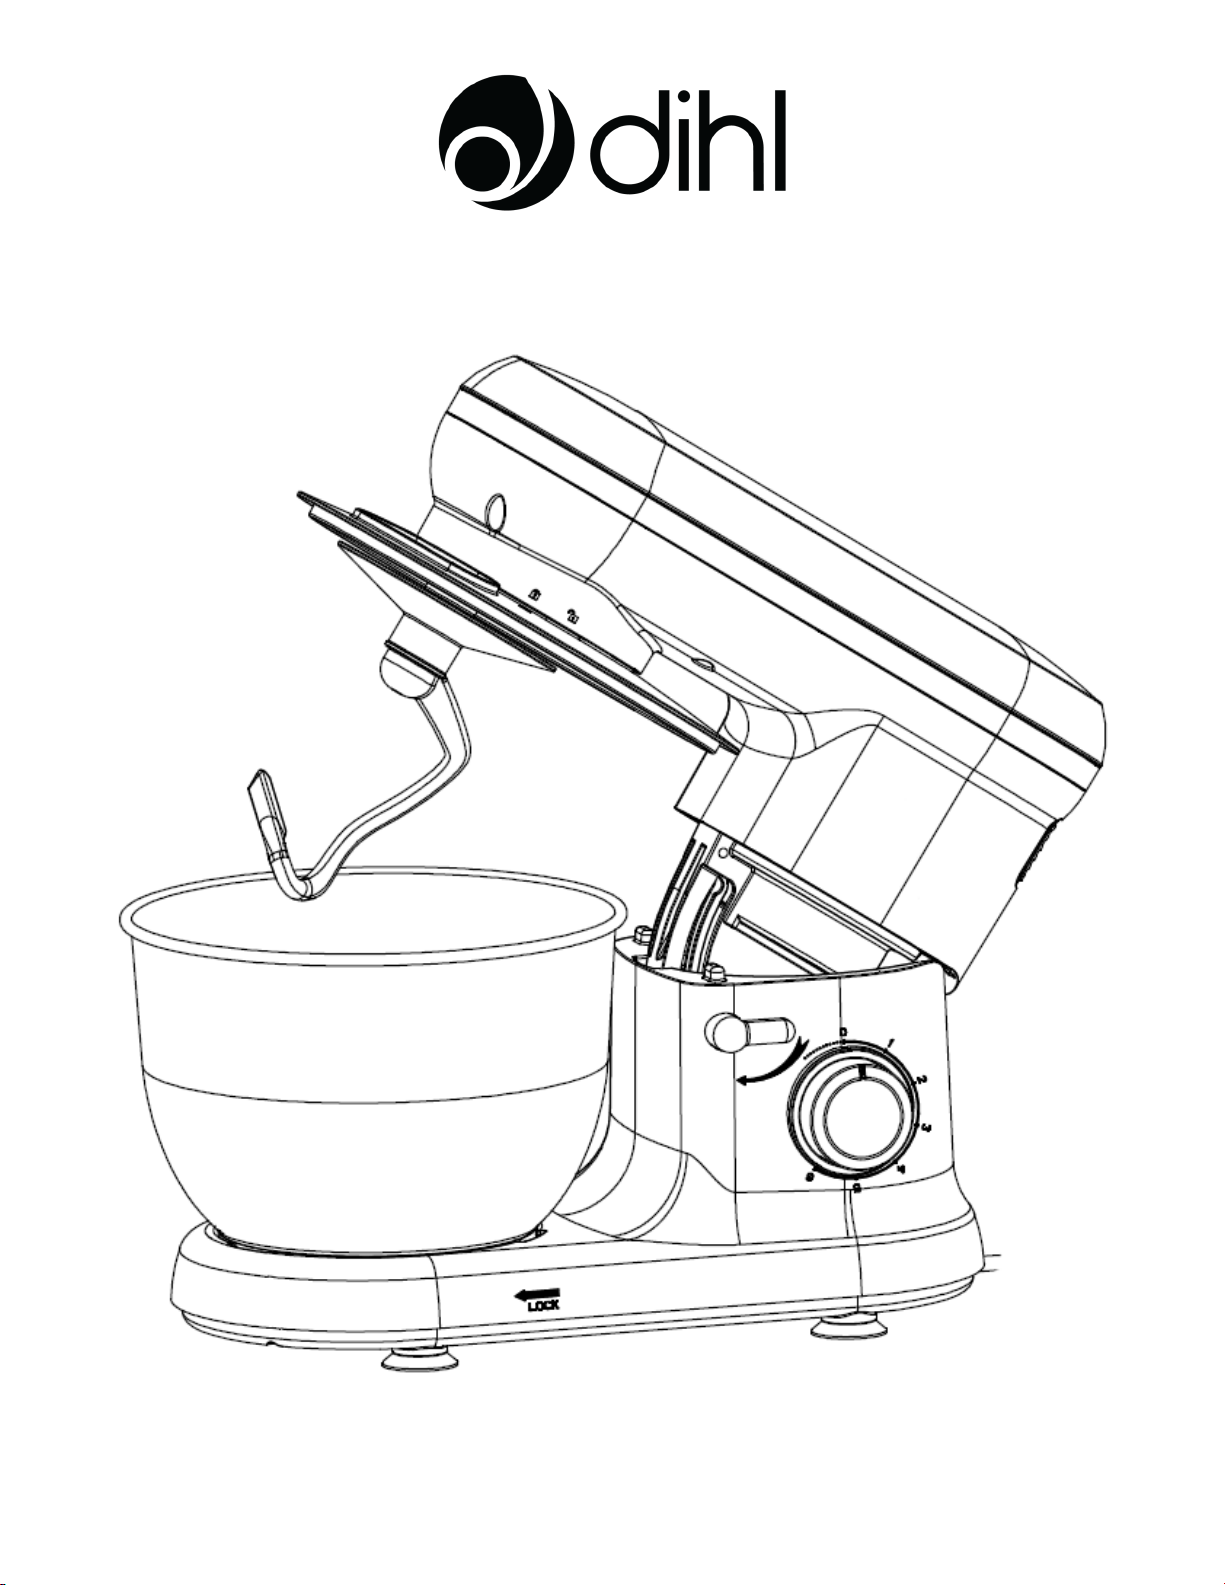
Overview of Components
1Output Shaft 5Mixing Bowl
2Tilt Lever 6Dough Hook
3Speed Control Dial 7Beater
4Power Cord 8Whisk

4
General Safety Instructions
Read the operating instructions carefully before putting the appliance into operation and keep them safe for
future reference. If possible, keep the box and internal packaging in case you need to send the product in for
repair. If you give this device to other people, please also pass on the operating instructions.
• This appliance was designed specifically for private use and for the intended purpose of mixing food.
This appliance is not designed for commercial use. Do not use it outdoors. Keep it away from sources of
heat, direct sunlight, humidity and sharp edges. Do not use the appliance with wet hands, and do not
submerge it. If the appliance is humid or wet, unplug it immediately.
• Do not operate for longer than six minutes at a time, leaving ten minutes between sessions to allow the
unit to cool.
• When cleaning or putting it away, switch off the appliance and always pull out the plug from the socket
(pull on the plug, not the cable). Remove the attached accessories when not in use.
• Do not leave the machine running unattended. If you should leave the workplace, switch the machine
off or remove the plug from the socket (pull the plug itself, not the lead).
• Check the appliance and the cable for damage on a regular basis. Do not use the appliance if it is
damaged.
• Do not try to repair the appliance or power cable on your own. Contact your supplier if within the
warranty period, or a qualified technician.
• Use only original spare parts.
• Pay careful attention to the “Special Safety Instructions” section.
Children and Frail Individuals
• In order to ensure your children‘s safety, please keep all packaging (plastic bags, boxes, polystyrene
etc.) out of their reach.
• In order to protect children or frail individuals from the hazards of electrical equipment, please ensure
that this device is only used under supervision of a capable adult. This device is not a toy. Do not allow
small children to play with it.
Special Safety Instructions for This Machine
• Do not interfere with any safety switches.
• Do not insert anything into the rotating hooks while the machine is working.
• Place the machine on a smooth, flat and stable working surface.
• Do not connect this machine to the power socket without having installed all the necessary accessories
first.

5
Before First Use
Before assembling the mixer, remove and safely discard any packaging material. Wash the mixing bowl,
splash guard, beater, dough hook and whisk attachment in warm soapy water with a soft cloth. Rinse and dry
thoroughly.
Attaching the Mixing Bowl
1. Place one hand on top of the mixer head and with other hand downward rotation the tilt lever as per
the arrow showed to lift the mixer head up until it stops. Release the tilt lever. The mixer head will lock
into the elevated position. It is now easy to position the mixing bowl.
2. Fit the bowl so that it aligns with the grooves on the mixer stand.
3. To lock the mixing bowl, turn it clockwise following the symbol on the mixer stand. Make sure that
the mixing bowl is securely locked in place.
Attaching the Splash Guard
1. After lifting the mixer head, place the splash guard under the mixer head.
2. Align the symbol on the mixer head with the symbol on the splash guard.
3. Turn the splash guard clockwise so that the symbol on the mixer head aligns with the symbol on
the splash guard.
4. Make sure the splash guard is securely locked in place.
Inserting Dough Hook/Beater/Whisk
1. After attaching the splash guard, align the chosen attachment so that the grooves on the attachment
align with the attachment shaft located under the mixer head.
2. With some pressure, push the attachment towards the mixer head, lifting the attachment shaft spring
upwards and twisting the attachment in an anti-clockwise direction. Make sure that the attachment is
securely locked in place.
NOTE: It is important that the dough hook, beater or whisk attachment is securely locked into place on the
attachment shaft or your stand mixer will not operate correctly.
Removing the Dough Hook/Beater/Whisk
1. Lift the mixer head, then hold on to the assembled attachment. With some pressure, push the
attachment towards the mixer head, lifting the attachment shaft spring upwards and twist the
attachment in a clockwise direction. Pull the attachment away from the attachment shaft to remove it
from the mixer head.

6
Operating Your Mixer
1. Ensure the speed control dial is set to the “0” position.
2. Place one hand on top of the mixer head, and with your other hand, activate the tilt lever as per the
arrow shown to lift the mixer head up until it stops. Release the lever and the mixer head will lock into this
elevated position. It is now easy to position the mixing bowl.
3. Attach and securely lock the mixing bowl in place.
4. Attach and securely lock the splash guard in place.
5. Insert the dough hook, beater or whisk attachment as required.
6. Place your ingredients in the mixing bowl as required. Do not overfill the bowl. It is recommended to mix
no more than 1.2 kg in total (eg. 700g dough + 500g water) each time.
7. As a reversal of step 2, use the tilt lever and push the mixer head down so that it is in the horizontal
position and the attachment is inside the mixing bowl. Release the tilt lever.
8. Insert the power cord into a 220–240V power outlet and switch the power outlet on. The speed control
dial will illuminate and flash blue.
9. To start mixing, turn the speed control dial in a clockwise direction. The dial will illuminate blue. Always
begin mixing at a lower speed setting to prevent splattering. Gradually increase the speed using the
dial as required. Use the Power Level and Attachment Configuration Guide in this document as a
reference.
10. Use the pulse function when you require a quick burst of power, or for the quick addition of an
ingredient such as chocolate chips to cookie mix, or flour to cake batter. Turn the speed control dial in
an anti-clockwise direction and hold it in this position. Hold the dial for no more than 30 seconds at any
one time. When the dial is released, it returns to the “0” position automatically.
11. When mixing is complete, turn the speed control dial to the “0” position, switch the appliance off at the
power outlet and remove the power cord from the outlet.
Power Level and Attachment Configuration Guide (Max 1.2 kg Load)
Levels Use Type of Mixture
1–2 Dough hook Heavy mixtures (e.g. bread or short pastry)
1–4 Beater Medium-heavy mixtures (e.g. pancake or sponge mixture)
5–6 Whisk Light mixtures (e.g. cream, egg white, blancmange)
Pulse Whisk Interval (e.g. for mixing under sponge, egg white)
NOTE:
Short operation time: With heavy mixtures, operate the machine for a maximum of six minutes, then
allow it to cool down for a further ten minutes.

7
Suggested Recipes
Sponge Mixture (Basic Recipe), Level 1–4
Ingredients:
200g soft butter or margarine, 200g sugar, 1 packet vanilla sugar or 1 bag Citro Back, 1 pinch of salt, 4 eggs,
400g wheat flour, 1 packet baking powder, approx. 125ml milk.
Preparation:
Transfer the wheat flour and the remaining ingredients to the mixing bowl, stir with the beater for 30 seconds
on level 1, then for approximately 3 minutes on level 2. Grease a tin or cover with baking paper. Fill with the
mixture and bake. Before the cake is removed from the oven, test to see if it is done: with a sharp wooden
stick pierce the centre of the cake. If no mixture sticks to it, the cake is cooked. Flip the cake onto a cake grid
and allow to cool.
Baking Directions:
Shelf height: middle
Heating: 175–200°Celsius / gas mark 5–6
Baking time: 50–60 minutes
This recipe can be adjusted to taste, for example with 100g raisins, nuts or grated chocolate. The possibilities
are endless!
Linseed Bread Rolls, Level 1–4
Ingredients:
500–550g wheat flour, 50g linseed, 375ml water, 1 cube of yeast (40g), 100g low-fat curds—well drained, 1 tsp
salt. For coating: 2 tbsp of water.
Preparation:
Soak the linseed in 125ml of lukewarm water. Transfer the remaining lukewarm water (250ml) into the mixing
bowl, crumble in the yeast, add the curds and mix with the dough hook on level 2. The yeast must be
completely dissolved. Put the flour with the soaked linseed and salt into the mixing bowl. Knead thoroughly on
level 1, then switch to level 3 and continue kneading for 3–5 minutes. Cover the mixture and allow to rise in a
warm place for 45–60 minutes. Knead thoroughly once more, remove from the bowl and form sixteen rolls.
Cover the baking tin with wet baking paper. Place the rolls on this and allow to rise for 15 minutes. Coat with
lukewarm water and bake.
Baking Directions:
Shelf height: middle
Heating: preheat to 200–220°C / gas mark 6–7
Baking time: 30–40 minutes

8
Chocolate Cream, Level 5–6
Ingredients:
200ml sweet cream, 150g semi-bitter chocolate coating, 3 eggs, 50–60g sugar, 1 pinch of salt, 1 packet of
vanilla sugar, 1 tablespoon cognac or rum, chocolate flakes.
Preparation:
Beat the cream in the mixing bowl with the whisk until stiff. Remove from the bowl and place somewhere to
cool. Melt the chocolate coating in accordance with the instructions on the packet. In the meantime, beat
the eggs, sugar, vanilla sugar, cognac or rum and salt in the mixing bowl with the whisk on speed 2 to form a
foam. Add the melted chocolate and stir in evenly on speed 5–6. Leave a little of the cream for decoration.
Add the remaining cream to the creamy mixture and stir in briefly using the pulse function. Decorate the
chocolate cream and serve well cooled.
Pizza dough, Level 1–3
Ingredients:
400g plain flour, 250ml warm water, ½ tsp sugar, 1 sachet active dried yeast (about 2½ tsp), 1½ tsp olive oil
and 1 tsp salt.
Preparation:
Put the flour in the bowl. Mix the remaining ingredients in a bowl or jug. Run the mixer at speed 1–2, and
gradually add the liquid. As the ingredients incorporate, and the dough ball becomes more formed, increase
the speed to 2–3. Knead for a couple of minutes on this speed, until the dough ball is smooth. Remove from
the bowl and split into 2–4 pieces. Roll into pizza bases (circles or rectangles) on a floured surface, then lay
them on a baking sheet or pizza tray. Spread the pizza bases with tomato purée and add toppings —
mushrooms, ham, olives, sun dried tomatoes, spinach, artichoke, etc. Top with dried herbs, pieces of
mozzarella, and a drizzle of olive oil. Bake in a preheated oven at 200°C/400°F/gas mark 6 for 15–20 minutes,
until the toppings are bubbling and golden brown.
Basic White Bread, Level 3–6
Ingredients:
600g strong white bread flour, 1 sachet active dried yeast (about 2½ tsp), 345ml warm water, 1 tbsp sunflower
oil or butter, 1 tsp sugar, 2 tsp salt.
Preparation:
Use the mixing instructions for pizza dough, then put the dough in a bowl, cover and leave in a warm place
until it’s doubled in size (30–40 minutes). Remove the dough and punch down to remove air. Knead lightly on
a floured board, shape it into a loaf, or put it in a tin, cover, and leave in a warm place to rise for another 30
minutes. Bake in a preheated oven at 200°C/400°F/gas mark 6 for 25–30 minutes, until golden brown and
hollow sounding on the bottom.

9
Soft Poppy Seed Rolls, Level 1–3
Ingredients:
570g strong white bread flour, 1 sachet active dried yeast (about 2½ tsp), 300ml milk (warmed slightly), 2 eggs
(room temperature), 1 tbsp sunflower oil, 1½ tsp sugar, 2 tsp salt, 75g poppy seeds.
Preparation:
Mix the milk, eggs, oil, sugar, salt and yeast in a jug or bowl, and leave for 5 minutes. Put the flour and poppy
seeds in the bowl, and mix at speed 1, gradually adding the liquid, then increase the speed to 2, and mix for
five minutes. Remove the dough to a floured surface, cut into 8–10 pieces, roll into shape, then put on a
greaseproof baking sheet. Leave in a warm place until double in size. Brush with a little egg or milk, and bake
in a preheated oven at 220°C/425°F/gas mark 7 for 20–25 minutes, until golden brown and hollow sounding
on the base.
Italian Herb Bread
Ingredients:
575g strong white bread flour, 1 sachet active dried yeast (about 2½ tsp), 290ml water, 2 tbsp olive oil, 2 tsp
sugar, 2 tsp salt, 4 tbsp mixed dried herbs.
Preparation:
Mix the water, oil, sugar, salt and yeast in a jug or bowl, and leave for 5 minutes. Put the flour and dried herbs
in the bowl, and mix at speed 1, gradually adding the liquid, then increase the speed to 2, and mix for 5
minutes. Put the dough in a bowl, cover and leave in a warm place until double in size (20–30 minutes). Put on
a floured surface, knead gently to knock out the air, then shape, put on a baking sheet, and leave in the
warm until double in size. Bake in a preheated oven at 200°C/400°F/gas mark 6 for 25 minutes or until golden
brown and hollow sounding on the bottom.
Coffee & Brandy Ice Cream, Level 5–6
Ingredients:
3 eggs, 75g caster sugar, 300ml single cream, 2 tbsp instant coffee powder, 300ml double cream, 2½ tbsp
brandy.
Preparation:
Add the sugar and eggs to the bowl and process at speed 6 until smooth in texture. In a saucepan, bring the
single cream and coffee just to the boil and stir in the egg and sugar mixture. Put in a heatproof bowl over a
simmering pan of water and cook gently, stirring well, until thick enough to coat the back of a spoon. Strain
into a bowl and leave to cool. Whip the double cream at speed 6 until soft peaks form, then fold into the cold
egg and sugar mixture, with the brandy. Pour into a container, cover, and freeze for 2½–3 hours, until partially
frozen. Remove, stir well and then freeze again, until the desired texture is achieved.

10
Basic Meringues, Level 5–6
Ingredients:
4 egg whites, 100g caster sugar, 100g icing sugar
Preparation:
Put the egg whites in the bowl and process at speed 6 until fairly stiff. Add half the sugar, and whisk again until
the mixture is smooth, and stiff peaks have formed. Remove the bowl, and lightly fold in the remaining sugar
with a metal spoon. Line a baking sheet and spoon or pipe the meringue mixture into ovals. Sprinkle with the
remaining sugar and put on the lowest shelf of a cool oven (120°C/250°F/ gas mark ½) for 1½ hours. Cool on a
wire rack. Top with soft fruits, chocolate, and sweetened cream.
Cleaning
• Before cleaning, remove the mains lead from the socket.
• Never immerse the motor housing in water!
• Do not use any sharp or abrasive detergents.
Motor Housing
• Only a damp rinsing cloth should be used to clean the outside of the housing.
Mixing Bowl, Mixing Equipment
CAUTION: DO NOT WASH ANY COMPONENTS IN A DISHWASHER!
• If exposed to heat or caustic cleaners they might become misshapen or discoloured.
• Components that have come into contact with food can be cleaned in soapy water.
• Allow the parts to dry thoroughly before reassembling the device.
Disposal
Do not dispose of this device in normal domestic waste.
Dispose of the device at your local waste recycling facility.
Support / Warranty
Your new Dihl product comes with a 12-month warranty from the date of purchase. Contact your retailer
directly for any claims.
View our entire product range at
www.dihl.co.uk
Table of contents
Other DIHL Mixer manuals

Popular Mixer manuals by other brands

Johnson
Johnson Combi Instructions for use

Louroe Electronics
Louroe Electronics MLA-6 Installation and operating instructions

IMG STAGE LINE
IMG STAGE LINE PMX-400 instruction manual

Barnstead International
Barnstead International Maxi-Mix 1329 Series Operation manual

IMER
IMER Workman 350 II Manual instruction and parts list

Sunbeam
Sunbeam MXM5000 user guide


