peut être augmentée en enfonçant la touche gain
(5) (réglage “HI”). Via la fonction préécoute, il est
possible de régler de manière optimale l’amplifi-
cation d’entrée (voir chapitre 6.3.1).
3) Si la LED rouge “PEAK” (14) du canal brille, le
signal est proche de la surcharge. La LED ne doit
pas briller ou que brièvement pour des pointes de
musique. Si elle brille en permanence, le niveau
du signal d’entrée doit être diminué [en baissant
l’amplification d’entrée (gain) ou le niveau de sor-
tie de la source correspondante].
Conseil : La LED brille également en perma-
nence lorsque la touche “PFL” (15) du
canal est enfoncée (fonction préécoute
pour le canal activée).
4) Avec l’égaliseur, réglez l’image tonale souhaitée
pour le canal :
avec le réglage des aigus (6) et le réglage des
graves (9), il est possible de régler les aigus et
les graves jusqu’à ±15dB. Pour les canaux
mono, les médiums peuvent en plus être corrigés
de ±15dB avec le réglage des médiums (8). La
fréquence filtre pour la plage des médiums peut
être réglée avec le réglage (7) de 350Hz à 6kHz.
Conseil : les réglages de tonalité ont une in-
fluence sur le niveau. Une fois le
réglage de tonalité effectué, vous pou-
vez contrôler voire modifier le niveau
du canal selon l’affichage (22) et la
LED “PEAK” (14) du canal.
5) Effectuez les réglages de niveau et de tonalité
pour les autres canaux comme décrit ci-dessus.
6.2 Mixage des sources audio
1) Poussez les réglages Master (26) et le réglage
de l’amplificateur (30) jusqu’à ce que le rapport
de mixage des sources reliées soit optimal et
puisse être écouté via les haut-parleurs.
2) Avec les faders des canaux (16), réglez le rapport
de volume souhaité des sources ; réglez complè-
tement, les sources audio devant étre écoutées
avec le volume le plus fort (voir chapitre 6.1
“Réglage de base des canaux d’entrée”) et rédui-
sez les niveaux des autres sources en fonction.
3) Mixez le signal allant au système monitor (voir
6.2.3) et effectuez les réglages d’effet (voir cha-
pitre 6.2.2).
4) Avec les réglages de panoramique (12) pour cha-
que canal mono, répartissez les signaux comme
souhaité sur la base stéréo.
Avec les réglages de balance (13), réglez
pour les canaux stéréo, le rapport de niveau sou-
haité des canaux gauche et droit (pour des si-
gnaux mono sur ces canaux, les réglages de
balance fonctionnent comme des réglages de
panoramique).
5) Avec les réglages Master (26), réglez le niveau
définitif du signal Master stéréo qui sera appliqué
sur l’amplificateur de la table de mixage et sur la
sortie Master “MAIN OUT” (17) et la sortie enre-
gistrement “TAPE REC” (32).
Le réglage est optimal, en règle générale,
lorsque le VU-mètre (22) affiche des valeurs
dans la plage 0dB. Si le niveau de sortie à la sor-
tie Master (17) ou à la sortie enregistrement (32)
est trop élevé ou trop faible pour I’appareil sui-
vant, le signal Master doit être réglé en fonction
plus bas ou plus haut.
6) Avec le réglage (30) de l’amplificateur , réglez le
niveau définitif pour les haut-parleurs. En cas de
surcharge de l’amplificateur, les LEDs “CLIP”
(29) – respectivement pour le canal gauche (“L”)
et le canal droit (“R”) brillent. Tournez le réglage
dans l’autre sens.
7) Pour des volumes plus bas, il est possible d’ef-
fectuer des corrections de tonalité pour la sonori-
sation de la salle avec la touche “LOUDNESS”
(27) ; si la touche est enfoncée, les graves et les
aigus peuvent être augmentés (8dB à 50Hz/
10kHz) puisque ces plages de fréquence sont
moins bien perçues par l’oreille humaine pour
des volumes faibles.
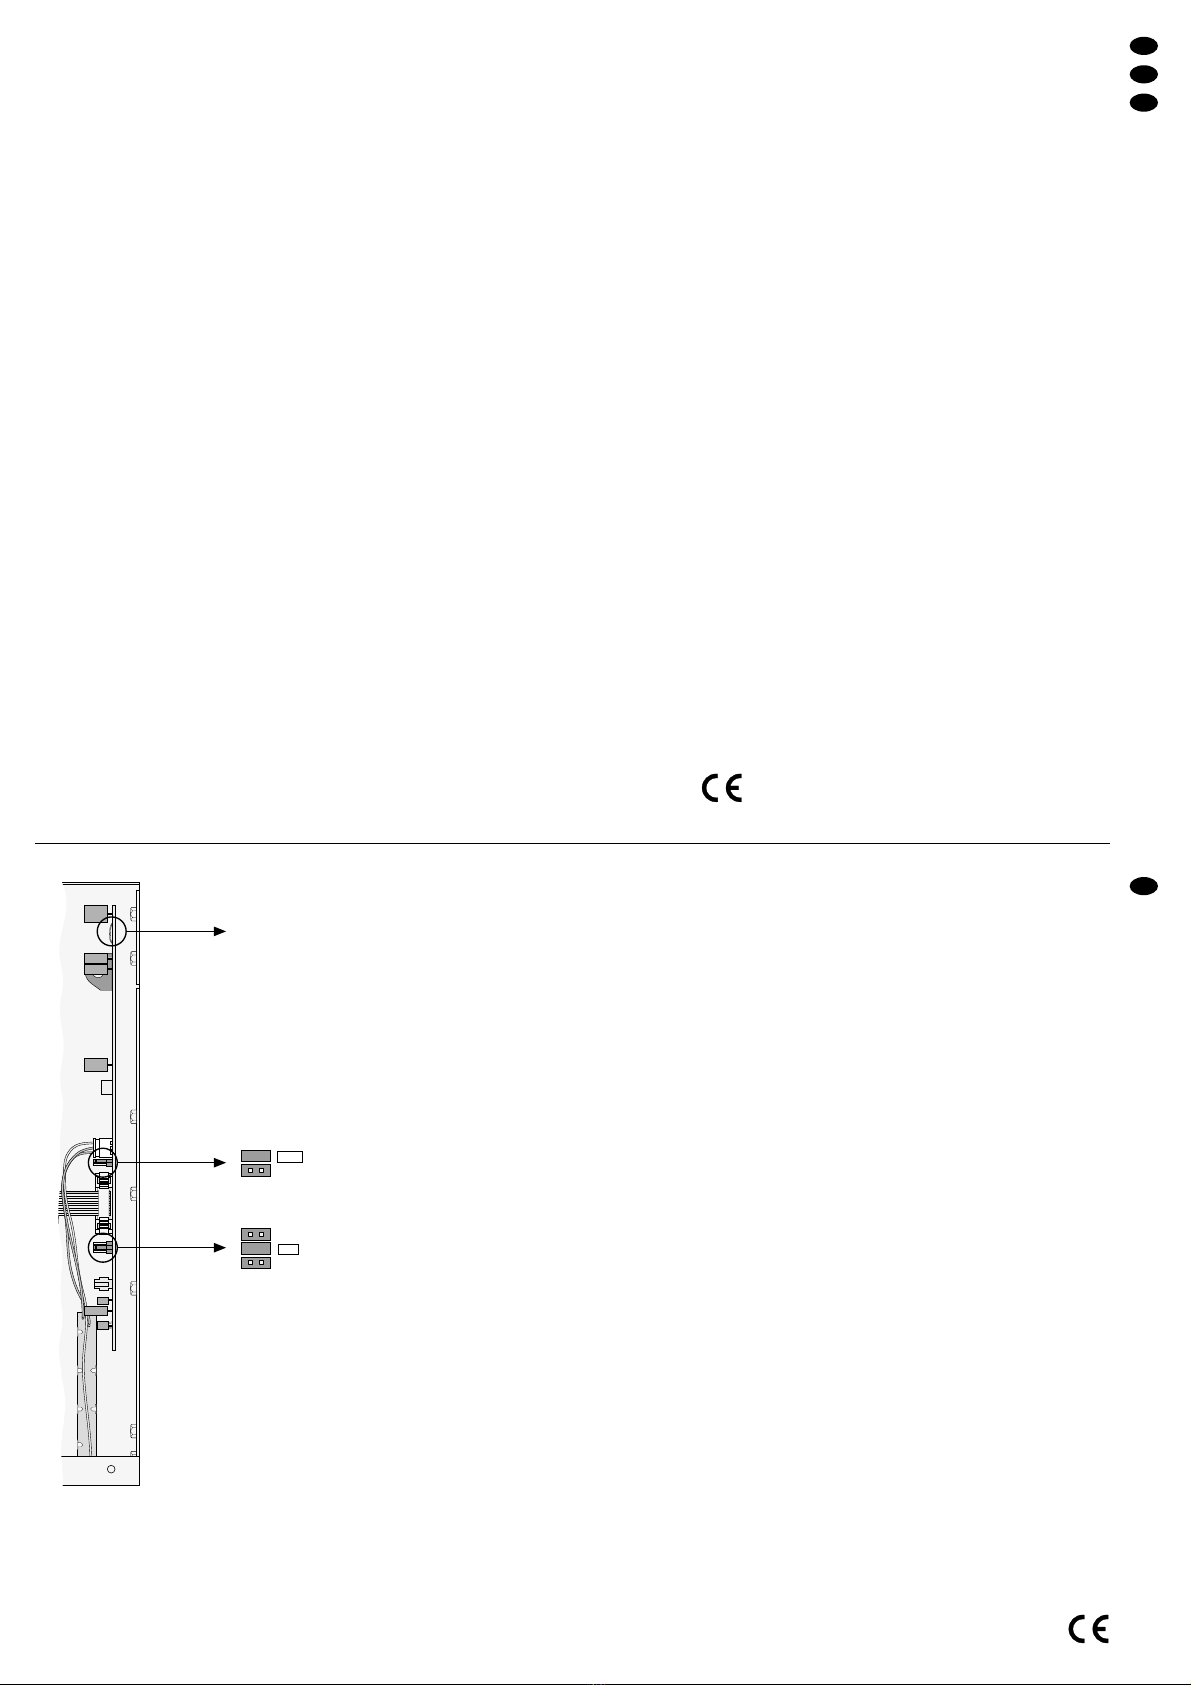
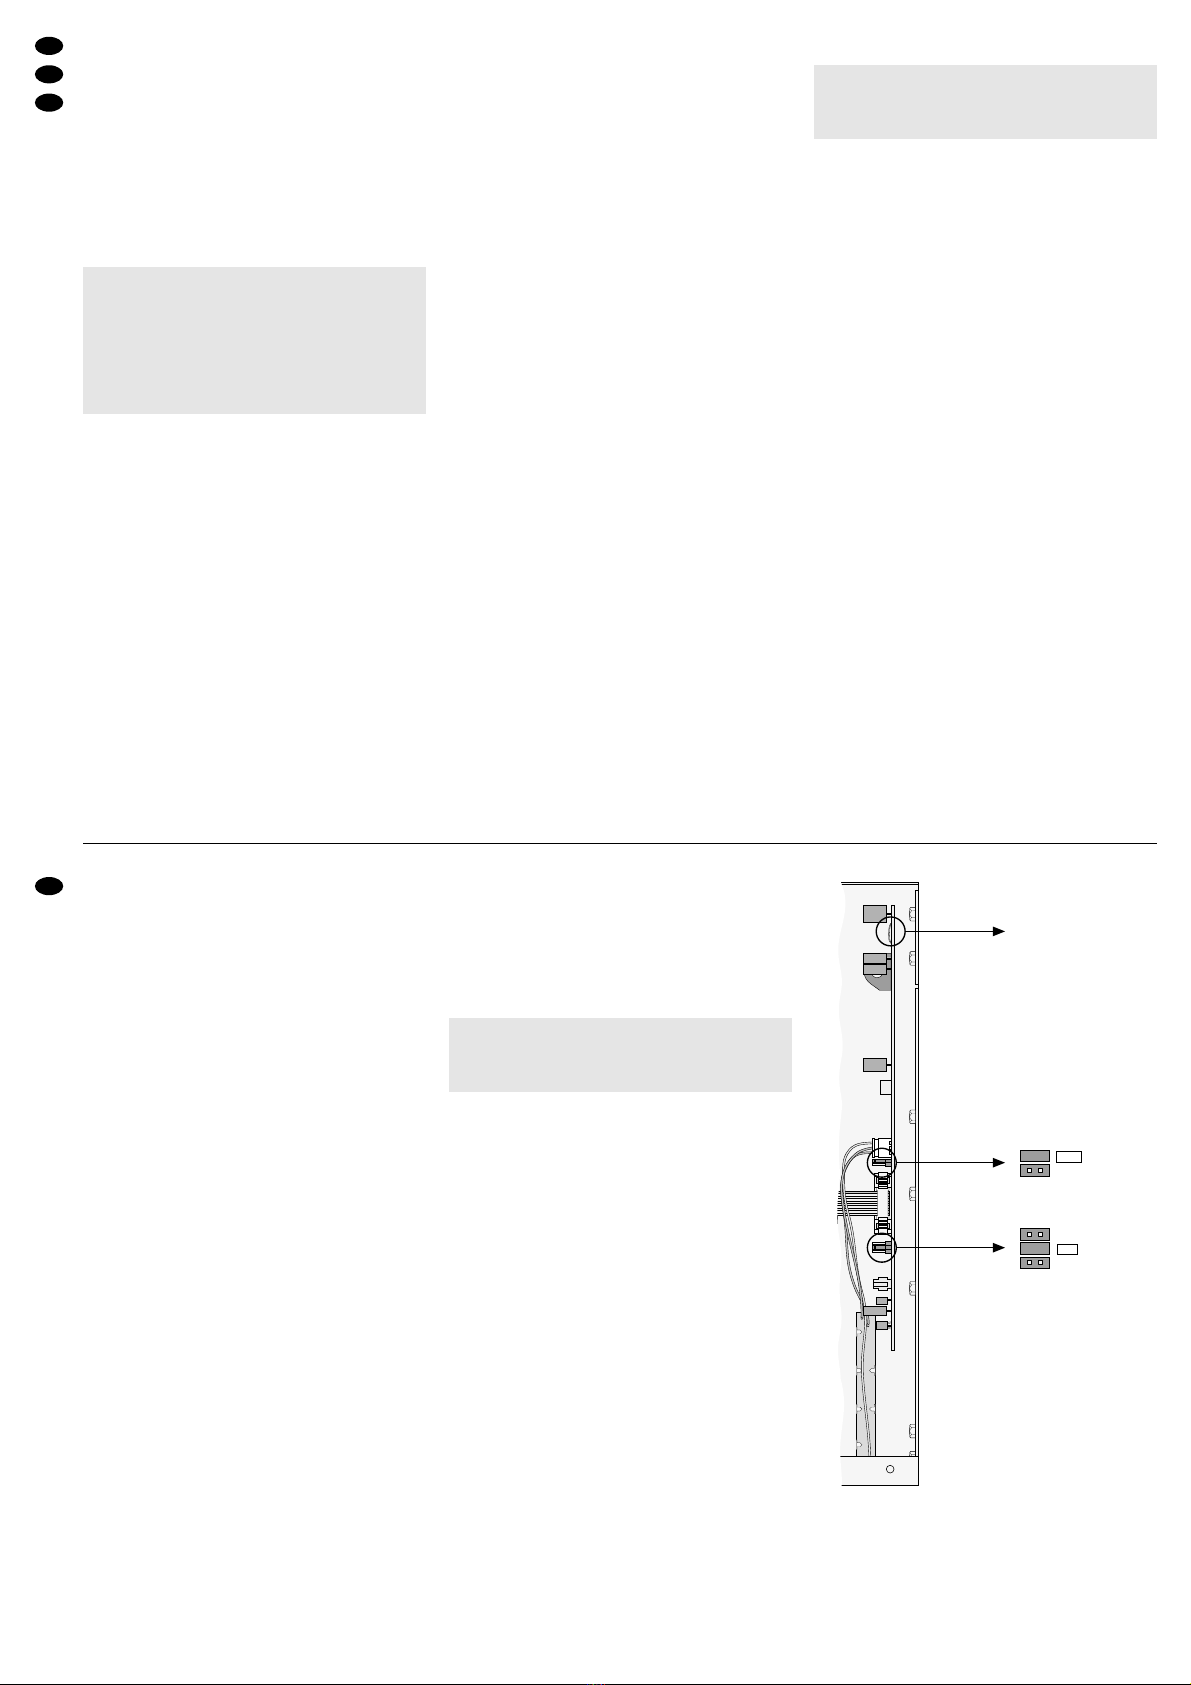
6.2.1 Entrées “AUX INPUT” et “TAPE PLAY”
Si l’entrée “AUX INPUT” (20) n’est pas utilisée
comme entrée Return (voir chapitre 5.2.1), il est
possible de brancher un autre appareil à niveau
Ligne. Mixez le signal de cet appareil avec le
réglage “AUX IN” (23) sur le signal Master.
Le signal de lecture d’un enregistreur relié aux
prises “TAPE PLAY” (33) est appliqué directement
avant les réglages Master (26) sur le signal Master.
Pour écouter exclusivement le signal lecture, mettez
les faders (16) des canaux d’entrée et le réglage de
niveau “AUX IN” (23) sur le minimum.
6.2.2 Réglages pour la voie d’effet “FX”
Il est possible de diriger via la voie d’effet “FX”, les
signaux des canaux “1” à “11-12”, de les insérer dans
un appareil à effets spéciaux et de les retourner vers
la table de mixage (pour brancher un appareil à
effets spéciaux, voir chapitre 5.2.1). La voie d’effet
est “Post fader”, c’est-à-dire que la part d’effet d’un
canal est toujours proportionnelle au niveau réglé du
canal.*
1) Avec les réglages “FX” (10), mixez les signaux
des canaux d’entrée sur la voie d’effet.
2) Avec le réglage “FX OUT” (24), réglez le niveau
du signal de sortie de la voie d’effet qui passe par
la prise “FX” (19) et est dirigée vers l’appareil à
effets spéciaux.
3) Avec le réglage “AUX IN” (23), réglez le niveau
avec lequel le signal venant de l’appareil à effets
spéciaux est mixé sur le signal Master.
* si besoin, le point de ponction du signal – séparément pour cha-
que canal, peut être commuté sur “Pre fader” (voir chapitre 7.1).
6.2.3 Réglages pour la voie monitor
Il est possible de prendre les signaux des canaux “1”
à “11-12” via la voie monitor et de les diriger vers un
système monitor pour une sonorisation sur scène
(pour brancher le système monitor, voir chapitre
5.3). La voie monitor est branchée en “Pre fader”,
c’est-à-dire que la position du fader du canal (16) n’a
pas d’influence sur le niveau du signal du canal pré-
sent sur la voie monitor.*
4) Con i regolatori dei toni si impostano i toni
secondo desiderio:
Con i regolatori (6) e (9) si possono modificare
gli alti e i bassi fino a ±15dB. Per il canali mono,
con il regolatore dei medi (8) si possono modifi-
care anche i medi di ±15 dB. Con il regolatore (7),
la frequenza di filtraggio per i medi può essere
regolata in continuo fra 350Hz e 6kHz.
N.B.: Le regolazioni dei toni hanno effetto sul
livello. Perciò, dopo la regolazione dei toni
conviene controllare e eventualmente cor-
reggere il livello osservando la catena di
LED (22) e il LED “PEAK” (14) del canale.
5) Eseguire le impostazioni dei livelli e toni per gli
altri canali come descritto sopra.
6.2 Miscelazione delle sorgenti
1) Aprire i regolatori master (26) e quello dello sta-
dio finale (30) finché si può impostare ed ascol-
tare con gli altoparlanti il rapporto di miscelazione
delle sorgenti collegate in modo ottimale.
2) Impostare il rapporto del volume delle sorgenti
con i fader (16): regolare le sorgenti che devono
essere più forti (vedi cap. 6.1) e ridurre il volume
delle altre sorgenti secondo necessità.
3) Miscelare il segnale che va all’impianto di moni-
toraggio (vedi cap. 6.2.3) e impostare gli effetti
(vedi cap. 6.2.2).
4) Coni panpot (12) distribuire i segnali dei canali
mono sulla base stereo secondo i propri gusti.
Con i regolatori di bilanciamento (13) dei canali
stereo impostare il rapporto desiderato del livello
dei canali di sinistra e di destra (con segnali
mono su questi canali, i regolatore di bilancia-
mento lavorano come dei panpot).
5) Con i regolatore master (26) impostare il livello
definitivo del segnale stereo master che sarà por-
tato sia sullo stadio finale del Power mixer che
sull’uscita master “MAIN OUT” (17) e sull’uscita
di registrazione “TAPE REC” (32).
Generalmente, la regolazione è ottimale
quando la catena di LED (22) à vicina a 0dB. Se
il livello all’uscita master (17) o di registrazione
(32) è troppo alto o troppo basso per l’appa-
recchio a valle occorre abbassare o aumentare il
livello del segnale master.
6) Con il regolatore (30) dello stadio finale si imposta
il livello definitivo per gli altoparlanti. In caso di so-
vrapilotaggio dello stadio finale si accendono i
LED “CLIP” (29) per il canale sinistro (“L”) e destro
(“R”). In questo caso si deve ridurre leggermente il
livello del regolatore dello stadio finale.
7) Con i volumi bassi, con il tasto “LOUDNESS” (27)
si può correggere la sonorizzazione della sala: se
il tasto è stato premuto, i bassi e gli alti diventano
più potenti (8dB a 50Hz/10kHz) poiché sono
queste le frequenze che l’udito dell’uomo per-
cepisce meno se il volume non è alto.
6.2.1 Ingressi “AUX INPUT” e “TAPE PLAY”
Se l’ingresso “AUX INPUT” (20) non viene usato
come ingresso return (vedi cap. 5.2.1), si può colle-
gare qui un altro apparecchio con livello Line. Mi-
scelare il segnale di quell’apparecchio sulla somme
dei segnali servendosi del regolatore “AUX IN” (23).
Il segnale di riproduzione di un registratore colle-
gato con le prese “TAPE PLAY” (33) viene portato
sulla somma dei segnali direttamente prima dei
regolatori master (26). Per sentire esclusivamente il
segnale di riproduzione posizionare i fader (16) dei
canali d’ingresso nonché il regolatore livello “AUX
IN” (23) sul minimo.
6.2.2 Impostazioni per la vie degli effetti “FX”
Attraverso la vie degli effetti “FX” è possibile fare
uscire i segnali dei canali “1” a “11-12”, farli attra-
versare un’unità per effetti e riportarli nel Power
mixer (per il collegamento dell’unità per effetti vedi
cap. 5.2.1). La via degli effetti è “post fader”, cioè la
parte dell’effetto di un canale è sempre proporzio-
nale al livello impostato del canale.*
1) Con i regolatori “FX” (10) miscelare i segnali dei
canali d’ingresso sulla via degli effetti.
2) Con il regolatore “FX OUT” (24) impostare il
livello del segnale d’uscita della via degli effetti
che viene disaccoppiato attraverso la presa “FX”
(19) e portato all’unità per effetti.
3) Con il regolatore “AUX IN” (23) impostare il livello
con il quale si miscela sulla somma dei segnali il
segnale proveniente dall’unità per effetti.
*Se necessario, il punto dove viene prelevato il segnale può
essere posto – separatamente per ogni canale – su “pre fader”
– vedi cap. 7.1.
6.2.3 Impostazione per la via monitor
Attraverso la via monitor si possono disaccoppiare i
segnali dei canali “1” a “11-12” e portarli in un im-
pianto di monitoraggio per la sonorizzazione del pal-
coscenico (per il collegamento dell’impianto di moni-
toraggio vedi cap. 5.3). La via monitor è “pre fader”
cioé la posizione del relativo fader (16) non influisce
sul livello del segnale portato sulla via monitor.*
1) Con i regolatori “MON” (11) miscelare i segnali
dei canali d’ingresso sulla via monitor.
2) Con il regolatore “MON OUT” (25) impostare il
livello del segnale d’uscita della via monitor che
viene disaccoppiato attraverso la presa “MON”
(21) e portato all’impianto di monitoraggio.
*Se necessario, il punto dove viene prelevato il segnale può
essere posto – separatamente per ogni canale – su “pre equa-
lizzatore” o “post fader”–vedi cap. 7.1.
6.3 Ascolto del segnale attraverso una cuffia
6.3.1 Preascolto (“PFL”) di un canale d’ingresso
Con una cuffia è possibile il preascolto di ogni sin-
golo canale d’ingresso da “1” a “11-12” [preascolto
(“PFL” = Pre Fader Listening”): il segnale del canale
Attenzione! Mai tenere molto alto il volume nelle
cuffie. A lungo andare, il volume
eccessivo può procurare danni all’-
udito! L’orecchio si abitua agli alti
volumi e dopo un certo tempo non se
ne rende più conto. Non aumentare il
volume successivamente.
17
I
F
B
CH