DIHS Optima W R2 Plus User manual
OPTIMA W R2 PLUS THERMOSTAT
Optima W PLUS is a development of DIHS BV, NETHERLANDS. www.dihsbv.nl
This surface-mounted radio thermostat has been developed to be able to switch electric and
conventional heating systems on and off using a set temperature and time. It can pair with TC-25, TC30,
TC35, TC40 or TC-60 for remote control anytime anywhere.
Functions
Large display can be clearly read with the background lighting.
Easy to fit thermostat and receiver.
Five buttons make it easy to use.
4 periods of each day programmable
The display shows the set temperature as well as the measured temperature, time.
Temperature display in degrees Celsius.
The thermostat is supplied with a wall-fixing frame, base and a very compact receiver
(surface-mounted).
Technical Data
Thermostat operating voltage: 2 x AA1.5 V, alkaline batteries.
Backup storage: EEPROM
Receiver operating voltage: 230 VAC, 50/60 Hz
TC-05 Max. load: 10 A.
TC-06 Max.load: 16A
Frequency: 868 MHz bi-directional
Channel selection: By programming the thermostat and the receiver.
Switching options: 7day, 4 periods each day.
Receiver switch contacts: Voltfree of powered NO/NC (depends on the type of
reciever).
Temperature settings: 5°C ~ 35°C, 0.5°C increments.
Accuracy: +/- 0.5°C
Thermostat dimensions: Surface mounted, 135mm x 87.5 mm x 23.2mm.
Receiver dimensions: Surface mounted, 86mm x 86 mmx26mm
Color: White
IP protection rating: 20.
Certification: CE, Rohs, RED

OPTIMA W R2 PLUS THERMOSTAT
Optima W PLUS is a development of DIHS BV, NETHERLANDS. www.dihsbv.nl
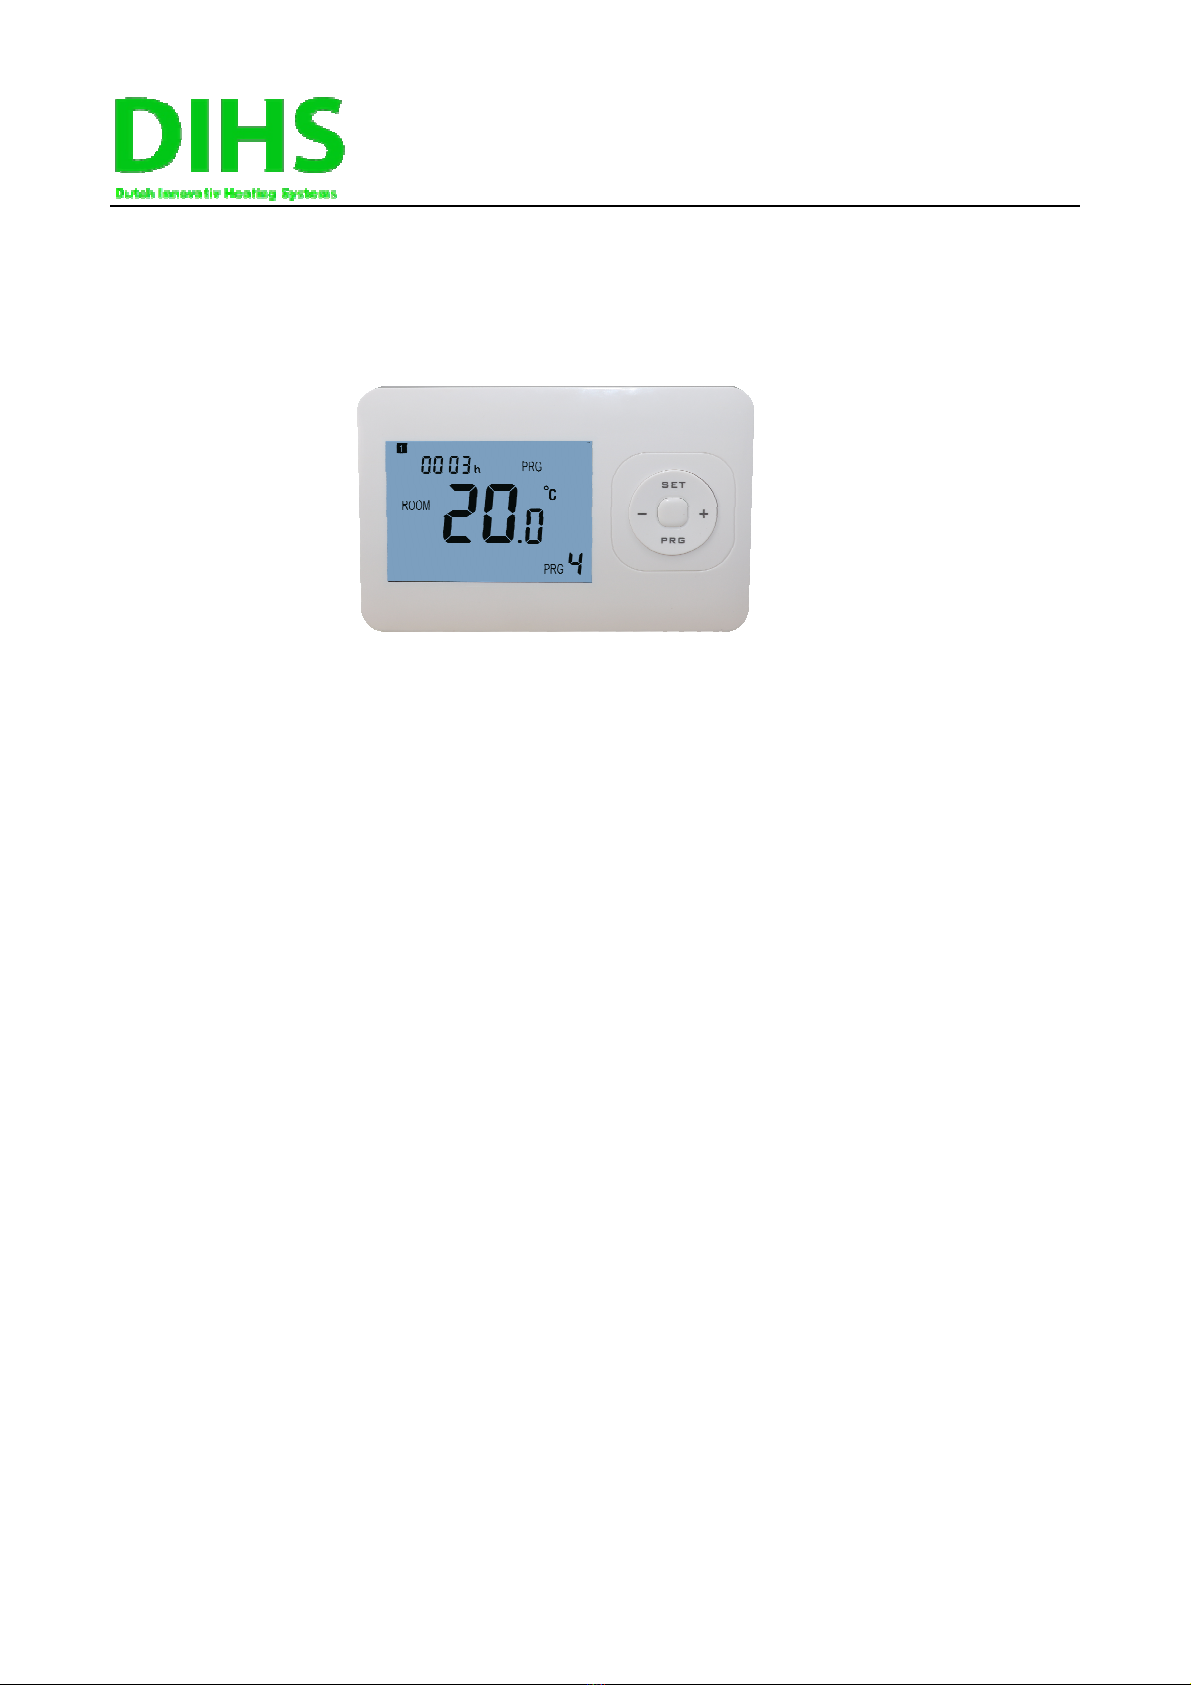
Display & Buttons
Mode Select
Short press SET button to select MAN Mode/Away Mode(no icon indicators).
Press PRG button to switch on/off PRG mode
PRG. Schedule Setting
Long press PRG button to enter PRG setting. The weekday is fixed from Monday to Sunday(1~7), each
day have 4 periods(1~4). Each press of PRG button can into next item setting.
The time and temperature of each period i can be set in following steps.
1). Press PRG and hold for 3 seconds, the time display flash, change the value by + and - button.
(each press is 15mins)
2) Press PRG button , the temperature display flash, change the temperature by + and - button.
3). Press PRG button to next period.
4). The other period settings follow the same way.
Default Setting:
Period 1 2 3 4
Time Temp Time Temp Time Temp Time Temp
12345(Mon.~Fri.) 7:00 22℃8:30 19℃17:00 22℃22:00 19℃
6(Sat.) 8:00 22℃8:30 22℃17:00 22℃22:00 19℃
7(Sun.) 8:00 22℃8:30 22℃17:00 22℃22:00 19℃
On/off Button
Mode Select & Time
Adjust & Sensor
Calibration Button
Room Temp.
Set Temp.
Heat Icon
Programming Button &
MAN/PRG. Mode Select
Week/Day
Time
PRG Period
PRG. Mode
MAN Mode

OPTIMA W R2 PLUS THERMOSTAT
Optima W PLUS is a development of DIHS BV, NETHERLANDS. www.dihsbv.nl
Clock Adjustment
-Press and hold the SET button for around 3 seconds. The minutes display (top left in the display)
flashes.
-Change this value using the +and –buttons.
-Press the SET button . The hour display (top left in the display) flashes.
-Change this value using the +and –buttons.
-Press the SET button. The day display (top left in the display) will flash as a number.
-Change this value using the +and –buttons. Use 1 for Monday, 2 for Tuesday, 3 for
Wednesday, 4 for Thursday, 5 for Friday, 6 for Saturday and 7 for Sunday.
Code Pairing
TC-25/30 (wall mounted type):
TC-35/40 (flush type):
Notes:
If thermostat will connect to TC-25 or TC-35, please adjust parameter setting item 04 to 0 (Internal
sensor only). (Factory default mode)
If thermostat will connect to TC-30 or TC-40, please adjust parameter setting item 04 to 1 or 2, depends
on actual usage.
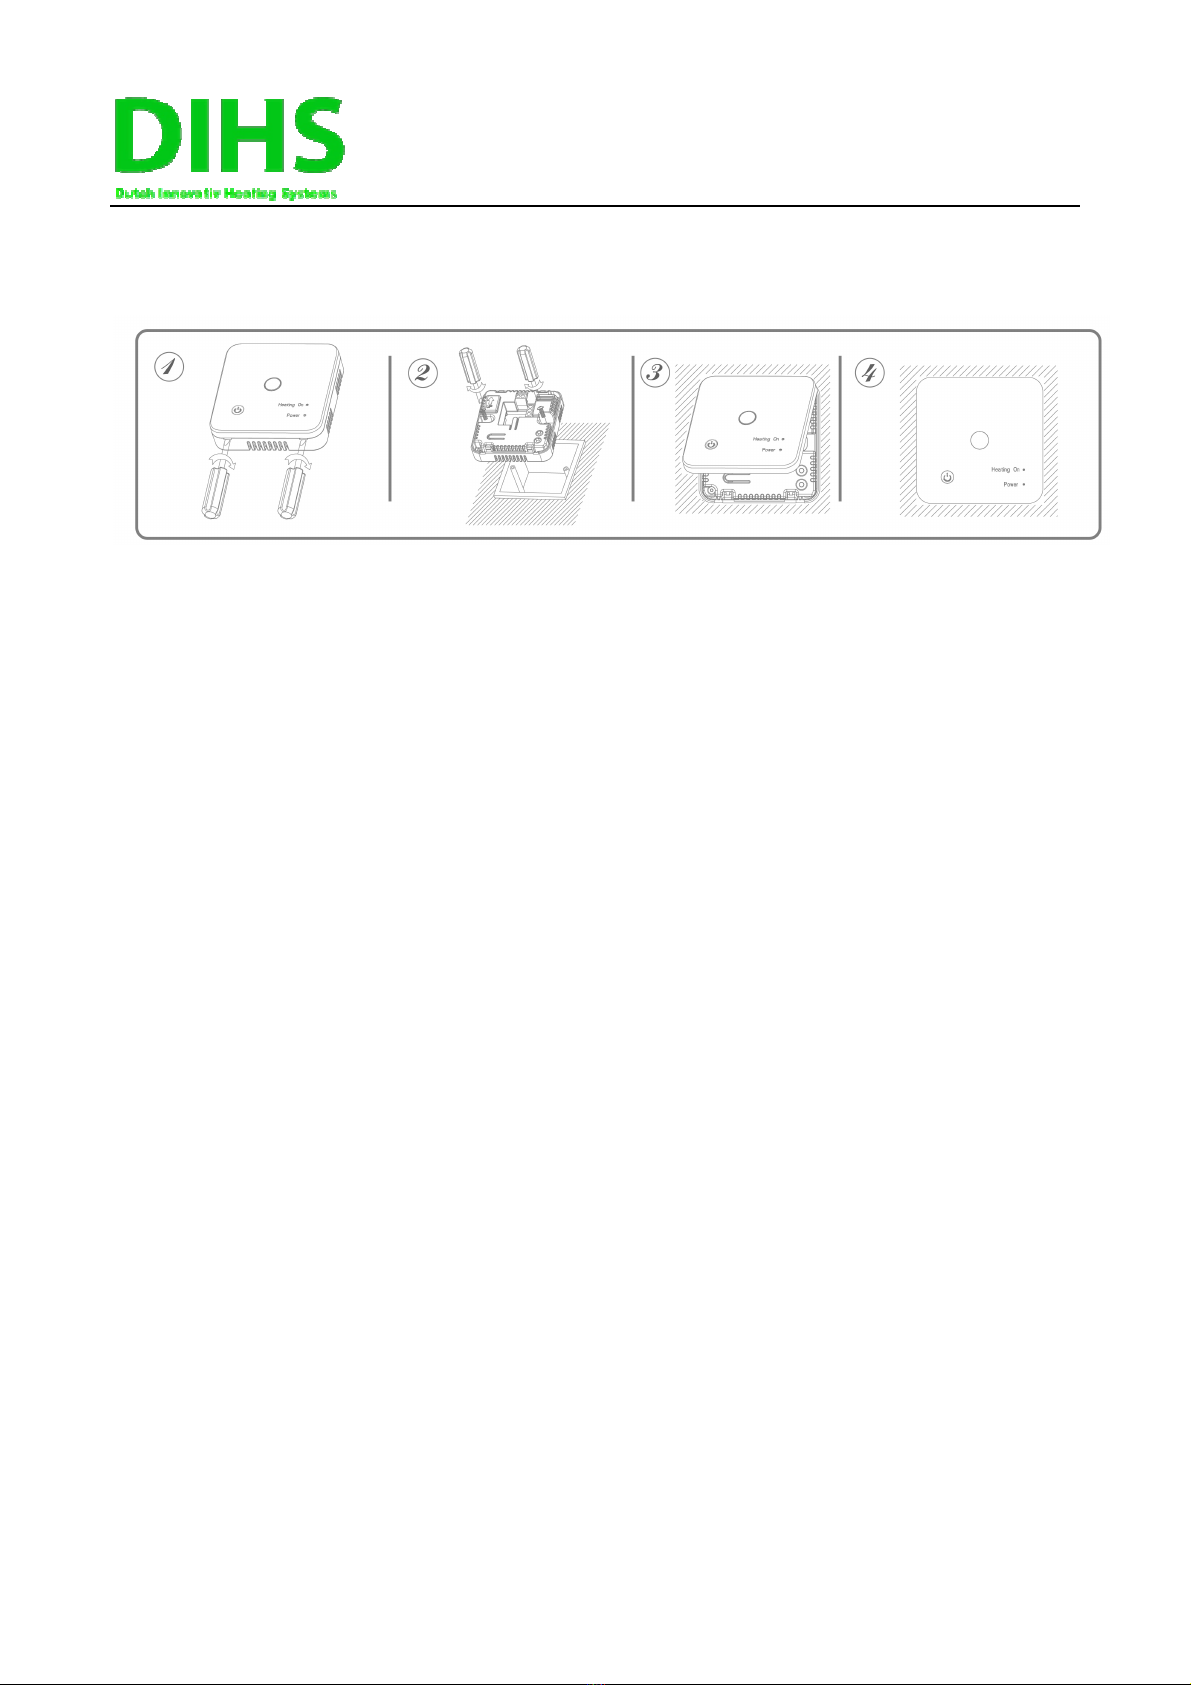
Code pairing button
Heating on indicator (LED
1)
Power indicator (LED 2)
On/off button
Pairing indicator (LED1)
Code pairing button
& on/off button
Power indicator (LED2)
OPTIMA W R2 PLUS THERMOSTAT
Optima W PLUS is a development of DIHS BV, NETHERLANDS. www.dihsbv.nl
I. Code Pairing with TC-25, TC-30, TC-35 or TC-40.
1) Long press the code pairing button on the receiver until LED 1 is flickering quickly.
2) Turn off thermostat, and long press SET button until the code shows on the top left corner of screen,
then press +button, the left corner battery icon start flashing.
3) Wait for a while, when LED 1 on TC05/TC06 stop flickering, indicating successful code pairing.
II. Code Pairing with App
1) Scan the QR code, and download “Smart Life” APP from google play or app store
2) Install app and register account
3) Add device by press + button at top right corner
4) Press “ Home Appliances II”
5) Find “ Thermostat or Heater” on the list and press
6) Long press Pairing button on receiver till the LED 1 will flash quickly.
7) Press “Confirm indicator rapidly blink” on phone.
8) After a while, when the LED 1 on receiver stop flashing, indicating successful Wifi connection.
If the LED still flash slowly, the connection fail, please try again from step. 5.
III. Signal Lost
In case the RF and WIFI signal lost/disconnected, LED 1 will flash slowly.
Parameter Setting
Turn thermostat off, press and hold SET button and +button for 6s to enter parameter setting. Each
press of SET button will go to next item setting. Adjust the value by pressing +or –button.
Menu
Description Range Default Value
01 Temp. calibration for internal sensor -8 ℃~8 ℃0℃
02 Set Point Max. 5 ℃~35℃35 ℃
03 Set Point Min. 5 ℃~35℃5 ℃
04 Sensor Select 0: Internal sensor
1: External sensor
2:Internal & External
sensor
2
05 Frost Protection Temp. 5 ℃~15℃5 ℃
06 Floor Temp. Display Read Only
08 High temp protection 30°C ~ 80°C 32 ℃
09 Dead zone 0~3℃0℃
10 Display 0: Room temp.
1: SET temp.
0
11 Child Lock 0: Disable
1: Enable
0

OPTIMA W R2 PLUS THERMOSTAT
Optima W PLUS is a development of DIHS BV, NETHERLANDS. www.dihsbv.nl
Parameter Settings Explained
Feature 01– This feature used to calibrate the room temperature when need. For example, if actual
room temperature 21.5°C, but thermostat shows 23°C, then you can set this value to -1.5 to calibrate.
Feature 02/03– Temperature Max.& Min. Limit: This function allows you to limit the use of the up and
down temperature by pressing +/- buttons.
Menu 05 - Low Temperature Protection: This is the temperature maintained when the thermostat is in
Frost Mode. If room temperature below 5°C(Settable), thermostat will turn on heating device till room
temperature arrive 5°C(Settable).
Menu 09 - Switching Differential: This function allows you to increase the switching differential of the
thermostat. The default is 0°C which means that with a set temperature of 20°C, the thermostat will
switch the heating on at 19.5°C and off at 20.5°C. With a 0.5°C differential, the heating will switch on at
19°C and off at 21°C.
Menu 11– This feature used to lock the keys. When lock, you can long press SET button to unlock.
Menu 12-This function allows you to save energy. When enable Open Window Detection function, the
system will automatically stop heating when it detects a sudden drop of room temperature (2°C in 15
minutes as default). This is normally caused when a window or door is opened without turning off the
heating device.
The device will return to the previous mode of operation after 30mins, then letter OP disappear. Press
any button will exit OWD function during the heating off period.
Menu 13-The setting time to detect the drop of room temperature between 2-15mins (15 mins is the
default setting).
Menu 14-The drop temperature to during detect period. Setting between 2-4°C (2°C is the default
setting).
Menu 15-The time to exit OWD mode select. Setting between 10~60min(30min is the default setting).
12 Open window detect function 1: Enable 0: Disable
0
13 OWD Detect Time 2~30mins 15mins
14 OWD Drop temp. select
(within detect time)
2.3.4’C 2 ‘C
15 OWD Delay time select
(Return to previous working status)
10~60min 30mins
17 Factory reset 0: No 0
1: Yes, and then press
On/off button for 5s,wait
until thermostat restart
18 Software version

OPTIMA W R2 PLUS THERMOSTAT
Optima W PLUS is a development of DIHS BV, NETHERLANDS. www.dihsbv.nl
Wiring Diagram
TC-25 TC-35 wiring:
TC-30 TC-40 wiring:
Installation
Mount the thermostat at eye level. Read the instructions fully so you get the best from our product. Do
not install near to a direct heat source as this will affect functionality. Do not push hard on the LCD
screen as this may cause irreparable damage.
Step 1: Carefully separate the front half from the back plate.
Step 2: Screw the thermostat back plate securely on wall with provided screws
OPTIMA W R2 PLUS THERMOSTAT
Optima W PLUS is a development of DIHS BV, NETHERLANDS. www.dihsbv.nl
Step 3: Clip the front of the thermostat onto the back plate.
TC-25 TC-30:
Step 1: Using a small screwdriver, slightly loosen receiver cover plate.
Step 2: Terminate the thermostat as shown in the diagram
Step 3: Clip the front of the thermostat onto the back plate.
Types of receivers (with RF and WiFi);
TC-25: Wall mounted receiver, 230Vac, voltfree output, 10 A Ohmic load / 4A Cap/ind load.
TC-30: Wall mounted receiver with floorsensor, 230Vac, voltfree output, 10 A Ohmic load / 4A Cap/ind
Load.
TC-35: Flush mounted receiver, 230Vac, voltfree output, 16 A Ohmic load / 10A Cap/ind load.
TC-40: Flush mounted receiver with floorsensor, 230Vac, voltfree output, 16 A Ohmic load / 10A
Cap/ind Load.
TC-60: Plugin mounted receiver, 230Vac, powered output, 16 A Ohmic load / 10A Cap/ind load.
NOTE;
When the voltage output is above 230Vac, eg 240-250Vac, then the capacity of the receiver should be
lower. For the TC-25 and TC-30 the maximum ohmic load is then 6A. For the TC-35, TC-40 and TC-60
its 12A ohmic load.
Table of contents
Other DIHS Thermostat manuals

Popular Thermostat manuals by other brands


Vive Comfort
Vive Comfort TP-P-705 operating manual

Aube Technologies
Aube Technologies TH114-A-024T-15S owner's guide

TECH
TECH ST-37 Manual guide
Danfoss
Danfoss Icon Master user guide

HOTOWELL
HOTOWELL HTW-ST01-A Installation and operation manual

Nexans
Nexans N-HEAT Series Installation instructions and user manual

Salus
Salus SQ605RF quick start guide

Resol
Resol tt2 manual

Bosch Thermotechnik
Bosch Thermotechnik E.L.M. Leblanc TR 200 manual

Honeywell
Honeywell TRADELINE Q7300H Series System engineering

Johnson Controls
Johnson Controls TEC3023-14-000 installation guide

ensto
ensto ECO16BT Installation and operating instructions