Dilux AP2114B User manual

User Manual
Decorative Lighting –Spacing Matching Series
China Factory: Block 5, Lianjian Science &
Technology lndustrial Park, Crossing of Huarong
Road, Dalang Sub-District, Longhua, ShenZhen
City, Guangdong, China
Tel: (86) 755 2344 6211
Fax: (86) 755 8601 9193
HK Office: Unit 1901, 19th Floor, NanYang Plaza,
No. 57 Hung To Road, Kwun Tong, Kowloon,
Hong Kong
Tel: (852) 3152 3059
Fax: (852) 3152 3039

Contents
I. Installation Guide
1. AP2114B/AP1709B/AP1709C/AP1720(New item)
/AP1714/AP1612B/AP1807/AP1804/AP1506
/AP1013 Installation guide 3
①Surface Mounted Installation
②Trimles Recessed Installation
2. AP5712C Installation guide 5
①Trim Recessed Installation
II. Cutting Instruction 6
III. Precautions (Storage, Warranty, Frequently Asked Questions) 7
Installation Guide
(AP2114B/AP1709B/AP1709C/AP1720(New item) AP1714/AP1612B/AP1807/AP1804/AP1506/AP1013)
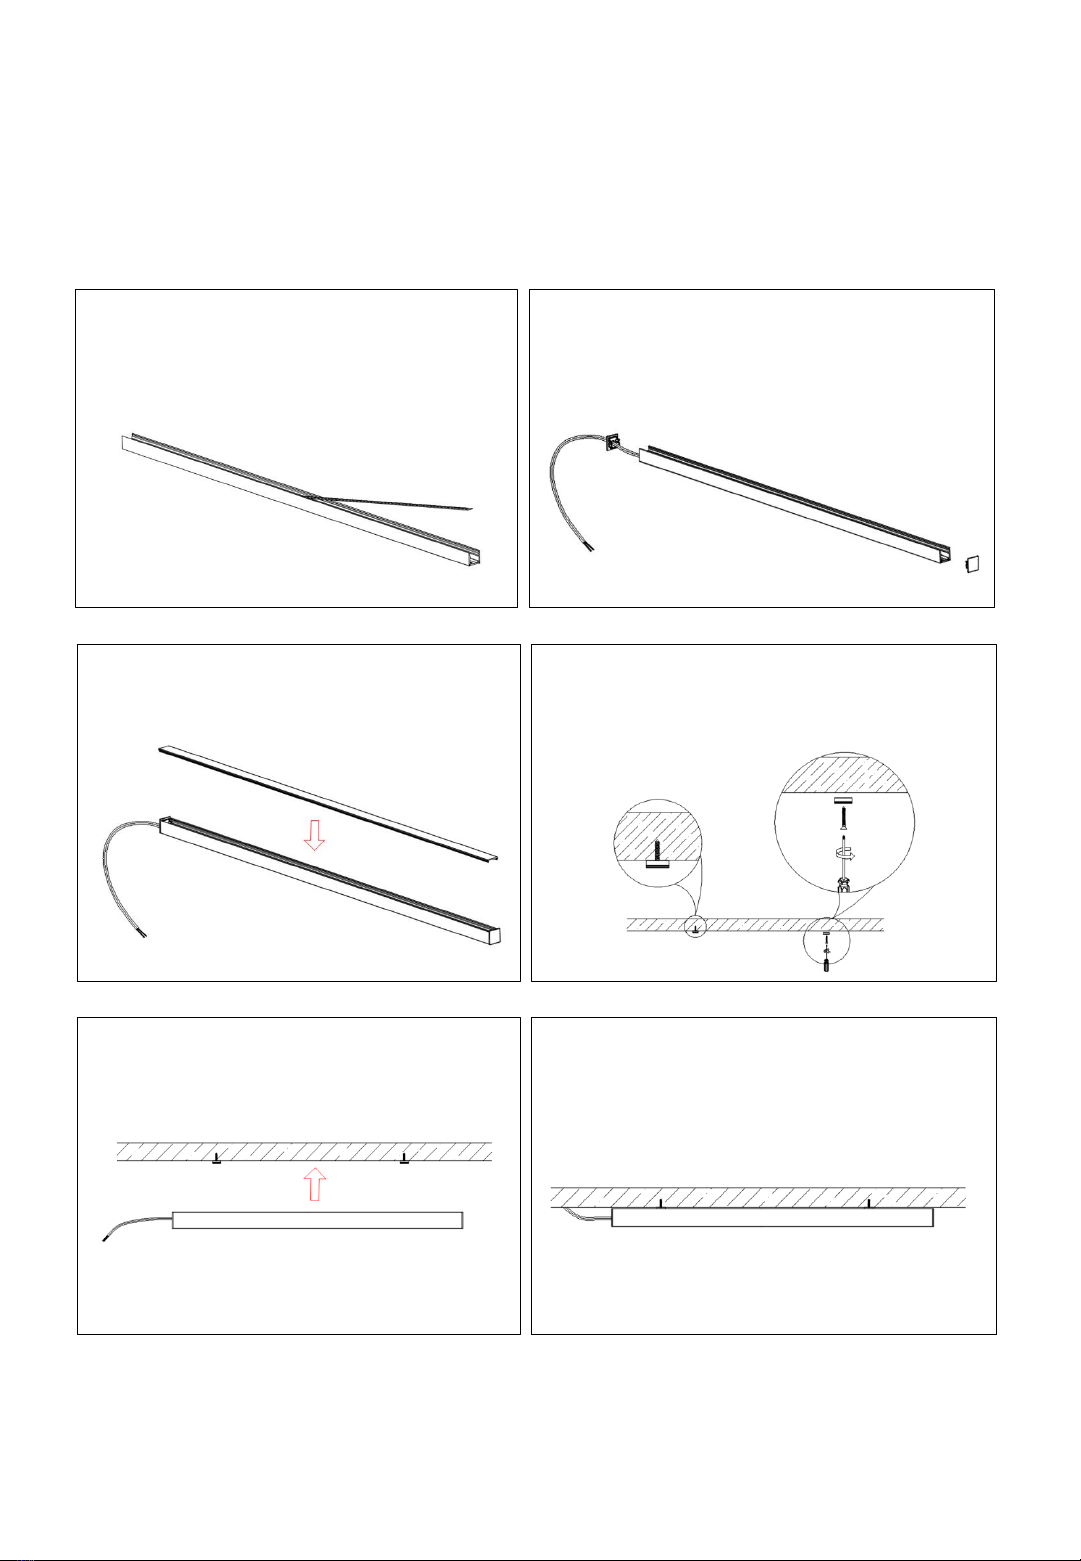
Surface Mounted
6. Connect the cable and do a power checking. The
installation is completed.
5. Mount the profile on the buckles.
1. Attach strip light at the center of the inner
bottom of aluminum profile. 2. Connect the cable and install the two end caps.
3. Cover the PC cover on the profile. 4. First determine the installation position, make sure
there is a power supply available for connection in the
installation position. Then screw the mounting clip to
the position where it needs to be installed

Installation Guide
(AP1709B/AP1709C/AP1720(New item)/AP1714/AP1612B/AP1807/AP1804/AP1506/AP1013 )
Trimless Recessed
2. Install the front-end cap and PC cover.
3. Slot the place where the profile need to be
installed. The length of the groove is determined by
the actual length of the product. The recommended
width and depth are shown in the attached table
below. Also reserve a DC power cord
5. Connect the profile cable to the reserved DC
power cable, pay attention to the positive and
negative poles. Put the profile into the slot and press
it.
4. Apply glass glue to the bottom of the tank.
6. After the glue is cured, the profile is firmly adhered.
The installation is completed.
1. Attach strip light at the center of the inner
bottom of aluminum profile.
Model
no.
AP1709B
AP1709C
AP1720
AP1714
AP1612B
AP1807
AP1804
AP1506
AP1013
Width
(mm)
18
18
18
18
17
19
19
16
11
Depth
(mm)
10.5
10
14.5
14.5
12
7
4
6
13

2. Install the front-end cap and PC cover.
3. Slot the place where the profile need to be
installed. The length of the groove is determined by
subtracting 8 mm from the actual length of the
product. It is recommended that the width be 19 mm
and the depth be greater than 6 mm. Also reserve a
DC power cord.
4. Apply glass glue on both sides of the groove
6. After the glue is cured, the profile is firmly adhered.
The installation is complete.
5. Connect the profile cable to the reserved DC
power cable, pay attention to the positive and
negative poles. Put the profile into the slot and press
it.
1. Attach strip light at the center of the inner
bottom of aluminum profile.
Installation Guide(AP2507B)
Trim Recessed
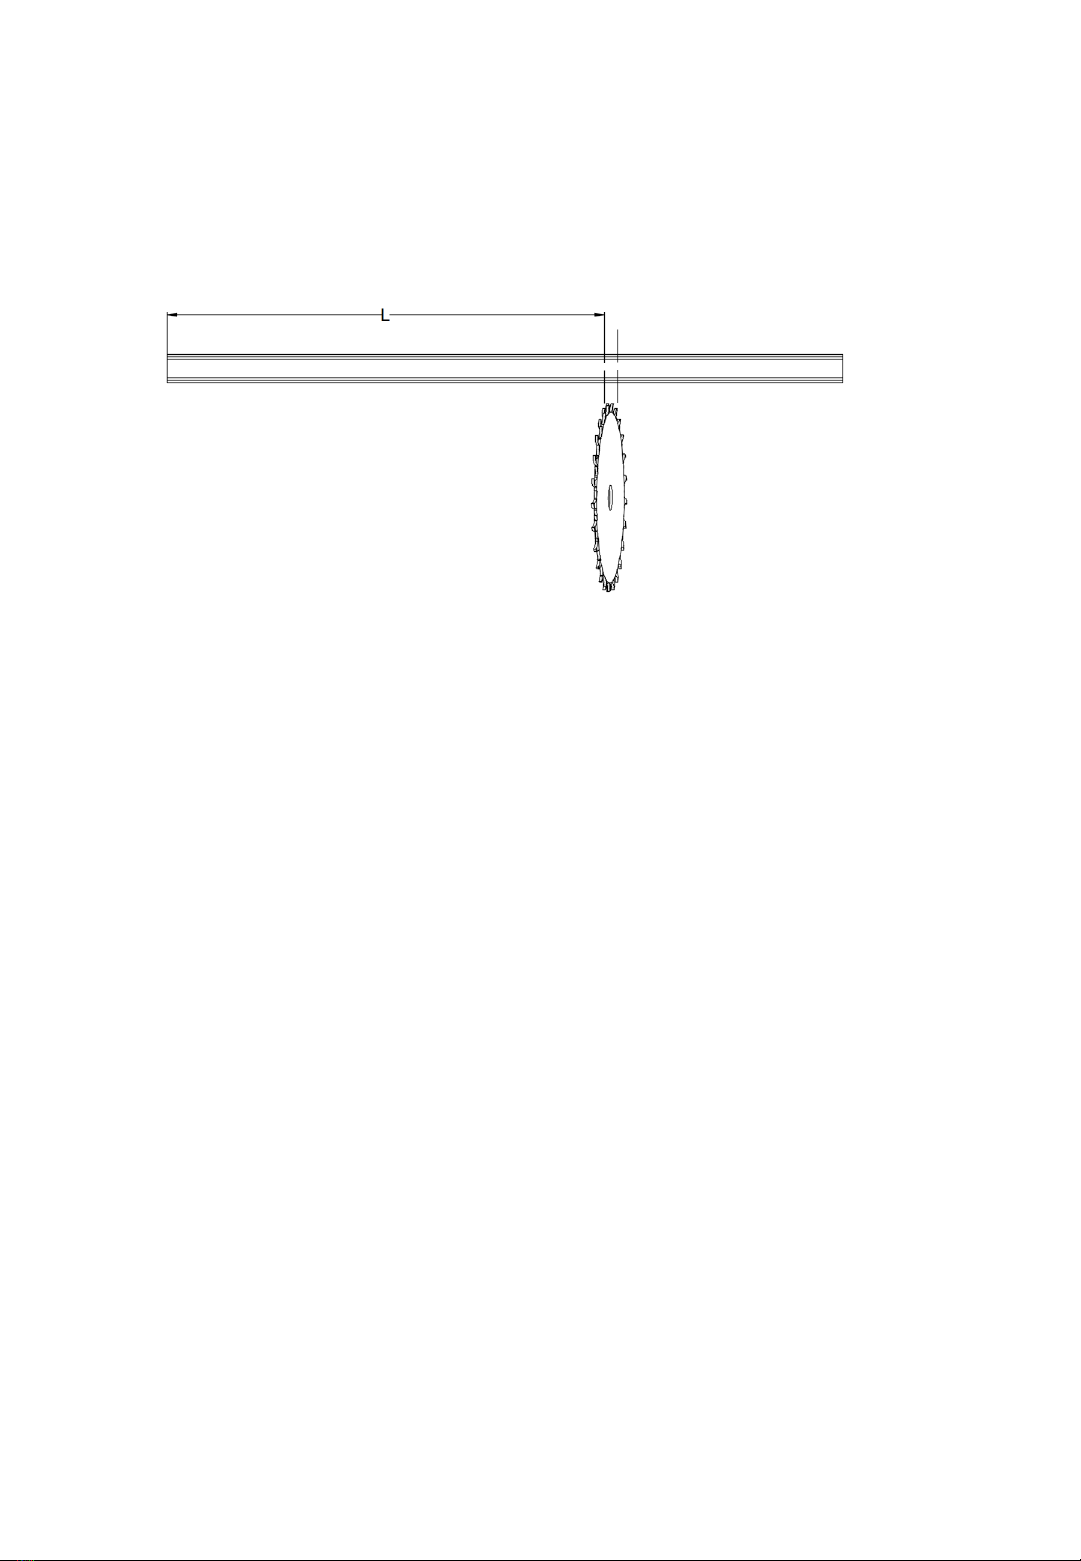
Cutting Instruction
1 According to the length of the multiple of the strip light minimum cutting unit,
measure the aluminum profile and mark the area need to be cut, and the cutting
blade is biased toward the portion to be cut.
2. Cautions:
It is recommended to slow down the speed when cutting. If the speed is too fast, the mask will be
damaged.
The inner profile do not install with strip light when cutting.
Fix it firmly when cutting, the fracture after cutting should be flat and not skewed. Round off the
fracture, ensure there is no burr, and the metal debris in the profile should be cleaned.
Recommended cutting speed 1000-1200rpm

Precautions
1. Storage should be dry, clean and ventilated;
2. Should be equipped with shelves or cabinets for linear lights;
3. Should have corresponding fire prevention measures;
4. Linear lights (including accessories) should be categorize for managed, storage and labeled;
5. Keep the instructions and packing boxes of lighting fixtures, accessories and light sources etc. for future checking;
6. The lighting fixture should be wiped and maintained regularly. It is recommended to maintain once or twice a
quarter.
7. When wiping the fixture, use a clean, soft cloth. After wiping, put it in a clean transparent plastic bag and an
appropriate place;
8. Do not rinse directly with water.
Warranty Instruction
1. Under normal conditions of use, the product is warranted for three years. During the warranty period, the
product fails, if the product is inspected by the company, the product of the same model will be replaced free
of charge.
2. One of the following conditions is not covered by the warranty:
(1) Damage to the product if it is not used as required by the instructions;
(2) The situation in which the user disassembles the internal parts and improperly damages the product;
(3) The product is seriously damaged or deformed.
Storage Management
1. During the installation, ensure the wire is connected properly base on the marking of the wire end and the
electricity operation is prohibited.
2. Electronic components such as power supplies are strictly prohibited from being disassembled;
3. The lighting fixture should be wiped and maintained regularly. It is recommended to maintain once or twice a
quarter. Pay attention to electricity safety and check the fastening of the installation parts;
4. Avoid hit by external objects when using.
Use Maintenance

Frequently Asked Questions
Q: Some parts of the linear light are not bright?
A: If it is not bright in some parts, there should be defect of LED chip of the LED strip. It is recommended to replace the defected
LED strip.
Q: The entire linear light do not work?
A: First check if the line wiring is properly connected, and then check if the power supply is working properly. If it is the problem of
power supply, please replace the power supply.
Q: If the linear light is flicking?
A: It may be caused by loose contact. Please check the wiring again. If it is normal, please check whether the power supply is
overloaded. If both of the above conditions are normal, it may be caused by the power supply. Please check the power supply.
Q: The installed linear light cannot be dimmed?
A : Please check if your wiring is correct. If the wiring is normal, there may be an abnormality in the power dimming control module.
Q: The two same linear lights appear one darker than the other?
A: It may be a problem with the power output. If you are using our power supply, it may be a power overload protection. Please
ensure one power supply do not connect with too many light sources.
This manual suits for next models
10
Table of contents
Popular Outdoor Light manuals by other brands


BGS technic
BGS technic 9767 instruction manual

LIGMAN
LIGMAN SMITH 3 installation manual

Sea gull lighting
Sea gull lighting 1 Light Outdoor Wall 8301 Series installation instructions

Flipo
Flipo Pacific Accents Sparkler Lights... manual

IKEA
IKEA SOLVINDEN Instructions for use

LIGMAN
LIGMAN LIGHTWAVE 3 installation manual


