Dimton BlueRider M1-S User manual

Attention
Appearance Design
Recharge
Lower Power Notification
Adjust Volume of Voice Message
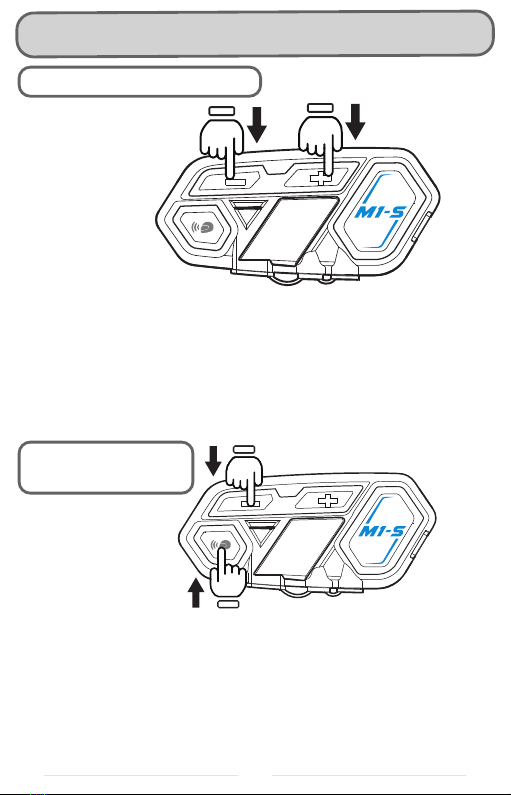
On/Off
Pair Up To Different Devices
Pairing With Cellphone
Cellphone Function
Voice Command
Music Selection
Memory Clearance / Headset Reset
AUX 2.5mm to 3.5mm cable / Radio
Operating Scenario 1
Operating Scenario 2
Operating Scenario 3
Multiple Intercom 1
Multiple Intercom 2
Connect to Other Brand Headset
Upgrade Software
Content In Package
Speaker Installation
Microphone Installation
M1/M1-S (3M Dual Lock)
EVO version-Bracket Installation
EVO(Helmet Bracket with Metal Clip)
1
2
4
5
5
6
7
9
10
12
13
14
15
16
17
19
21
24
27
28
31
32
34
36
40
43
Operation Manual
Installation Manual

Attention
1
Thank you for purchasing Dimton M1-S, M1
Bluetooth stereo headsets. For the best user
experiences, please read this manual before using.
Sound volume warning
Listening for long hours or to loud sounds may
cause impaired hearing.
Disassembly or modification
The M1-S is precisely made in the factory. Any
disassembly or modification may damage the
device. Please do not tear any of the safety
regulation and serial number stickers from the
device, which will void warranty. Please contact us
Warranty:
In normal use, we offer one year warranty of the
headset and half year warranty of the cables from
the date of purchase. Any disassembly or
modification will void warranty.

2
M1/M1-S
FRONT
REAR
Product serial
number sticker
3M Dual Lock
USB charger
cable port
Speaker &
microphone
set port
Intercom
AUX In
Function
Volume+
Volume-
Appearance Design
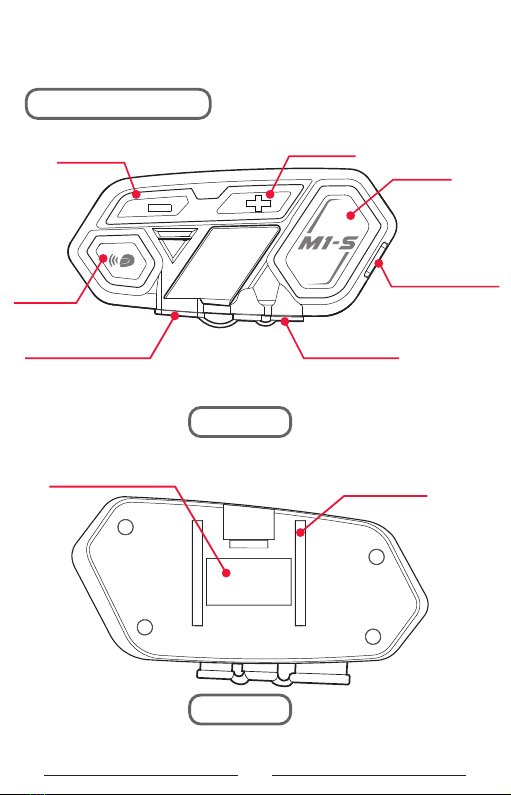
3
Bracket mounting
chute
M1 EVO/M1-S EVO
FRONT
REAR
Product serial
number sticker
USB charger
cable port
Speaker &
microphone
set port
Intercom
AUX In
Function
Volume+
Volume-
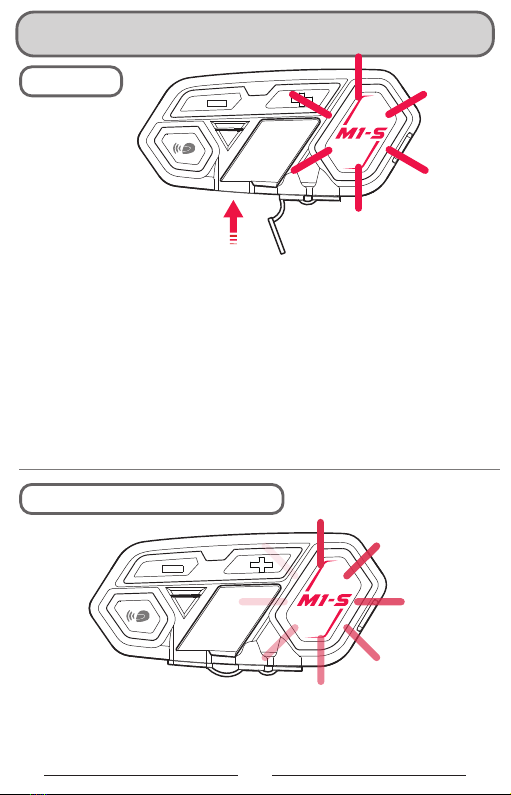
Recharge
4
When the power is lower than 10%, the function button will flash
red light and a voice message will say “the power is lower than
10%, please recharge immediately.”
For first time use, please recharge the device until the red light is
off.
1. Connect the device and computer port with the USB charger
cable.
*Bike USB charging ports are not recommended because
unstable circuits may damage the headset.
2. When connecting to a power source, The function button will
emit red light. When recharge is complete, the red light will be
off. Complete recharge takes about 2 hours.
USB charger cable port
Recharge
Lower Power Notification
Lower Power Notification/Adjust Volume of Voice Message
When the headset is on, long press the intercom button and
volume –until you hear “du” sound. Then, adjust the volume of
voice message by pressing volume + or –. When adjusting, you
can short press + and volume – to listen to power detection to
confirm the volume. After you finish adjusting, long press
intercom button and volume – until you hear “du” sound,
meaning adjustment completed.
Adjust Volume of
Voice Message
5
M1-S has a power detection function. When the device is on,
short press volume – and volume + at the same time. The voice
message will say
Power over 90%
Power over 50%
Power lower 50%
Power lower than 10%, please recharge immediately
Power Detect Function

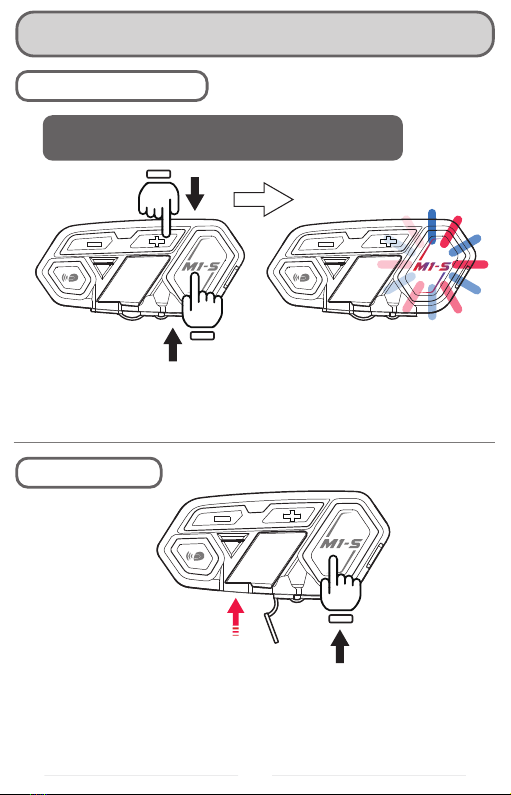
On / Off
6
1.Switch on: Long press function and intercom button at the
same time for 3 seconds, until the function button flashes blue
light. A voice message will say
“Welcome to the Bluerider Bluetooth communication system.”
2.Switch off: When the device is on, long press function and
intercom button at the same time for 3 seconds, until the
function button flashes red light. The device will detect power
and a voice message will say
1.Power over 90%
2.Power over 50%
3.Power lower 50%
4.Power lower than 10%, please recharge immediately
3 seconds
3 seconds
Switch On
Switch Off

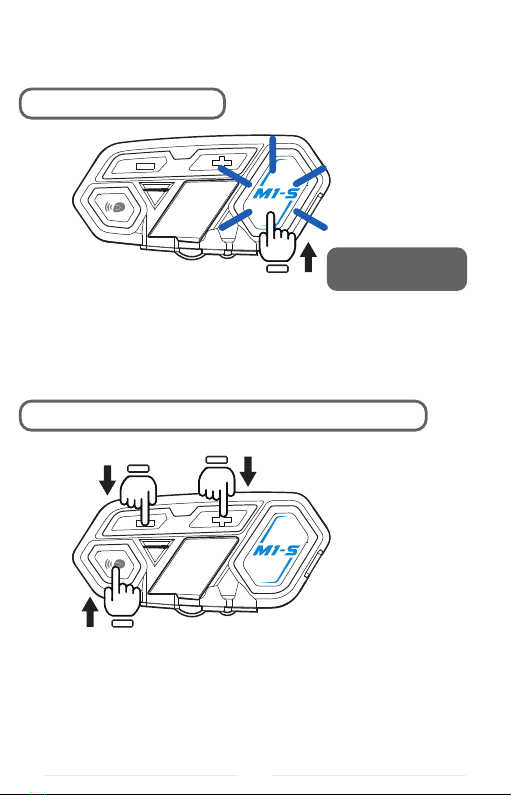
Pair Up To Different Devices
7
When the device is on, long press the function button
M1-S/M1 can pair to different bluetooth devices.
The device will turn into passive pairing mode
The function button will flash red and blue light
alternately quickly
Passive Pairing Mode
STEP
STEP

8
When the device is on, long press the intercom Button
Active searching
STEP
STEP
When the headset is on, long press the intercom button until
red and blue light flash alternately slowly, meaning active
searching mode.
You will hear “du” notification sound.
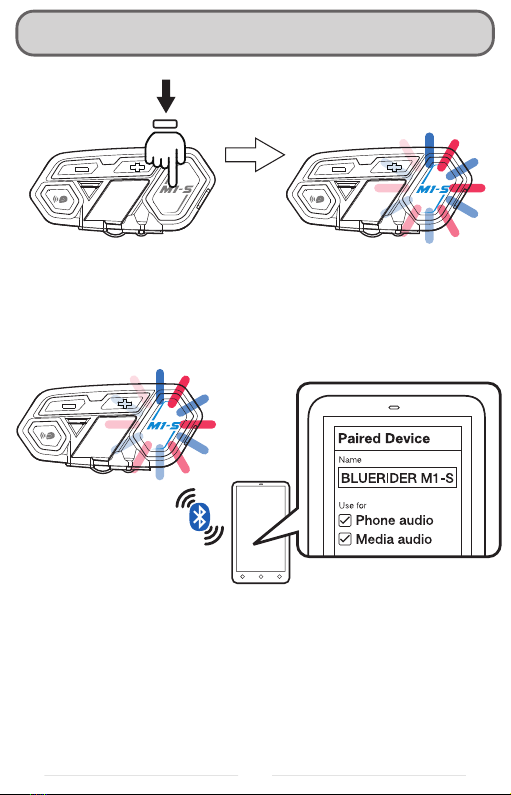
Pairing With Cellphone
9
STEP
STEP
When the device is on, long
press the function button
The function button will flash red
and blue light alternately quickly,
enter passive pairing mode
Switch on cellphone bluetooth, choose Bluerider M1-S or
Bluerider M1, the pairing is complete.
Remark: When pairing is complete, please make sure that both
cellphone audio and media audio are checked, other call or
music can’t be processed.
5 seconds

Cellphone Function
When the device is on, short press the function button twice to
redial, and blue light will flash.
*redial only calls the last number
Redial
M1-S is set to manually answering incoming calls, when there is
an incoming call, besides ringing, blue light will flash. Press the
function button to answer and press the function button to hang
up.
When talking, press volume + and volume – to adjust volume.
Answer / Hang up
10
Press to Answer
/ Hang up
Short press the
function button twice
11
When the headset is on, long press the intercom button and
volume + – for more than 3 seconds. If you hear one “du” sound,
it means automatic answering phone calls. If you hear “du du”
sound, it means manual answering phone calls.
Long press for
2 seconds
Reject to Phone Calls
Switch to Automatic Answering Phone Calls
When there is an incoming call, long press the function button
to reject calls.
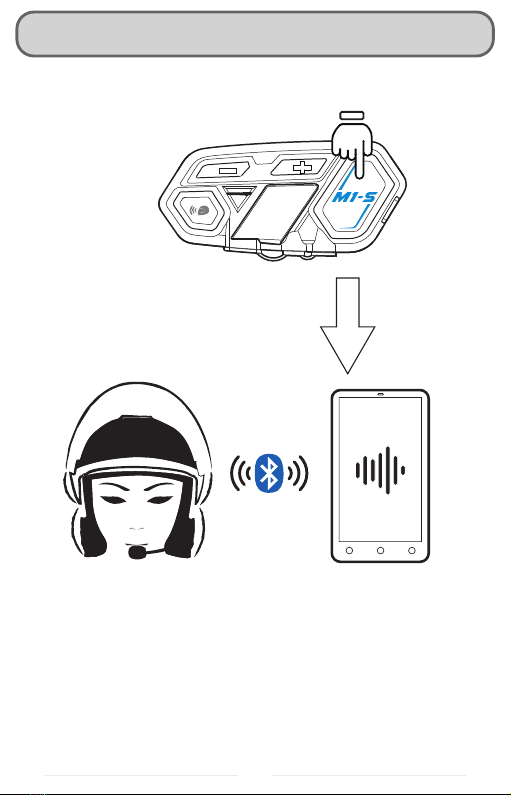
Voice Command
When your M1-S or M1 is paired up with your cellphone, when
both devices are on, short press the function button once, it will
automatically switch on the voice command function.
*Cellphone must be equipped with voice command function
12
Short press the function
button once
Automatically switch on
voice command function

Music Selection
When cellphone is paired up with M1-S or M1, when both
devices are on, short press volume + twice to play music.
Play music
When playing music, short press volume + twice to pause
Pause
Long press volume + for 2 seconds to play the previous song on
your cellphone music list
Previous
Long press volume – for 2 seconds to play the next song on
your cellphone music list
Next
13
Short press volume + twice
Long press volume +
for 2 seconds
Long press volume - for
2 seconds
When the headset is on, long press the function button and
volume + for more than 5 seconds. The function button will flash
red and blue light, meaning deleting all the pairing memory.
When the headset is off and when USB charger cable is
connected to power supply, hold the function button and insert
the charger cable, then unplug the charger cable. Headset reset
is done.
Memory Clearance / Headset Reset
Long press the function button
and volume + for more than 5 seconds
Memory Clearance
Headset Reset
14
USB charger cable port

AUX 2.5mm to 3.5mm cable / Radio
Speed detector
Music playerGPS directions
Radio
Use AUX cable
Radio cable (optionally available)
If the device is equipped with 3.5mm port, M1 headset will be
able to receive signal with AUX cable, and the sound can be
heard through speaker.
Connect radio to the M1 headset with radio cable. There is a
button on the radio cable to install on the hand bar, press to
send PTT
Install on the hand
bar of motorbike
15

Operating Scenario 1:One person use, pair to cellphone
+ bluetooth gps device + bluetooth speed dectector
*After M1-S or M1 is paired with gps, if you
don't switch off the GPS's bluetooth, it will
interfere when pairing to the speed detector.
We recommend to switch gps bluetooth off,
after pairing up with the detector, switch the
bluetooth back on
16
First of all, pair up gps and your cellphone
(GARMIN)
(GARMIN)
(GARMIN)
(cellphone)
(cellphone)
(bluetooth speed
dectector)
Pair up M1-S with gps, after paired, please switch off the bluetooth
function in the gps
Lastly, pair up M1-S or M1 with the bluetooth speed detector,
after pairing, switch on the gps bluetooth function
(bluetooth speed
dectector)

17
Operating scenario 2:Two person intercom, and pairing
to cellphone + bluetooth gps + speed detector or radio
Rider cellphone
Rider cellphone
Rider GPS Rider Speed Detector
Passenger HeadsetRider Headset
Rider Headset
Passenger HeadsetRider Headset
Pairing procedure:
Step 1: Switch the rider’ headset to active searching mode and
the passenger’s headset to passive pairing mode. When both
headset stop flashing red and blue light, they are paired.
Step 2: switch the rider's headset to passive pairing mode,
search for this on your cellphone and pair it up.

18
Rider GPS
Rider Speed Detector
Rider Headset
Rider Headset
Step 3: Keep the rider’s headset in passive pairing mode. Use
Bluetooth GPS to search for riders’ headset and pair it up.
Step 4: Connect speed detector or radio to M1-S or M1 with
2.5mm to 3.5mm aux cable. All audio integration is complete.
This manual suits for next models
1
Table of contents


