Directed Nanocam+ NCP-DVR3CH User manual

USER MANUAL
3-Channel Front, Rear, and In-Cabin
FHD Dash Camera with GPS, WiFi and DMS
Your Safety. Our Priority
NCPDVR3CH

CONTENTS
1.0 CAUTIONS .......................................................................................................................3
2.0 WARNING ........................................................................................................................3
3.0 MICRO SD CARD WARNING.............................................................................................4
3.1 FORMATTING THE INSERTED MICRO SD CARD.................................................................5
4.0 INTRODUCTION...............................................................................................................6
5.0 PACKAGE CONTENTS .....................................................................................................6
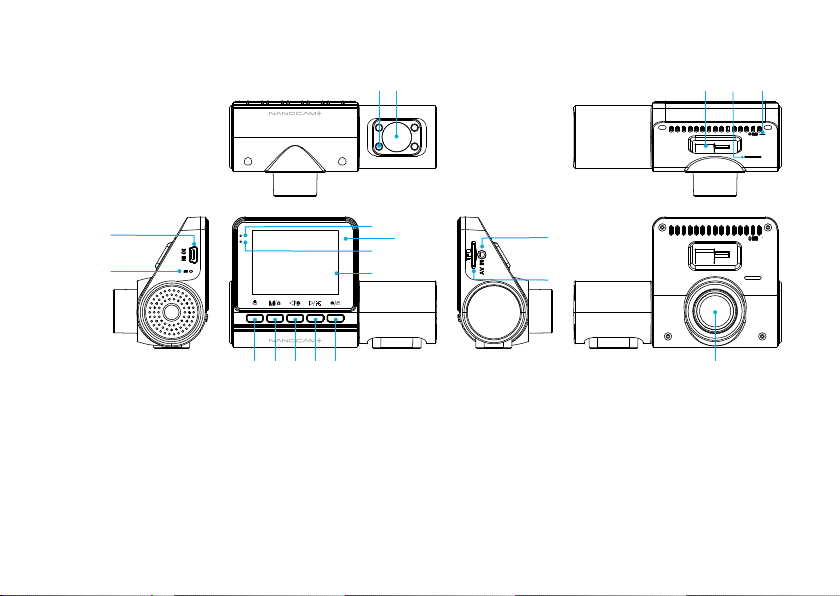
6.0 PRODUCT OVERVIEW......................................................................................................7
6.1 BUTTON FUNCTIONS............................................................................................................8
7.0 BEFORE INSTALLING YOUR DASH CAMERA .................................................................8
7.1 INSERTING THE MICRO SD CARD........................................................................................8
7.2 FITTING THE GPS MOUNT TO THE DASH CAMERA ...........................................................9
8.0 INSTALLATION INSTRUCTIONS ...................................................................................10
8.1 NCPDVR3CH INSTALLATION............................................................................................10
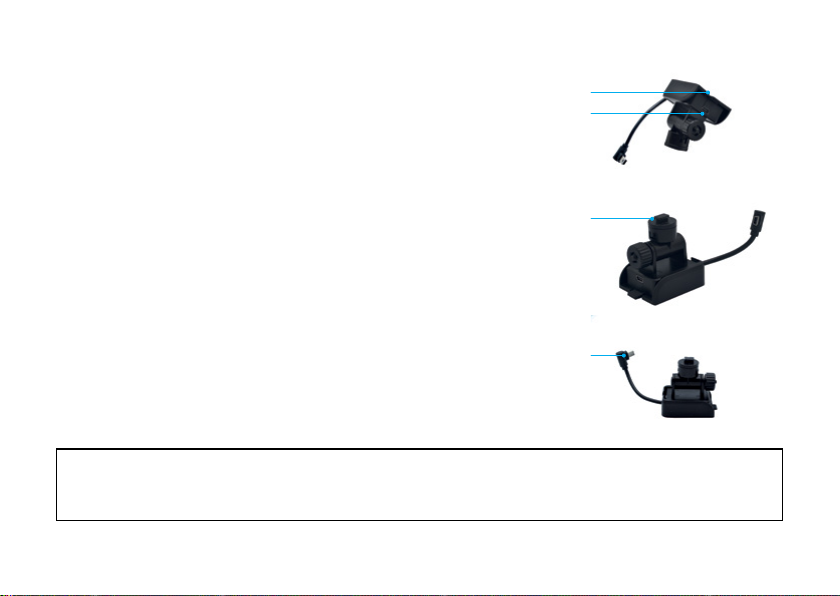
8.2 INSTALLING THE REAR CAMERA......................................................................................11
8.3 REAR CAMERA WIRING DIAGRAM ....................................................................................12
8.4 REAR CAMERA FEATURES ................................................................................................13

8.5 LED INDICATOR ...................................................................................................................13
9.0 USING YOUR DASH CAMERA ........................................................................................ 14
9.1 FORMATTING THE INSERTED MICRO SD CARD...............................................................14
9.2 SETTING THE DATE AND TIME...........................................................................................15
9.3 SCREEN INTERFACE WHEN RECORDING ........................................................................16
9.4 SCREEN INTERFACE WHEN IN PLAYBACK .....................................................................17
9.5 SETTINGS MENU.................................................................................................................17
9.6 SYSTEM SETTINGS .............................................................................................................18
10.0 DOWNLOADING AND INSTALLING THE NCPVIEW APP..............................................21
11.0 NCPVIEW APP OPERATION.........................................................................................23
11.1 APP VIDEO PLAYBACK........................................................................................................24
11.2 DOWNLOADING VIDEOS FROM THE APP..........................................................................24
11.3 SHARING VIDEOS ON SOCIAL MEDIA................................................................................24
11.4 NCPVIEW APP SETTINGS .................................................................................................25
12.0 DRIVER MONITORING SYSTEM.....................................................................................26
13.0 WARRANTY TERMS AND CONDITIONS ........................................................................26

3
1.0 CAUTIONS
• Please ensure you are using your Dash Camera within your country's road laws.
Please make sure you are familiar with your local road legislation before use.
• The time and date needs to be set before you start recording.
• The notifications provided by this Dash Camera are to be used as a guide only.
Please drive according to the actual conditions on the road.
• The system is for non-commercial use only, and within the limits permitted
by the relevant laws.
• Avoid using the Dash Camera in the vicinity of any devices that emit radio
interference (eg. microwave ovens).
• Please note that it is normal for the Dash Camera to get warm during use.
2.0 WARNING
• Always power the Dash Camera using the provided charger.
• Never dismantle the Dash Camera.
• Do not dispose of the Dash Camera in fire.
• Disposal of the Dash Camera should observe local regulations.

4
3.0 MICRO SD CARD WARNING
This Dash Camera can only be used with Micro SD Cards, Class 10 or above with 32GB -
128GB storage capacity (this is not included and will need to be purchased separately).
Please format your Micro SD card before use.
NOTE:
Formatting the Micro SD card will delete all information on the inserted Micro SD Card and
prepare the card for use with the Dash Camera.

5
3.1 FORMATTING THE INSERTED MICRO SD CARD
Please download the NCP-VIEW app and connect your Dash Camera with the downloaded
app by following the steps as mentioned on page 21.
NOTES ON INSTALLATION
1. For best results with the Drive Monitoring
System (DMS) we recommend that the Dash
Camera be installed near the driver side of
the windscreen perpendicular to eye level. If
DMS is not required, we recommend that the
Dash Camera be installed near the rear view
mirror, or at the top centre of the windscreen
for best results, making sure the internal
camera is not obscured by the mirror.
2. Make sure the lens is within the range of the windscreen wiper, so there is a clear line of
view when it rains.
3. Do not touch the lens. Fingerprints on the lens will result in unclear videos or photos. If
your photos or videos are blurred, this may be solved by cleaning the lens gently with a
microfibre cloth.
4. Please use only the included charging cable to power the Dash Camera. Other cables may
not work or may damage the camera.

6
4.0 INTRODUCTION
Thank you for purchasing a Nanocam Plus Dash Camera. We have developed this product
so you can have a better driving experience with enhanced safety features. Our products,
like most after-market safety enhanced devices, are designed to assist and aid the driver,
and not to replace the manual function of the person operating the vehicle. Please read
through these instructions before attempting to install this product.
For the latest manual and product updates, please visit our website at
www.nanocamplus.com.au or www.nanocamplus.co.nz
5.0 PACKAGE CONTENTS
3M
Mount x1
Electrostatic
Film x2
8M Rear
Camera
Cable x1
NCP-DVR3CH
Dash Camera x1
Rear
Camera x1
12/24V Power
Adapter x1
User
Guide x1

7
6.0 PRODUCT OVERVIEW
2
1
4
11
5
16
3
678910
1312 15
14
17 18
19
1. Power Indicator LED
2. Recording Indicator LED
3. Display Screen
4. Infra Red LED
5. In-Cabin Camera
6. Power Button
7. Menu/Lock Button
8. Previous/Camera Switch
Button
9. Next/DMS button
10. Take Picture/Confirm Button
11. Light Sensor
12. 3M Mount Slot
13. Speaker Vent
14. Front Camera Lens
15. Microphone
16. Mini USB Connector (for
power)
17. Reset Button
18. Micro SD Card Slot
19. Rear Camera Input

8
6.1 BUTTON FUNCTIONS
BUTTON FUNCTIONS
Power button Long press to power on/off,
Short press to turn on/off the display. (Recording will continue)
Menu/Lock button Short press to enter into menu when in standby /not recording mode.
Short press to lock the video when recording .
Long press to switch modes between video /video playback/
protected videos playback/parking videos playback/picture.
In menu/playback: Short press to exit menu.
Previous/Camera
Switch button
In video mode: Short press to switch the camera modes.
In menu/playback: Toggle the menu up or previous.
Next/DMS button In video mode: Short press to turn on/off DMS function. Long press to start DMS calibration
In menu/playback: Toggle the menu down or previous. Long press to delete the current file
Take Picture/
Confirm button
In video mode: Short press to take/stop video. Long press to take photo.
In menu/playback: Confirm.
Reset Press this button to restart the device. All pre saved information will be lost.
7.0 BEFORE INSTALLING YOUR DASH CAMERA
7.1 INSERTING THE MICRO SD CARD
Please insert the memory card into the Micro SD Card slot with the
chip contact surface facing up. Insert it until your hear a click sound.

9
7.2 FITTING THE GPS MOUNT TO THE DASH CAMERA
1. 3M Tape
Please remove the 3M tape and place the mount onto
your windscreen.
2. Power Socket
Please insert your 12V power adaptor cable into this
socket to power the GPS mount unit.
3. Dash Camera Mounting Lock
Please insert the mounting lock into the 3M
mounting lock at the back of camera and slide the
Dash Camera from left to right to lock.
4. Dash Camera Power Connection
Please insert this cable into your Dash Camera's
USB socket on top. This will power your Dash
Camera for use.
NOTE
When removing the GPS mount from your windscreen, gently twist the module bracket to the
left (unlocked) position until the 3M tape and bracket become loose from the windscreen.
3
2
1
4

10
8.0 INSTALLATION INSTRUCTIONS
8.1 NCPDVR3CH INSTALLATION
1. OPTIONAL: The electrostatic film helps for easy removal
of the Dash Camera from the windscreen and is included
in package contents. Select the electrostatic film from
the box and install it on the front windscreen in the
recommended position as shown. Please wipe the glass
before installation and push out any bubbles between the
static film and the glass before installation.
2. Remove the protective film from the NCP-DVR3CH mounting bracket and position
the Dash Camera in the middle of the electrostatic film (optional). Press down on the
base of the bracket by hand for 30 seconds to ensure that the adhesive is attached to
the electrostatic film. Adjust the camera until its lens is capturing the entire road.
3. Run the Dash Camera charging cable along the top of the front windscreen through
the A pillar and around and under the storage compartment of the passenger seat to
the car's 12/24V adaptor port. Connect the 12/24V adaptor to the car power.
* If not using DMS function * If using DMS function

11
8.2 INSTALLING THE REAR CAMERA
1. OPTIONAL: Select the electrostatic film from the box and install it on the rear
windscreen in the recommended position as shown on page 12. Please wipe the glass
before installation and push out any bubbles between the static film and the glass
before installation.
2. Remove the protective film from the rear Camera base bracket and select either the
top or the bottom of the rear window to position the rear Camera. Press down on the
base of the bracket by hand for 30 seconds to ensure that the sticker adhesive has
attached to the electrostatic film.
3. Connect the rear Camera to the front Dash Camera using the cable provided. Either
run the cable through the roof lining or under the carpet underlay as shown on
page 12. The rear Camera can rotate 360° depending on the position and type of
installation method.
Method 1: Thread the rear Camera cable along the top of the roof lining and connect
it to the Dash Camera.
Method 2: Lift up the car carpet and run the rear Camera cable along the underlay
of the carpet and connect it to the front Dash Camera.
4. Adjust the rear Camera by rotating the barrel until it is capturing the entire road.
NOTE:
While viewing your live footage on the Dash Camera, the rear Camera will show the true rear
view image where the licence plates of vehicles behind your vehicle will be inverted. Actual
recorded images are horizontally flipped to capture the licence plate correctly.

12
8.3 REAR CAMERA WIRING DIAGRAM
NOTE:
The rear Camera must be mounted inside the car as it is not waterproof.
Rear Camera 8M Rear Camera Cable

13
8.4 REAR CAMERA FEATURES
After successfully installing and connecting the rear Camera to the front Dash Camera,
the rear Camera image will be displayed on the front Dash Camera's 2.0” IPS screen. All 3
Cameras will instantaneously start recording after the Dash Camera is powered on. Both
front and in-cabin Dash Camera images will now be displayed on the left of your Dash
Camera's 2.0” Screen, while the rear Camera images will be shown on the right of the
screen. You can switch between screens by pressing the Previous/Camera Switch Button.
The Camera Display can switch between cameras and show the following:
• Full front Dash Camera view
• Full rear Camera view
• Full in-cabin Dash Camera view
• Half front Dash Camera and quarter in-cabin Dash Camera and rear Camera views
8.5 LED INDICATOR
• A flashing blue light indicates that recording is in progress.
• A constant blue light indicates not recording.
• A constant flashing red light indicates the internal battery is charging.
NOTE:
The Dash Camera is designed to be constantly powered by the included DC power plug. The
internal battery is designed to hold saved settings and power the Dash Camera when in park
mode. The battery is NOT designed for primary use.

14
9.0 USING YOUR DASH CAMERA
When the Dash Camera is correctly installed and connected to your vehicle’s 12/24V
power supply, and the ignition is turned on to ‘accessories’, the Dash Camera will
automatically turn on and start recording.
9.1 FORMATTING THE INSERTED MICRO SD CARD
It is highly recommended you format the Micro SD card before use.
NOTE:
Formatting the Micro SD Card will delete all previously saved information on the inserted card,
and prepare the card for best use with the car Dash Camera.
To format follow the steps below:
5. Press the Take Picture / Record button
6. Press the Menu/ lock button.
7. Scroll down the menu using the forward and backward key until you reach Format.
8. Press the Confirm button and press confirm again.
9. The Mirco SD card will now be formatted and be ready for use.
10. Press > twice to arrive at the Format SD Card option which will now be highlighted in
blue.
11. You can also format your Micro SD card via the NCP-VIEW app.

15
9.2 SETTING THE DATE AND TIME
This step is vital, as the correct date and time will be stamped on your recorded video
files, and their accuracy can be particularly important in an insurance claim. Please
follow the steps below carefully.
How to set the date and time:
1. Press the Take Picture / Record button
2. Press the Menu/ lock button.
3. Scroll down the menu using the forward and backward key until you reach Date and
Time
4. Press Confirm
5. Change the year, month, date and time by pressing Confirm. After confirming, the
setting will move to the adjacent setting and the text will change to red to help in the
selection.
6. Press the Menu/Lock Button to exit.

16
9.3 SCREEN INTERFACE WHEN RECORDING
1. Recording Indicator:
The red dot will flash when
your Dash Camera is recording.
2. Recording time:
Shows the duration of the recording.
3. DMS enabled
4. Wi-Fi:
If your Dash Camera is not
connected to Wi-Fi it will
have a strike through the icon.
5. GPS enabled
6. G-Sensor enabled
7. Audio Recording On/Off
8. Micro SD Card
9. Charging status
10. Date
11. Time
12 3 4 5 6 7 8 9
10 11

17
9.4 SCREEN INTERFACE WHEN IN PLAYBACK
1. Stop recording by pressing the
Confirm button.
2. Long press the menu button to
access the normal video playback/
picture gallery/locked videos /
parking videos.
3. All files can be accessed by pressing
the Previous and Next button.
4. Long press the previous
button to lock video.
5. Long press the next button
to delete video.
6. Press the Menu button again
to exit the Playback menu.
9.5 SETTINGS MENU
System settings allow you to adjust the Dash Camera settings, format Micro SD cards,
perform a factory reset and offers you the QR code to scan and download the NCP-VIEW
app.
1 2
1. Recorded file name
2. File number

18
9.6 SYSTEM SETTINGS
NAME FUNCTION OPTIONS DEFAULT NOTE
Format SD card Formats the Micro SD card Deletes all recorded data from
the micro SD Card
Wi-Fi On/Off To turn on/off Wi-Fi with the Dash
Camera On/Off On
Wi-Fi info Provides the Wi-Fi SSID and
Password information
G-sensor
The G–Sensor monitors your
vehicle against impact. The dash
camera will automatically lock
the recording in the event of a
collision. Turn off or adjust the
sensitivity of the built in G- Sensor
Off/Low/
Medium/
High
Low
A higher sensitivity means more
videos will be stored in the
emergency folders. Even a hard
door closure will be saved as an
emergency file in high sensitivity
mode.
Loop recording
Loop recording allows you to set
the duration that the camera will
record before creating a new clip
1/3/5
Minutes 1 Minute
Licence plate
stamp
To stamp the licence plate on the
recorded footage On/Off Off
Volume To increase or decrease the
volume of alerts
Low/
Medium/
High/Off
Low
Driver
monitoring
System
Gives an alert analysing driver
behaviour On/Off Off

19
NAME FUNCTION OPTIONS DEFAULT NOTE
DMS settings Fatigue/Inattention/Smoking/
Phone use On/Off Off
Audio
recording Turns the microphone On/Off On/Off On Turning off will leave no audio
recording on the recorded footage
Date and time
setting
Adjusts the date and time on the
time stamp On
Time format Set the time in 12 Hr or 24 Hr
format 12/24 Hr 12 Hr
Keypad volume Turns the keypad volume on/off On/Off On
Power on
sound
Provides sound when the DVR is
powered on On/Off Off
Factory
settings Restore factory settings
About Dash
Camera
Provides the model name and
firmware version
GPS info
Provides the GPS information
and the number of satellites
latched to
Only when GPS signal is available
GPS switch Turns the GPS on/off On/Off On Speed and position coordinates
will not be stamped on the footage
Rear camera
display
To switch display on the screen to
mirror/ normal image
Mirror/
Normal Mirror Will re-record in "non-mirror
image" to read licence plates
Table of contents
Other Directed Dashcam manuals