DirekTronik 25-0577 User manual

4-PORT 4K HDMI KVM Switch
The device supports switching four computer’s HDMI video and USB signals to one
monitor and USB signals’ device.
Apply to bank, transportation, education, home, conference, hotel, etc.
25-0577

Operating Instructions
Dear Customer
Thank you for purchasing this product. For optimum performance and safety, please read these
instructions carefully before connecting, operating or adjusting this product. Please keep this
manual for future reference.
FEATURES
Computer: HDMI input maximum support 4K2K30Hz RGB4:4:4, 8 Bit
Display: HDMI input maximum support 4K2K30Hz YUV 4:4:4, 8 Bit
The Four USB-TYPE B interface pass through three USB interface to the corresponding host
of HDMI signal channel.
Operating system support Windows 95/98/2000/2006/NT/XP/WIN7/WIN8/WIN10, Linux,
Unix, MAC, etc
Support hot plug, connect or disconnect devicestotheKVMswitchinanytimeandwithout
turn off devices.
Support auto switching (monitor the devices in a specified time interval.)
Support keyboard’s hot keys to control the KVM switch.
Available to use keyboard and mouse without any delay after switching the host devices.
With mounting ears
PACKING CONTENTS
HDMI KVM switch, 1 user manual.
12VDC Power Supply.
Operating Instructions.
Mounting ear 1 pair.
NOTICE
Our company reserves the right to make changes in the hardware, packaging and any
accompanying documentation without prior written notice.
2

Operating Instructions
SPECIFICATIONS
1). Input resolution list
Resolution I/P Resolution Color Space Support
50Hz
P 720*576 √√
P 1280*720 √√
P 1920*1080 √√
59.97/60Hz
P 720*480 √√
P 1280*720 √√
P 1920*1080 √√
29.97/30Hz
I 720*480 √√
P 1280*720 √√
I 1920*1080 √√
P 1920*1080 √√
P 3840*2160 √√
P 1280*720 3D √√
P 1920*1080 3D √√
25Hz
I 720*576 √√
P 1280*720 √√
I 1920*1080 √√
P 1920*1080 √√
P 3840*2160 √√
23.97/24Hz
P 1280*720 √√
P 1920*1080 √√
P 3840*2160 √√
P 1280*720 3D √√
P 1920*1080 3D √√
3

Operating Instructions
2
)
.VESAResolution
(
RGB8bit
)
4
Output Device Resolution
Refresh Rate Copy
mode
Only second
screen mode
PC 4K TV
LENOVO
ThinkPad E470c
800×600 60HZ 60HZ √√
1024×768 60HZ 60HZ √√
1152×864 60HZ 60HZ √√
1280×600 60HZ 30HZ √√
1280×720 60HZ 30HZ √√
1280×768 60HZ 30HZ √√
1280×800 60HZ 30HZ √√
1280×960 60HZ 30HZ √√
1280×1024 60HZ 60HZ √√
1360×768 60HZ 60HZ √√
1366×768 60HZ 30HZ √√
1400×1050 60HZ 30HZ √√
1440×900 60HZ 30HZ √√
1600×900 60HZ 30HZ √√
1680×1050 60HZ 30HZ √√
1920×1080 60HZ 60HZ √√
1920×1220 / 30HZ / √
1920×1440 / 30HZ / √
2048×1152 / 30HZ / √
2048×1536 / 30HZ / √
2560×1600 / 30HZ / √
2560×1920 / 30HZ / √
2560×2048 / 30HZ / √
2840×2160 / 30HZ / √
4096×2160 / 30HZ / √
Operating Instructions
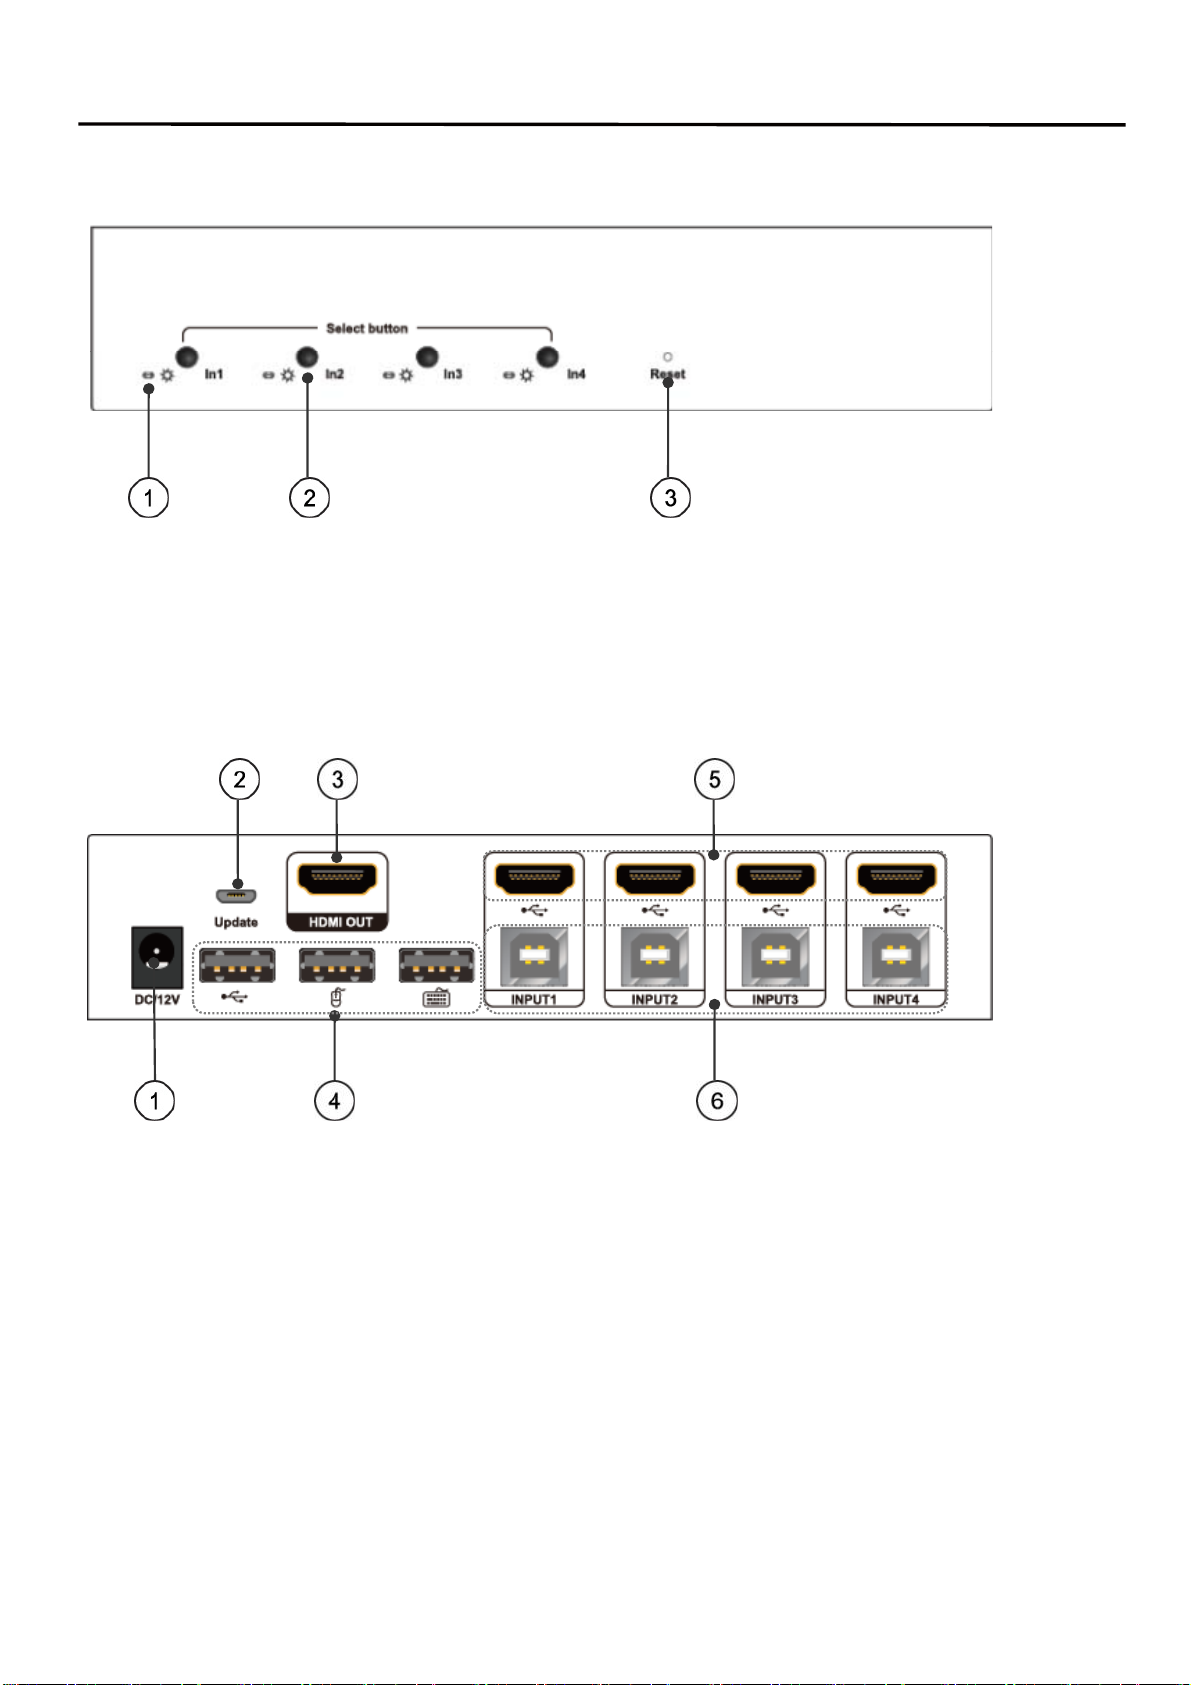
PANEL DESCRIPTIONS
Front Panel
1) Bi-coloured light
(Green Status = USB connected Red Status = HDMI connected
Orange Status = USB + HDMI connected)
2) Select button(Reset & Swith). 3) Rest status indication.
Back Panel
1) 12V DC power input. 2) Upgrading the firmware
3) HDMI out port. 4) USB keyboard and mouse output ports.
5) HDMI in ports. 6) USB keyboard and mouse input ports.
Connecting and Operating
(1) Connect all the PCs to the HDMI KVM switch, then start all the PCs.
(2) After all the PCs are started in step 1, then you can switch to any PC by keyboard hot key or the
key pad on the KVM panel. (For example, if you want to control the PC connected to HDMI IN 2
just press the key under the PORT 2 LED indicator, or the keyboard hot key commands described
following).
5

Operating Instructions
CONNECTION DIAGRAM
HOW TO USE KEYBOARD HOT KEYS:
1) Press Scroll Lock key twice will enter Hot Keys Mode. then the buzzer will ring once. Scroll
Lock + Scroll Lock + Corresponding instruction. The buzzer will ring again after the hot key
input is completed.
Noted: Hot Key mode will exit without the following key input in 10S
6

Operating Instruction
FAQ
Problems Solutions
Keyboard and mouse don’t work at all no
matter which input port is switched to
Try below ways:
1. Unplug and plug the USB keyboard and mouse
2. Make sure the USB cable connections from KVM
switch to host devices are all correct
3. Reset the KVM switch by press RESET key
4. Unplug and plug the power cord of the KVM switch
then press RESET key
5. Make sure the precision of the mouse is less than
2000DPI
Only after switch to some input port the
keyboard and mouse don’t work
Make sure the USB cable connection from KVM
switch to host devices is correct and the USB cable
isn’t broken
Mouse is slowed down/lag/delayed in
Windows 95/98/2000 system
1. Go to device manager of the Windows, make sure
the KVM USB device is recognized by Windows, if
not, go to Windows control panel and add new
hardware manually
2. After KVM USB device is recognized by Windows,
install USB drivers in Windows device manager
MAINTENANCE
Clean this unit with a soft, dry cloth. Never use alcohol, paint thinner of benzine to clean this unit.
PRODUCT SERVICE
1) Damage requiring service: The unit should be serviced by qualified service personnel if:
(a)The DC power supply cord or AC adaptor has been damaged;
(b)Objects or liquids have gotten into the unit;
(c)The unit has been exposed to rain;
(d)The unit does not operate normally or exhibits a marked change in performance;
(e)The unit has been dropped or the cabinet damaged.
2) Servicing Personnel: Do not attempt to service the unit beyond that described in these
operating instructions. Refer all other servicing to authorized servicing personnel.
3) Replacement parts: When parts need replacing ensure the service uses parts specified by the
manufacturer or parts that have the same characteristics as the original parts. Unauthorized
substitutes may result in fire, electric shock, or other hazards.
4) Safety check: After repairs or service, ask the service to perform safety checks to confirm that
the unit is in proper working condition.
7

Operating Instruction
WARRANTY
If your product does not work properly because of a defect in materials or workmanship, our
Company (referred to as "the warrantor" ) will , for the length of the period indicated as below,
(Parts(2)Year ,Labor(90) Days) which starts with the date of original purchase ("Limited
Warranty period"), at its option either(a) repair your product with new or refurbished parts, or (b)
replace it with a new of a refurbished product. The decision to repair or replace will be made by the
warrantor.
During the "Labor" Limited Warranty period there will be no charge for labor.
During the "Parts" warranty period, there will be no charge for parts. You must mail-in your
product during the warranty period. This Limited Warranty is extended only to the original
purchaser and only covers product purchased as new. A purchase receipt or other proof of original
purchase date is required for Limited Warranty service.
Mail-In Service
When shipping the unit carefully pack and send it prepaid, adequately insured and preferably in the
original carton. Include a letter detailing the complaint and provide a day time phone and/or email
address where you can be reached.
LIMITED WARRANTY LIMITS AND EXCLUSIONS
1) This Limited Warranty ONLY COVERS failures due to defects in materials or workmanship,
and DOES NOT COVER normal wear and tear or cosmetic damage. The Limited Warranty ALSO
DOES NOT COVER damages which occurred in shipment, or failures which are caused by
products not supplied by warrantor, or failures which result from accidents, misuse, abuse, neglect,
mishandling, misapplication, alteration, faulty installation, set-up adjustments, maladjustment of
consumer controls, improper maintenance, power line surge, lightning damage, modification, or
service by anyone other than a Factory Service center or other Authorized Service, or damage that
is attributable to acts of God.
2) THERE ARE NO EXPRESS WARRANTIES EXCEPT AS LISTED UNDER "LIMITED
WARRANTY COVERAGE".THE WARRANTOR IS NOT LIABLE FOR INCIDENTAL OR
CONSEQUENTIAL DAMAGES RESULTING FROM THE USE OF THIS PRODUCT, OR
ARISING OUT OF ANY BREACH OF THIS WARRNTY. (As examples, this excludes damages
for lost time, cost of having someone remove or re-install an installed unit if applicable, travel to
and from the service, loss of or damage to media or images, data or other recorded content. The
items listed are not exclusive, but are for illustration only.)
3) PARTS AND SERVICE, WHICH ARE NOT COVERED BY THIS LIMITED WARRANTY,
ARE YOUR RESPONSIBILITY.
8
Table of contents
Other DirekTronik Switch manuals

DirekTronik
DirekTronik SM-MST-2D User manual

DirekTronik
DirekTronik 20100851 User manual

DirekTronik
DirekTronik 25-0390 User manual

DirekTronik
DirekTronik TS0800G-2S-SE User manual

DirekTronik
DirekTronik HDR10 User manual

DirekTronik
DirekTronik 20102192 User manual

DirekTronik
DirekTronik 20114297 User manual

DirekTronik
DirekTronik SX-SWE01B User manual


