Disc Blu-Safe User manual

V1.2
The universal mini archiving system for everyone
EN

2
1. Contents
1. Contents 2
2. Explanation of symbols 2
3. Guarantee 3
4 Safety information 3
4.1. General safety information 3
4.2. Safety information about Blu-safe® 4
4.3. Safety information about the Media 5
5. Overview of Blu-safe®and contents of delivery 6
5.1. Front view of Blu-safe® 6
5.2. Rear view of Blu-safe® 6
5.3. Accessories 7
6. Connection and operation of Blu-safe®8
6.1. Unpacking Blu-safe® 8
6.2. Preparing Blu-safe® 9
6.3. Connecting Blu-safe® 10
6.4. Setting up Blu-safe® 10
6.5. Operation 11
7. Windows 2003 / Windows XP
Installation and operating software 12
7.1 Driver installation 12
7.2 Setup DISC Blu-safe® Manager 16
7.3 Setting up an archive 21
8. Windows Vista
Installation and operating software 25
8.1 Driver installation 25
8.2 Setup DISC Blu-safe® Manager 30
8.3 Setting up an archive 35
9. Correcting errors 39
10. Care, disposal 40
10.1 Care and cleaning 40
10.2 Recycling and disposal 40
11. Technical data and appendix 41
11.1. Hardware 41
11.2. System requirements 42
11.3. Appendix 43
2. Explanation of symbols
Attention!
In order to prevent damage,
this instruction must
always be observed.
Note/Tip
This always refers to
features or offers a tip.
Control
A control or performance
test must be performed here.
Reference
This is a reference to
another source of
information

3
3. Guarantee
■■ Thank you for choosing the archiving system
Blu-safe®from DISC - a good choice!
■■ Blu-safe®is a universal data archiving system
which uses optical Medien and which can be used
as a player device.
■■ Please read the User Manual befor use. The perform-
ance and security of the product can only be guaran-
teed by following the notes in the User Manual.
■■ Please note the information and instructions on the
installation CD.
■■ Do not open the DISC Blu-safe®device. Opening the
DISC Blu-safe®voids the warranty.
■■ DISC accepts no responsibility for lost or damaged
data. The user accepts full responsibility for the data
and has no claim for compensation in case of conse-
quential damage or loss of said data.
■■ Blu-safe®supports the following formats:
- Blu-ray (read and write)
- DVD (read only)
- CD (read only)
■■ For a perfect read and write operation, we
recommend Panasonic Medien, as the
Blu-safe®device is fitted with a Panasonic drive.
e.g.:
- Panasonic BD-R25
- Panasonic BD-R50
- Panasonic BD-RE25
- Panasonic BD-RE50
■■ Maintenance Services and other information can be
found on our website:
http://www.disc-group.com
4. Safety information
4.1. General safety information
■■ The Blu-safe®and the mains adapter must never
be opened. Unauthorised opening can result in a
risk of electric shocks and class 3b laser radiation.
■■ The Blu-safe®is fitted with a laser unit. When
unopened, the device fulfils the requirements for la-
ser class 1. Laser radiation is dangerous to the
eyes. Laser radiation must not be directed at body
parts.
■■ After transport, the Blu-safe®must be allowed to
reach ambient temperature before being used.
Condensation from rapid changes temperature can
cause electrical short circuits inside the Blu-safe®.
■■ The Blu-safe®may only be used with the accesso-
ries supplied. Only the enclosed cables may be
used.
■■ The cables must be arranged such that they are not
damaged or represent a risk.
■■ The mains adapter may only be operated with
cables corresponding to the VDE requirements
(Mains cables, extension cables).
■■ The mains adapter may only be connected to
earthed sockets with AC 100-240V~, 50/60Hz.
■■ To avoid damage to the Blu-safe® and the mains
adapter, the mains plug must always be discon-
nected from the mains socket before unplugging
the mains cable from the Blu-safe®.
■■ The Blu-safe®must never be moved while in use.
■■ The slots and openings on the Blu-safe®serve as
ventilation and must not be covered. Objects must
not be inserted through the slots and openings into
the Blu-safe®.
■■ Repairs may only be carried out by the manufac-
turer.
■■ The Blu-safe®and the packaging must be kept out
of reach of children.

4
4.2. Safety information about the
Blu-safe®
■■ Please ensure that the Blu-safe®is in a horizontal
position and is positioned on a stable, flat, vibration-
free base.
■■ Avoid large changes in temperature, humidity, dust
and direct sunlight.
■■ Never open the Blu-safe®.
Note:
The Blu-safe® comes with a guaran-
tee seal. A damaged seal invalidates
the guarantee.
■■ Never use force (e.g. to open the mailslot).

5
■■ Please ensure that there are no foreign objects
(e.g. pieces of paper or paper clips) in the mailslot.
4.3. Safety information about the
Media
■■ Always handle the Medien with care.
■■ Avoid fingerprints on the discs. To this end, only
touch the Medien on the edge or at the central hole.
■■ Only use clean Medien in perfect condition. Defec-
tive or scratched Medien must not be inserted into
the Blu-safe®.
■■ Always insert the Medien into the Blu-safe®the right
way up (printed side up).
■■ Do not use Medien with a sticker.
■■ Only use standard format Medien (120 mm).
Different formats with adapter discs can damage the
device.
■■ Let the Media gently fall into the correct mailslot
position. Pressure on the mailslot can damage the
Media and the mailslot.

6
5. Overview of Blu-safe®and
contents of delivery
5.1. Front view of Blu-safe®
■■ Casing
■■ Mailslot with lights
■■ 15 LEDs with lights
■■ Power switch
5.2. Rear view of Blu-safe®
■■ Mains adapter connection (5-pin socket)
■■ USB connection (end device layout)
■■ Transportation Clamp (plastic pin in the under-
side of the casing)

7
5.3. Accessories
Enclosed box
■■ Mains adapter with fixed cable (5-pin socket) for
connecting to the Blu-safe®
■■ USB cable for connecting the Blu-safe®
and PC
■■ Mains cable
Enclosed pack
■■ CD-ROM with software, Blu-safe® Manager Manual
and User manual
■■ User manual
■■ Cover

8
6. Connection and operation
of Blu-safe®
6.1. Unpacking the Blu-safe®
■■ Please ensure right way up before unpacking
("Top" sticker).
■■ Remove the transport corners.
■■ Remove the contents from the packaging one at a
time in the prescribed order.
- Enclosed pack
- Blu-safe®
- Enclosed box
■■ Check the contents. If something is missing, please
contact our service department.
Tip:
Keep the original packaging in case the
Blu-safe®has to be returned.

9
6.2. Preparing Blu-safe®
■■ Position the Blu-safe®in the required location.
■■ Remove the adhesive strips in the direction of the
arrow from the mailslot and from the transport pro-
tection.
■■ Remove the transport protection from beneath the
Blu-safe®.
■■ Close the opening with the cover.
Attention!
In order to prevent damaging the Blu-safe®
during transport, the Medien must be re-
moved and the transport protection re-
placed.

10
6.3. Connecting Blu-safe®
Note:
Only 1 Blu-safe® device can be con-
nected per PC.
■■ Connect the 5-pin socket cable from the mains
adapter to the Blu-safe®.
■■ Connect the Blu-safe®and PC using the enclosed
USB cable (shorter than 3 metres).
■■ Connect the mains adapter and plug using a Mains
cable.
6.4. Setting up Blu-safe®
■■ Switch on the mains adapter.
■■ Switch on the Blu-safe®with the power switch.
■■ Start the connected PC. The Blu-safe® is automati-
cally detected by the PC. A request to install the
necessary drivers appears. The accompanying soft-
ware and all necessary drivers are on the enclosed
CD-ROM.
Reference:
Installation and operation of the soft-
ware are described in chapters
7 and 8.

11
6.5. Operation
■■ The Blu-safe® is fitted with 15 media slots. There is
one LED for each media slot.
■■ The LED lights up if the corresponding media slot is
occupied by a Media.
■■ The LED flashes if this Media is being written to or
read from.
■■ The Blu-safe®is fitted with a mailslot for loading /
unloading media..
■■ The mailslot lights are an if the Blu-safe®is in use.
■■ The mailslot lights flash when it is opening or
closing.
■■ The mailslot is opened via a corresponding com-
mand on the PC.
Note:
The mailslot is not motor-driven. It
springs open and must be fully opened
manually and likewise pushed shut
against the spring clip.
12
7. Installation and operation
Windows 2003
Windows XP
■■ Please note the system requirements before
installation.
Reference:
The system requirements are de-
scribed in chapter 11.
Detailed explanations about DISC Blu-
safe®Manager and its set up and use
are contained in the DISC Blu-safe®
Manager Administrator Manual, in-
cluded as a PDF document on the en-
closed CD.
7.1 Windows 2003
Windows XP
driver installation
This document describes the installation process for
the Blu-safe®driver software for Windows XP and
explains what to do if the installation cannot be
performed as planned.
The software runs on Windows 2003 and XP (32 bit).
The driver is installed in two stages:
1. USB driver
2. COM driver
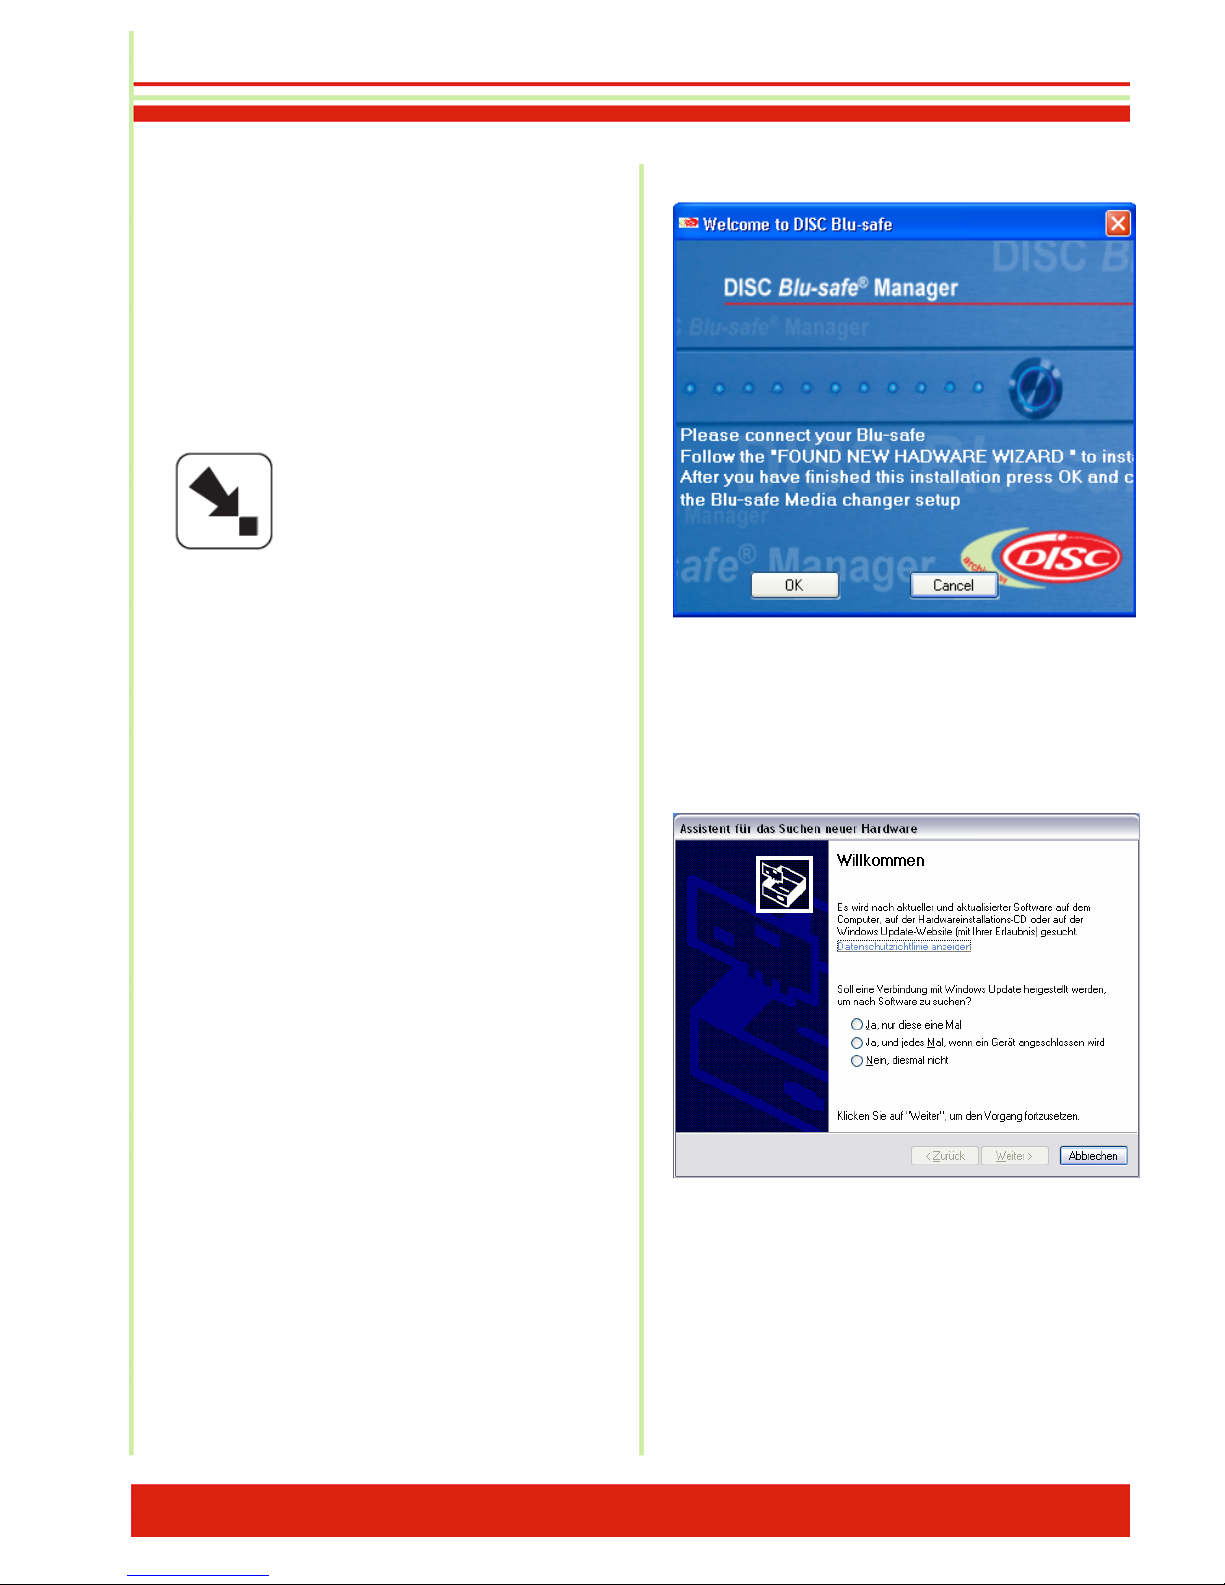
When the supplied Blu-safe®CD is inserted, the
Installations Wizard welcome message is displayed.
Attention: Do not click on OK before
performing the next step!
As soon as you connect the DISC Blu-safe®device
to your PC with the USB cable provided, the
Windows Assistant for finding new hardware opens.
Please select "No, not this time" in order to prevent
Windows looking for the driver software in the internet
and click on "Continue".

13
Select the option "Install the software automatically".
Click on "Next".
Select the driver for your Windows version (XP or Vista
or 2003).
If the Microsoft message about an unverified driver
appears, click on "Continue anyway".
The USB drivers are now installed – click on
"Complete" and continue with the installation of the
automatic USB Serial Port (COM) driver.
- Select Install the software automatically and click on
"Next" to continue.
- If the Microsoft warning appears, confirm that you
want to continue anyway.
- Click on "Complete" in order to complete this
second part of the driver installation. The help
message on the taskbar should now inform you that
the new hardware is installed and ready to use.

14
Now click on OK in the Blu-safe®Installation Assistant
window ("Welcome to DISC Blu-safe®" window, which
opened after the provided Blu-safe®CD was inserted).

15
Click on "Next" to continue and follow the Blu-safe®
Installation Wizard.
After completion, restart your PC.
After restarting your PC, the DISC Blu-safe®Manager
Installations Assistant starts automatically.
A progress chart is displayed during the installation.
Please wait until the second-clock is at zero or the
display bar is completely full.
At the end, the setup program automatically starts the
Blu-safe®Manager and checks the Blu-safe®. This
process lasts up to 5 minutes.
If a request to restart the PC is still visible on the screen
during this time, please click on "Restart later" or simply
close this message in order to complete the installation
and configuration of the DISC Blu-safe®Manager
program first.

16
7.2 Setup DISC Blu-safe®Manager
(Windows 2003 and Windows XP)
Click on "Next"
Please accept the "Licence Agreement" in the following
window.
If you reject the licence agreement, the installation is
cancelled at this point.

17
The installation path for installing the program
components of the DISC Blu-safe®Manager is
displayed in the next window. If you want a path
other than the default directory, please select it here
and/or click on "Next".
Please follow the link in the License Settings window or
copy the internet address into your browser.
In order to prevent abuse, the Blu-safe®registration
site is password-protected. In the window in the
Assistant, please enter DISC as the username and
Blu-safe as the password.
After entering your user information and the serial
number, together with the Product Key, a "Licence Key"
is generated which you transfer (copy & paste) into the
corresponding field in the Blu-safe Installation Assistant
Licence Settings window.
If you do not have internet access, you can cancel the
installation at this point and contact your dealer or send
the serial number and product key to
support@disc-group.com.
The licence key is then emailed to you.
After receiving the licence key you can continue with
the installation from this point.

18
In the "Device Properties" window you can choose
whether your DISC Blu-safe®is to be used exclusively
as an archive device or as a separate Blu-ray drive as
well.
By selecting "Use slot 15 as User Slot" you choose 1
media slot (slot 15) to be used as a drive under
Windows. As a result, only 14 media slots (= 700 GB)
are available online for archiving using the Blu-safe®
Manager.
In the Administration window of the Blu-safe®Manager
you can then activate this individual slot later, import
BDs, DVDs or CDs and use them independently of the
Blu-safe®Manager via the Windows Desktop (e.g. in
order to view an HD film on a Blu-ray disc or to import
externally burned data)
If you leave the check box "Use slot 15 as user slot"
open, all 15 media slots are reserved for archiving on
BD media by the Blu-safe®Manager. I.e., in this case
the DISC Blu-safe®cannot be used as a multimedia
drive.
Please wait while the DISC Blu-safe®is actived.

19
Note:
For archiving purposes,
DISC Blu-safe® exclusively supports
secure 25 GB and 50 GB Blu-ray disc
media. For security reasons, the use of
DVDs or CDs is excluded for archiving.
CDs and DVDs can only be used by
setting up the 15th slot as a user slot
(cross in the check box) outside the
archiving functionality.
Pleas import one or more blank Blu-ray media.
After Import of the Blu-ray media, the DISC Blu-safe®
will check all imported media.
DISC Blu-safe®Manager is now ready to setup the first
Archive.
Please speify a name for the Archive and the directory
you want to archive.

20
DISC Blu-safe®Manager is now creating your first
Archive.
Your DISC Blu-safe®is now installed and the DISC Blu-
safe®Manager controls and automatically archives the
data in the specified folder.
Table of contents
Other Disc Storage manuals

Popular Storage manuals by other brands


Solinst
Solinst Leveloader Gold quick start guide

Angelbird
Angelbird SSD2go pocket user manual

Hewlett Packard Enterprise
Hewlett Packard Enterprise AF20 Hardware guide

LaCie
LaCie Hard Drive user manual

Western Digital
Western Digital WDBAAA2500Axx - My Passport Essential install guide

IBM
IBM System Storage DS4000 EXP420 installation, user and maintenance instructions