Discovery Channel STX7500 User manual
1608 Fourth Street
Berkeley, CA 94710
tel: (510) 558-6441
Filename: DIscAdult
_
weather4
_
STX7500
_
Instr.indd
DiscAdult_Weather 4_STX7500_inst1 1 2/2/07 2:49:16 PM

2 3
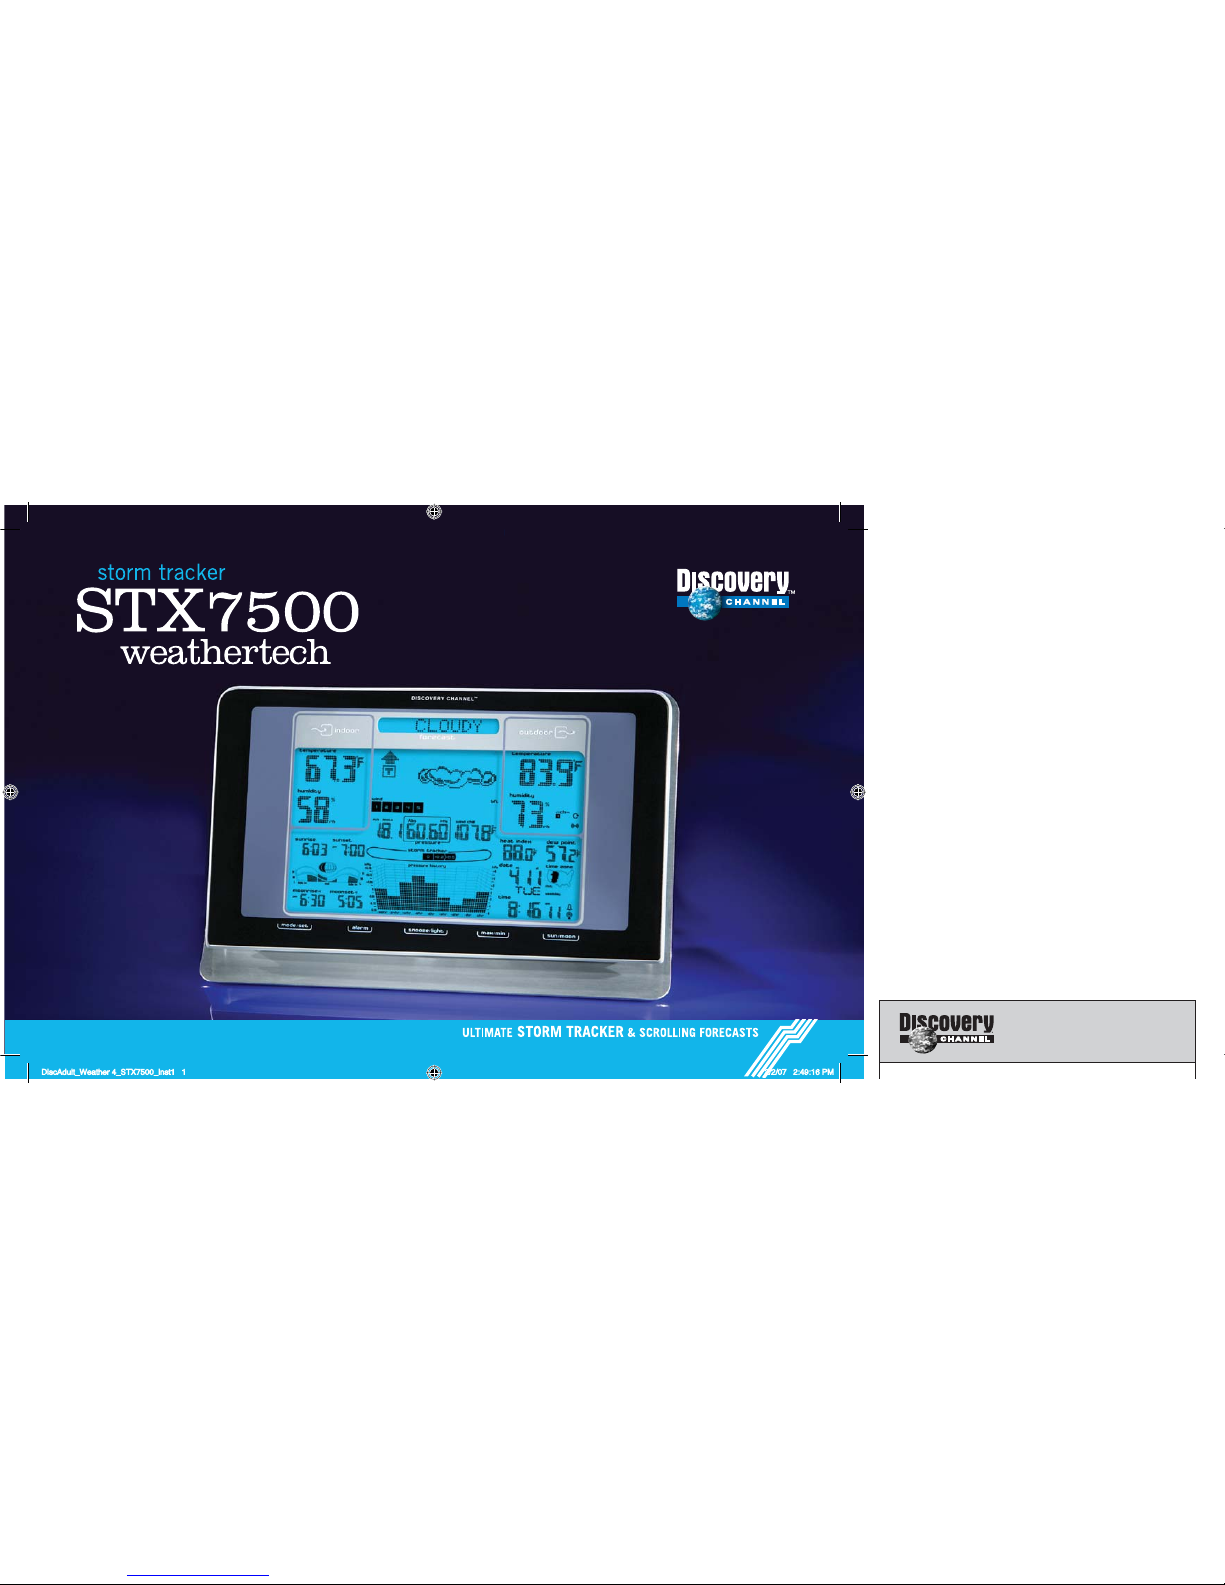
The WeatherTech STX7500 is our top-line home weather station. It has comprehensive weather data for you — including 30-hour barometric pressure, forecasts, dew point, wind chill,
tidal reports, sunrise, moonrise and more. The STX7500 also has elegant info delivery, with a clear, easy to read blue screen showing scrolling weather alerts.
Set up is simple
1. Place the main station in your home — the bright back-light makes it a perfect alarm clock, or the mounting brackets make it perfect for any wall.
2. Program the main station.
3. Place the remote sensor outside your home.
4. Access your weather data anytime at a glance.
Set up your remote sensor
Your first step is to set up the STX7500 remote sensor. The remote device will read external conditions and automatically send them to the main station inside your home.
1. Open up the back panel of the remote sensor and add two AA (1.5V) batteries (not included).
2. Just above the batteries is a switch which lets you choose which “channel” to broadcast on. Unless you plan to have multiple remote devices (which is unlikely), just keep the
setting on channel 1.
3. Find the button which is marked C/F, for Celsius or Fahrenheit, located on the back of the unit. Choose the temperature metric that you would prefer by pressing the button until your
preference is displayed.
Set up your anemometer
Your second step is to set up your STX7500 wind anemometer.
1. Mount your wind anemometer near your outdoor sensor.
2. Attach it to your outdoor sensor by connecting the included cable.
Includes
• STX7500 Weather station
• 1 Remote temperature and humidity sensor
• 1 Wind anemometer
• 1 AC Adapter – adapter rated 120V AC, 60Hz input,
6.0 V DC, 500mA output
Air pressure
tendency arrow
Scrolling forecast
Indoor
temperature
Indoor
humidity
WWVB
Reception
indicator
Forecast icon
Outdoor (remote)
temperature
Outdoor
(remote)
humidity
Radio-controlled
time
Outdoor wind
chill
Barometric air
pressure
Tide indicator
Moon phase
indicator
Sunrise and sunset
time for selected
areas
Moonrise and moonset time
for selected areas
Outdoor wind
speed
Day and date
Outdoor dew
point
Outdoor heat
index
Barometric
history graph
Touch panel
functionality
DiscAdult_Weather 4_STX7500_inst2-3 2-3 2/2/07 2:49:24 PM

4
5
Set up your main station
Your third step is to set up and program your STX7500 main station. You will set the current weather, location, and other settings.
Programming the main unit
1. Open up the battery panel of the main station device and add four AA (1.5V) batteries (not included). The unit can also be operated using the supplied AC adaptor. Plug the barrel
end of the adaptor into the jack located on the bottom of the STX7500; plug the other end into a wall outlet.
2. Main unit will light up entire display, and a sound will tell you unit is defaulting to initial settings.
3. DO NOT TOUCH ANY BUTTONS FOR 10 MINUTES, WHILE THE STATION LOOKS FOR THE OUTDOOR SENSOR AND SCANS FOR THE WWVB SIGNAL.
4. The two devices will begin communicating in this time. You should see the main station pick up a temperature and channel reading. This shows that the two devices are in
communication.
5. Place the remote device outside the house.
a. Fog and mist will not harm your remote sensor, but direct rain should be avoided.
b. The sensor has a range of 30 meters, but intervening walls will lower that number. An outdoor wall or window may have a 20 to 30 foot resistance.
c. Consider mounting your device on an outside wall, directly opposite to the room where you plan to have your main station.
6. Once you have placed your outdoor sensor, check the main station to make sure the two devices are still communicating.
Setting the Weather
To begin, you must input the current weather conditions outside your house. This is because the forecaster technology works using current conditions to predict future conditions.
1. Immediately after set up, the weather icon will be flashing for 15 seconds.
2. Press “+” or “-” on the back of the unit to input the correct weather outside. It is recommended that you set your first forecast based on a local weather report.
3. Once you have established current weather, press the “REL/ABS” button, located on the back of the unit, again to exit
4. The main station will start to forecast 6 hours after the current weather is entered.
5. When the main station begins forecasting, you will see one of 6 different symbols in the weather forecast. This is your forecast for your area. The forecast is for 6 hours ahead.
6. At any time you can reset the weather forecast by holding down the “REL/ABS” button for 3 seconds. Then follow steps 2 and 3 again to set the new forecast.
7. When setting the weather, please note:
a. If the outdoor sensor reads below 0°C and you have input the weather to “rain” or “heavy rain” then your main station will display snow
b. The weather conditions should be reset if you change the altitude.
Setting Clock Automatically
After the main station has finished searching for the remote sensor, it will proceed to scan for the “WWVB” signal — this is an atomic clock transmission which is sent all across the
United States.
1. Buttons will not function while station is scanning for WWVB time signal.
2. While scanning the RCC icon will flash on the main station.
3. When the RCC icon stops flashing, the main station has successful updated with the correct time.
a. Your main station will automatically rescan for WWVB time signal every night at 2:00 a.m.. If the first attempt fails, station will scan again at 3:00, 4:00, and 5:00 a.m.
b. To manually start a new time scan, press and hold the “RCC” button, located on the back of the unit, for 3 seconds.
4. If the reception fails, the RCC icon will disappear.
a. If reception fails, the main station will attempt to rescan for signal 4 times. Each time takes about 10 minutes.
b. If reception fails all four times, you can manually enter time (see next section). However, it’s best to let the main station attempt to automatically search for a signal for one
24 hour period.
5. You will see “DST” on the main display if clock is in Daylight Savings Time.
About the WWVB Signal
The NIST (National Institute of Standards and Technology) radio station, called WWVB, is located in Ft. Collins, Colorado. A team of atomic physicists continually measure every second
of every day to an accuracy of ten billionths of a second a day. That’s quite a clock! The team transmits the WWVB time continuously throughout the United States, and this signal can
be received up to 2000 miles away by your main station. However, transmission is best at night, which is why your main station will attempt to update every night at 2:00 a.m.
For more info visit the NIST website at: www.boulder.nist.gov/stations/wwvb.htm
DiscAdult_Weather 4_STX7500_inst4-5 4-5 2/2/07 2:49:24 PM

6
7
Setting Your Location and Setting Clock Manually
If your main station did not pick up the correct time from the WWVB transmission, you can set the time manually.
1. Hold the “MODE/SET” button for 3 seconds to enter Clock/Calendar Mode.
2. Press “+” or “-” button located on the back of the unit to adjust the setting, and press “MODE/SET” button to confirm and continue.
3. Every time you press the “MODE/SET” button you will step to the next setting in the sequence, following this order: Hour, Minute, Second, Year, Month-Day format, Month, Day,
Country, City.
4. You will exit out of the time setting mode automatically after 15 seconds.
Setting Sunrise/Sunset & Moonrise/Moonset
Your STX7500 main station will automatically calculate the sunrise and sunset once it knows the time and day and the “Country” and “City”.
1. Press “SUN/MOON” button to display hours the sun will be above the horizon.
2. If moonrise or moonset occur next day, then readout will display “MOONRISE +1” or “MOONSET +1”.
Sunrise/Sunset & Moonrise/Moonset Quick Check Mode
You can view Sunrise/Sunset and Moonrise/Moonset in any location you want – not only your home location.
1. Hold “SUN/MOON” button for 3 seconds to enter Quick Check Mode.
2. The location will begin to blink.
3. Press “+” or “-”, located on back of unit, to enter the “Country”, “City”, “Month” and “Day” which you would like to check.
4. Press “SUN/MOON” button to confirm.
5. The Sunrise/Sunset and Moonrise/Moonset time blinks while main station computes.
6. When blinking stops, the main station has computed the times for the location and calendar you requested.
7. The middle letter of the location will continue to blink, telling you that station is still showing Quick Check Mode.
8. Press “SUN/MOON” or wait 15 seconds to exit Quick Check Mode.
12/24 Hour Display Mode
Press “+(12/24)” button located on back of unit to select 12 or 24 hour mode.
Using the Alarm Clock
1. Press “ALARM” button to view first the Alarm Time, then press again to turn alarm on ( icon will show on your main display), or alarm off (icon will not show).
2. After you have turned alarm on or off, press “ALARM” again or wait ten seconds to confirm setting.
3. To set the alarm time, hold “ALARM” button for 3 seconds.
4. Press “+” or “-”, located on the back of the unit, to adjust alarm time.
5. Press “ALARM” button to confirm time.
6. When alarm sounds, press the “SNOOZE/LIGHT” button to put alarm to sleep for 5 minutes. This can be repeated seven times before the alarm turns off permanently.
7. Press and hold the “SNOOZE/LIGHT” button for 3 seconds to turn alarm off permanently.
DiscAdult_Weather 4_STX7500_inst6-7 6-7 2/2/07 2:49:24 PM

8
9
Mounting
Note: Before permanently mounting ensure that the STX7500 main unit is able to receive the WWVB signals from desired location. Also, extreme and sudden changes in temperature will decrease the
accuracy of the indoor weather station. To achieve true temperature readings, avoid mounting where direct sunlight can reach the remote temperature and humidity sensor or indoor weather station. While
the remote temperature and humidity sensor is weather proof, you should avoid setting up the sensor in an area that gets direct rain and also avoid submersion in water or snow. We recommend that you
mount the remote temperature and humidity sensor on an outside North-facing wall. Obstacles such as walls, concrete, and large metal objects can reduce the sensor range. Place both units in their desired
locations, and wait approximately 15 minutes before permanently mounting to ensure that there is proper reception. The main unit should display temperature readings within 5 minutes of setting up
both units.
The Remote Temperature and Humidity Sensor
1. Mounting with Screws
a. Fix the included screw into the desired wall, leaving approximately 3/16 of an inch (5mm) extended from the wall.
b. Place the remote temperature and humidity sensor onto the screw using the hanging hole on the backside.
The Wind Anemometer
1. Mounting with Screws
a. Place the wind anemometer near the remote temperature and humidity sensor. The two sensors will connect with the included cable.
b. Place the included screws through the holes at the base of the sensor and screw into the desired wall, making sure the wind anemometer is secure. It is recommended that you
mount the anemometer horizontally for best performance.
The Indoor Main Station
The indoor main station can be mounted in two ways:
• With the table stand or,
• On the wall with the use of a wall hanging screw (included).
1. Using the table stand
a. The indoor main station comes with a table stand already mounted. If you wish to use the table stand all that is required is to pull the stand out from the main unit and place
in an appropriate location.
2. Mounting with Screws
a. Fix the included screw into the desired wall, leaving approximately 3/16 of an inch (5mm) extended from the wall.
b. Place the indoor main unit onto the screw using the hanging hole on the backside.
Reading the weather, forecast and wind speed
Scrolling Forecasts
Once set up, your main station will continuously scroll your forecasts across the top of the screen in
a 420 dot matrix display.
Storm Tracker
The main station displays the pressure change over the last 3 hours – a good reading to determine
a coming storm. If the forecast is for a storm, you will see a storm forecast on the scrolling
message, and you will also see storm in the weather icon.
Wind Speed
Wind speed in your STX7500 is measured in two ways:
1. In a bar display showing from 1-12 bft (Beaufort Number of Force) units. At right is a reference
chart to better understand how a bft unit relates to conventional speed measurements.
2. In km/h just below the bar display.
Wind gust speed is shown when the “WIND” button on the back of the unit is pressed.
Wind Chill
Wind chill is measured in either Celsius or Fahrenheit and is displayed below the wind bar display.
It shows the actual feel of the temperature when exposed to the current wind conditions.
Beaufort Number
of Force
Wind Speed
MPH KM/HR KNOTS
0<1 <1 <1
11-3 1-5 1-3
24-7 6-11 4-6
38-12 12-19 7-10
413-18 20-28 11-16
519-24 29-38 17-21
625 39-49 22-37
732-38 50-61 28-33
839-46 62-74 34-40
947-54 75-88 41-47
10 55-63 89-102 48-55
11 64-72 103-117 56-63
12 73+ 118+ 64+
DiscAdult_Weather 4_STX7500_inst8-9 8-9 2/2/07 2:49:24 PM

10
11
Seeing Your Pressure History Graph
The Barometric Pressure Reading at –30hr, -24hr, -12hr, –6hr, -3hr, -2hr, -1hr, 0hr is recorded and shown on the Barometric Pressure Bar Graph.
The Graph is displayed in both hPa (Hectopascal) and inHg (inches of mercury).
Data will be updated every hour.
Barometric Pressure
Press “Absolute/Relative” button located on the back of the unit to select Absolute or Relative pressure display. “Abs” is shown for Absolute pressure, “Rel” is shown for Relative
pressure (sea level).
“Absolute” is the actual pressure measured by the main unit.
“Relative” is sea level pressure.
Data will be updated every hour.
Checking High & Low Temperatures
1. Press “MAX/MIN” button to show the maximum recorded indoor or outdoor temperature. You will see MAX on the main display.
2. Press “MAX/MIN” button again to show the minimum recorded temperature. You will see MIN on the main display.
3. Hold “MAX/MIN” button for 3 seconds to clear the recorded maximum and minimum readings.
Low Batteries Indicator
When you see the low battery icon it means you should change the batteries.
•
•
•
•
•
•
Back Light
Press the “SNOOZE/LIGHT” button to turn on the back light for 5 seconds.
*If you desire to keep the back light on permanently, follow the directions below. Please note that keeping the back light on permanently will cause the back light to become dim
over time.
— Plug in the included AC adaptor into the jack on the bottom of the unit.
— Slide the switch on the bottom of the unit to turn the back light on.
Helpful hints
If the main station is not working properly, use a pin to press the reset button in the back.
Avoid placing the main station near interference — this can include computers, TV sets, or anything with a metal frame.
No buttons will function while main station is scanning for the remote sensor, or for the WWVB time transmission.
If you ever want to cancel what you are doing, wait 5 seconds and main station will default back to it’s primary screen.
Discovery facts
The fastest temperature change on record was in South Dakota, January 22, 1943. The mercury jumped from -4° to 45° F in just two minutes.
A computer performs more than 10 billion arithmetical operations to determine the 24 hour national weather forecast.
The highest temperature ever recorded in the United States was 134° F at Greenland Ranch in Death Valley, California.
Lightning strikes the Earth 100 times every second…generated by one of the 1,800 active thunderstorms around the planet on any given day.
Outdoor temperature can be estimated fairly accurately by timing the chirps of a cricket. Count the number of chirps in a 15 second period, add 37 to the total, and you’ll be quite
close to the Fahrenheit temperature.
•
•
•
•
•
•
•
•
•
DiscAdult_Weather 4_STX7500_inst10-11 10-11 2/2/07 2:49:25 PM

12
13
Battery warnings and cautions
Important Safety Instructions
When using this product, especially when children are present, basic safety precautions should be followed.
Read All Instructions Before Using
Battery warnings:
Do not use rechargeable batteries.
Non-rechargeable batteries are not to be recharged.
Do not mix old and new batteries.
Do not mix alkaline, standard (carbon-zinc), lithium, or rechargeable (nickel-cadmium) batteries.
Only batteries of the same equivalent type as recommended are to be used.
Batteries are to be inserted according to the correct polarity (+ and -). Incorrect insertion can damage the unit, provoke fire or cause the batteries to explode.
Dead or exhausted batteries are to be removed.
Do not throw batteries into a fire.
Do not attempt to open batteries.
The supply terminals are not to be short circuited.
Batteries are harmful if swallowed. Keep out of reach of young children.
Dispose of batteries safely, following guidelines for your area.
Care and maintenance:
Keep the product clean by wiping with a dry cloth.
The adaptor should be periodically examined for conditions that may result in fire, electric shock, or injury to persons and that, in an event of such conditions, the adaptor should not
be used until properly repaired.
•
•
•
•
•
•
•
•
•
•
•
•
•
•
Specifications
STX7500
Radio-controlled time signal 60KHz from Ft. Collins, CO.
Indoor weather station recommended 32°F to 122°F (0°C to 50°C)
operating temperature
Sunrise/set, Moonrise/set Jan. 1, 2007 through Dec. 31, 2099
and moon phase dates available
Temperature measuring range
Indoor 32°F to 122°F with 0.2°F resolution (0°C to 50°C with 0.1°C resolution)
“LL.L or HH.H” displayed if outside this range
Outdoor -4°F to 158°F with 0.2°F resolution (-20°C to 70°C with 0.1°C resolution)
“LL.L or HH.H” displayed if outside this range
Relative humidity range
Indoor 20% to 99% with 1% resolution, indoor weather station displays “--” if outside this range
Air pressure
Absolute hPa/in Hg 850 hPa to 1050 hPa (25.10 in Hg to 31.00 in Hg)
Relative hPa (adjustable) 850 hPa to 1050 hPa
Relative in Hg (adjustable) 25.10 in Hg to 31.00 in Hg
Sensitivity setting hPa 2 hPa to 4 hPa
Air pressure history For the past 30 hours
(0, -1, -3, -6, -12, -24, -30 hours)
DiscAdult_Weather 4_STX7500_inst12-13 12-13 2/2/07 2:49:25 PM
14
15
Wind
Wind speed measuring range 0 to 111.8 mph (0 to 50 m/s)
Wind Gust 0 to 111.8 mph (0 to 50 m/s)
Wind Chill -20°C to 50°C with 0.1°C resolution -4°F to 158°F with 0.2°F resolution “--.-” displayed if outside this range
Data checking intervals
Indoor temperature Every 10 seconds
Indoor humidity Every 10 seconds
Outdoor temperature Every 36 seconds
Outdoor humidity Every 36 seconds
Transmitter reading update (within sensor)
Outdoor temperature Every 36 seconds
Outdoor humidity Every 36 seconds
Transmission frequency 433.92 MHz
Transmission range 110 feet (30m)
Power supply
Weather Center 4 x AA (IEC LR6) 1.5 batteries or AC adaptor 120V AC, 60hz input, 6.0V DC, 500mA output
Thermo-Hygro Transmitter 2 x AA (IEC LR6) 1.5V batteries
Dimensions ( L x W x H )
Indoor weather station 266 x172x34mm
Remote thermo-hygro sensor 75x113x25mm
Wind anemometer 86x255x89mm
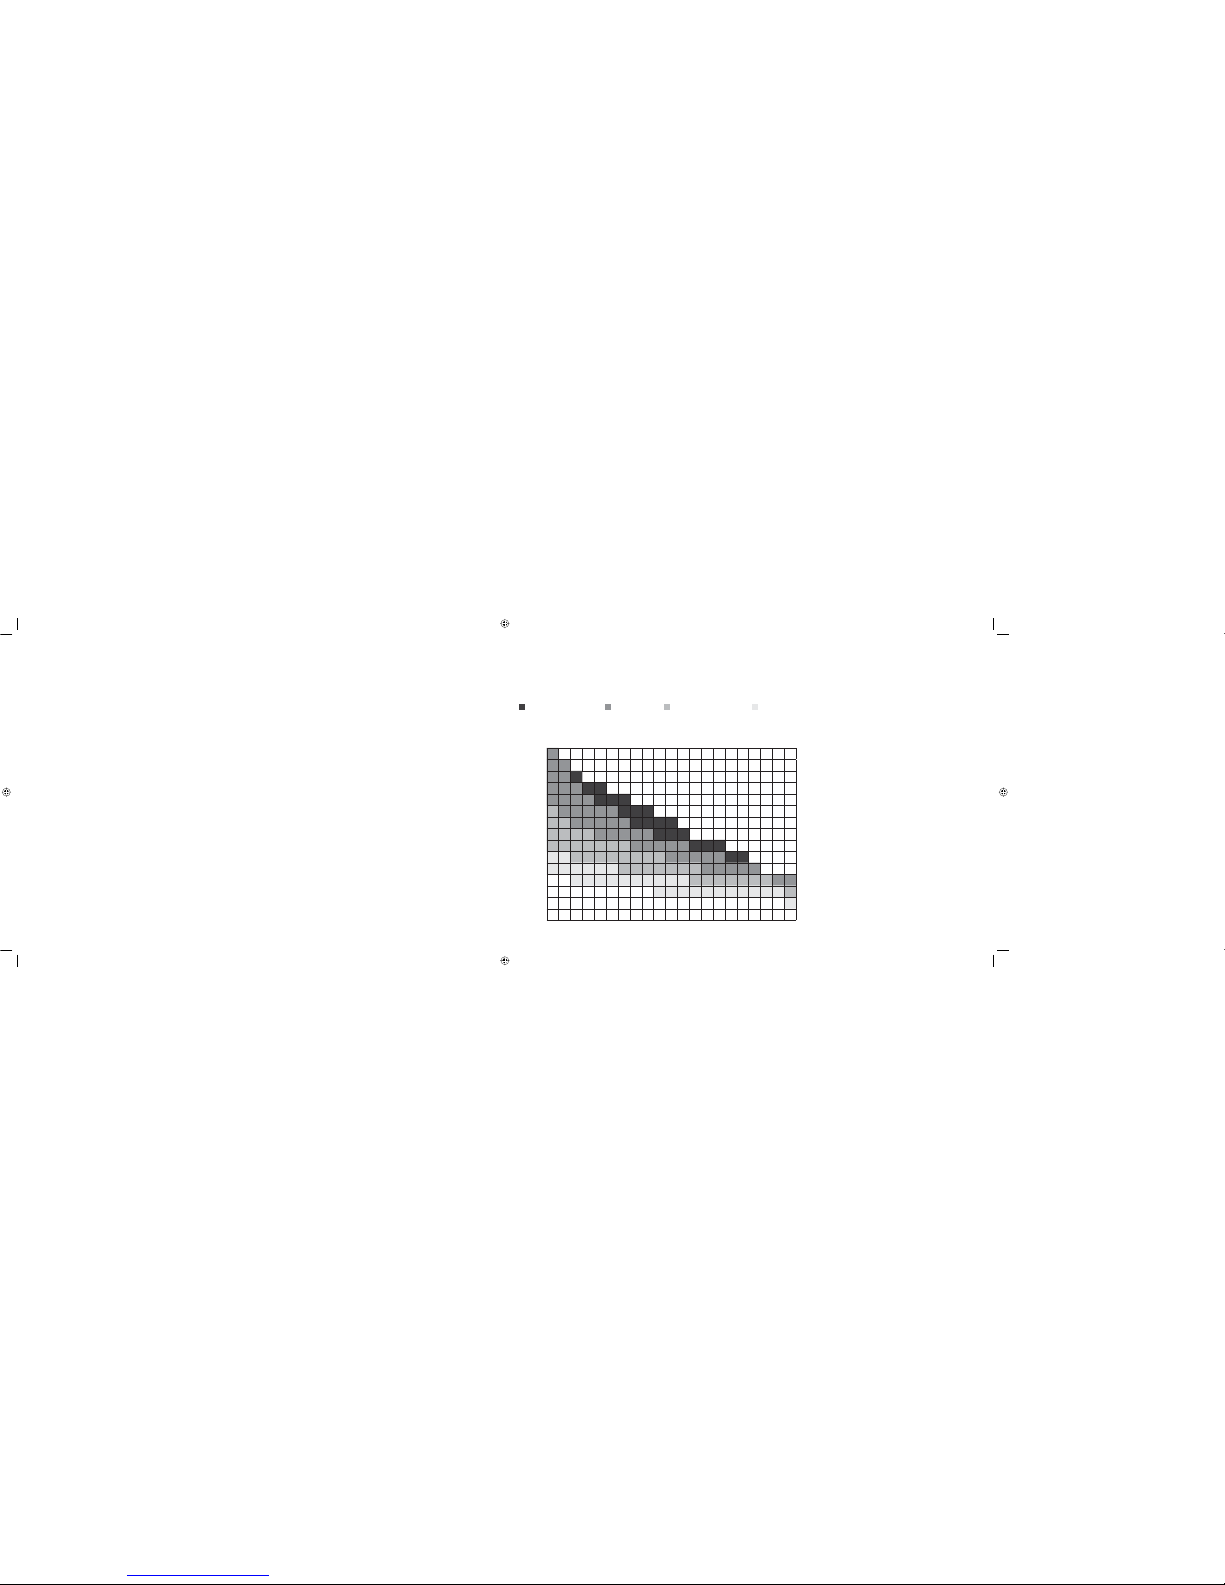
How temperature and humidity combine to make it feel hotter
Extreme danger Danger Extreme caution Caution
Heat and humidity chart
Here’s a quick way to calculate the heat index inside and outside —a combination of humidity and heat.
Relative humidity (percent)
Air temperatures (degrees Farenheit)
0 5 10 15 20 25 30 35 40 45 50 55 60 65 70 75 80 85 90 95 100
140 125
135 120 128
130 117 122 131
125 111 116 123 131 141
120 107 111 116 123 130 139 148
115 103 107 111 115 120 127 135 143 151
110 99 102 105 108 112 117 123 130 137 143 150
105 95 97 100 102 109 113 118 123 129 135 142 149
100 91 93 95 97 99 101 104 107 110 115 120 126 132 138 144
95 87 88 90 91 93 94 96 98 101 104 107 110 114 119 124 130 136
90 83 84 85 86 87 88 90 91 93 95 96 100 102 106 109 113 117 122
85 78 79 80 81 82 83 84 85 86 87 88 89 90 91 93 95 97 99 102 105 108
80 73 74 75 76 77 77 78 79 79 80 81 81 82 83 85 86 86 87 88 89 91
75 69 69 70 71 72 72 73 73 74 74 75 75 76 76 77 77 78 78 79 79 80
70 64 64 65 65 66 66 67 67 68 68 69 69 70 70 70 71 71 71 71 71 72
Apparent temperature is how hot the
heat-humidity combination makes it feel.
DiscAdult_Weather 4_STX7500_inst14-15 14-15 2/2/07 2:49:25 PM

16
17
Troubleshooting
Problem: No reception of WWVB time signal.
Solution: • Wait overnight for signal
• Be sure indoor thermo station is at least 1.8m (6 feet) from any electrical devices, such as televisions, computers, or other radio-controlled clocks.
• Remove batteries or unplug the adaptor for five minutes, reinsert and leave the unit alone overnight without pressing any buttons.
• If there are still problems, contact Discovery Channel.
Problem: Hour is incorrect (minute and date are correct).
Solution: • Be sure correct time zone and daylight savings time settings are selected.
Problem: The LCD is faint.
Solution: • Replace the batteries.
Problem: No outdoor temperature is displayed.
Solution: • Remove all batteries or unplug the adaptor, reinsert into remote temperature sensor first, then into the indoor thermo station.
• Place remote temperature sensor closer to the indoor thermo station.
• Be sure all batteries are fresh.
• Place remote temperature sensor and indoor thermo station in position so that the straight-line signal is not passing through more than two or three walls.
Problem: Temperatures do not match if units are placed next to each other.
Solution: Each temperature sensor is manufactured to be accurate to within 1 degree plus or minus and under normal conditions, so two sensors could be as much as 2 degrees
different. However, the difference can be exaggerated further because the sensors are designed for different working environments. The indoor sensor is less responsive to
ambient air currents because of the shielding effect of the display’s case. In addition, the case can act as a heat sink to absorb and store heat from external sources (i.e.
handling of the case or radiant heat). Also, the much greater range of the outdoor temperature sensor requires different calibration curve than the outdoor range. Error
is usually greater at the extreme ends of a range, making it harder to compare different ranges with different curves. Under non-laboratory conditions, it is difficult to
compensate for the above factors and obtain an accurate comparison.
FCC Disclaimer
This device complies with part 15 of the FCC Rules. Operation is subject to the following two conditions: (1) This device may not cause harmful interference, and (2) this device must
accept any interference received, including interference that may cause undesired operation.
Warning: Changes or modifications to this unit not expressly approved by the party responsible for compliance could void the user’s authority to operate the equipment.
NOTE: This equipment has been tsted and found to comply with the limits for a Class B digital device, pursuant to Part 15 of the FCC Rules. These limits are designed to provide
reasonable protection against harmful interference in a residential installation. This equipment generates, uses and can radiate radio frequency energy and, if not installed and used
in accordance with the instructions, may cause harmful interference to radio communications.
However, there is no guarantee that interference will not occur in a particular installation. If this equipment does cause harmful interference to radio or television reception, which can
be determined by turning the equipment off and on, the user is encouraged to try to correct the interference by one or more of the following measures:
Reorient or relocate the receiving antenna.
Increase the separation between the equipment and receiver.
Connect the equipment into an outlet on a circuit different from that to which the receiver is connected.
Consult the dealer or an experienced radio/TV technician for help.
•
•
•
•
DiscAdult_Weather 4_STX7500_inst16-17 16-17 2/2/07 2:49:25 PM

©2007 Discovery Communications, Inc. All rights reserved.
Discovery Channel and logo are trademarks of Discovery Communications, Inc.
Made in China for The Discovery Channel Store, Inc. Berkeley, CA 94710
For Customer Service or Questions call: 1-800-379-0244
Product and color may vary. A012507
DiscAdult_Weather 4_STX7500_inst18 18 2/2/07 2:49:27 PM
Table of contents
Other Discovery Channel Weather Station manuals


