Discus Potters Wheels User manual

Discus User Manual
DISCUS POTTERS WHEELS
User Manual

2
Discus User Manual
TABLE OF CONTENTS PAGE
Discus Welcome and Accessories 3
Important safety information 4
Preparing your Discus for use 5
How to connect up your Discus 6
Discus Bats 7
Product care, Guarantee and Service 8
Health and Safety information 9
Product technical specifications 10
Connecting a ‘Bump off’ Hand Controller 11
Connecting a Basic Hand Controller 12
Optional stand and shelf assembly and fitting 13
Further copies of this manual are available from Pottery Products Ltd
or can be downloaded from the Web site.
This manual is generic to all models and most instructions are relevant to all models.
The main variations are that the Compact models come without built in bowls and the Standard and basic Compact have
anticlockwise rotation only and are not fitted with a rotation direction switch.
The CE icon confirms that the conformity to EC standards has been met.

3
Discus User Manual
Discus Welcome
Thank you for purchasing a Discus Potters Wheel.
We aim to provide quality products for potters that are technically superior at a price that
enables everyone to experience the pleasure of creating their own works of art, whatever
their level of skill or ability.
Discus Potters Wheels have been manufactured in the UK for over twenty five years and
thousands of people across the world of all abilities now enjoy using them every day.
We have exported to over 16 countries including Argentina, Australia, Russia and Japan.
We hope you will enjoy working with your new Discus potters wheel and wish you excellent
throwing results!
We are committed to helping you make the most of your Discus by assisting whenever you
need help.
Please read these instructions carefully and if in doubt ask;
Helpline
Helpline: 01730 300762
email: [email protected]
Accessories
A full range of accessories and options are available to enhance your Discus.
Products include:
External plywood bats in various sizes
Mini bat system
Seats
Stands
Polishing machines
Hand Controllers (for special needs)
To order Discus accessories or for more information on any of our products please see our
website or call us.
www.discuspotterswheels.co.uk

4
Discus User Manual
Important Safety Information
Please observe the following to ensure your safety :
Read all instructions carefully before use and keep them in a safe place for future
reference.
We strongly recommend this product be used in conjunction with a Residual
Current circuit Breaker (RCD).
This machine is designed exclusively for working clay for the production of pottery.
Any other use will invalidate the guarantee.
Ensure the unit is placed on a level firm base before use, we recommend the Discus
stand.
It is dangerous to carry out modifications to the machine or have it serviced by
unqualified or unauthorised personnel. There are no user serviceable parts and
opening or dismantling the machine may invalidate the guarantee.
Children must be supervised at all times when using this equipment.
Foot pedals fitted with return springs must be used when operated by students,
schools and colleges.
Tie back any loose hair or clothing and remove loose jewellery before using this
equipment.
Do not immerse any of the units in water and ensure the splash pan is properly drained
to avoid over filling, causing water to enter the motor compartment.
The splash pan is designed to retain a small volume of water/waste clay for the
anticipated period of use only therefore drain, dry and clean after use.
Wear an apron or protective clothing and ensure clothes cuffs and sleeves are well clear
of the wheel head when in operation.
Never handle electrical equipment with wet or damp hands.

5
Discus User Manual
4
Preparing Your Discus for Use
1. Remove all packing materials from the Discus and retain should you need to return
the product under the guarantee.
2. Conduct a visual inspection of the units to ensure no damage has occurred during
transit.
3. Place the Discus on a clean level surface at the correct working height.
We recommend the Discus Stand and shelf. (see page 13 for assembly)
4. Ensure wheel head bat locating pins are not protruding unless the Discus bat
retaining system is in use. (see page 7) Screw the bat pins clockwise just below the top
of the wheel and no further using the provided Allen key.
5. Arrange the foot/hand controls so they are comfortable to use.
6. Connect cables as diagram on next page.
DO NOT touch the plugs or electrical contacts with wet hands.
Before attaching the power lead to the mains outlet ensure the voltage is
UK Standard 230V 50Hz AC.
7. Ensure all speed controls are set to zero before switching on mains and power unit.
8. When the Discus is supplied with a hand controller this should be fitted in place of
the foot controller.
9. Ensure the Control unit is kept dry and positioned away from any contact with water
or other liquids.
10. The wheel head will continue to turn for a few seconds if the foot pedal is operated
directly after switching off—this is normal.

6
Discus User Manual
Connections Diagram
Operating Instructions
1 Read Manual and safety instructions on previous pages.
2 Ensuring the correct match of the pins, plug the foot pedal cable in to the socket on the
control unit.
3 Ensuring the correct match of the pins, plug the control cable from the control unit into
the socket on the potters wheel.
4 Position the wheel, pedal and control unit for safety and comfortable working posture.
Check that no cables are trapped under furniture etc.
5 Keep the control unit away from contact with liquids.
6 Connect to power supply.
7 Set the turntable direction switch on the control unit where fitted. (models vary)
Do not change direction whilst the wheel is spinning and wait for 5 seconds after it has
stopped spinning.
8 Switch on the power to the control unit.
9 Press the foot pedal to regulate speed.
10 Keep water in bowl to maximum 30 mm depth.
Do not open the covers on the machine components as this may invalidate the guarantee.
There are no user serviceable parts.

7
Discus User Manual
Discus bats
Discus bats have been designed to fit easily on to the Wheel Head.
Using the Allen key provided with the wheel, raise the two bat retaining pins
approximately 3 to 5 mm by unscrewing anticlockwise.
Locate the bat so that the pre drilled holes fit over the bat retaining pins and push in to
place.
Ensure the bat pins are not proud of the bat’s surface.
To close the bat pins, screw clockwise to just below the top surface of the wheel head
and no further
(Any further may result in the bat pin dropping in to the casing)
SAFETY NOTE
Always screw the bat pins back flush with the wheel head when you have finished using
bats and always check that the bat pins are not protruding before using the wheel as you
may injure your hands.
Plastic Master Bat with mini plywood bat
Fit the Plastic Master bat (where supplied) in a similar way and locate the mini bat in the
centre of the master bat with the lug located in the notch. To remove the mini bat from
the master bat push a tool against the lug and carefully lever out from the master bat.
Tip
Should the bat pins work loose over time apply a drop of medium thread lock (such as
Loctite 243) to the pin and screw back in to position.
Turn the pin a little after a few minutes so as to ensure that the bind is not too tight.
Note
Plywood will always have a tendency to warp slightly. Store bats on their edge upright.

8
Discus User Manual
Product Care, Guarantee and Service
Cleaning
To clean the unit dry hands first then turn off at the control unit.
Disconnect the power supply.
Remove the plugs and all the cables.
Empty excess water from the bowl and then clean the units with a damp cloth using water
only.
Ensure no water enters the Control unit or foot control.
The splash pan should not be overfilled with water as this may cause damage to the motor.
DO NOT allow water to come into contact with the electrical connections or remove any
covers or immerse any of the Discus units in water.
Please note there are no user serviceable parts and opening a case may invalidate the
guarantee.
2 Year Guarantee
Discus Potters Wheels carry a full 2 year warranty on all parts and labour.
Please retain your original purchase invoice in case you have need of the guarantee.
In the event of a problem please read the instructions first before calling the helpline –If
necessary the wheel can be returned to the company –we will repair or replace it at our
discretion free of charge subject to fair wear and tear and its use being in accordance of our
guidelines and the capacities stated.
A Returns Number and form should be obtained from us in the first
instance by emailing or calling.
Telephone 01730 300762
All Discus models should give many years of trouble free service;
We do however provide a comprehensive repair and maintenance service
should your wheel ever have problems call us or email for advice.

9
Discus User Manual
8
Health and Safety Information
Portable Appliance Testing (PAT) regulations
Applicable where appliances are used by employees; the public in places such as hospitals,
schools, colleges, clubs, workshops etc. and where appliances are supplied or hired.
To comply with the 1989 Electricity regulations (PAT testing), it is necessary to implement a
regular programme of inspection and testing of all portable appliances.
If a machine fails these tests, or if the tests are not carried out then a prosecution may be
brought if the equipment is used.
Initial testing is carried out by us with all products being tested prior to despatch.
However with any subsequent testing or testing requirement, the responsibility lies with the
equipment owner.
Current legislation states that ALL appliances, regardless of age, must be tested at least once
a year.
If work is carried out subsequently on the electrical system of this product, then it must be
retested before it conforms to safety standards.
Waste Electronic & Electrical Equipment
(WEEE) Regulations (UK only)
To comply with UK legislation on the disposal of electronic and electrical equipment the unit
may be returned to us for disposal at the end of its serviceable life.

10
Discus User Manual
Specifications
Standard Wheel
Weights
Bowl 6.5kg, Control 5kg, pedal 500g. Total 12kg
Dimensions
Bowl 575mm x 445mm x 160mm
Control 190mm x 205mm x 90mm (excluding handle)
Pedal 215mm x 115mm x 75mm
Wheel head cast alloy 250mm
Other Information
230v Ac 50Hz 3amp fuse in mains plug
Power Consumption 1.1 amps, 250W maximum
Maximum Rotation speed 250RPM ±5%
Motor 24v DC
Centre 12Kgs clay maximum
Craftsman Wheel
Weights
Bowl 6.7kg, Control 5kg, pedal 500g. Total 12.2kg
Dimensions
Bowl 575mm x 445mm x 160mm
Control 190mm x 205mm x 90mm (excluding handle)
Pedal 215mm x 115mm x 75mm
Wheel head cast alloy 250mm
Other Information
230v Ac 50Hz 3amp fuse in mains plug
Power Consumption 1.3 amps, 300W maximum
Rotation direction reverse switch on control box
Maximum Rotation speed 300RPM ±5%
Motor 24v DC
Centre 16Kgs clay maximum
Compact Wheel
Weights
Wheel 6kg, (6.2kg Compact plus) Control 5kg, pedal 500g. Total 11.5kg
(11.7 kg Compact plus)
Dimensions
Wheel 270mm x 265mm x 160mm (excluding handle)
Control 190mm x 205mm x 90mm (excluding handle)
Pedal 215mm x 115mm x 75mm
Wheel head cast alloy 250mm
Other Information
230v Ac 50Hz 3amp fuse in mains plug
Power Consumption 1.1 amps, 250W maximum
(Compact plus 1.3 amps, 300W maximum)
Maximum Rotation speed 250RPM ±5%
(Compact plus 300RPM ±5%)
Motor 24v DC
Centre 12Kgs clay maximum (16Kgs Compact plus)

11
Discus User Manual
The Bump Off Hand control enables fixed rotation speed control of the Potters wheel and is fitted
with an emergency ‘Bump Off’ button that disengages power immediately to the wheel.
The ‘Bump’ button is reactivated by slightly twisting the button so it pops up.
(Must not be used by children unless supervised by an adult)
Hand Controller (Emergency off) connections
(when supplied or purchased separately)
Connecting the hand control unit.
1) Ensure the power button on the Electrical Control Unit is off.
2) From the Hand Control connect the cable end marked ‘To Bowl’ to the socket on the
potters wheel ensuring the 3 pin plug is correctly mated.
3) From the Hand Control connect the cable end marked ‘To Control Unit’ and connect
to the Electrical Control Unit socket that is marked ‘Foot Pedal Connection’
ensuring the 3 pin plug is correctly mated.
4) Finally connect the 3 pin plug from the Electrical Control Unit to the socket on the
Hand Control marked ‘Control Cable In’ ensuring the 3 pin plug is correctly mated.

12
Discus User Manual
Hand Controller (Basic) connections
(when supplied or purchased separately)
The Basic Hand control enables fixed rotation speed control of the Potters wheel.
Simply connect to the Control unit instead of the Foot pedal ensuring the 3 pin plug is
correctly mated.
Always ensure you can reach the ‘power off’ switch on the control unit.
(Must not be used by children unless supervised by an adult)
13
Discus User Manual
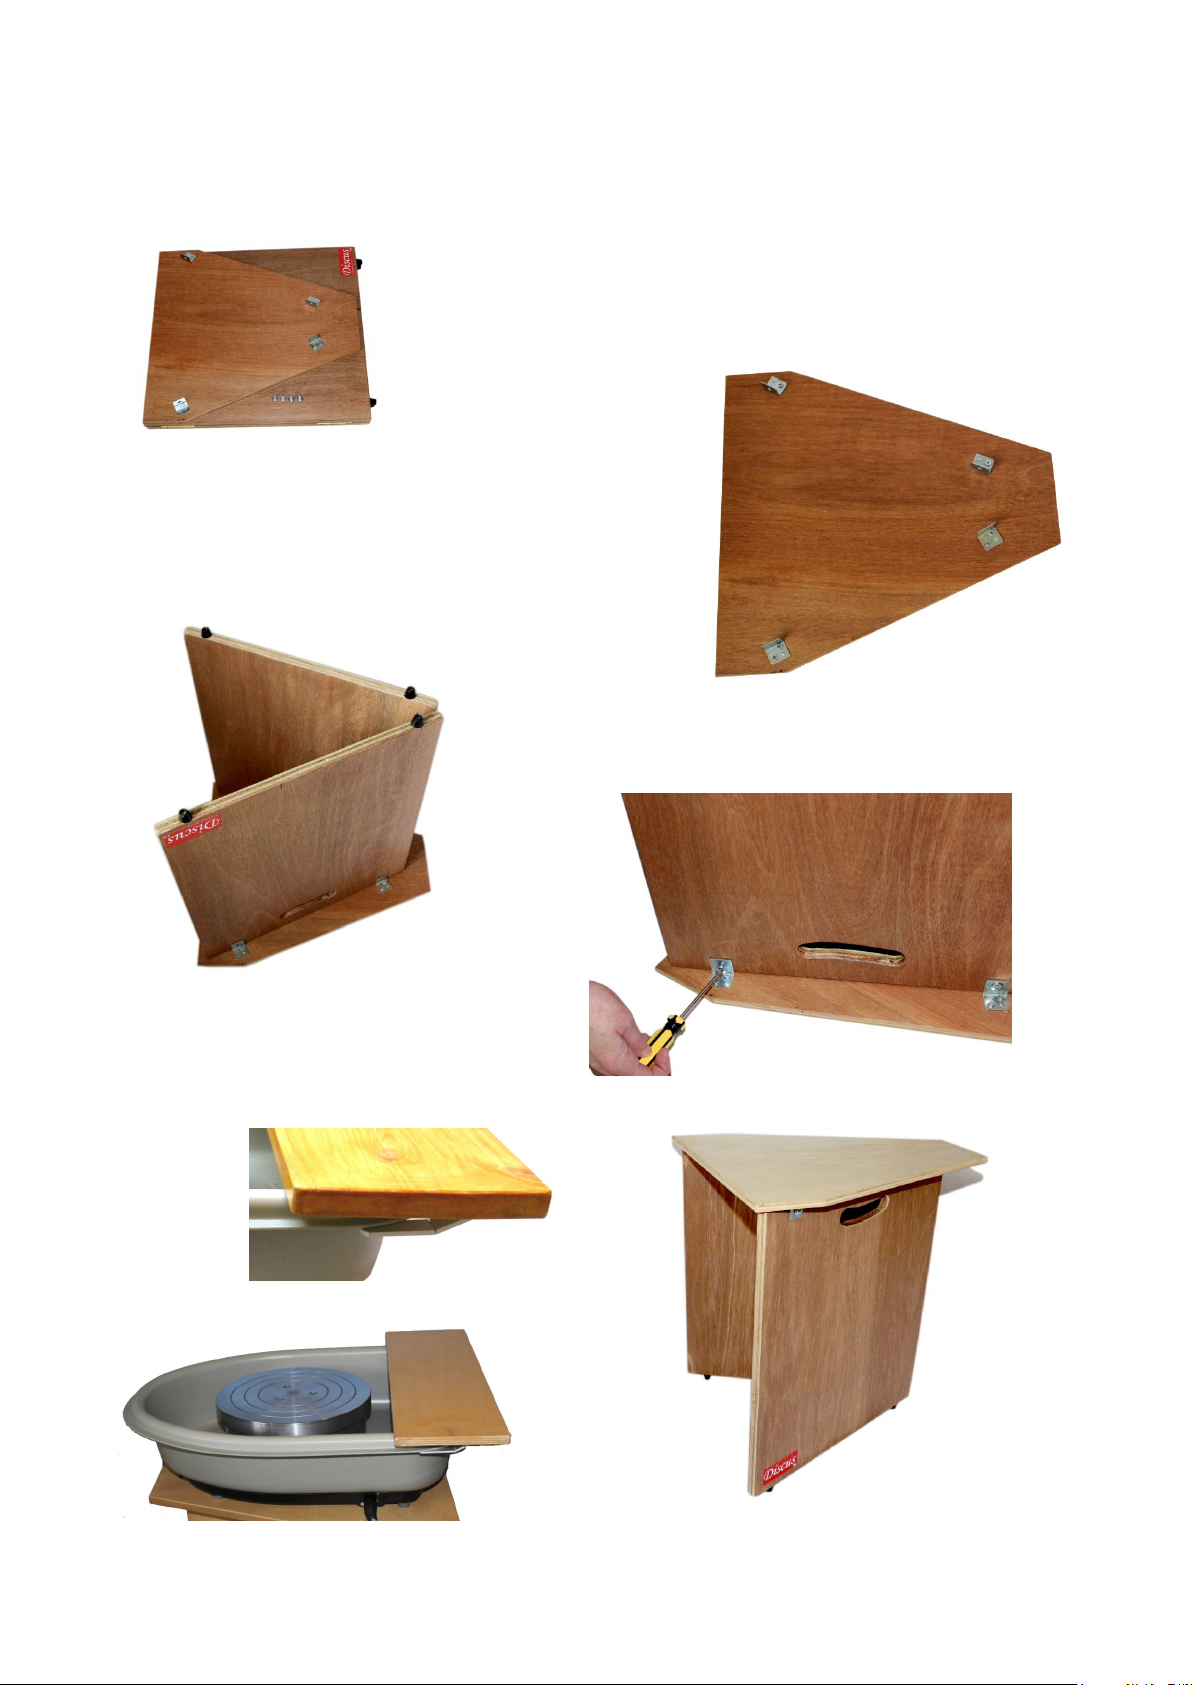
Stand and Shelf Assembly
(when supplied or purchased separately)
1) Lay the top upside down on the floor
and remove the 4 bolts from the base
and keep handy.
2) Place the base inside the metal
brackets with the bolt holes lining up
with the bracket holes.
3) Screw in the 4 bolts and then turn the
assembly over ready for use.
The shelf is designed to hook over
the bowl rear. Locate and push the
brackets under the rear of the bowl
lips to secure.

14
Discus User Manual
DISCUS POTTERS WHEELS
www.discuspotterswheels.co.uk
Pottery Products Ltd
8 Hazelbank Close, Petersfield, Hampshire, GU31 4BY
Table of contents


