Disty distybox 300 User manual
Bedienungsanleitung
1
DE
www.disty.de
German
English
French
Italian
Spanish
DE
EN
FR
IT
ES
Operating
Instructions

Bedienungsanleitung Bedienungsanleitung
2 3
DE DE
Wichtige Informationen
Die distybox300 ist ein universell einsetzbarer, schnurloser
Adapter (DECTStandard) für den Betrieb analoger End‑
geräte an GAP‑fähigen DECTSystemen. Diese „schnurlose
Verlängerungsleitung“ erspart Ihnen aufwändige Verka‑
belungsarbeiten und kann an jeder
handelsüblichen DECT/
GAP Basisstation wie ein zusätzliches Mobil
teil eingebucht
werden. Sie können analoge Telefone, Faxgeräte, Anruf‑
beantworter, Türsprechstellen oder Modem mit Hilfe der
distybox300 an Ihre DECT Basisstation anschließen. Das
Gerät muss mit DTMF‑Wahlverfahren (MFV‑Wahlverfahren,
Tonwahl) arbeiten. Endgeräte, die nur Impulswahl
(IWV‑Wahlverfahren, Pulswahl) unterstützen, können an
der distybox300 nicht verwendet werden. Bitte prüfen Sie
in diesem Falle, ob Ihr Gerät auf DTMF‑Wahlverfahren
umgeschaltet werden kann.
Die distybox300 besitzt eine integrierte Antenne und hat
eine DECT‑übliche Reichweite von bis zu 30 m im Gebäude
und bis zu 300 m im Freifeld.
Weitere Informationen nden Sie im Bereich Download auf
unserer Homepage www.disty.de
HINWEIS
Inhaltsverzeichnis
distybox300
Wichtige Informationen 3
Anschlüsse und Anzeigen 4
Hörtöne 5
Inbetriebnahme 6
Montage 6
Einbuchung/Programmierung 7
Automatisches Einbuchen 7
Programmiermodus 8
Programmiermodus aktivieren 8
Parametereinstellung im Programmiermodus 9
Anhang 13
Technische Daten 13
Zulassung/CE‑Zeichen 14
Reinigung 14
Bedienungsanleitung Bedienungsanleitung
4 5
DE DE
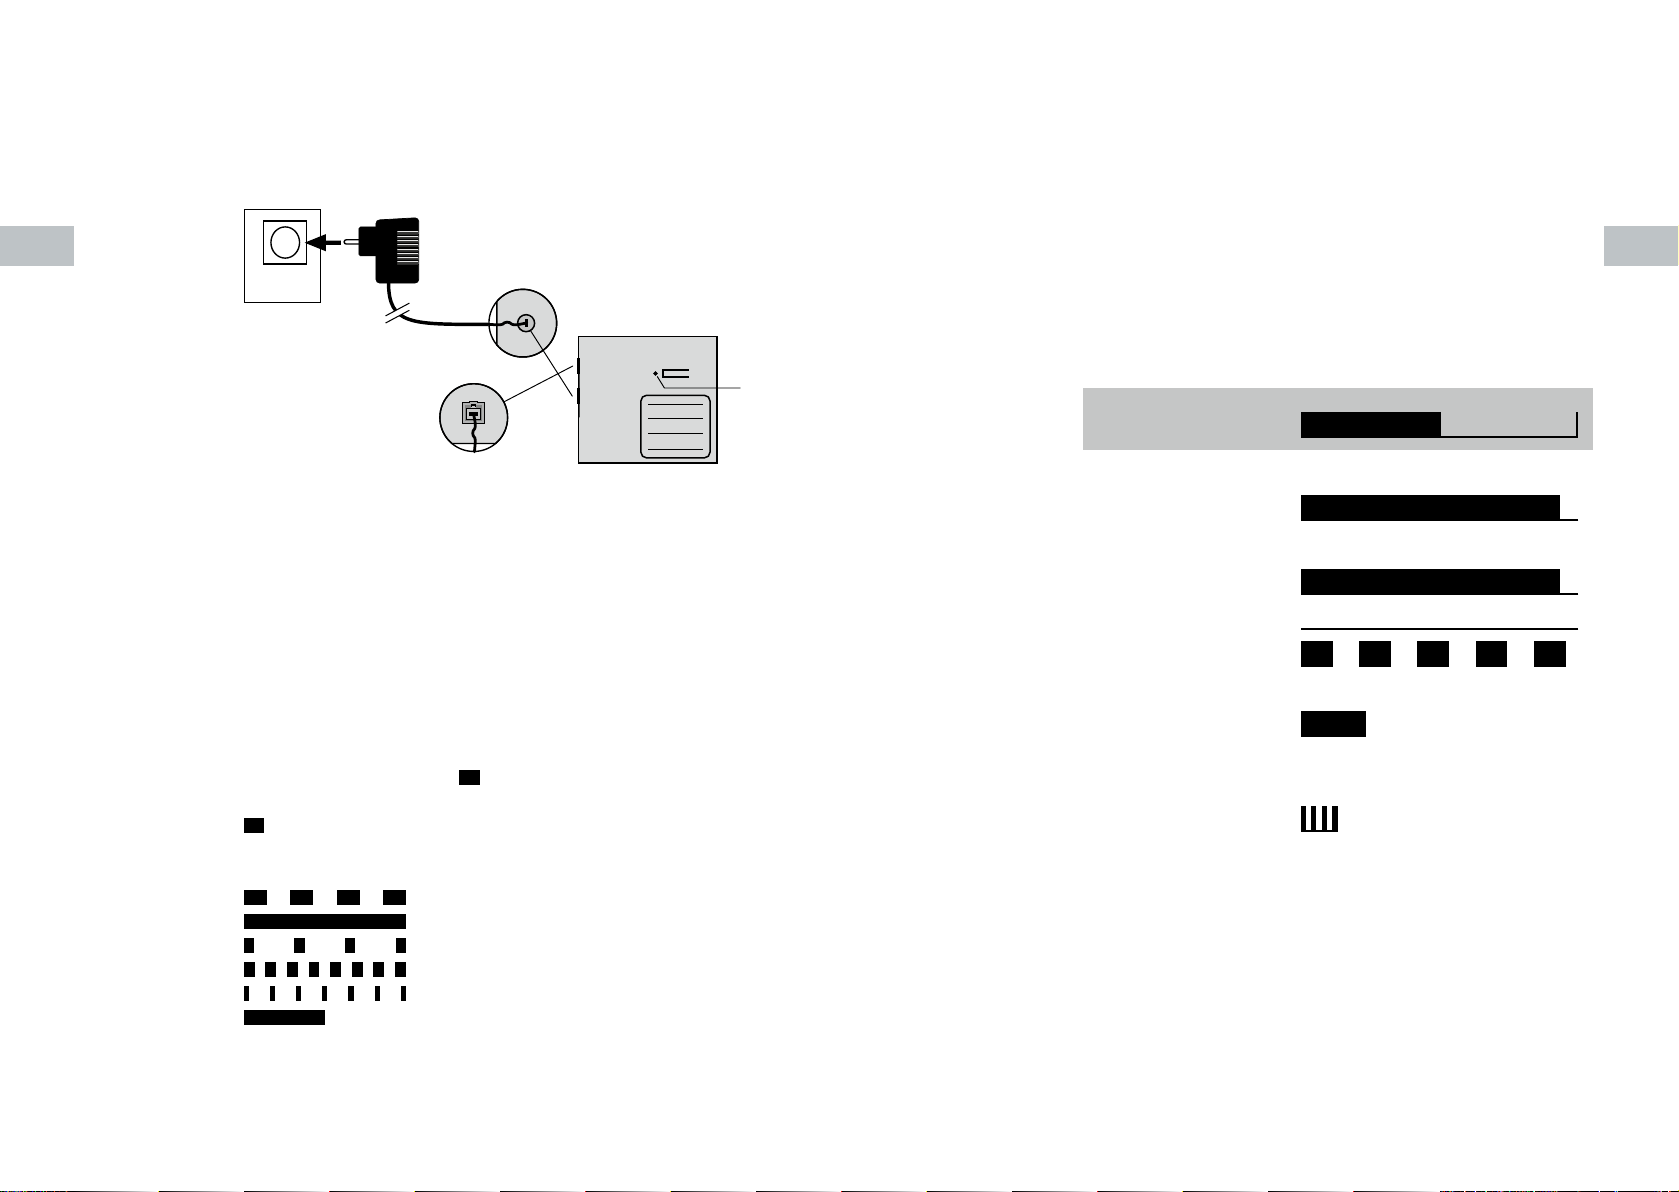
4Line‑Anschluss Anschluss für Telefon, Faxgerät,
Anrufbeantworter oder Modem
Die RJ 11 Buchse ist auf den
beiden mittleren Anschlüssen
belegt (Pin3 und 4).
Hörtöne (im Hörer oder Lautsprecher)
Wählton
(Dauerton)
Sonderwählton
(400/425Hz, Dauerton)
Besetztton
(425 Hz, wiederholt)
Positiver
Quittungston
(einmalig)
Negativer
Quittungston
(einmalig)
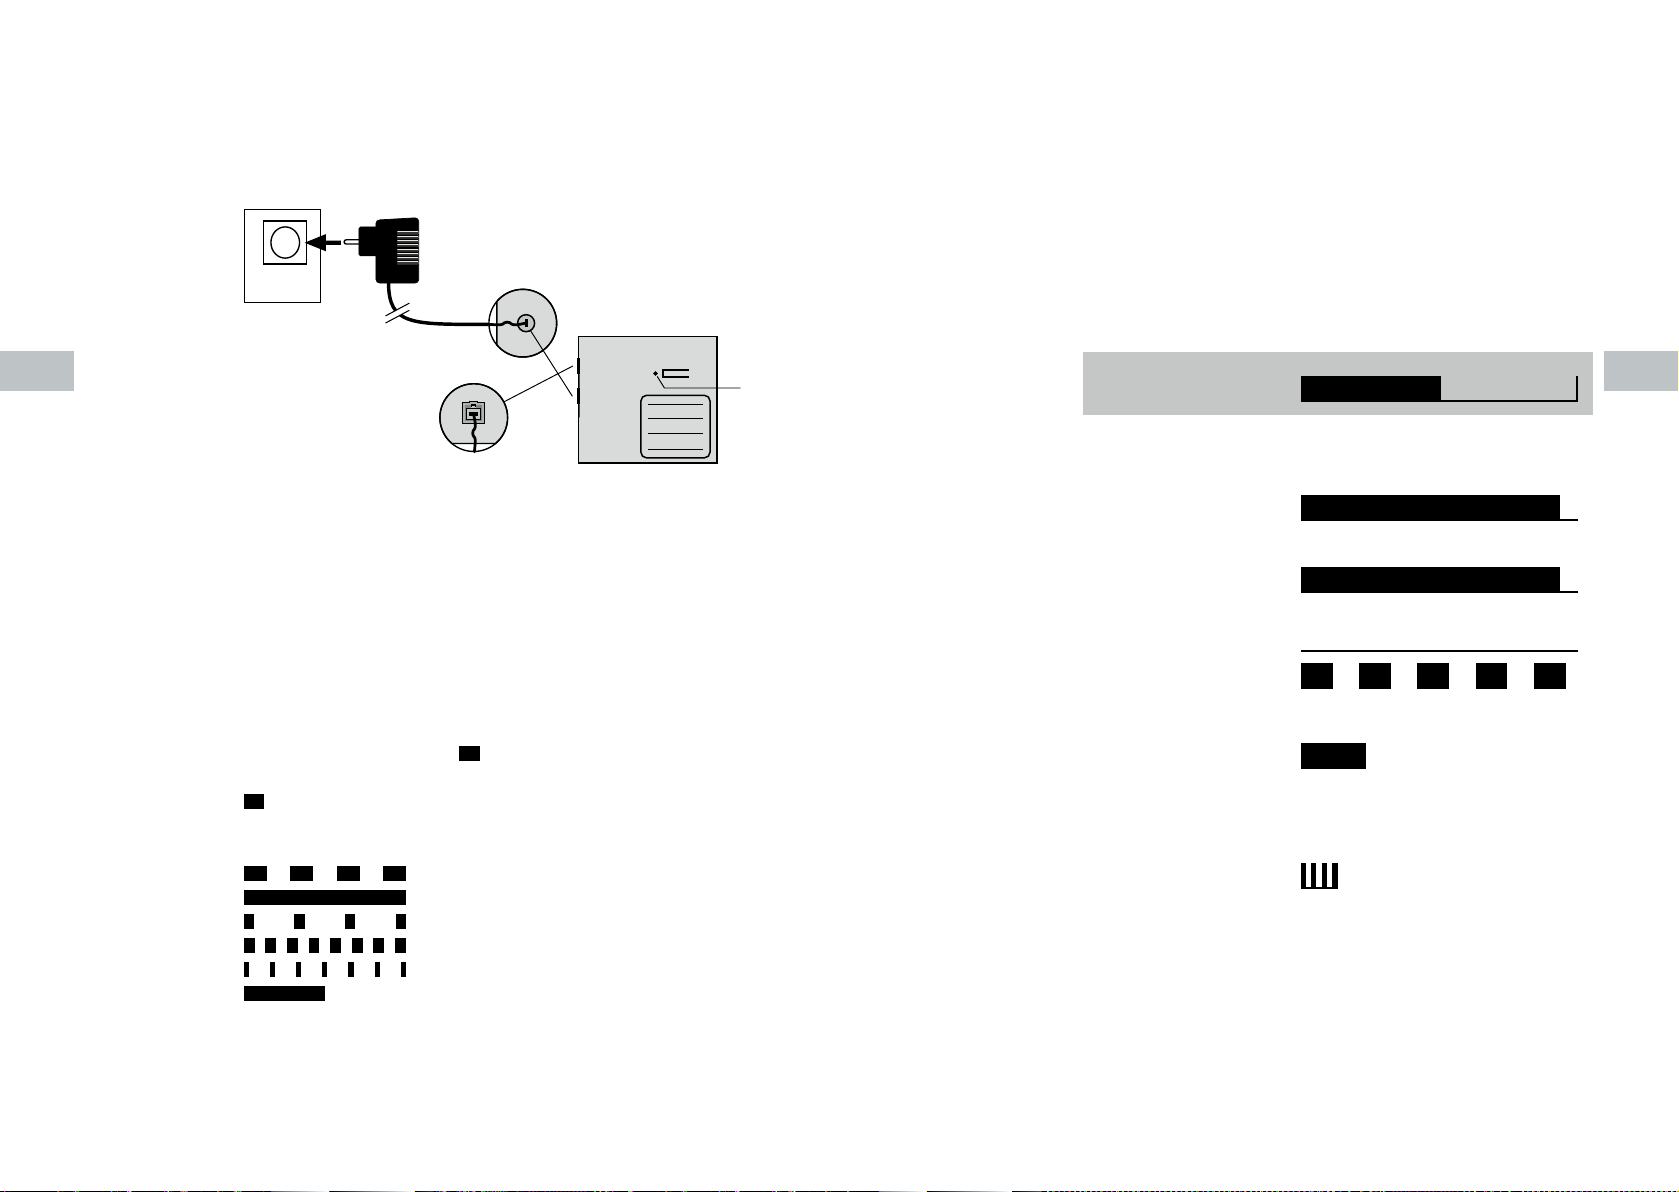
Anschlüsse und Anzeigen
1Stromversorgung
2Steckernetzgerät
Nach dem Einstecken des Steckernetzgerätes muss der Hörer
des angeschlossenen Telefons mindestens 30 Sekunden auf‑
gelegt bleiben!
Verwenden Sie nur das mitgelieferte Steckernetzgerät!
Vor Öffnen des Gehäuses unbedingt das Steckernetzgerät
ziehen!
3Leuchtanzeige (LED)
I ‑ Zeitintervall 8 Sek. ‑ I LED an
LED aus Keine Stromversorgung
Betriebsbereit/Stromversorgung
(220/230 V) vorhanden/Gerät ist an
der Basis registriert und angemeldet
Anruf steht an
Bestehende Gesprächsverbindung
Programmiermodus (Menü)
Basis wird gesucht
Basis gefunden
Keine Basis
220/230V
50 Hz 21
4
3
1 m
Darstellung der Töne
(Angaben in Sekunden) Pause
Ton
HINWEIS
HINWEIS

Bedienungsanleitung Bedienungsanleitung
6 7
DE DE
STANDORT-
AUSWAHL
Montage
Die distybox300 ist für Wandmontage in geschlossenen
Räumen ausgelegt.
Beachten Sie dabei bitte, dass Sie das Gerät nicht in un‑
mittelbarer Nähe von anderen elektronischen Geräten wie
z.B. HiFi‑Anlagen, Büromaschinen oder Mikrowellengeräten
anbringen sollten. Sie vermeiden damit eine gegenseitige
Beeinussung. Der Aufstellungsort sollte auch nicht in der
Nähe von Wärmequellen gewählt werden (z.B. Heizkörper
oder direkte Sonneneinstrahlung).
Um im Verbindungszustand Störgeräusche zu vermeiden,
sollte das angeschlossene Endgerät nicht näher als 1Meter
zur distybox300 aufgestellt werden.
Die distybox300 muss eine Funkverbindung zur DECT
Basisstation herstellen. Vor der endgültigen Festlegung
des Montage‑Standortes prüfen Sie bitte, ob der
von Ihnen gewünschte Ort innerhalb der Reichweite
der DECT Basisstation liegt. Aufgrund der digitalen
Übertragung im benutzten Frequenzbereich kann es –
je nach den baulichen Gegebenheiten – auch innerhalb
der angegebenen Reichweite zu Abschattungen der
Funkwellen kommen. Hierdurch wird die Übertragungs‑
qualität eingeschränkt. Schon eine geringfügige Standort‑
änderung stellt aber die gewohnte Übertragungsqualität
wieder her.
Da die distybox300 wie ein Mobilteil Ihrer DECT Basis‑
station arbeitet, können Sie mit Hilfe Ihres Mobilteils prüfen,
ob der Montagestandort geeignet ist.
Die folgenden Arbeitsschritte sind nötig, um
die distybox300 zu montieren:
1. Bohren Sie im Abstand von 60mm zwei
Löcher mit einem Durchmesser von 6 mm
in die Wand.
FUNK-
AUSBREITUNG
WAND-
BEFESTIGUNG
2. Setzen Sie die Dübel ein und drehen Sie die Schrauben
bis ca. 5 mm Abstand zur Wand ein.
3. Verbinden Sie Ihr Endgerät mit der distybox300.
4. Verbinden Sie die distybox300 mit der Stromversorgung.
5. Hängen Sie die distybox300ein.
Die distybox300 muss in Ihre DECT/GAP Basisstation
eingebucht werden bevor sie benutzt werden kann. Die
Einbuchung kann im Regelfall mit der Funktion
„automatisches Einbuchen“ durchgeführt werden.
Der „Programmiermodus“ bietet die Möglichkeit ver‑
schiedene Parameter einzustellen, um die distybox300 der
Funktionalität Ihrer Basisstation anzupassen. Zusätzliche
Parameter erlauben die Einstellung der distybox300 auf Ihre
persönlichen Anforderungen. Weiterhin können Sie hier die
manuelle Einbuchung durchführen.
Automatisches Einbuchen
Das automatische Einbuchen der distybox300 ist möglich
solange sie noch nicht an einer Basisstation angemeldet ist.
Voraussetzung dafür ist, dass die PIN Ihrer Basisstation auf
„0000“ oder „1111“ eingestellt ist.
1. Verbinden Sie das Steckernetzgerät mit Ihrer distybox300.
2. Verbinden Sie Ihr Telefon mit der distybox300, lassen Sie
den Hörer aufgelegt.
3. Stellen Sie sicher, dass Ihre Basisstation die Möglichkeit
bietet ein weiteres Mobilteil anzumelden.
4. Während des Einbuchvorganges sollte sich die distybox300
in der Nähe Ihrer Basisstation benden.
5. Starten Sie die Anmeldeprozedur an Ihrer DECT/GAP
Basisstation so, als wollten Sie ein zusätzliches Mobil‑
teil anmelden. Die Beschreibung des Bedienablaufes
nden Sie in der Anleitung Ihrer Basisstation.
60 m
HINWEIS

Bedienungsanleitung Bedienungsanleitung
8 9
DE DE
Die Eingabe der PIN ist nur notwendig, wenn zuvor im
Programmiermodus eine PIN, abweichend vom Lieferzustand,
eingerichtet wurde.
Durch die PIN kann der Zugang zum Programmiermodus
geschützt werden!
8. Sie hören den Sonderwählton, der Programmiermodus
ist aktiviert.
Jetzt können Sie durch Eingabe der Parameterkennzahlen
die entsprechenden Leistungsmerkmale Ihrer distybox300
verändern.
Sie möchten Ihre distybox300 an einer Basisstation mit
einem ISDN Telefonanschluss benutzen. Aktivieren Sie den
Programmiermodus wie oben in Punkt 1–8 beschrieben.
Dann:
1. Geben Sie die Programmierkennzahl zur Einstellung
„Anschluss an ISDN/Analog Leitung“ ein: 04 4 0
2. Geben Sie zum Aktivieren des Leistungsmerkmals ein:
#0 #
3. Sie hören einen positiven Quittungston und anschließend
wieder den Sonderwählton. Das Leistungsmerkmal ist
aktiviert.
Parametereinstellung im Programmiermodus
Nicht alle hier angebotenen Leistungsmerkmale werden von
jeder DECT/GAP Basisstation unterstützt. Klären Sie mit Hilfe
der Bedienungsanleitung Ihrer Basisstation welche Leistungs‑
merkmale Sie nutzen können.
Um diese Parameter einzustellen, muss vorher der Program‑
miermodus aktiviert werden. Die Programmierung einer
Funktion wird durch Eingabe der #abgeschlossen und
6. Stecken Sie das Steckernetzgerät in eine Steckdose.
Der Einbuchvorgang wird automatisch gestartet.
7. Den erfolgreichen Abschluss des Einbuchvorganges
erkennen Sie daran, dass die LED in Abständen von
ca. 10 Sekunden kurz aueuchtet.
Sollte der Einbuchvorgang innerhalb von ca. 3Minuten
nicht erfolgreich abgeschlossen sein, führen Sie die
manuelle Einbuchung im Programmiermodus durch.
Programmiermodus
Der Programmiermodus der distybox300 kann nur innerhalb
der ersten 10 Minuten nach Stecken des Netzteils aktiviert
werden. Dadurch wird eine versehentliche Veränderung der
Parameter im laufenden Betrieb verhindert.
Programmiermodus aktivieren
Um die distybox300 in den Programmiermodus zu bringen,
gehen Sie wie folgt vor:
1. Verbinden Sie Ihr Telefon mit der distybox300.
2. Verbinden Sie das Steckernetzgerät mit Ihrer distybox300.
3. Stecken Sie das Steckernetzgerät in eine Steckdose.
Lassen Sie den Hörer Ihres Telefons mindestens 30Sekunden
aufgelegt.
4. Heben Sie den Hörer Ihres Telefons ab. Abhängig davon,
ob Ihre distybox300 schon in eine Basis eingebucht ist
oder nicht, hören Sie einen Besetztton oder einen Wählton.
5. Geben Sie über Ihr Telefon ein: * * 9
6. Sie hören einen positiven Quittungston.
7.
Optional! Geben Sie über Ihr Telefon die PIN
der distybox300 ein.
HINWEIS
HINWEIS
HINWEIS
HINWEIS
HINWEIS
BEISPIEL

Bedienungsanleitung Bedienungsanleitung
10 11
DE DE
durch den positiven Quittungston bestätigt. Anschließend
hören Sie wieder den Sonderwählton und können mit der
Programmierung weiterer Funktionen fortfahren. Die
Änderung wird mit Ausnahme der Programmierpunkte 90,
91 und 99 ohne Neustart der distybox300 wirksam.
Wird während der Programmierung ein ungültiger Wert ein‑
gegeben, erfolgt ein negativer Quittungston, die Prozedur
wird abgebrochen und Sie hören wieder den Sonderwählton.
Erfolgt während der Programmierung innerhalb einer Minute
keine Eingabe, wird die Prozedur abgebrochen und Sie hören
wieder den Sonderwählton.
Durch Auegen des Hörers wird jederzeit der Programmier‑
modus beendet, die distybox300 bendet sich wieder im
Normalbetrieb.
Funktion Parameter‑ Weitere Eingaben
kennzahl
Manuelles Einbuchen 1 Basis PIN #
der distybox300
Zum Einbuchen der distybox300 muss die PIN der Basisstation
eingegeben werden. Es wird eine 0–8 stellige PIN von der
distybox300 akzeptiert. Nach Eingabe der #hören Sie einen
positiven Quittungston. Legen Sie den Hörer nicht auf bis
der Einbuchvorgang abgeschlossen ist und Sie wieder den
Sonderwählton hören. Sollte das Einbuchen nicht innerhalb
von ca. 3 Minuten abgeschlossen sein überprüfen Sie bitte
die Einstellungen der Basis und starten den Einbuchvorgang
erneut. Durch die vierstellige PIN kann der Zugang zum
Programmiermodus geschützt werden.
Funktion Parameter‑ Weitere Eingaben
kennzahl
Anschluss an ISDN/ 40 0 #
analog Leitung
Diese Einstellung benutzen Sie, wenn Ihre Basisstation an eine
ISDN Telefonleitung angeschlossen ist. Wahlziffern werden als
Keypad Information gesendet. Im Verbindungszustand werden
Keypad Informationen unterdrückt, damit ist die Übertragung
von MFV Signalen zur Steuerung von externen Geräten möglich.
40 1 #
Keypad Information unterdrücken, diese Einstellung benutzen
Sie wenn Ihre Basisstation an eine analoge Telefonleitung
angeschlossen ist.
40 2 #
Die Keypad Information wird immer gesendet. Diese Ein‑
stellung nutzen Sie auch bei Betrieb der distybox300 mit der
distybase duo als Basisstation oder ISDN Basisstationen.
Lieferzustand: 0
Parknummer 80 Parknummer #
einstellen
Optional kann der Einbuchvorgang unter Verwendung
der max. 15‑stelligen Parknummer Ihrer DECT Basisstation
durchgeführt werden. Diese Vorgehensweise ist sinnvoll,
wenn durch weitere aktive DECT Basisstationen der Einbuch‑
vorgang behindert wird. Entnehmen Sie die Parknummer
der Bedienungsanleitung Ihrer Basisstation.
Lieferzustand: keine Parknummer
Bedienungsanleitung Bedienungsanleitung
12 13
DE DE
Funktion Parameter‑ Weitere Eingaben
kennzahl
Parknummer/ARI 81 0 #
aktivieren
Die unter Programmierpunkt 80/85 eingestellte Parknummer/
ARI wird beim Einbuchvorgang nicht verwendet.
81 1 #
Die unter Programmierpunkt 80/85 eingestellte Parknummer/
ARI wird beim Einbuchvorgang verwendet.
Lieferzustand: 0
ARI-Nummer 85 31 ARI #
einstellen
An Stelle der PARK Nummer (siehe Parameter 80) kann die
ARI Nummer zum Einbuchen verwendet werden. Bei der
Eingabe wird der ARI Nummer die Kennung 31 vorangestellt.
Lieferzustand: keine ARI‑Nummer
distybox300 90 #
zurücksetzen
Die distybox300 wird in den Lieferzustand versetzt.
Die distybox300 ist anschließend nicht mehr an einer Basis
eingebucht! Alle bisherigen Einstellungen werden gelöscht.
Nach Ziehen/Stecken des Steckernetzteils wird ein Neustart
der distybox300 durchgeführt und es kann mit der Neupro‑
grammierung der distybox300 begonnen werden.
Parameter 91 #
zurücksetzen
Die distybox300 bleibt an der Basisstation eingebucht, alle
anderen Parameter werden in den Lieferzustand versetzt.
Nach der Eingabe bitte den Hörer auegen und 30 Sekunden
warten. Die distybox300 führt einen Neustart durch.
HINWEIS
HINWEIS
Technische Daten
Standard: DECT (Digital Enhanced Cordless
Telecommunications), GAP‑fähig
Frequenzbereich: 1880 MHz bis 1900 MHz
Sendeleistung: 10 mW im Mittel
Sprachübertragung: 32 kbit/s ADPCM
Faxbetrieb: Gruppe 3, V.29 maximal
mit 9600 bit/s
Modembetrieb: 9600 bit/s maximal
Wählverfahren: DTMF (Tonwahl)
Anschließbare Telefone: max. drei Standardtelefone
parallel anschließbar
CLIP: Übertragung über FSK1,
Protokoll nach ETSI Standard
Arbeitstemperatur: +10°C bis +40°C
Relative Feuchte: 20 % bis 75%
Zulässige Lagertemperatur: ‑10°C bis + 60°C
Anzeigeeinheit: Leuchtdiode (LED)
Abmessungen: 120 x 100 x 38 mm (B x H x T)
Gewicht: 140 g
Montageort: Wandmontage in Innenräumen
Spannungsversorgung: 12 V DC +/‑ 15% = 10,2–13,8 V
(0,12 A Ruhestrom, 0,4 A max.)
Lieferumfang: Steckernetzteil, 230 V ~, 50 Hz,
optional Anschlussadapter

Operating instructions
15
EN
Bedienungsanleitung
14
DE
Zulassung/CE-Zeichen
Wir, disty communications gmbh, erklären, dass die
distybox300 mit den grundlegenden Anforderungen und anderen
relevanten Bestimmungen der Richtlinie 2014/53/EU (Radio und
Telekommunication Terminal Equipment, R&TTE) übereinstimmt.
Die Übereinstimmung ist durch das CE Kennzeichen bestätigt. Die
vollständige Konformitätserklärung kann auf folgender Internetseite
eingesehen werden:
www.disty.de
Reinigung
Wischen Sie das Gerät einfach mit einem leicht feuchten Tuch
oder mit einem Antistatiktuch ab; verwenden Sie bitte kein
trockenes Tuch. Vermeiden Sie bitte den Einsatz von Putz‑ und
Scheuermitteln.
Table of contents
distybox300
Important information 16
Connections and indicators 17
Tones 18
Commissioning 19
Mounting 19
Registration/programming 20
Automatic registration 20
Programming mode 21
Activating programming mode 21
Setting parameters in programming mode 22
Annex 26
Technical data 26
Product approval/CE mark 27
Cleaning 27
Operating instructions Operating instructions
16 17
EN EN
Important information
The distybox300 is a DECT‑standard cordless adapter for
universal usage when operating analogue terminals on GAP‑
compatible DECT systems. Essentially a ”cordless extension
cable”, the distybox300 eliminates the need for complicated
cabling work and can be registered on any standard DECT/
GAP base station just like an extra cordless handset. The
distybox300 can be used to connect analogue telephones,
fax machines, answering machines, entrance intercoms and
modems to your DECT base station. The device must use
DTMF dialling (voice frequency signalling); terminals that only
support pulse dialling cannot be used on the distybox300. If
your device uses pulse dialling, please check if it can also be
switched over to DTMF dialling.
The distybox300 features an integrated aerial and has a
standard DECT range of up to 30 m indoors and up to 300 m
out of doors.
More information can be found in the download area on our
homepage www.disty.de
NOTE
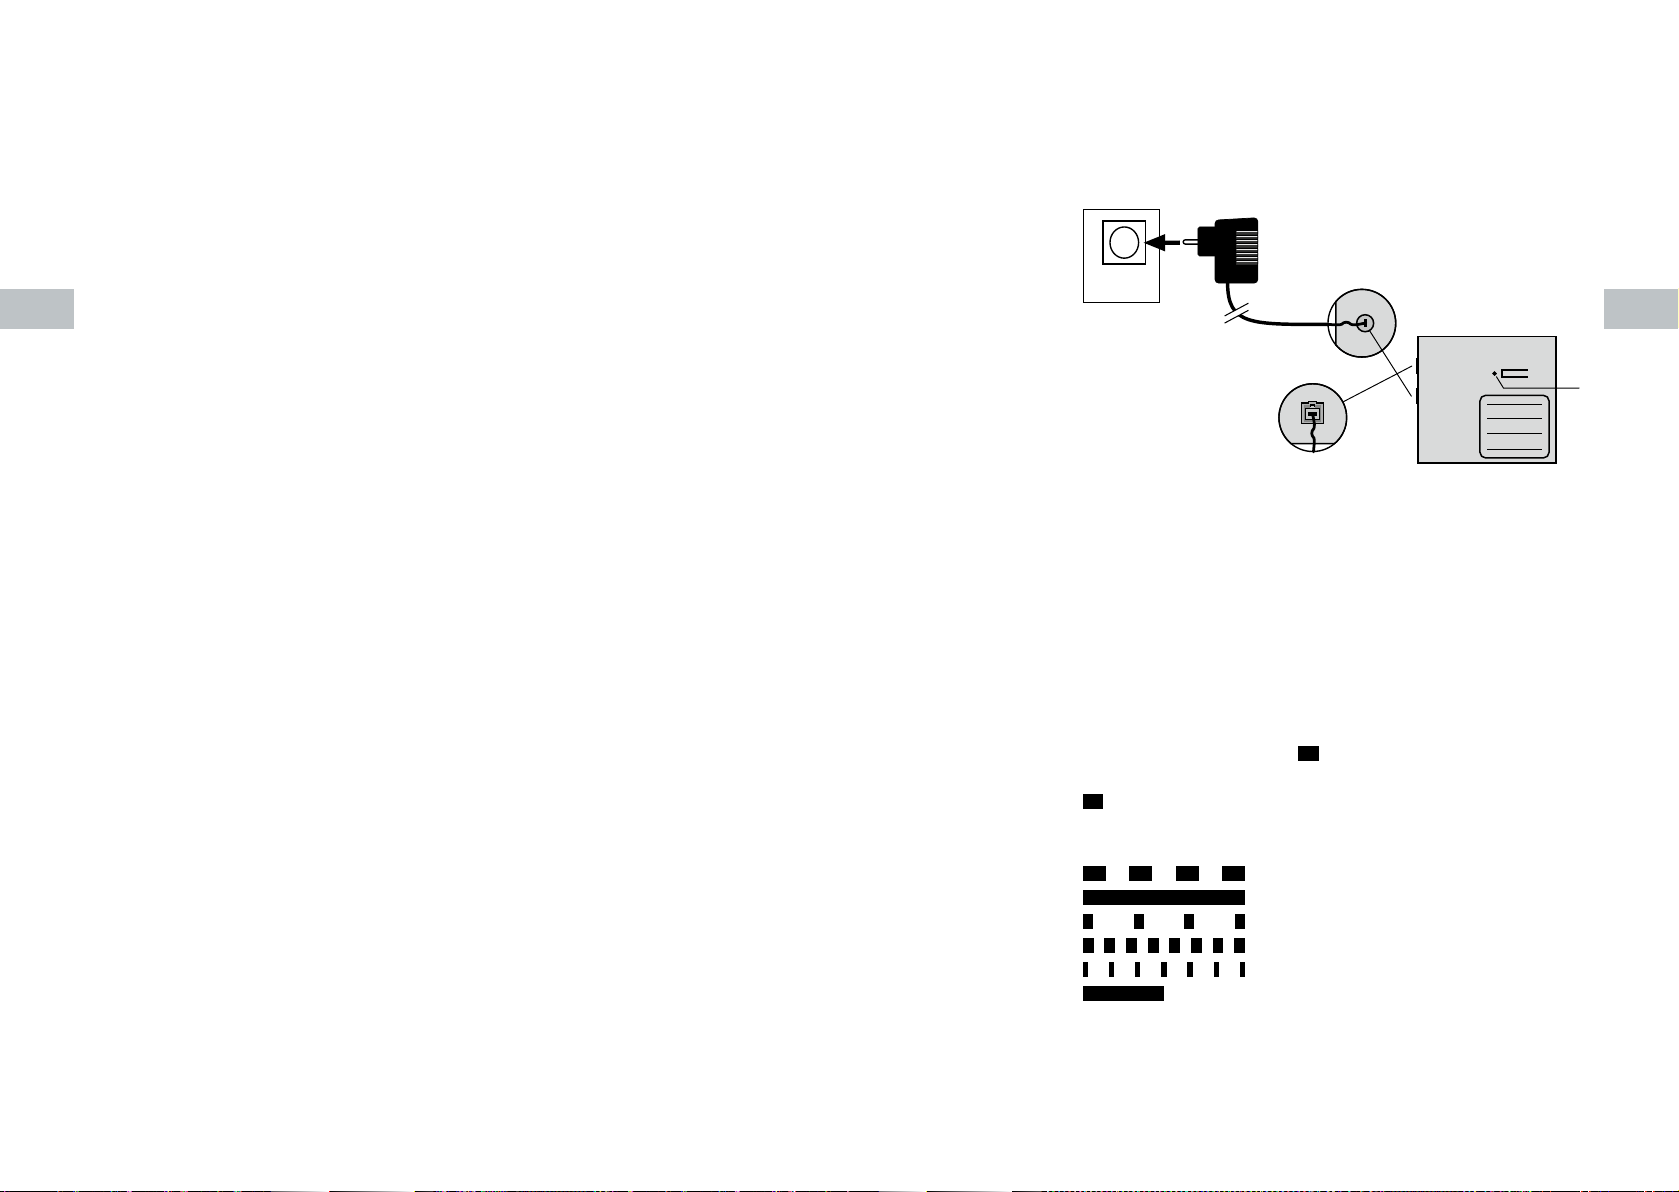
Connections and indicator
1Power supply
2Power supply unit (adapter)
After plugging in the power supply unit, the handset on the
connected telephone must remain on the hook for at least
30 seconds.
Only the power unit supplied should be used. Before opening
the housing, ensure that the power supply unit is disconnected!
3LED
I ‑ time interval 8 sec ‑ I LED on
LED off No power supply
Ready to use / standby mode /
power available (220/230 V) /
device is registered at a base station
Incoming call alert
Connection
Programming mode (Menu)
Search for the base
Found the base
No Basis
220/230V
50 Hz 21
4
3
1 m
NOTE
NOTE

Operating instructions Operating instructions
18 19
EN EN
4Line connection Connection for a telephone, fax
machine, answering machine or
modem. The RJ‑11 socket is
assigned to the two middle
connections (pins 3 and 4).
Tones
Dial tone
(continous)
Special dial tone
(400/425Hz, continous)
Busy tone
(425 Hz, repeated)
Positive acknowledge
tone (single)
Negative
acknowledge
tone (single)
Description of the tones
(given in seconds) Pause
Tone
SELECTING
A SUITABLE
LOCATION
Mounting
The distybox300 is designed for wall mounting in interior
rooms.
Please note that the device must not be tted in the immediate
vicinity of any other electronic devices such as hi systems,
ofce machines or microwave ovens. This prevents any inter‑
ference between the devices. In addition, the device should
not be installed near heat sources (e.g. radiators or in direct
sunlight).
To prevent noise interference when making calls, the
connected terminal should not be positioned closer than
one metre away from the distybox300.
The distybox300 must be able to establish a radio link to the
DECT base station. Before determining the nal mounting
position, you should therefore check that your desired location
is within the range of the DECT base station. Owing to the
digital transmission in the frequency range used, there may
be radiowave ”blind spots” even within the specied range,
depending on the nature of the building. This results in
a loss of transmission quality. However, just a small change
in position will restore normal transmission quality. As the
distybox300 works as a cordless unit on your DECT base
station, you can use your cordless handset to check whether
or not the mounting position is suitable.
Follow the steps given below to install the distybox300
1. Drill two 6 mm diameter holes into
the wall at a distance of 60 mm
apart.
2. Insert the rawl plug and turn the
screws until they are approx. 5 mm
away from the wall.
3. Connect your terminal to the
distybox300.
RADIO
COVERAGE
WALL
MOUNTING
60 m
NOTE

Operating instructions Operating instructions
20 21
EN EN
4. Connect the distybox300 to the power supply.
5. Fit distybox300 in place.
The distybox300 must be registered on your DECT/GAP base
station before it can be used. The registration process can
normally be carried out using the ”Automatic registration”
function.
“Programming mode” allows you to set various parameters
to modify the distybox300 to suit the functionality of your
base station. Additional parameters allow the distybox to be
set according to your personal preferences. Manual registra‑
tion can also be carried out in this mode.
Automatic registration
The distybox300 can be registered automatically, assuming
it has not been registered on any other base station yet.
To do this, the PIN on your base station must be set to ”0000”
or ”1111”.
1. Connect the power supply unit (adapter) to your
distybox300.
2. Connect your telephone to the distybox300, leaving the
handset on the hook.
3. Ensure that your base station enables an additional
cordless phone to be registered.
4. During the registration process, the distybox300 should be
located close to your base station.
5. Start the registration procedure for the device on your
DECT/GAP base station as if you were registering an
additional cordless unit. Instructions on how to do this
will be given in the operating manual for your base station.
6. Plug the power supply unit into a power socket.
The registration process will be started automatically.
7. The registration process has been successful if the LED
ashes at intervals of approx. 10 seconds.
If the registration process has not been completed successfully
within approx. 3 minutes, register the device manually in
programming mode.
Programming mode
Programming mode on the distybox300 can only be activated
within the rst 10 minutes after plugging in the power supply
unit. This prevents the parameters being changed accidentally
during operation.
Activating programming mode
To put the distybox300 into programming mode, proceed
as follows:
1. Connect your telephone to the distybox300.
2. Connect the power supply unit to your distybox300.
3. Plug the power supply unit into a power socket. Leave the
phone on the hook for at least 30 seconds.
4. Lift the handset on your telephone. Depending on whether
or not your distybox300 is already registered on a base
station, you will either hear a busy tone or a dialling tone.
5. On your telephone, enter: * * 9
6. You will hear a positive acknowledgement tone.
7.
Optional step: Enter the PIN for the distybox300 via your
telephone.
The PIN only needs to be entered if a new PIN has been set up
beforehand in programming mode.
Access to programming mode can be protected using the PIN!
NOTE
NOTE
NOTE
NOTE

Operating instructions Operating instructions
22 23
EN EN
8. You will hear the special dialling tone indicating that
programming mode is active.
You can now enter the parameter codes to change the
relevant features of your distybox300.
Let’s say, for example, you want to use your distybox300 on
a base station with an ISDN telephone connection. Activate
programming mode as described above in points 1– 8 and
then proceed as follows:
1. Enter the programming code for ”Connection to an ISDN/
analogue Line”: 04
2. To activate the feature, enter: #0
3. You will hear a positive acknowledgement tone, followed
by the special dialling tone once more. The feature is now
active.
Setting parameters in programming mode
Not all the features offered by the distybox300 are
supported by every DECT/GAP base station. Refer to the
operating manual for your base station to clarify which
features you can use.
Programming mode needs to be activated before this pa‑
rameter can be set. The function‑programming process is
concluded by entering # and conrmed by the positive
acknowledgement tone. You will then hear the
special dialling tone once more, which means that you can
continue programming other functions. With the exception of
programming points 90, 91 and 99, the change is effective
without having to restart the distybox300.
If an invalid value is entered during programming, a negative
acknowledgement tone is sounded, the procedure is cancelled
and you will hear the special dialling tone once more.
NOTE
EXAMPLE
If during programming no input is made for one minute, the
procedure is cancelled and you will hear the special dialling
tone again.
Programming mode can be exited at any time by replacing
the handset; the distybox300 will then be returned to normal
mode.
Function Parameter Other input
code
Manual registration 1 Base PIN #
of the distybox300
The base station PIN needs to be entered to register the
distybox300. A PIN with 0 to 8 digits will be accepted by the
distybox300. After entering #you will hear the positive
acknowledge tone. Leave the handset off hook and wait
until you hear again the special dial tone, which means that
the registration is completed. If the registration process has
not been completed successfully within approx. 3 minutes,
crosscheck the settings of the base station and try again.
Access to programming mode can be protected using the
four‑digit PIN.
Connection to 40 0 #
an ISDN/analogue
line
This setting has to be used if your base station is connected
to an ISDN phone line. Send Keypad Information, while
connection Keypad information will be suppressed, so it is
possible to transmit DTMF signals.
40 1 #
Suppress Keypad Information: This setting has to be used if
your base station is connected to an analogue phone line.

Operating instructions Operating instructions
24 25
EN EN
Function Parameter Other input
code
40 2 #
Send always Keypad Information: This setting has to be used
if your base station is a distybase Duo or other specied ISDN
system.
Factory setting: 0
Set PARK 80 PARK nummer #
number
As an option, the registration process can be carried out
using the PARK number of your DECT base station (PARK =
Portable Access Rights Key). This can have up to 15 digits.
The procedure is advisable if the registration process cannot
be completed due to other active DECT base stations. Please
refer to the user’s guide for your base station for further
details about PARK numbers.
Factory setting: no PARK number set.
Activate PARK/ARI 81 0 #
number
The PARK/ARI number set under programming point 80/85
is not used during the registration process.
81 1 #
The PARK/ARI number set under programming point 80/85
is used during the registration process.
Factory setting: 0
Function Parameter Other input
code
Set ARI number 85 31 ARI #
Instead of the PARK number (see Parameter 80) the ARI number
can be used for subsciption. For input of the ARI number use 31
as prex.
Factory setting: no ARI number set.
Reset distybox300 90 #
The distybox300 is reset to the factory settings.
This means, however, that the distybox300 is no longer re‑
gistered on a base station. All previous settings are deleted.
After unplugging/plugging in the adapter, the distybox300
is restarted and reprogramming of the distybox300 can begin.
Reset parameter 91 #
The distybox300 remains registered on the base station;
all other parameters are reset to the factory settings.
After entering the parameter, replace the handset and wait for
30 seconds. The distybox300 will be restarted automatically.
NOTE
NOTE

Operating instructions Operating instructions
26 27
EN EN
Technical data
Standard: DECT (Digital Enhanced Cordless
Telecommunications, GAP‑
compatible)
Frequency range: 1880 MHz to 1900 MHz
Transmission performance: 10 mW on average
Voice transmission: 32 kbit/s ADPCM
Fax mode: Group 3, V.29, 9600 bit/s max.
Modem mode: 9600 bit/s maximum
Dialling mode: DTMF (voice frequency signalling)
Connectable telephones: Up to three standard telephones
can be connected in parallel
CLIP: Transmission via FSK1; protocol
conforms to ETSI standard
Operating temperature: +10°C to +40°wC
Relative humidity: 20% to 75%
Permissible storage
temperature: ‑10°C to +60°C
Display unit: LED
Dimensions: 120 x 100 x 38 mm (W x H x D)
Weight: 140 g
Mounting location: Wall mounting in interior rooms
Power supply: 12 V DC +/‑ 15% = 10.2‑13.8 V
(0.12 A zero signal current,
0.4 A max.)
Delivery package: 230 V AC, 50 Hz power supply
unit, optional adapter
Product approval/CE mark
disty communications gmbh hereby declares that the
distybox300 conforms to the fundamental requirements and
other relevant regulations stated in Directive 2014/53/EU
(Radio and Telecommunication Terminal Equipment, R&TTE).
Conformity is declared by the CE mark. The full declaration
of conformity can be viewed on the following website:
www.disty.de
Cleaning
Simply wipe the device with a slightly damp cloth or with an
antistatic cloth; do not use a dry cloth. Do not use cleaning or
scouring agents.

FR FR
Mode d‘emploi Mode d‘emploi
28 29
Table des matières
distybox300
Information importante 29
Connexions et afchages 30
Tonalités audibles 31
Mise en service 32
Assemblage 32
Connexion/Programmation 33
Connexion automatique 33
Mode de programmation 34
Activer le mode de programmation 34
Réglage des paramètres en mode programmation 35
Annexe 39
Caractéristiques techniques 39
Admission/Marquage CE 40
Nettoyage 40
Information importante
Le distybox300 est un adaptateur sans l universel (standard
DECT) pour le fonctionnement de terminaux analogiques
sur des systèmes DECT compatibles GAP. Ce «câble de
rallonge sans l » vous permet d‘économiser du temps de
câblage et peut être réservé dans n‘importe quelle station
de base DECT/GAP disponible dans le commerce comme
un combiné supplémentaire. Vous pouvez connecter des
téléphones analogiques, des télécopieurs, des répondeurs,
des interphones de porte ou des modems à votre station de
base DECT en utilisant le distybox300. L‘appareil doit utiliser
la numérotation DTMF (numérotation DTMF, numérotation
par tonalité). Les terminaux qui ne prennent en charge que
la numérotation par impulsions (méthode de numérotation
IWV, numérotation par impulsions) peuvent être raccordés
à de la distybox300 ne peut pas être utilisé. Veuillez vérier
dans ce cas, si votre appareil est en mode de numérotation
DTMF peut être changé.
Le distybox300 dispose d‘une antenne intégrée et d‘une
portée DECT jusqu‘à 30 m dans le bâtiment et jusqu‘à
300m en champ libre.
Vous trouverez de plus amples informations dans la section
Téléchargement de notre page d‘accueil www.disty.de
NOTE
FR FR
Mode d‘emploi Mode d‘emploi
30 31
Connexions et afchages
1Alimentation électrique
2 Bloc d‘alimentation enchable
Après avoir branché le bloc d’alimentation, le combiné du téléphone
connecté doit rester sur le crochet pendant au moins 30 secondes!
Utilisez uniquement l’adaptateur secteur fourni!
Avant d’ouvrir le boîtier, toujours débrancher le transformateur
d’alimentation!
3Diode électroluminescente (LED)
I ‑ Intervalle de 8 sec. ‑ I LED allumée
LED éteinte Pas d’alimentation électrique
Prêt à fonctionner/Alimentation
(220/230 V) disponible/L’appareil
est enregistré et connecté à la base.
Appel en instance
Connexion d’appel existante
Mode de programmation (menu)
La base est recherchée
Base trouvée
Aucune base
220/230V
50 Hz 21
4
3
1 m
NOTE
NOTE
4Raccordement de ligne Connexion pour téléphone, télécopieur,
répondeur ou modem
La prise RJ 11 est occupée sur les deux
connexions centrales (broches 3 et 4).
Tonalités audibles (dans le combiné ou le haut-parleur)
Tonalité de
numérotation
(Tonalité continue)
Tonalité spéciale
(400/425 Hz,
Tonalité continue)
Tonalité occupée
(425 Hz, répétée)
Tonalité
d’acquittement
positive
(une fois)
Tonalité
d’acquittement
négative
(une fois)
Représentation des
tons (Indication en sec.) Pause
Tonalité

FR FR
Mode d‘emploi Mode d‘emploi
32 33
SÉLECTION
DU SITE
Assemblage
Le distybox300 est conçu pour un montage mural dans des pièces
fermées.
Veuillez noter que vous ne devez pas installer l’appareil à proximité
immédiate d’autres appareils électroniques tels que systèmes hi-,
machines de bureau ou fours à micro‑ondes. De cette façon,
vous évitez les interférences mutuelles. Le lieu d’installation ne doit
pas non plus être choisi à proximité de sources de chaleur (p.ex.
radiateurs ou lumière solaire directe).
An d’éviter tout bruit parasite dans l’état de connexion, l’appareil
terminal connecté ne doit pas être placé à moins d’un mètre du
distybox300.
La distybox300 doit établir une connexion radio avec la station
de base DECT. Avant de déterminer le lieu d’installation, veuillez
vérier si l’emplacement souhaité se trouve dans la zone de portée
de la station de base DECT. En raison de la transmission numérique
dans la plage de fréquences utilisée, les ondes radio peuvent –
selon les conditions structurelles – être également ombragées
dans la plage spéciée. Cela limite la qualité de la transmission.
Toutefois, même un léger changement d’emplacement permet
d’obtenir la qualité de transmission habituelle. ici à l’arrière.
Comme le distybox300 fonctionne comme un combiné de votre
station de base DECT, vous pouvez utiliser votre combiné pour
vérier si le lieu d’installation est approprié.
Les étapes suivantes sont nécessaires pour
assembler le distybox300 :
1. Percer deux trous de 6mm de diamètre
dans le mur tous les 60mm.
2. Insérer les chevilles et tourner les vis
jusqu’à une distance d’environ 5 mm
du mur.
PROPAGATION
RADIO
FIXATION
AU MUR
60 m
NOTE
3. Connectez votre terminal au distybox300.
4. Connectez la distybox300 à l’alimentation électrique.
5. Montez la distybox300.
La distybox300 doit être connectée à votre station de base
DECT/GAP avant de pouvoir être utilisée. La comptabilisation
peut généralement être exécutée à l’aide de la fonction
« comptabilisation automatique ».
Le « mode programmation » offre la possibilité de régler différents
paramètres pour adapter le distybox300 aux fonctionnalités de
votre station de base. Des paramètres supplémentaires permettent
d’adapter le distybox300 à vos besoins personnels. Vous pouvez
également exécuter l’enregistrement manuel ici.
Connexion automatique
La connexion automatique de la distybox300 est possible tant
qu’elle n’est pas encore enregistrée à une station de base.
La condition préalable est que le code PIN de votre station de
base soit réglé sur « 0000 » ou « 1111 ».
1. Connectez l’adaptateur secteur à votre distybox300.
2. Connectez votre téléphone au distybox300, appuyez d’abord
sur la touche « Remplacer le combiné ».
3. Assurez‑vous que votre base offre la possibilité d’enregistrer
un autre combiné.
4. Pendant le processus de connexion, le distybox300 doit être
situé près de votre station de base.
5. Démarrez la procédure d’enregistrement sur votre station de
base DECT/GAP comme si vous vouliez enregistrer un combiné
supplémentaire. La description du mode opératoire se trouve
dans le manuel de votre station de base.

FR FR
Mode d‘emploi Mode d‘emploi
34 35
6. Branchez l’adaptateur secteur dans une prise murale.
Le processus de connexion est lancé automatiquement.
7. L’achèvement réussi du processus de connexion est indiqué par
le fait que la LED s’allume brièvement toutes les 10 secondes
environ.
Si le processus de connexion n’est pas terminé avec succès dans
les 3 minutes environ, exécutez la connexion manuelle en mode
programmation.
Mode de programmation
Le mode de programmation de la distybox300 ne peut être activé
que dans les 10 premières minutes suivant la mise sous tension.
Ceci permet d’éviter toute modication accidentelle des paramètres
en cours de fonctionnement.
Activer le mode de programmation
Pour mettre le distybox300 en mode programmation, procédez
comme suit:
1. Connectez votre téléphone au distybox300.
2. Connectez l’adaptateur secteur à votre distybox300.
3. Branchez l’adaptateur secteur dans une prise murale. Laissez
le combiné de votre téléphone raccroché pendant au moins
30 secondes.
4. Décrochez le combiné de votre téléphone. Selon que votre
distybox300 est déjà connecté à une base ou non, vous enten‑
drez une tonalité d’occupation ou une tonalité de numérotation.
5. Entrer par votre téléphone: * * 9
6. Vous entendez une tonalité d’acquittement positive.
7.
En option! Entrez le NIP de la distybox300 via votre téléphone.
NOTE
NOTE
Il n’est nécessaire d’entrer le code PIN que si un code PIN a été
conguré au préalable en mode de programmation, s’écartant
de l’état à la livraison.
L’accès au mode de programmation peut être protégé par
le code PIN!
8. Vous entendez la tonalité spéciale, le mode de programmation
est activé.
Vous pouvez maintenant modier les caractéristiques de
performance de votre distybox300 en entrant les codes des
paramètres.
Vous souhaitez utiliser votre distybox300 sur une station de
base avec une connexion téléphonique RNIS. Activer le mode
de programmation comme décrit aux points 1–8 ci‑dessus.
Ensuite:
1. Entrer le code de programmation pour le réglage
« Connexion au RNIS/Ligne analogique » : 04 4 0
2. Pour activer la caractéristique de service, saisissez les
données suivantes: #0 #
3. Une tonalité d’acquittement positive retentit, puis la tonalité
d’appel spéciale retentit à nouveau. La fonction est activée.
Réglage des paramètres en mode programmation
Toutes les fonctions proposées ici ne sont pas prises en charge
par toutes les stations de base DECT / GAP. A l’aide du mode
d’emploi de votre station de base, déterminez quelles fonctions
vous pouvez utiliser.
Pour régler ces paramètres, il faut d’abord activer le mode de
programmation. La programmation d’une fonction est terminée
par l’entrée # # et conrmée par la tonalité d’acquittement
NOTE
NOTE
NOTE
EXEMPLE

FR FR
Mode d‘emploi Mode d‘emploi
36 37
positive. Vous entendez alors à nouveau la tonalité de numérota‑
tion spéciale et pouvez continuer à programmer d’autres fonctions.
A l’exception des points de programmation 90, 91 et 99, la
modication prend effet sans redémarrer la distybox300.
Si une valeur invalide est entrée pendant la programmation,
une tonalité d’acquittement négative est émise, la procédure
est interrompue et vous entendez à nouveau la tonalité de
numérotation spéciale.
Si aucune entrée n’est effectuée dans la minute qui suit la
programmation, la procédure est interrompue et vous entendez
à nouveau la tonalité de numérotation spéciale.
Le mode de programmation peut être interrompu à tout moment en
raccrochant le combiné, le distybox300 revient au fonctionnement
normal.
Fonction № d’identication Autres entrées
du paramètre
Connexion manuelle 1 NIP de base #
de la distybox300
Pour enregistrer le distybox300, le code PIN de la base doit être
saisi. Un code PIN de 0 à 8 chiffres est accepté par la distybox300.
Après avoir entré le #, vous entendrez une tonalité d’acquittement
positive. Ne raccrochez pas le combiné tant que le processus de
connexion n’est pas terminé et que vous n’entendez pas à nouveau
la tonalité de numérotation spéciale. Si la connexion n’est pas
terminée dans les 3 minutes environ, veuillez vérier les paramètres
de la base et recommencer le processus de connexion. L’accès
au mode de programmation peut être protégé par le code PIN à
quatre chiffres.
Fonction № d’identication Autres entrées
du paramètre
Raccordement au RNIS/ 40 0 #
ligne analogique
Vous utilisez ce paramètre si votre station de base est connectée à une
ligne téléphonique RNIS. Les chiffres de numérotation sont envoyés
sous forme d‘informations sur le clavier. Dans l‘état de connexion, les
informations du clavier sont supprimées an que les signaux DTMF
puissent être transmis aux dispositifs externes de contrôle.
40 1 #
Supprimer les informations du clavier, ce paramètre est utilisé lorsque
votre base est connectée à une ligne téléphonique analogique.
40 2 #
Les informations du clavier sont toujours envoyées. Vous
pouvez également utiliser ce paramètre lorsque vous utilisez le
distybox300 avec le distybase duo comme station de base ou
station de base RNIS.
État de livraison: 0
Dénir le numéro de 80 Numéro de
stationnement stationnement
#
En option, le processus de connexion peut être effectué en
utilisant le numéro de stationnement à 15 chiffres maximum de
votre station de base DECT. Cette procédure est utile si le processus
de connexion est entravé par d’autres stations de base DECT
actives. Reportez‑vous au mode d’emploi de votre station de
base pour connaître le numéro de stationnement.
État de livraison: pas de numéro de stationnement

FR FR
Mode d‘emploi Mode d‘emploi
38 39
Fonction № d’identication Autres entrées
du paramètre
Numéro de stationnement
/ 81 0 #
Activer ARI
Le numéro de parc/ARI déni au point de programmation 80/85
n‘est pas utilisé lors de la connexion.
81 1 #
Die unter Programmierpunkt 80/85 eingestellte Parknummer/ARI
wird beim Einbuchvorgang verwendet.
État de livraison: 0
Réglage du 85 31 ARI #
numéro ARI
Au lieu du numéro PARK (voir paramètre 80), le numéro ARI
peut être utilisé pour la connexion. Le numéro ARI est précédé de
l‘identication 31.
État de livraison: pas de numéro ARI
reset distybox300 90 #
La distybox300 sera mise à l‘état de livraison.
La distybox300 n‘est alors plus enregistrée à une base ! Tous les
réglages précédents sont effacés. Après avoir débranché/branché
l‘alimentation, un redémarrage du distybox300 est effectué et la
reprogrammation du distybox300 peut être lancée.
Réinitialiser 91 #
les paramètres
La distybox300 reste connectée à la station de base, tous
les autres paramètres sont réglés sur l‘état de livraison.
Après l’entrée, veuillez raccrocher le combiné et attendre
30 secondes. La distybox300 effectue un redémarrage.
NOTE
NOTE
Caractéristiques techniques
Standard: DECT (Digital Enhanced Cordless
Telecommunications), Compatible GAP
Gamme de fréquence: 1880 MHz à 1900 MHz
Puissance d‘émission : 10 mW en moyenne
Transmission de la voix: 32 kbps ADPCM
Fonctionnement fax: Groupe 3, V.29 max. avec 9600 bps
Fonctionnement du modem: 9600 bps max.
Procédure de numérotation: DTMF (numérotation par tonalité)
Téléphones connectables : Jusqu‘à trois téléphones standard
peuvent être connectés en parallèle
CLIP: Transmission via FSK1,
protocole selon la norme ETSI
Température de
fonctionnement: +10°C à +40°C
Humidité relative: 20 % à 75%
Température de stockage
admissible: ‑10°C à + 60°C
Unité d’afchage : Diode électroluminescente (LED)
Dimensions: 120 x 100 x 38 mm (L x H x P)
Poids: 140 g
Lieu de montage : Montage mural à l‘intérieur
Alimentation électrique: 12 V DC +/‑ 15% = 10,2–13,8 V
(0,12A de courant de repos,
0,4A maximum)
État de livraison : Alimentation électrique enchable,
230 V ~, 50 Hz,
adaptateur de connexion en option
Other manuals for distybox 300
3
Table of contents
Languages:
Popular Network Hardware manuals by other brands


WEISS
WEISS INT203 owner's manual

Cisco
Cisco IAD2430 Series Hardware installation guide

ZyXEL Communications
ZyXEL Communications Prestige 1600 Configuration guide

Canon
Canon Vb-C60 - Ptz Network Camera Operation guide

Cisco
Cisco ONS 15454 Procedure guide

ZyXEL Communications
ZyXEL Communications PLX-111 manual