manuals.online logo
Brands
  1. Home
  2. •
  3. Brands
  4. •
  5. Ditel
  6. •
  7. Transmitter
  8. •
  9. Ditel Kosmos series User manual

Ditel Kosmos series User manual

KOS215
PROGRAMMABLE
DIN RAIL
TEMPERATURE
TRANSMITTER
1.0 GENERAL
The KOS215 is a universal DIN Rail mounted temperature transmitter that accepts
most commonly used temperature sensors, slide wire transducers or mV signals and
transmits them as a 4-20mA signal to a host system. The unit can be programmed by
the user from a selection of preset ranges selected by DIL switches or by computer if
required.
2.0 SPECIFICATION @ 24ºC
2.11 RTD Input (Pt100)
Sensor Range -200 to +850ºC (18 a 390Ω)
Minimum Span125ºC
Linearisation BS EN 60751 (IEC 751)
BS1904 (DIN 43670)
JISC 1604
Basic Measurement Accuracy 2±0.01% FRI 5±0.05% Rdg
Thermal Drift Zero 0.008 ºC/ºC, Span 100 ppm / ºC
Excitation current 300µA a 550µA
Maximum lead resistance 50Ω/ leg
Lead resistance effect 0.002ºC /Ω
Preset ranges Refer to section 3.3
2.12 Thermocouple Input
Sensor Ranges Termocouple type Measuring RangeºC4Minimum Span1
TC Tipo K -200 a 1370 50
TC Tipo J -200 a 1200 50
TCTipo T -210 a 400 25
TC Tipo R -10 a 1760 100
TC Tipo S -10 a 1760 100
TC Tipo E -200 a 1000 50
TC Tipo F(L) -100 a 600 25
TC Tipo N -180 a 1300 50
Linearisation BS EN 60584-2, IEC 584-2 (BS 4937)
Basic measurement Accuracy² ±0.04% FE5±0.04% L o 0.5ºC
(Which ever is greater)
Thermal Drift Zero 0.1µV/ ºC, Span 100 ppm/ºC
Cold junction error ±0.5ºC
Cold junction Tracking 0.05ºC/ºC
Cold junction Range -40 to +85ºC
Preset Ranges Refer to section 3.3
2.13 Millivolt input
Input voltage source
Range -10 to +75 mV
Minimum Span¹ 5 mV
Basic Measurement Accuracy2±10µV ±0.07% Rdg
Input Impedance 10 MΩ
Thermal Drift Zero 0.1µV/ºC, Span 100 ppm / ºC
2.14 Slidewire input
Input 3 Wire potentiometer
Resistence Range 10Ωto390Ω(entre extremos) Para entrada a R > 390 los
terminales 9 y 10 deben estar unidos
Characterisation Linear.
Minimum Span15% of full range
Basic Measurement Accuracy20.1% FRI5
Thermal Drift 100 ppm / ºC
Notes.
1Any Span may be selected, full accuracy is only guaranteed for spans
greater than the minimum recomended.
2. Basic Measurement Accuracy includes the effects of calibration,
linearisation and repeatability.
4. Consult thermocouple reference standards for thermocouple material
limitation.
5. FRI = Full Range Input.
2.2 Output
Output range 4-20mA (<3.8 to >20.2 mA)
Maximum Output 23mA
Accuracy ±5µA
VoltageEffect 0.2µA /V
Thermal Drift 1µA / ºC
Supply voltage 10 to 35V
Maximum Output Load [(V Supply -10)/20] KΩ(i.e. 700Ω@ 24V)
Restricted to 300ΩMaximum for inloop
programming
Protection Reverse connection overvoltage 35V
2.3 General
Input/Output Isolation 500VAC rms (galvanically isolated)
Update time 250 mS Maximum
Time constant (Filter Off) < 1 Second (Time to reach 63% of final value)
Filter factor Programmable Off, 2sec, 10sec or Adaptative
Warm-upTime 2 minutes to full accuracy
Stability 0.1% FRI 5or 0.1ºC/year
Environmental
ambient operating range -40 to 60ºC
ambient storage temperature -25 to 70ºC
ambient humidity range 10 to 90% HR non condensing
EMC
Emissions EN50081-1
Inmunity EN50082-2
Mechanical
Enclosure Din rail EN 50022-35
Material ABS
Weight 70g
Flammability SEI UL 94-VI
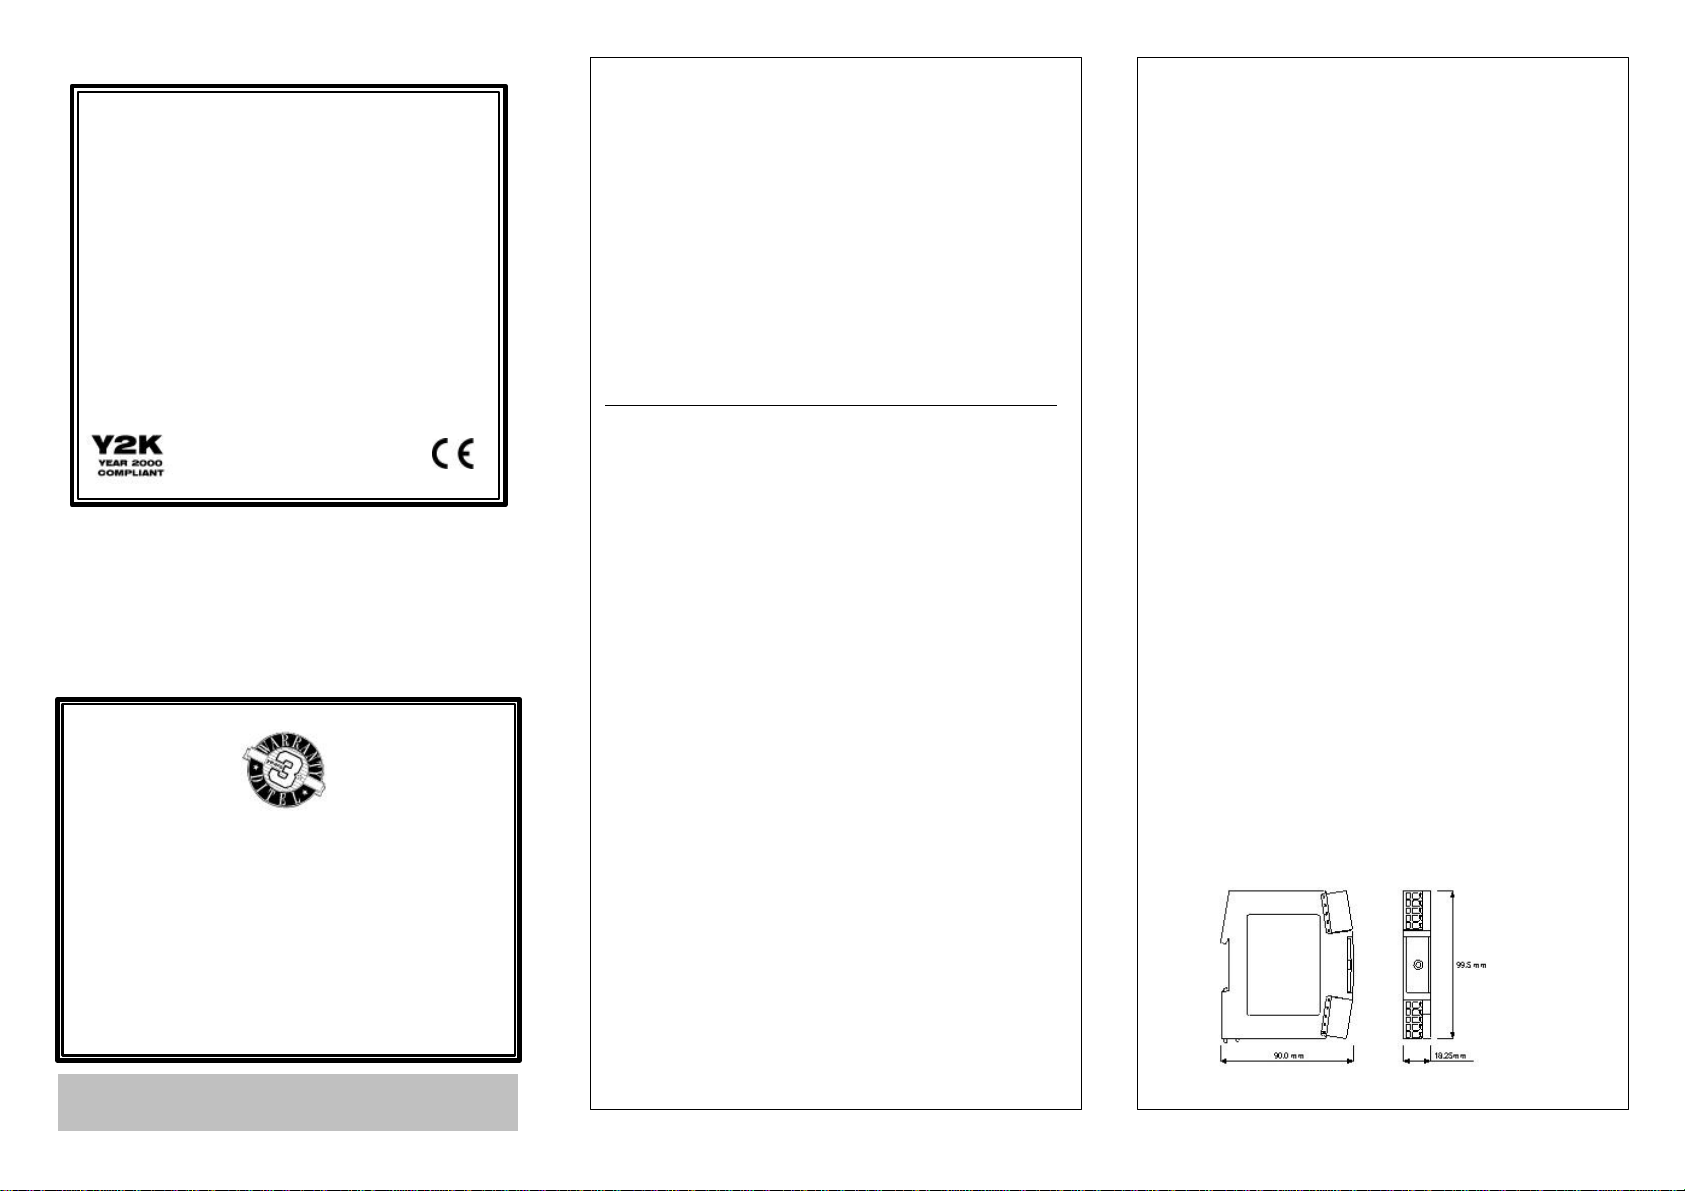
Dimensions 90 x 99 x 18.5mm
Connections Tension clamp two part terminals and 3.5mm jack for comms
Communications
PC Interface RS232 via PC
Loop Load 100-300Ωin loop programming
(Available as quick selector or via PC)
Maximum cable length 1000m
Configurable Parameters Sensor type:Burnout: ºC/ºF: output:
Available as quick selector or via PC
: Hi/Lo: Filter: Tag: user Offset
(available via PC programming only)
Comms protocol ANSI X3.28 1976
Data Rate 1200 baud
3.0 INSTALLATION
3.1 Mechanical
The transmitter is designed to mount onto a standard Din Rail. The transmitter should
be installed with adequate protection from moisture and corrosive atmospheres. The
transmittermay be mountedin any orientation.
Care must be taken when locating the transmitter to ensure the ambient temperature
remains within the specified operating rang. The figure shows the mechanical layout of
thetransmitter.
kos215manualb.doc
30727042
Oct.99
WARRANTY
The instruments are warranted against defective materials and
workmanship for a period of three years from date of delivery.
If a product appears to have a defect or fails during the normal use
within the warranty period, please contact the distributor from which
you purchased the product.
This warranty does not apply to defects resulting from action of the
buyer such as mishandling or improper interfacing.
The liability under this warranty shall extend only to the repair of the
instrument. No responsability is assumed by the manufacturer for
any damage which may result from its use.
KOSMOS SERIES
3.2 Electrical
Connections to the transmitter are made to the tension clamp terminals
providedon the frontface. Output signalwiring should usescreened
twisted pair. It is recommended that the screened cable is used for the
input signal wires for cable runs greater than one metre. For Pt100 inputs
all three input wires must have the same core diameter to maintain equal
resistance. If required the user may change the range of the transmitter by
selecting one of the ranges from the table shown in section 3.3. Power
must be switched OFF first. The selection switch is located at the rear of
the transmitter between the Din rail mounting.
The figure shows the method of connection to provide a 4-20mA current loop output.
The Pt100 sensor shown would normally take the form of a probe assembly with a
three wire connection. The output loop has a voltage power supply used to provide
loop excitation. The load symbol represents other equipment in the loop, normally
indicators, controllers or loggers. Care must be taken when designing the 4-20mA
circuit to ensure that the total voltage requirements of all the equipment in the loop
added together , does not exceed the power supply voltage. If a number of
instruments are connected in the loop, ensure that only one instrument is tied to
ground. Grounding the loop at two points will cause a short circuit of part of the loop
leading to measurement errors.
To maintain CE compliance the transmitter should be mounted in an enclosure to
prevent access to the transmitter during normal operation.
3.3 Preset Ranges
WARNING- Power must be removed before changing DIP settings
Sensor and temperature ranges may be preset using table shown below.
Example shows 123 down 456 up
Temperatureunits and Burnoutoptions may bepreset using tableshown
below.Example shows 7and 8 UP.
Temperature units, Switch 7 Burnout, Switch 8
U= ºC U= Bajo
D= ºF D= Alto
4. CONFIGURATION
The following transmitter parametres can be reconfigured by the user:
Units ºC, ºF, mV or %
Low Range Corresponds to 4mA output
High Range Corresponds to 20mA output
Tag Nº Transmitter identifier
Offset User calibration adjustement
Filter None, 2sec, 10sec, adaptive
Configuration of the trasnmitter is achieved by connecting a PC running RCPW
configuration software to the transmitter via the Configurator Unit. Range switch must
be set to all positions up before programming a non standard unit.
Range 123456
Code
Computer Programmable
Prog UUUUUU 00
Use this code to configure unit using
RCPWsoftware
Pt100, EN60751
-100 to 100 DUUUUU 01
-50 to 50 UDUUUU 02
-50 to 100 DDUUUU 03
-50 to 150 UUDUUU 04
0 to 50 DUDUUU 05
0 to 100 UDDUUU 06
0 to 150 DDDUUU 07
0 to 200 UUUDUU 08
0 to 300 DUUDUU 09
0 to 400 UDUDUU 10
0 to 500 DDUDUU 11
0 to 600 UUDDUU 12
50 to 150 DUDDUU 13
Pt100, IEC 584-1
-25 to 125 UDDDUU 14
0 to 100 DDDDUU 15
0 to 250 UUUUDU 16
250 to 500 DUUUDU 17
-50 to 150 UDUUDU 18
0 to 200 DDUUDU 19
50 to 150 UUDUDU 20
Pt100, JISC 1604
-25 to 125 DUDUDU 21
0 to 100 UDDUDU 22
0 to 250 DDDUDU 23
250 to 500 UUUDDU 24
-50 to 150 DUUDDU 25
0 to 200 UDUDDU 26
50 to 150 DDUDDU 27
Range 123456
Code
Tipo K, IEC 584-3 BS 4937
0 to 100 UUDDDU28
0 to 200 DUDDDU29
0 to 500 UDDDDU30
0 to 600 DDDDDU31
0 to 800 UUUUUD32
0 to 1000 DUUUUD33
0 to 1200 UDUUUD34
Tipo J, IEC 584-3 BS 4937
0 to 100 DDUUUD35
0 to 150 UUDUUD36
0 to 200 DUDUUD37
0 to 400 UDDUUD38
0 to 600 DDDUUD39
Tipo T, IEC 584-3 BS 4937
-50 to 50 UUUDUD40
-50 to 100 DUUDUD41
0 to 100 UDUDUD42
-100 to 100 DDUDUD43
0 to 200 UUDDUD44
0 to 400 DUDDUD45
Tipo R, IEC 584-3 BS 4937
0 to 1000 UDDDUD46
0 to 1600 DDDDUD47
Tipo S, IEC 584-3 BS 4937
0 to 1000 UUUUDD48
0 to 1600 DUUUDD49
Tipo N, IEC 584-3 BS 4937
0 to 100 UDUUDD50
0 to 200 DDUUDD51
0 to 400 UUDUDD52
0 to 600 DUDUDD53
0 to 800 UDDUDD54
0 to 1000 DDDUDD55
0 to 1200 UUUDDD56
Tipo E, IEC 584-3 BS 4937
0 to 1000 DUUDDD57
4.1 Connection of Configuration Module
When configuration is performed using an existing loop, the loop power must be
capable of supplying 30mA and the load resistor chosen so that at least 10V remains
across the transmitter, taking into account all other volt drops within the loop. The
configurator is connected by plugging the 3.5mm jack plug in to the socket located in
the front panel behind the transparent window.
4.2 PC Installation of RCPW
Minimum PC operating system: Windows3.1
Minimum PC requirement: IBM386 or above with 4Mb RAM and
available serial port.
To install RCPW, log File Manager on to drive A: (or as appropriate) and run the
installation program. Note: if no "Product License Number" is entered when prompted
the program will operate in Demonstration mode only.
4.3 Operation of RCPW
Theconfiguration software has alist of main menuoptions which are:File,
View, Option, Devices and Help. These options can be selected by the
mouse or by sinultaneously depressing <ALT> and the letter underlined
as above. Once a menu option has been selected, the status bar shows a
brief description of functions.
For more details see RCPW onscreen help.
DISEÑOS Y TECNOLOGÍA
Travessera de Les Corts,180
08028 BARCELONA, Spain
Tel: +34 - 93 339 47 58
Fax: +34 - 93 490 31 45
e-mail:
[email protected]
DITEL FRANCE, s.a.r.l.
Les Costes,D18
30360 CRUVIERS-LASCOURS,France
Tel: +33 -(0)4 66 542 770
Fax: + 33 -(0)4 66 542 771
e-mail:
[email protected]
DITEL CORP.
379 Rye Beach Avenue
Rye, NY 10580, USA
Tel: +1 914-967 2957
Fax: +1 914-967 0658
e-mail:
[email protected]

Other manuals for Kosmos series

14

This manual suits for next models

1

Other Ditel Transmitter manuals

Ditel KOS1015 User manual

Ditel

Ditel KOS1015 User manual

Ditel Kosmos series User manual

Ditel

Ditel Kosmos series User manual

Ditel Kosmos series User manual

Ditel

Ditel Kosmos series User manual

Ditel KOS1605P User manual

Ditel

Ditel KOS1605P User manual

Ditel Kosmos series User manual

Ditel

Ditel Kosmos series User manual

Ditel KOS206TC User manual

Ditel

Ditel KOS206TC User manual

Popular Transmitter manuals by other brands

INVISIBLE FENCE Outdoor Shields Plus owner's manual

INVISIBLE FENCE

INVISIBLE FENCE Outdoor Shields Plus owner's manual

Powercast TX91513 user manual

Powercast

Powercast TX91513 user manual

Gogen CTR 348 BTC user manual

Gogen

Gogen CTR 348 BTC user manual

Beyerdynamic Synexis TS8 operating instructions

Beyerdynamic

Beyerdynamic Synexis TS8 operating instructions

Renkforce RF-BTR-200 operating instructions

Renkforce

Renkforce RF-BTR-200 operating instructions

Wireless Devices M-823 Operation manual

Wireless Devices

Wireless Devices M-823 Operation manual

Infineon CYW920829M2EVK-02 quick start guide

Infineon

Infineon CYW920829M2EVK-02 quick start guide

Cervis WARRIOR CB W Series manual

Cervis

Cervis WARRIOR CB W Series manual

Stingray 318LIPW1V quick guide

Stingray

Stingray 318LIPW1V quick guide

HK Instruments DPT-MOD Series installation instructions

HK Instruments

HK Instruments DPT-MOD Series installation instructions

Kingspan SENSiT installation manual

Kingspan

Kingspan SENSiT installation manual

Shure P4T user guide

Shure

Shure P4T user guide

GE DewPro MMY31 Installation and operation manual

GE

GE DewPro MMY31 Installation and operation manual

M-system M3LPA instruction manual

M-system

M-system M3LPA instruction manual

Tait TMAA11-06 installation instructions

Tait

Tait TMAA11-06 installation instructions

Status Instruments SEM206/P user guide

Status Instruments

Status Instruments SEM206/P user guide

BWI Eagle AIR-EAGLE SR PLUS 36-1400-4B-120VAC Product information bulletin

BWI Eagle

BWI Eagle AIR-EAGLE SR PLUS 36-1400-4B-120VAC Product information bulletin

HumanTechnik lisa combi II RF operating instructions

HumanTechnik

HumanTechnik lisa combi II RF operating instructions

manuals.online logo
manuals.online logoBrands
  • About & Mission
  • Contact us
  • Privacy Policy
  • Terms and Conditions

Copyright 2025 Manuals.Online. All Rights Reserved.