DITTING KED640 2.0 HYBRID User guide
KED640 2.0 HYBRIDKED640 2.0
EN
Original instrucon manual
Double Espresso Grinder
KED640 2.0 | KED640 2.0 HYBRID

2
15
KED640 2.0
1
2
3
4
5
6
7
8
9
10
12
10
9
8
7
6
14
5
4
3
2
1
13
11
A
DOUBLE ESPRESSO GRINDER
Overview
3
KED640 2.0 HYBRID
1
2
3
4
5
6
7
16
17
18
12
10
9
8
7
6
14
5
4
3
2
1
13
15
11
B
KED640 2.0 (HYBRID) | EN

4
19
20
21
C
DOUBLE ESPRESSO GRINDER

5
KED640 2.0 KED640 2.0 HYBRID
15
13
E
22
19
D
KED640 2.0 (HYBRID) | EN
6
4
5
F
1
23
24
2
15
24
G
DOUBLE ESPRESSO GRINDER
7
8
10
H
KED640 2.0 HYBRID
16
18
I
KED640 2.0 (HYBRID) | EN

8
DOUBLE ESPRESSO GRINDER
KED640 2.0 (HYBRID)
Contents
Overview ............................. 2
Included in delivery ............. 9
General informaon .......... 10
Read operang instrucons
and keep safe .............................. 10
Explanaon of symbols used ...... 10
Safety................................. 12
Intended use ............................... 12
Safety informaon ...................... 12
Before using....................... 15
Funconing and basic sengs ... 15
Checking grinder and
scope of delivery......................... 16
Seng up the grinder and
inserng the bean container ...... 16
Connecng the potenal
equalizer...................................... 18
Adjusng the portafilter support and
aaching the container intake....... 19
Operaon .......................... 20
Adding coffee beans ................... 20
Switching on the grinder ............ 21
Seng the grinding degree ........ 21
Selecng the recipe/grinding me . 22
Changing the recipe/grinding me. 22
Grinding coffee beans................. 23
Interrupng grinding
(stop funcon) ............................ 24
Changing sengs .............. 25
Display/navigaon symbols ........ 25
Retrieving and leaving
main menu.................................. 26
Unlocking service menu ............. 26
Retrieving service menu ............. 27
Eding recipe number ................ 27
Eding recipe details................... 27
Seng the date and me ........... 28
Other sengs ............................. 28
Counter readings ........................ 31
Cleaning............................. 32
Cleaning the grinder installaon
surface......................................... 33
Cleaning the casing..................... 33
Cleaning the bean container ...... 33
Cleaning the grinder ................... 34
Troubleshoong ................ 35
Technical data.................... 38
Disposal ............................. 39
Disposing of the packaging......... 39
Disposing of the grinder ............. 39
Maintenance and service .. 39
CE conformity declaraon . 40
Notes ................................. 41

9
KED640 2.0 (HYBRID) | EN
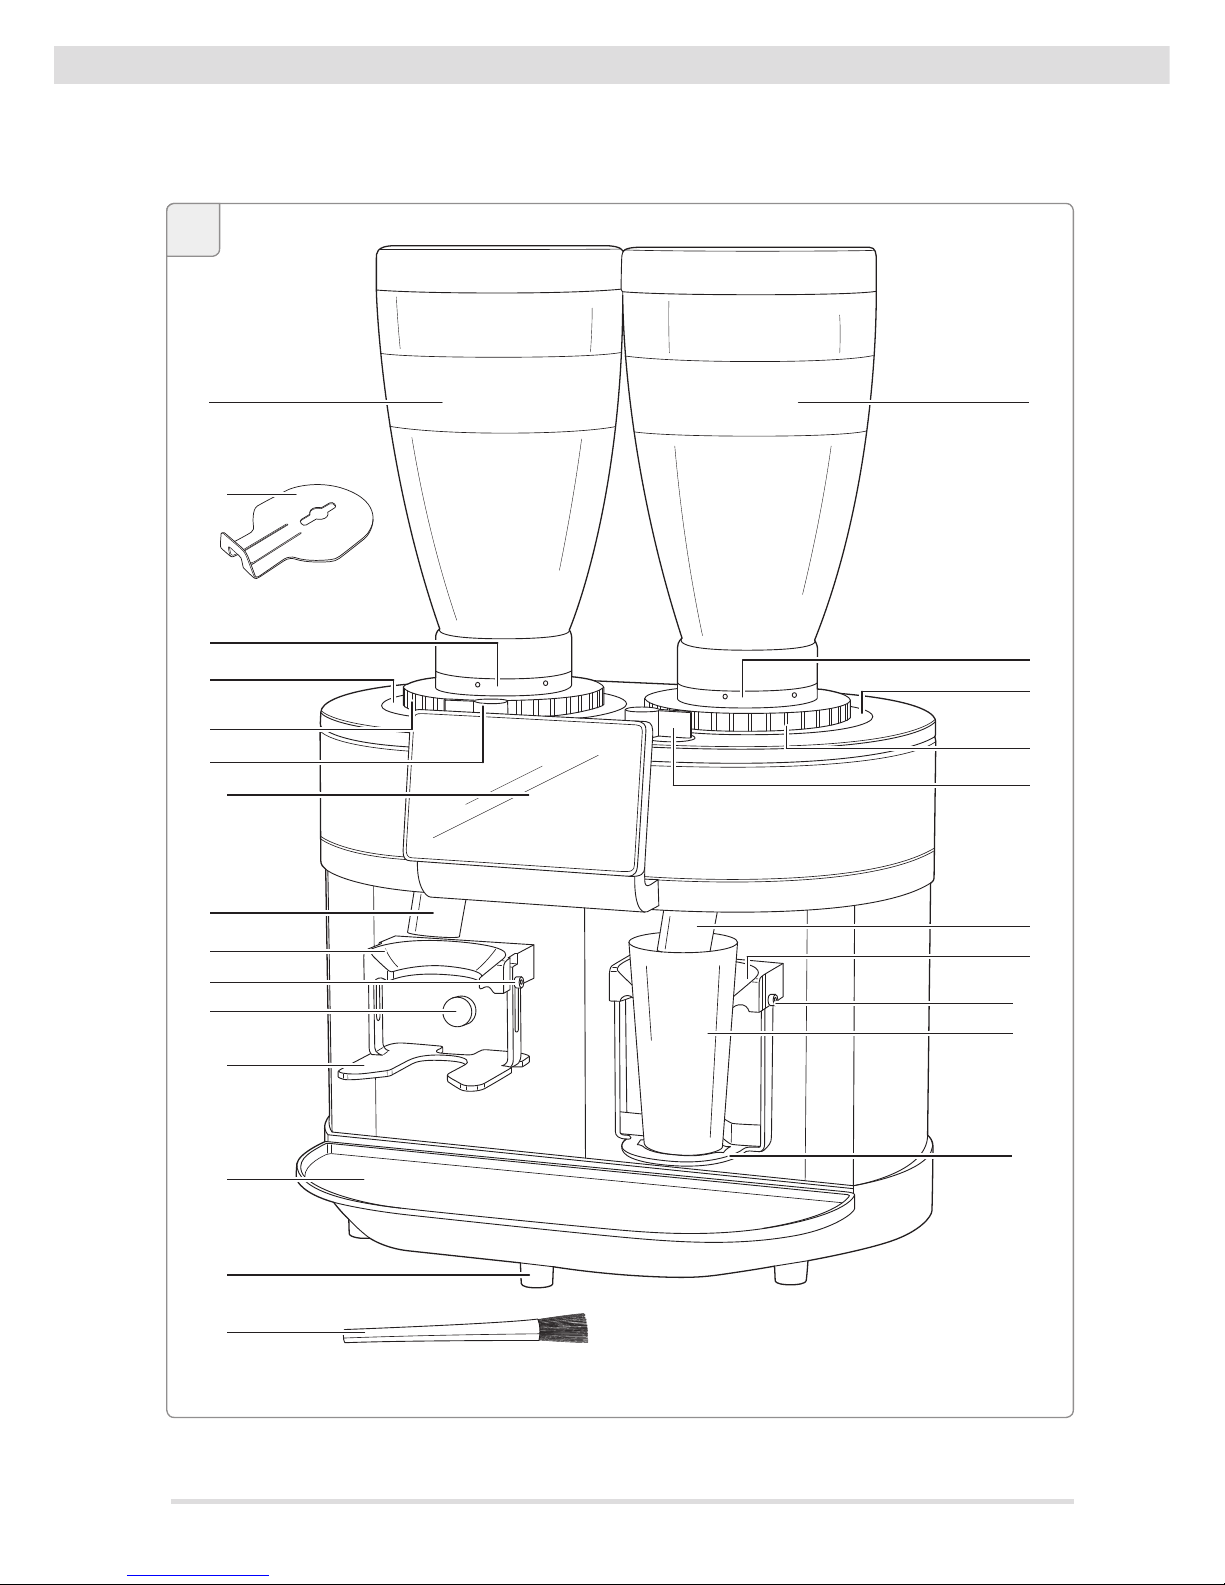
Scope of delivery
No. Name
1Bean container (incl. lid), 2×
2Bean container intake, 2× (legrinder/right grinder)
3Grinding degree scale, 2× (legrinder/right grinder)
4Grinding degree adjustor, 2× (legrinder/right grinder)
5Grinding degree release, 2× (legrinder/right grinder)
6Outlet, 2× (legrinder/right grinder)
7Portafilter intake, 2× (legrinder/right grinder)
8Screw for adjusting the portafilter support (left and right)
[Model KED640 2.0: 4× | Modell KED640 2.0 HYBRID: 2×]
9Start button, 2×
[Model KED640 2.0 HYBRID: with rubber cover on container space]
10 Portafilter support [Model KED640 2.0: 2× (legrinder/right grind-
er) | Model KED640 2.0 HYBRID: 1× (portafilter space)]
11 Brush
12 Feet, 5×
13 Drip tray
14 Display
15 Sliding valve, 2×
16 Screw for attaching the container intake (left and right), 2×
[only model KED640 2.0 HYBRID]
17 Grounds container [only model KED640 2.0 HYBRID]
18 Container intake [only model KED640 2.0 HYBRID]
19 Connecon for potenal equalizaon
20 Power cable (with power plug)
21 On/Offswitch
22 Potenal equalizaon conductor 10 mm2(not included with delivery)
23 Rubber ring (bean container support seal, 2× (legrinder/right grinder)
24 Locking screw for the bean container, 2×

10
DOUBLE ESPRESSO GRINDER
General informaon
Read operang instrucons and keep safe
Before you start using the Double Espresso Grinder KED640 2.0
(HYBRID), carefully read through this original instrucon manual
and the safety informaon. Only then will you be able to use the
Double Espresso Grinder safely and without danger. The original
instrucon manual is based on the standards and regulaons in force in the
European Union. Please also note the guidelines and laws of your specific
country if abroad.
For beer clarity, the Double Espresso Grinder KED640 2.0 (HYBRID) shall be
referred to hereinaer simply as the “grinder”.
Please keep this original instrucon manual safe for later queries.
Please also hand this original instrucon manual on to later owners and users
of the grinder.
Explanaon of symbols used
The following symbols and signal words are used in this original instrucon
manual, on the grinder or on the packaging.
WARNING!
This signal word / symbol indicates a risk with medium
risk level, which, if it is not avoided, can lead to death or
serious injury.
CAUTION!
This signal word / symbol indicates a risk with a low risk level,
which, if it is not avoided, can lead to mild or moderate
injury.
INFORMATION!
This signal word warns against possible material damage.

11
KED640 2.0 (HYBRID) | EN
This symbol provides you with important informaon concerning
operaon or handling.
Conformity declaraon (see chapter “Conformity declaraon”):
Products marked with this symbol fulfil all applicable community
provisions of the European Economic Area.
ETL Listed seal of approval:
Products marked with this symbol meet the requirements for
electrical product safety of the United States of America.
Products marked with this symbol meet the required criteria of
the NSF (Naonal Sanitaon Foundaon) regarding cleanliness
and hygiene in the food industry.
Products marked with this symbol are only permied for use in
interior spaces.
This symbol brings your aenon to danger of electric shock.
This symbol informs you that you need to pull out the power plug
before you clean or repair the appliance.
This symbol indicates that the grinder conforms to protecon
class I.
This symbol indicates the connecon for potenal equalizaon.

12
DOUBLE ESPRESSO GRINDER
Safety
Intended use
The grinder is only suitable for grinding whole roast coffee beans. Do not use
the grinder to grind other products or objects. It is intended for commercial
use and may only be serviced by trained personnel. It may, however, be
operated by other persons in a place where use is supervised.
Any other use is not considered to comply with intended use and can result
in material damage or even personal injury. Do not make any changes to the
grinder. The manufacturer or the supplier shall not be held liable for any
injury or damage resulng from non-compliance with the safety instrucons.
Safety informaon
WARNING!
Danger of electrocuon!
Improper use, incorrect electrical installaon or a voltage that is too
high can all lead to electrocuon.
– Connect the grinder only if the mains voltage of the socket com-
plies with the informaon indicated on the nameplate.
– Only connect the grinder to a socket with good accessibility, so
that you can disconnect it quickly from the power supply in the
event of any hazardous incident.
– Do not use the grinder if you noce any visible damage or if the
power cable or plug is faulty.
– If the power cable for the grinder is damaged, it must be re-
placed by the manufacturer or by qualified personnel in order
to avoid hazards.
– Connect the grinder only to a power supply with a 16 A-slow
back-up fuse or a 15 A load switch.
Have the 16 A-slow back-up fuse or 15 A load switch fied by a
qualified electrician if the power connecon at the site of instal-
laon of the grinder is not secured in this way.

13
KED640 2.0 (HYBRID) | EN
– Install the grinder only in places where the handling of the
grinder can be supervised by trained personnel.
– Do not immerse the grinder or the power cable / power plug in
water or any other liquids.
– Do not clean the grinder with a water jet.
– Do not clean the grinder with compressed air
(e.g. with a compressed air blow gun).
– Never touch the power plug with wet hands.
– Never unplug the mains plug from the wall socket by pulling on
the power cable; always grip the power plug.
– Never use the power cable as a handle to carry the grinder.
– Keep the grinder and power cable / power plug away from open
flames and hot surfaces.
– Do not place the power cable in such a way that could create a
tripping hazard.
– Do not bend the power cable and do not place it over sharp
edges.
– Use the grinder in indoor areas only. Never operate the grinder
in damp rooms or in the rain.
– Keep children away from the grinder.
– Make sure that children do not insert any objects into the grinder.
– If you are not currently using or cleaning the grinder, or if a
disrupon occurs, switch the grinder offand remove the power
plug from the socket.
– Do not open the grinder casing; leave repairs to the experts.
If repairs are required, please contact a specialist workshop.
In the event of independent repairs being carried out, or of faulty
connecon or incorrect operaon, all liability and guarantee
claims are excluded. In the event of a repair, only parts that
comply with the original appliance specificaons may be used.
This grinder contains electrical and mechanical parts that are
essenal for protecon against potenal hazards.

14
DOUBLE ESPRESSO GRINDER
WARNING!
Danger for children and persons with reduced physical, sensory and
mental abilies (e.g. parally disabled persons, older persons with
limited physical and mental abilies) or a lack of experience and
knowledge (e.g. older children).
– This grinder may be used by children older than eight years and
by persons with reduced physical, sensory or mental disabilies
or a lack of experience and knowledge if they are supervised or
instructed on the safe use of the grinder and have understood
the possible resulng dangers. Children are not permied to
play with the grinder. Cleaning and user maintenance may not
be carried out by children without supervision.
– Do not leave the grinder unsupervised when in operaon.
– Do not let children play with the packaging film. Children can
become entangled and choke while playing.
– Do not let children play with the small parts. They can be
life-threatening if swallowed.
CAUTION!
Risk of pping and injury!
Incorrect handling of the grinder can result in injury.
– Posion the power cable so that nobody can become entangled
in it, causing the grinder to fall down.
– Place the grinder on a level and stable surface to prevent it from
falling off.
A USB port can be found on the back of the display.
This USB port must only be used by service technicians, e.g. for
installing soware updates.

15
KED640 2.0 (HYBRID) | EN
Before using
Funconing and basic sengs
The grinder models KED640 2.0 and KED640 2.0 HYBRID each have two
grinders that can be controlled separately (leand right).
The shot sizes, i.e. the volume of grounds per withdrawal, are defined by the
grinding me.
The user can specify up to six different recipes (grinding mes) for each of
the grinders (recipe mode) and also has the possibility of controlling the
grinding me manually (manual grinding).
The grinding process is started automacally when the portafilter/grounds
container is inserted and either stops automacally aer the defined grind-
ing me has elapsed (grinding according to recipe) or when the portafilter/
grounds container is removed (manual grinding).
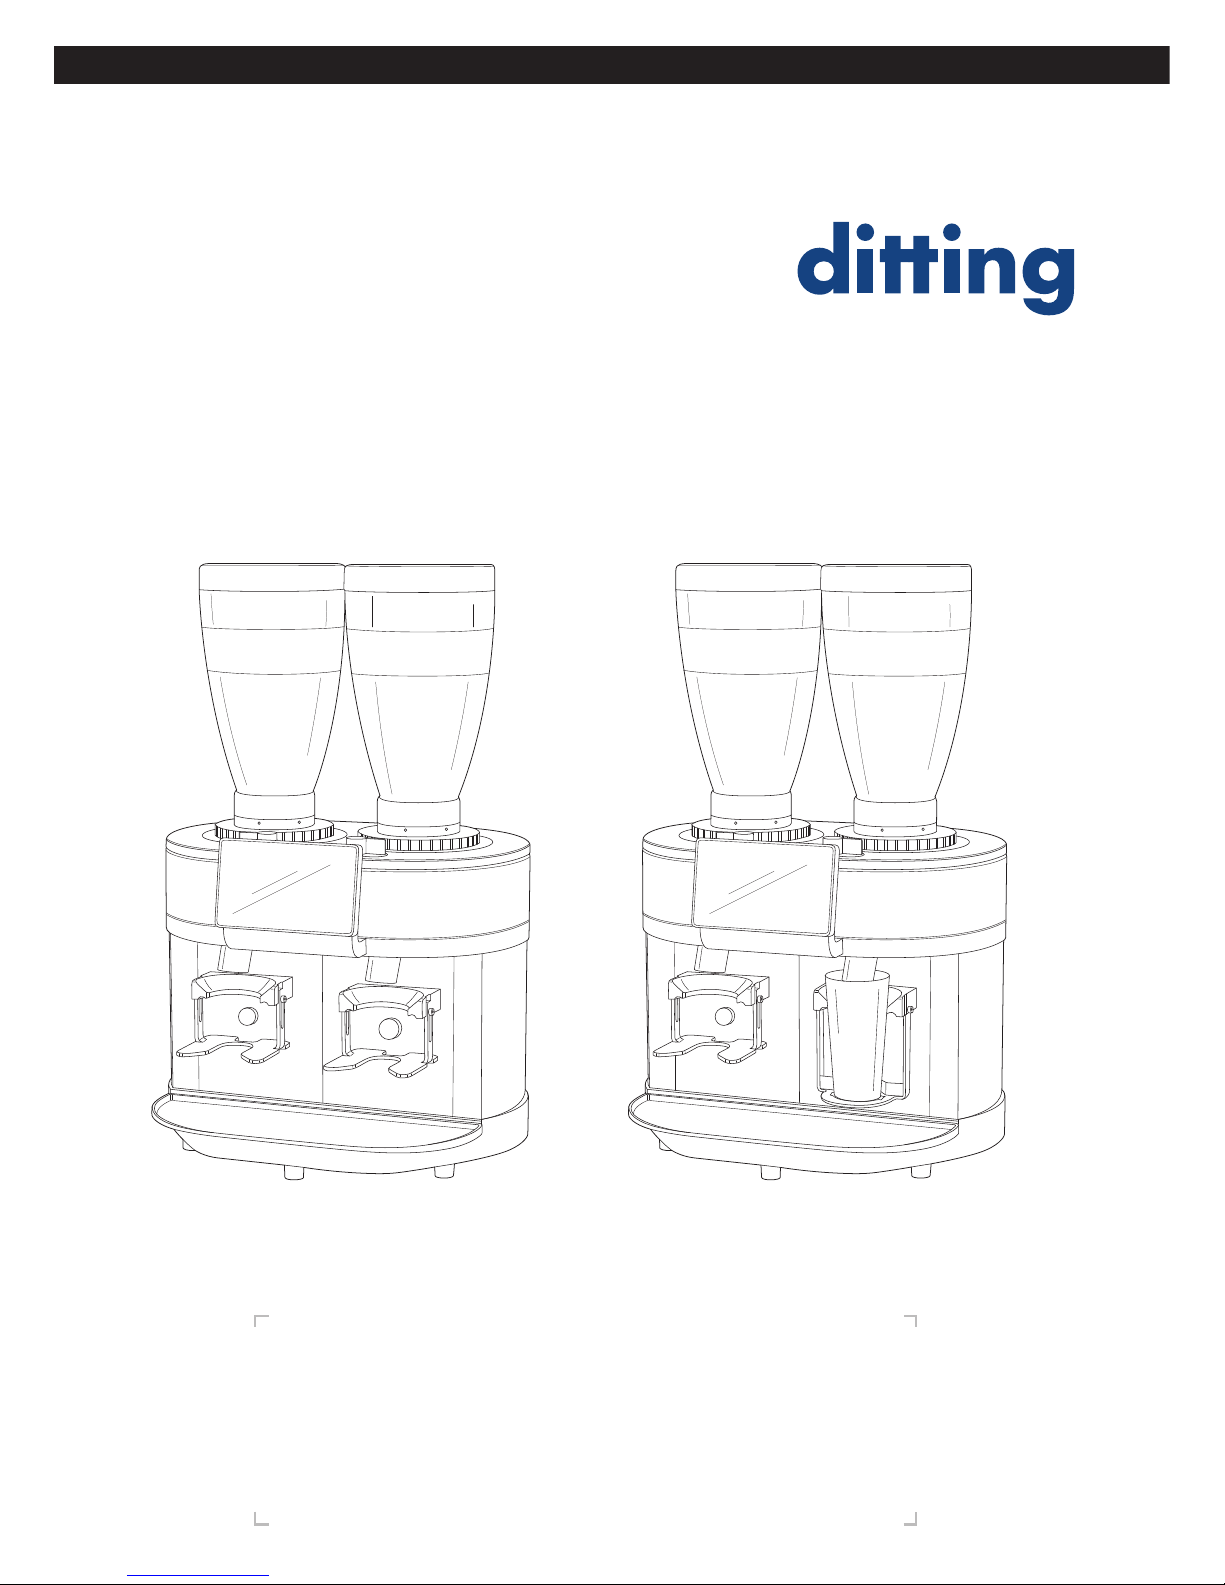
KED640 2.0:
Model KED640 2.0 has two portafilter spaces, i.e. the grounds of both grind-
ers fall directly into the inserted portafilter.
You can modify the KED640 2.0 grinder using a hybrid kit, and as
such, set up a container space instead of a portafilter space (anal-
ogous to model KED640 2.0 HYBRID).
To do this, contact a cerfied service technician who can install
the hybrid kit and unlock the soware menu.
KED640 2.0 HYBRID:
The KED640 2.0 HYBRID model has a portafilter space and a container space,
i.e. the grounds of one grinder fall directly into the inserted portafilter and
the grounds of the other grinder fall into the inserted grounds container (e.g.
for filter coffee).

16
DOUBLE ESPRESSO GRINDER
Checking grinder and scope of delivery
INFORMATION!
Risk of damage!
The grinder can become damaged if the packaging is opened carelessly
with a sharp knife or other pointed object.
– Be very careful when opening.
1. Remove the grinder from its packaging.
2. Check if the delivery is complete (see Fig. A/Band C).
3. Check if the grinder or any of the individual parts are damaged.
If this is the case, do not use the grinder. Contact your supplier
(see chapter “Service”).
Seng up the grinder and inserng the bean container
INFORMATION!
Risk of damage!
Improper use can lead to damage of the bean container.
– Make sure during installaon to posion the bean container
in such a way that the locking screw for the bean container
reaches into the appropriate recess of the bean container when
screwing in. If you do not posion the bean container correctly,
you may damage the bean container when screwing in the
locking screw.

17
KED640 2.0 (HYBRID) | EN
For grinders designed for mains voltage ranges of 200–230 V or
220–240 V, the locking screw for the bean container is a hexagon
socket screw. Use the 2 mm Allen key supplied with this model to
fix the bean container.
For grinders designed for a mains voltage range of 100–127 V, the
locking screw for the bean container is a sloed screw. Use a slot
screwdriver to fix the bean container (not included in delivery).
1. Place the grinder on a level and stable surface that does not vibrate to
prevent it from falling off.
2. Make sure that the rubber ring (23) has been properly posioned in the
bean container intake (2) and is lying flat (see Fig. G).
3. Keep pressing the grinding degree release (5) forward (in the direcon of
the display (14)) and, at the same me, use the grinding degree adjustor (4)
to set the grinding degree to the finest level (scale value “0”) (see Fig. F).
Turn the grinding degree adjustor in such a way that the groove in the
grinding degree adjustor indicates “0” on the grinding degree scale (3).
The locking mechanism can become damaged if you turn the
grinding degree adjustor with force without holding down the
grinding degree release at the same me.
4. Place the bean container (1) onto the bean container intake (see Fig. G).
In doing so, make sure that the pins in the bean container intake catch
the corresponding grooves on the bean container and the recess for the
locking screw on the bean container aligns in the direcon of the locking
screw on the bean container intake.
5. Keep pressing down lightly on the bean container and turn the bean con-
tainer clockwise so that it clicks into the bean container intake.
6. Use a slot screwdriver or the 2 mm Allen key supplied to screw the lock-
ing screw (24) for the bean container clockwise unl finger-ght. Make
sure not to screw the locking screw too ghtly. The locking screw should
be level with the grinding degree adjustor.
7. Repeat steps 2–6 to insert the second bean container into the remaining
(free) bean container intake.
8. Seal the bean container by sliding in both sliding valves (15).
If you do not need both sliding valves, you can clamp them to the
boom of the drip tray (see Fig. E).
18
DOUBLE ESPRESSO GRINDER
9. Place the drip tray (13) into the corresponding opening under the outlet
(6) so that the magnets underneath the drip tray sit in the appropriate
intakes.
Connecng the potenal equalizer
The connecon for potenal equalizaon (19) is located on the back of the
grinder (see Fig. C). The electrical connecon and tesng of electronic func-
onality must be carried out by an electrician.
1. Loosen and remove the lock nut (see Fig. D).
2. Remove the lock ring and the flat washer.
3. Connect the potenal equalizaon conductor (22) to the potenal
equalizer.
The potential equalization conductor is not included with
delivery.
Use a copper potenal equalizaon conductor with a minimum
cross-secon of 10 mm2.
If you have quesons about this, contact an authorized service
partner or electrician.
4. Secure the potenal equalizaon conductor by reaaching the nut, flat
washer and lock ring.
5. Make sure that the grinder is switched off(On/Offswitch (21) to “0”) and
connect the grinder to the power supply by inserng the power plug (20)
into a properly installed safety socket.
19
KED640 2.0 (HYBRID) | EN
Adjusng the portafilter support and aaching the
container intake
For grinders designed for mains voltage ranges of 200–230 V or
220–240 V, the portafilter support and the container intake are
aached with hexagon socket screws. Use the 3 mm Allen key
supplied with this model for fixing.
For grinders designed for a mains voltage range of 100–127 V,
the portafilter support and the container intake are aached with
sloed screws. You will need a slot screwdriver for fixing (not
included with delivery).
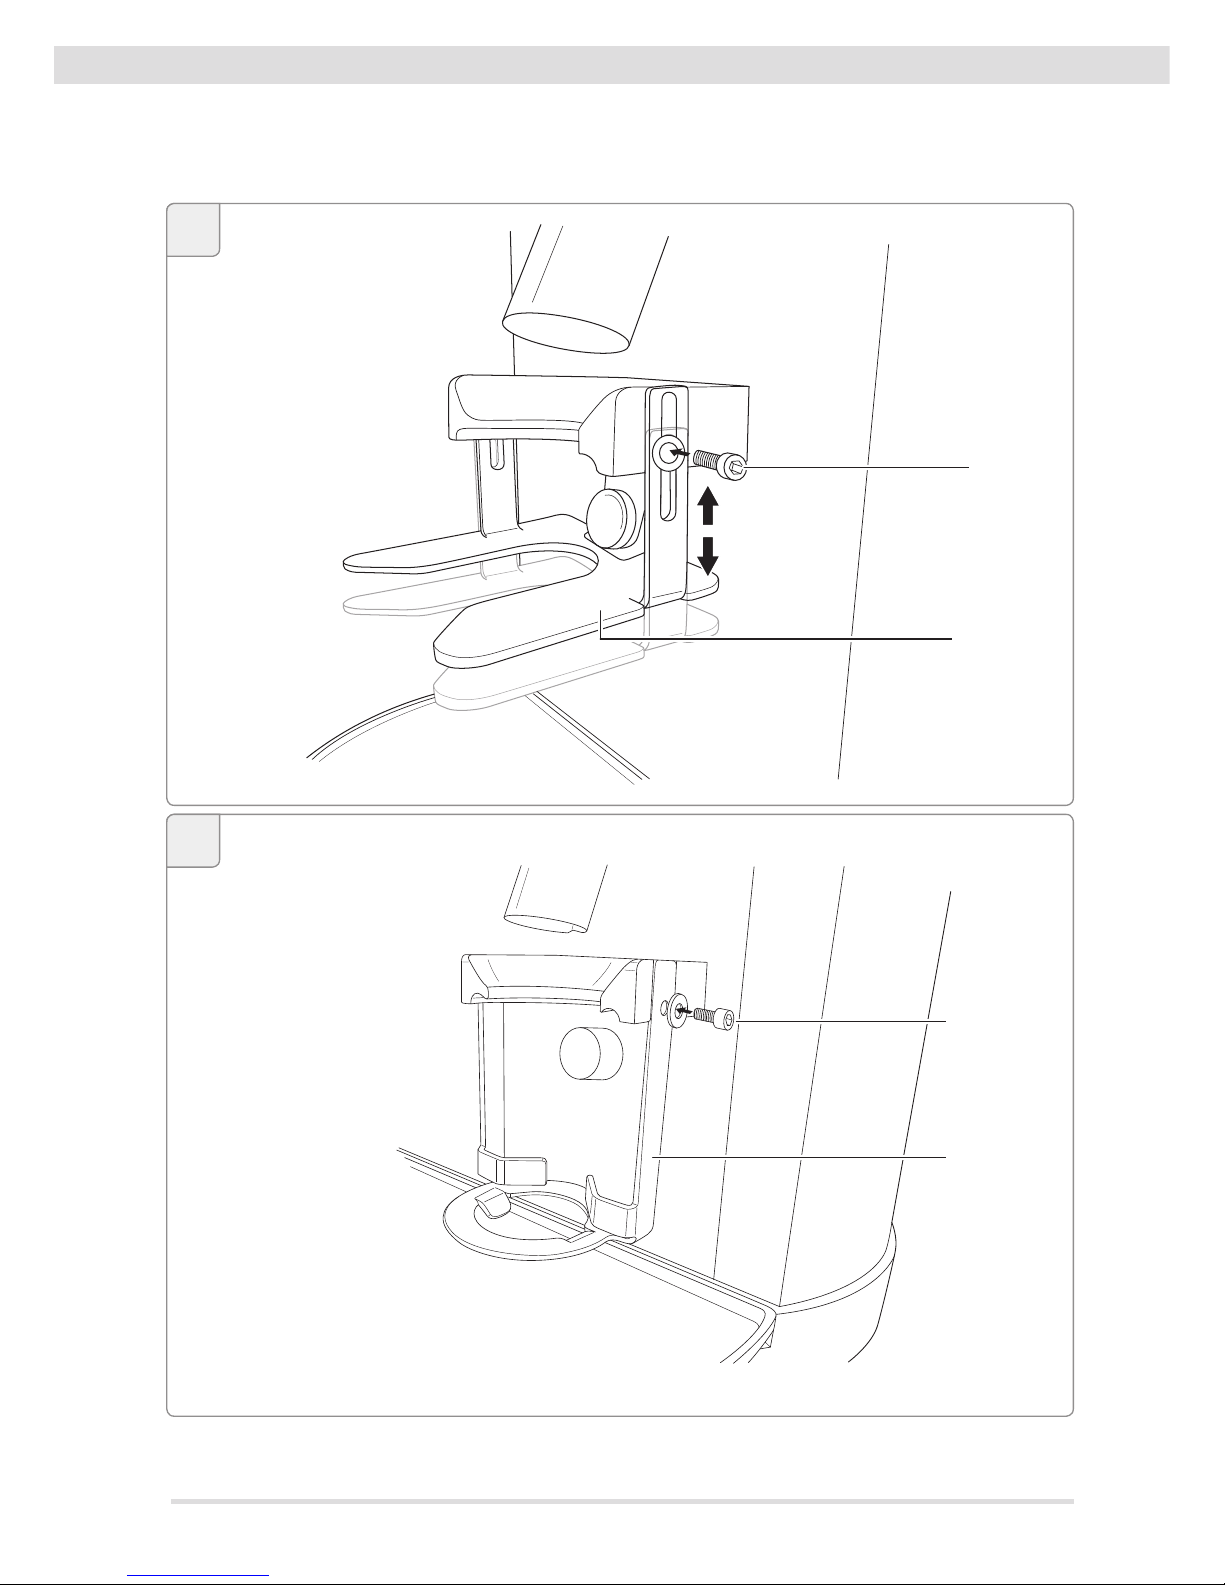
Adjust the portafilter support (10) to the size of your espresso machine’s
portafilter (see Fig. H):
1. Make sure that the grinder is switched offand not connected to a power
supply (On/Offswitch (21) to posion “0”).
2. Turn anticlockwise using a slot screwdriver or the 3 mm Allen key
supplied to loosen the screws (8) for adjusting the portafilter support
(left and right).
The portafilter support is lowered as far as it will go.
3. Insert the portafilter into the portafilter intake (7) .
4. Push the portafilter support upwards unl the portafilter fits exactly
between the portafilter support and the portafilter intake.
If the portafilter support does not fit, contact your supplier
(see chapter “Service”).
5. Hold the portafilter support in posion and fix it by turning the screws
for adjusng the portafilter support (leand right) unl ght using a slot
screwdriver or the 3 mm Allen key supplied.
6. KED640 2.0:
Repeat steps 2–5 to adjust the second portafilter support.
KED640 2.0 HYBRID:
Aach the container intake (18) by fixing it to the grinder on both sides
using the two screws (16) for aaching the container intake and two
washers (see Fig. I).

20
DOUBLE ESPRESSO GRINDER
Operaon
INFORMATION!
Danger of overheang!
Exceeding the maximum permissible operang cycle can cause the
grinder to overheat.
– Do not exceed the maximum operang cycle
(see chapter “Technical data”).
– Observe the recommended pause when the maximum permis-
sible operang cycle is reached (see chapter “Technical data”).
• The grinder has two fuses that act as an overcurrent
protecon device. If this overcurrent protecon device is
triggered because of electric overload, the grinder’s circuit is
interrupted.
• To be able to operate the grinder once again aer triggering
the overcurrent protecon device, switch the On/Offswitch
(21) to “0” (off) and contact an authorized service partner
(see chapter “Service”).
• The grinder also has a motor protector, which switches offthe
grinder when the motor becomes too hot. As soon as the
motor has cooled down, the grinder can be put into operaon
again (see chapter: “Troubleshoong”).
Adding coffee beans
1. Remove the lid from the bean container (1).
2. Pour whole roasted coffee beans into the bean container from above.
• The maximum filling quanty should be approx. 1 cm below
the edge of the bean container.
• The minimum filling quanty should not fall below 2 cm in
order to ensure that there are no dosing fluctuaons.
3. Place the lid back onto the bean container.
4. If necessary, open the bean container by pulling out the sliding valve (15)
(see Fig. G).
This manual suits for next models
1
Table of contents
Other DITTING Grinder manuals


Popular Grinder manuals by other brands


BIRO
BIRO 722 Operation and service manual

Rupes
Rupes GM62N Original operating and maintenance instructions

Sioux Tools
Sioux Tools 1291 Original instructions

Lincoln Electric
Lincoln Electric K5447-1 instruction manual

Silverline
Silverline 196512 Original instructions

Parkside
Parkside PWSA 20-Li E4 Translation of the original instructions