djive Vacumate One User manual
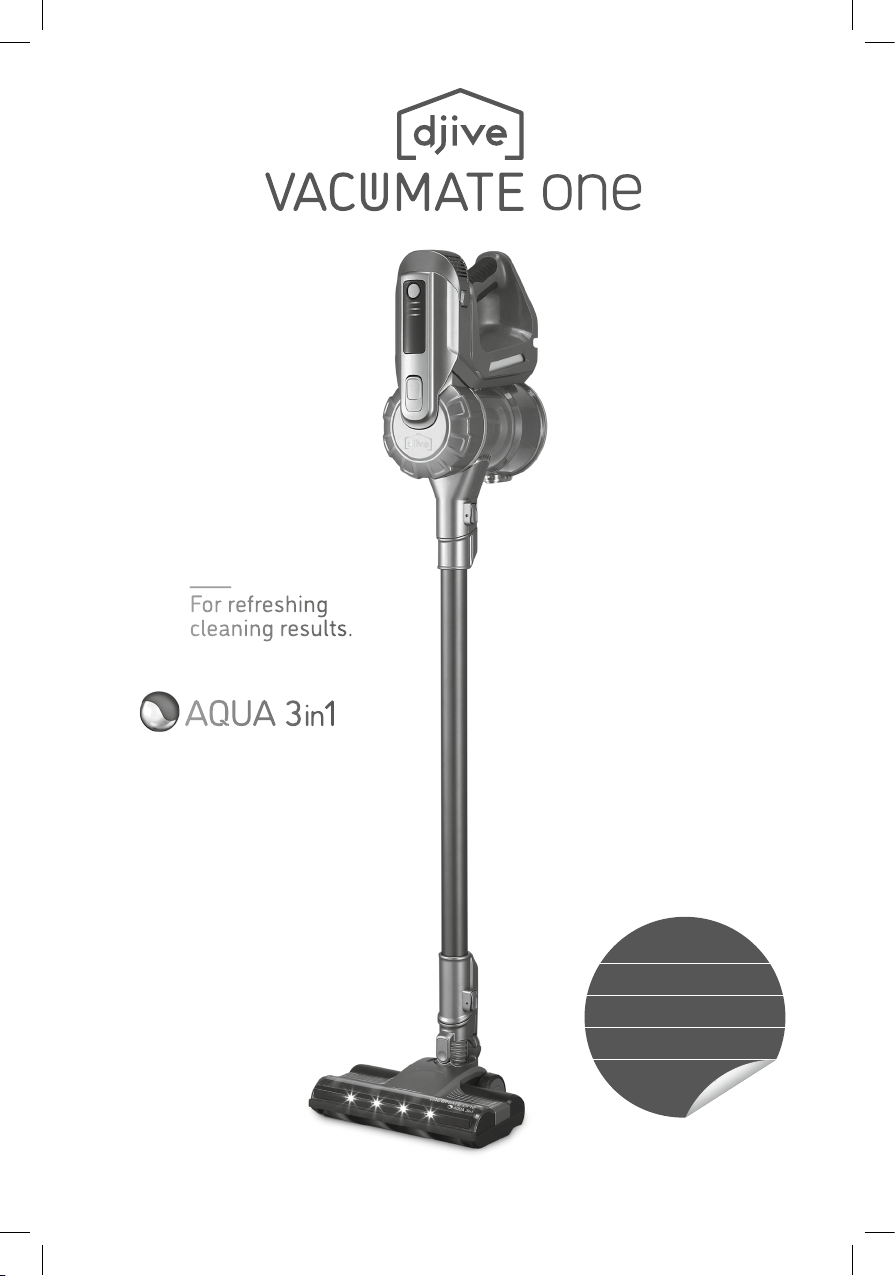
vacuum, mop
& brush
in a single step
For refreshing
cleaning results.
English
Deutsch
Français
Español
Italiano
Italiano
2
Contents
Important safety advice 4
Overview and description of the parts 8
Assembly 10
Charging station 12
Charging and removing the battery 14
LED display 16
Filling and docking the mopping tank 18
The first cleaning job 20
Emptying the dust container 22
Cleaning the dust container and filter system 24
Cleaning the exhaust air filter 26
Removing & cleaning the roller brush 28
Removing & cleaning the upholstery brush 30
Cleaning the water tank and mopping cloth 32
What to do if problems arise? 34

3
Dear Customer,
Your new Vacumate One is about to
be used for the first time to make your
living space shine.
Please take a moment to read this
manual to familiarise yourself with
your new Vacumate one 3in1 cordless
vacuum cleaner.
If you have any questions, please
contact our customer service.
Enjoy cleaning your home the easy
way, every day, with your Vacumate
One!
Customer care
Phone +49 (0) 209 5130340
suppor[email protected]
www.djive.eu vacumate
Robovox Distributions GmbH | Hamburger Straße 11, D-45889 Gelsenkirchen

4
IMPORTANT
SAFETY ADVICE \\\
Before you use this cordless vacuum cleaner, please read all the
instructions and warnings in this manual carefully as well as on
the device itself. Please store this manual in a safe place.
When using an electrical device, basic safety precautions should always be
implemented and followed. This especially applies to points in this manual
which are marked with the following:
ATTENTION
This warning applies to the cordless vacuum cleaner as well as to cleaning
attachments, accessories or charging devices.
TO REDUCE THE RISK OF FIRE, ELECTRIC SHOCK OR INJURY:
1. This device is not intended for use by small children or invalid persons
with reduced physical, sensory or mental capabilities or those with a lack
of experience and knowledge, unless they are instructed or supervised by
a responsible person regarding the use of the device to ensure that they
can use the device safely.
2. The device must not be used as a toy. Special attention is necessary
when the device is used by or near children. Children should be super-
vised at all times to ensure that they do not play with the device.
3. Only use the device as described in this manual. Do not carry out any
maintenance other than that described in this manual.
4. The cordless vacuum cleaner is only suitable for dry locations. Not to be
used outdoors or on wet surfaces.
5. Do not handle any part of the plug or device with wet hands.

5
English
6. Do not use the device with a damaged cable or plug. If the power cord is
damaged, it must be replaced by a service worker or a similarly qualified
person to avoid any hazards.
7. If the cordless vacuum cleaner is not functioning normally, has been
struck hard, dropped, damaged, left outdoors or fallen into water, for
safety reasons, do not continue to use the device.
8. Please contact customer service if maintenance or repair is required.
Do not dismantle the cordless vacuum cleaner yourself, as incorrect
assembly could lead to electric shock or fire.
9. Do not stretch the cable or expose it to any strain. Keep the cable away
from hot surfaces. Do not place the cable under doors or pull the cable
along sharp edges or corners. Do not plug the cable into locations that
cannot be easily accessed or where it could be tripped over. Do not drive
over the cable.
ATTENTION
Do not store near
warm or hot places.
10. Do not pull the mains plug out of the socket by the cable, instead always
hold the plug case to pull out the mains plug. The use of an extension
cable is not recommended.

6
IMPORTANT
SAFETY ADVICE \\\
11. Do not use to vacuum water.
12. Do not use to vacuum flammable or combustible liquids such as petrol,
or areas in which they or their vapours could be present.
ATTENTION
Do not vacuum water or other liquids
under any circumstances.
13. Do not vacuum burning or smoking items such as cigarettes, matches or
hot ash with the cordless vacuum cleaner.
ATTENTION
Do not vacuum burning objects under any
circumstances.
ATTENTION
Do not use near naked flames under any
circumstances.
14. Keep hair, loose clothing, fingers and all body parts away from openings
and moving parts. Do not direct the hose, suction hose or the cleaning
attachments at your eyes or ears and do not put them in your mouth.

7
English
15. Do not put any objects in the openings of the cordless vacuum cleaner.
Do not use when the opening is blocked, otherwise the device will over-
heat. Keep the cordless vacuum cleaner and the moving parts free from
dust, lint, hair and everything that could affect the air circulation.
16. Only use accessories and spare parts recommended in this manual.
17. Do not use the device without the dust container and the filter.
18. Unplug the device from the mains socket if it is not being used for a long
period of time and before maintenance.
19. Be especially careful when cleaning stairs and, if possible, hold on to the
banister.
20. Do not place the device outside, in a bathroom or within 3 metres of a
pool and do not use it outdoors. Do not use on wet surfaces and do not
expose it to moisture, rain or snow. Never charge the battery near water,
outdoors or in damp environments.
21. Only use the chargers of this device to charge this cordless vacuum
cleaner. Only use the batteries of this device as other types of batteries
could explode and lead to injury or damage to property.
22. Do not incinerate this cordless vacuum cleaner, even when the device is
severely damaged. The battery may explode in the event of a fire.
23. Always turn the cordless vacuum cleaner off before you insert or remove
the motorised floor brush or the motorised upholstery brush.
24. Do not fill the water tank with any flammable or corrosive liquids as this
could cause damage and cause the water tank to uncontrollably lose
water. Never use too much detergent in the water as the detergent will
remain on the floor and there may be a risk of slipping.
8
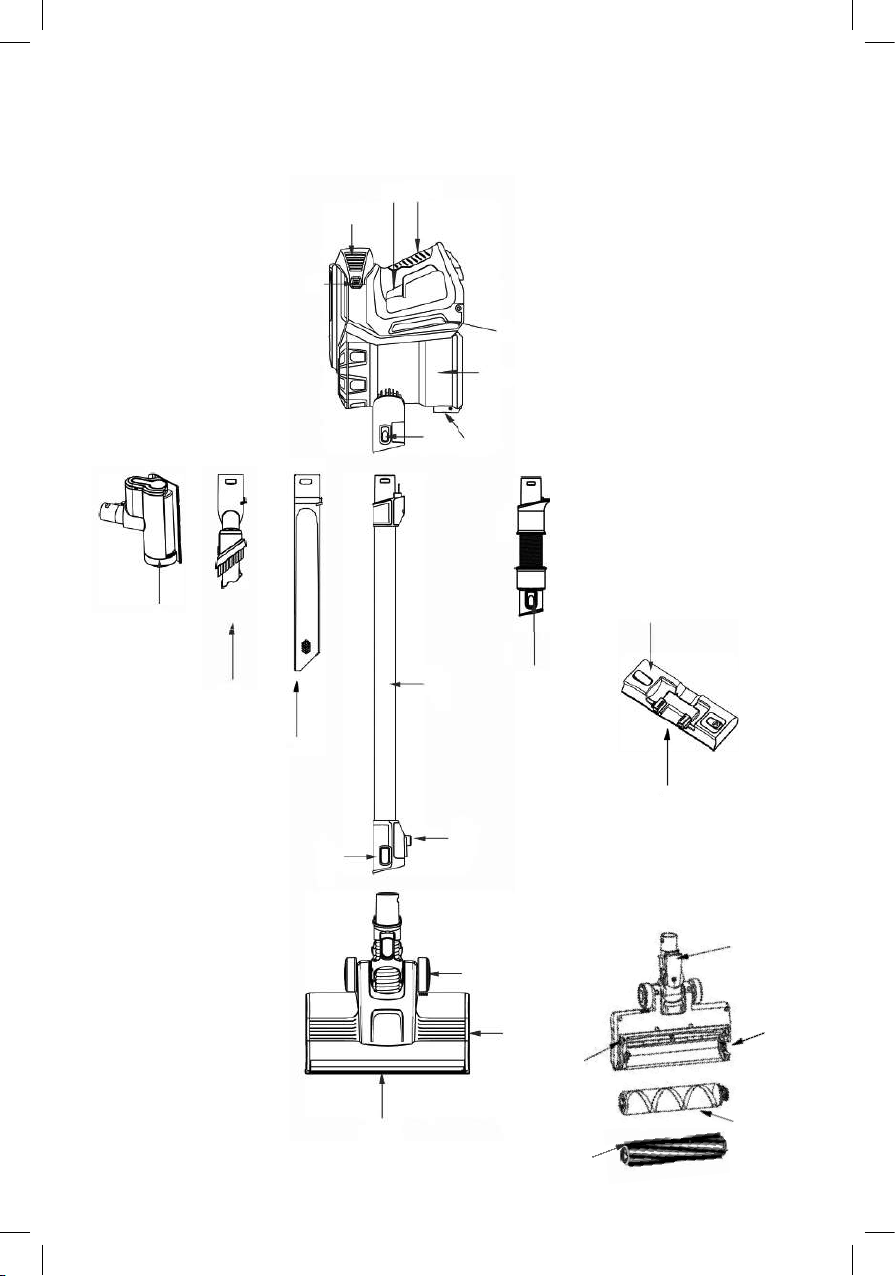
OVERVIEW \\\ 1.
2.
3.
6.
11.
8.
9.
18.
12.
13. 14.
20.
21.
19.
23.
28.
22.
24.
25.
16.
17.
7.
26.
27.
15.

9
English
10.
32.
Description of parts
1. Handle
2. Master switch on/off
3. Rechargeable battery
4. Battery eject button
5. Wall station bracket
6. Extract air grille
7. Extract air grille release button
8. Dust collection container
9. Release button for the dust con-
tainer bottom flap
10. Dust container module release
button
11. Release button for electrical
connection of the suction hose /
upholstery brush
12. Suction pipe with electrical con-
nections
13. Release button for the electrical
connection of the motorised floor
brush / upholstery brush or for
the attached 2in1 furniture brush /
grout nozzle
14. Pipe fixing hook
15. Flexible suction hose Motorised
upholstery brush
16. motorised upholstery brush
17. 2 in1 furniture brush
18. Grout nozzle
19. Motorised floor brush
20. Sliding wheel on the floor brush
21. LED lighting
22. Small sliding wheel
23. Electrical connection of the motor-
ised floor brush
24. Roller brush / carpet brush release
button
25. Roller brush
26. Carpet brush
27. Mopping tank
28. Mopping tank release button
29. LED display
30. Max mode button
31. Wall holder and charging station
32. Charger
31.
29. 30.
4.5.
10
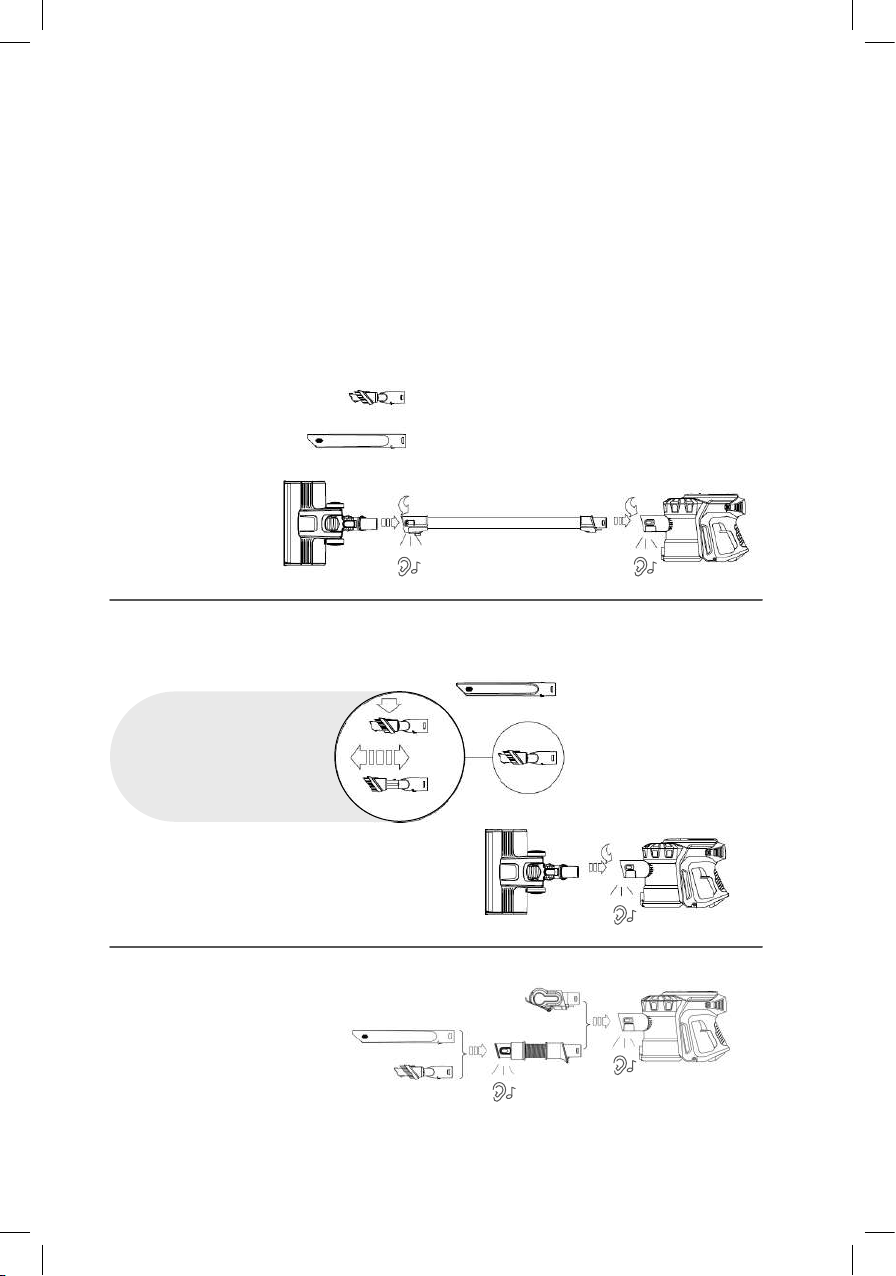
ASSEMBLY \\\
The cordless vacuum cleaner can be used in different configura-
tions: It can either be used as an upright appliance or as a prac-
tical hand-held vacuum cleaner.
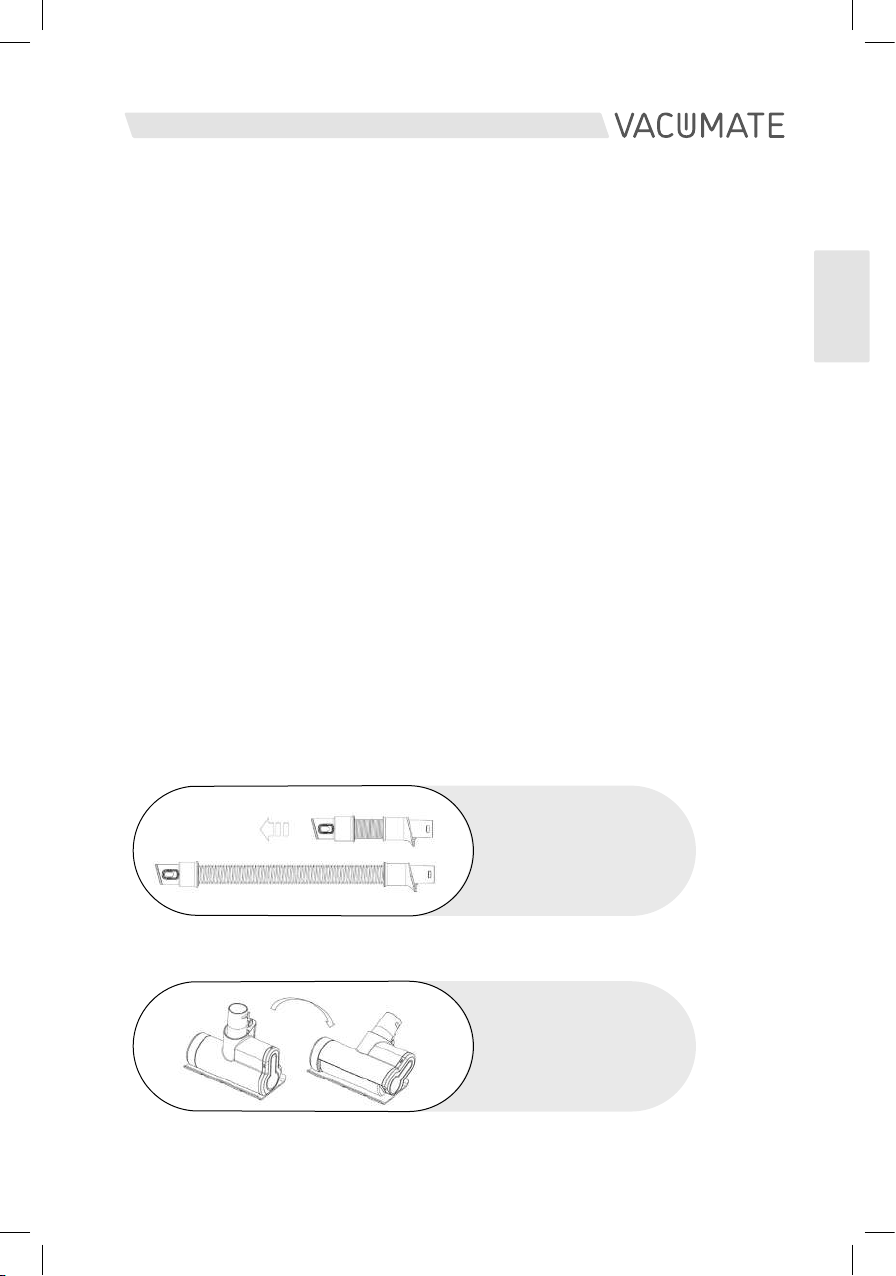
The 2in1 furniture brush
can be converted into
a small upholstery
nozzle by pushing the
button on top.
11
English
Assembly as an upright appliance
Hold the suction hose so that the electric contact rods are on the underside.
Now carefully push the suction hose into the hand module opening. The
electrical contacts then slide into the small openings on the hand-held part.
The suction snaps into place with an audible “click”.
Now you can either attach the floor brush or the other cleaning attachments
to the other end of the suction hose.
The grout nozzle and the 2in1 furniture brush both have a small guide rail on
the underside. This must point downwards during assembly so that it can
slide into the notch in the round part of the connection. These attachments
also lock in with an audible “click”.
Conversion
Press the electrical connection release button on the suction hose. Now
either the entire suction hose can be removed or only the respective cleaning
attachment at the other end using the second release button.
The position of the foot can
be flexibly changed on the
upholstery brush.
The flexible suction hose can
be pulled out and pushed
back together again.

12
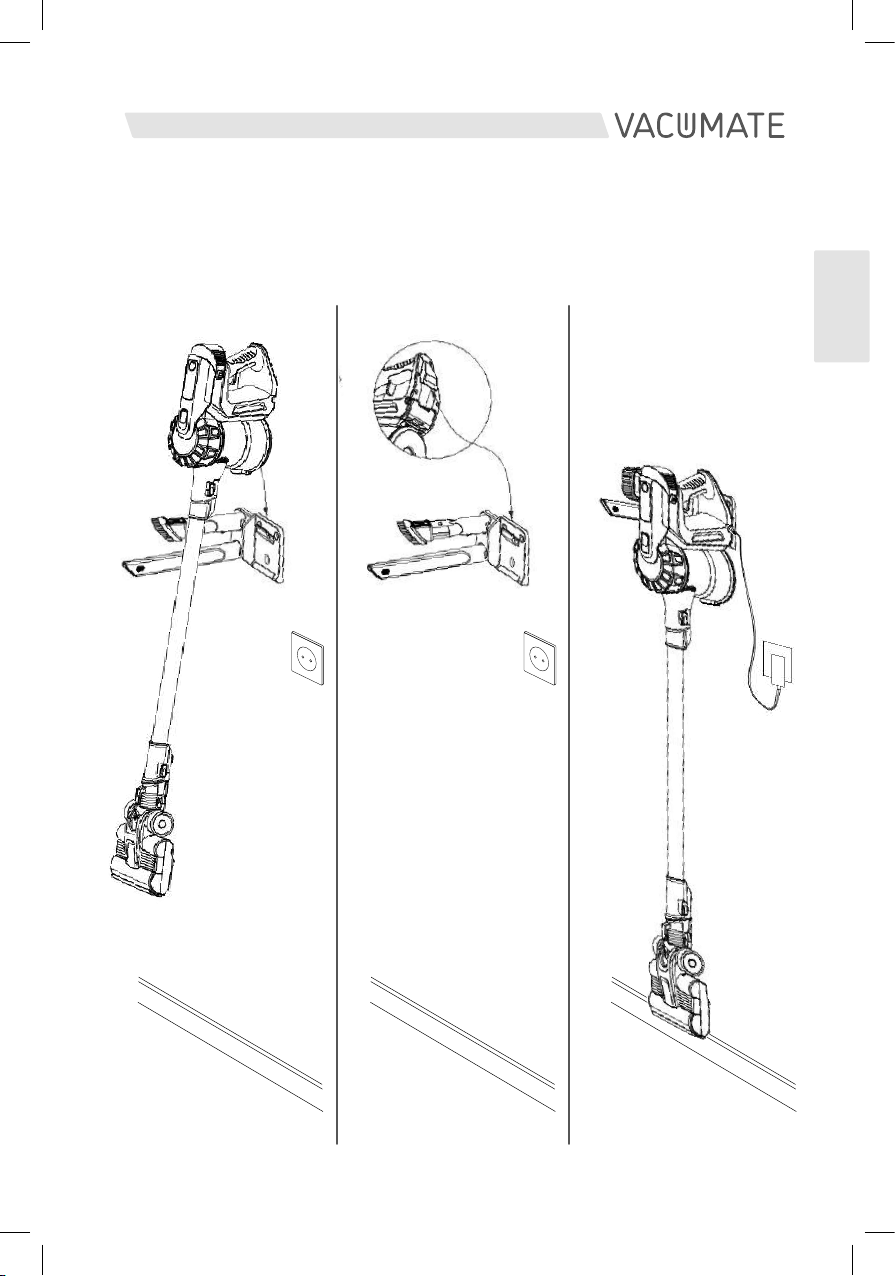
CHARGING STATION \\\
First, mount the wall bracket and charging station on the wall using the
supplied screw set. The minimum height of the wall bracket should be 115 cm
from the floor so that the assembled cordless vacuum cleaner can be hung in
its entire length. In addition, there must be a socket for the charging adapter
in the immediate vicinity (maximum 130 cm away).
Min. 115 cm
Max. 130 cm
13
English
1. 2. 3.
Hang the cordless vacuum cleaner at an angle from above into the wall
bracket, connect the charging cable to the battery in the appliance and
charge for approx. 4 hours.
14
CHARGING AND REMOVING
THE BATTERY \\\
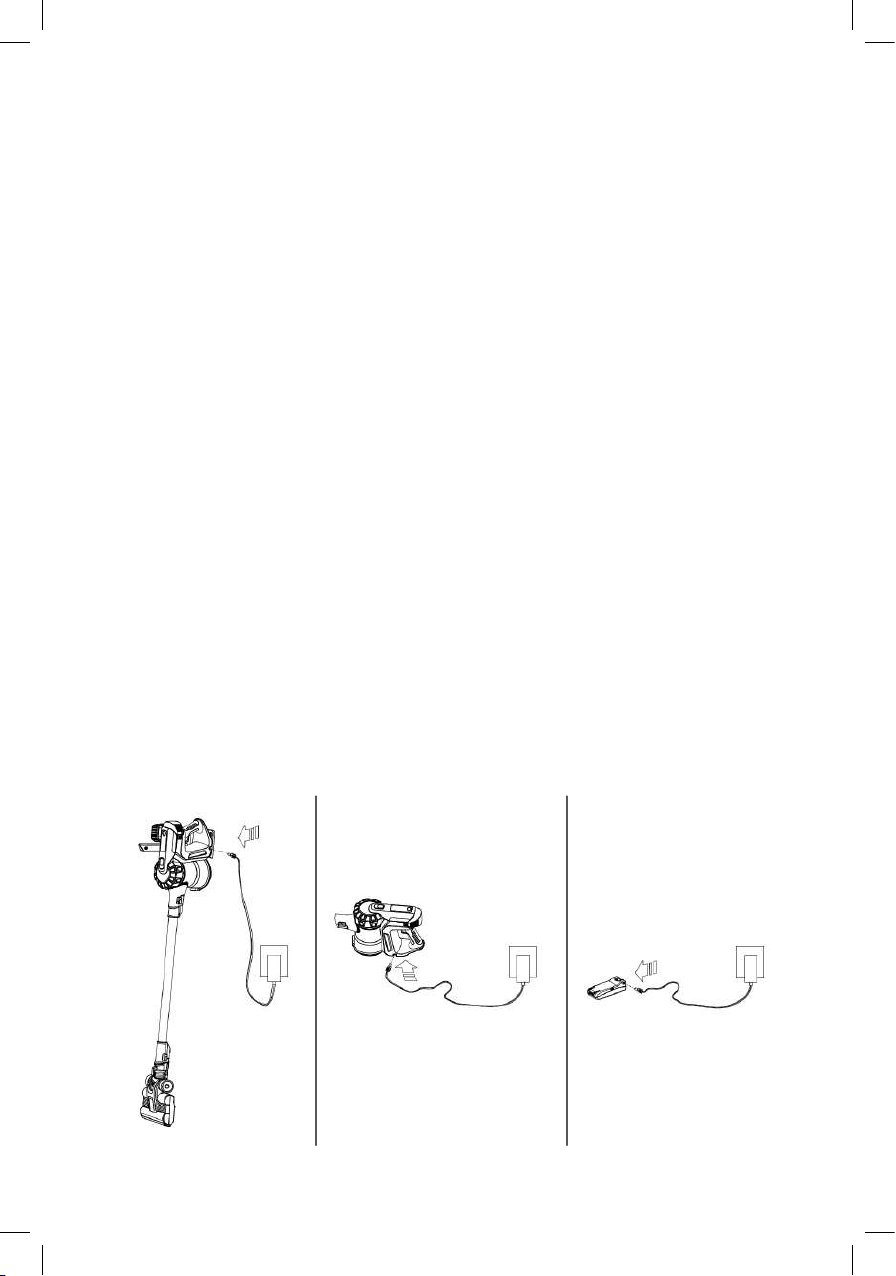
There are three options for charging the battery
1. Convenient charging on the wall station
After fitting the wall bracket, plug the charger connector into the battery
connector on the appliance, then plug it into the socket.
2. Stand-alone charging in any room
Due to the practical battery connection and the portable charger, the
cordless vacuum cleaner can also be charged lying down in any room of
your home.
3. Charging the removed battery
Remove the battery from the appliance (see page on the right) and plug the
charger cable connector directly into the battery connector. The option is
particularly suitable for charging spare batteries.
1. 2. 3.
15
English
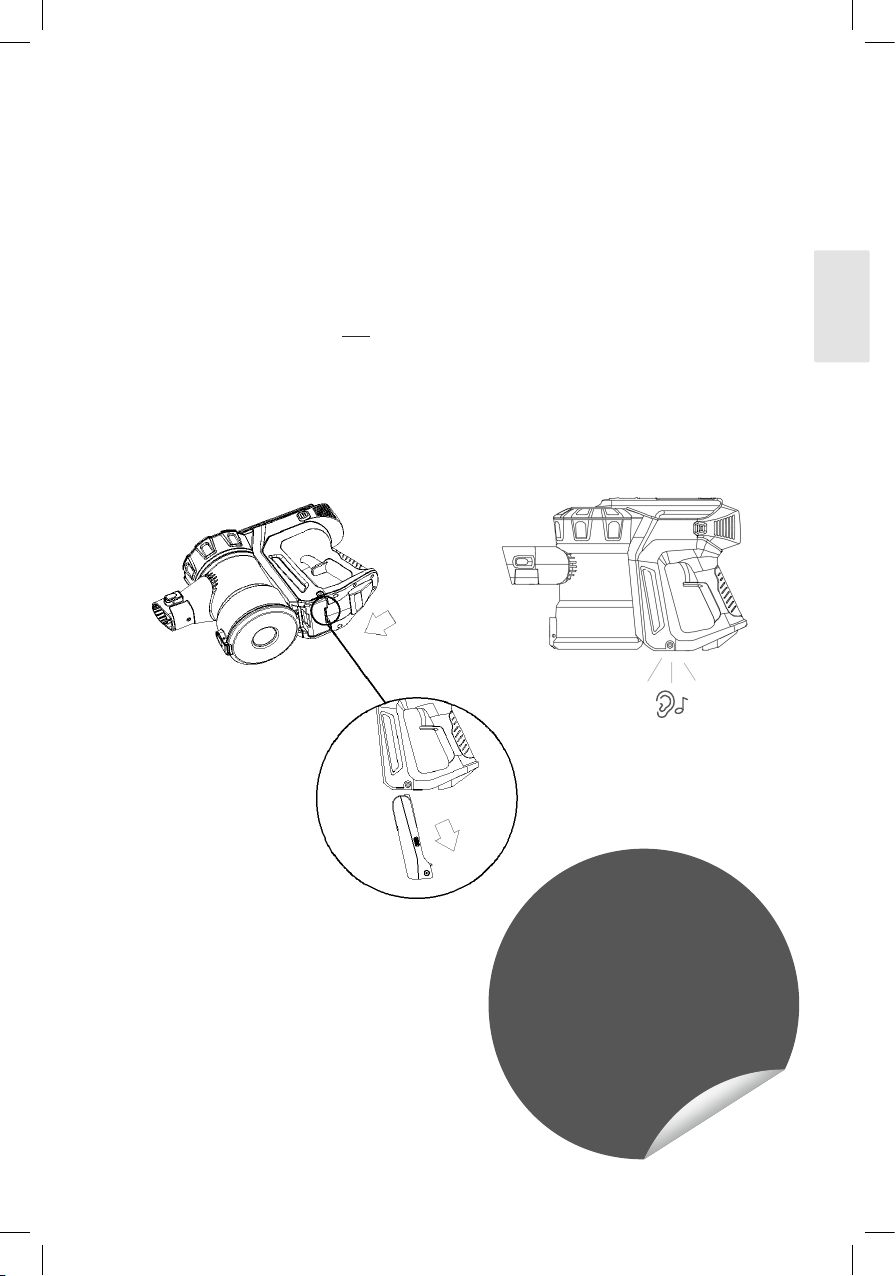
Removing and inserting the battery
1. Make sure that you do not press the ON switch.
2. Lay the hand-held part down flat and press the grey release button directly
on the battery underneath the appliance to release it.
3. Push in a new battery until a “click” sound is heard and the battery snaps
into the handle.
For extra long
cleaning power
Spare batteries
www.djive.eu

16
LED DISPLAY \\\
Battery power always in view during cleaning
At the beginning and during cleaning, you can check the upper display to see
the battery level.
Charge 100% Eco: 40 minutes
Max: 15 minutes
Charge 50% Eco: 20–30 minutes
Max: 5–10 minutes
Low charge Eco: 5–15 minutes
Max: 1–5 minutes
Battery almost drained
(all three LEDs flash)
Cleaning time (approx.)

17
English
Charge level display
While charging, you can check the progress of the battery charging on the
upper display of the cordless vacuum cleaner.
Battery charge starting
(all three LEDs flash in circulation)
Battery charge is just low
(two LEDs flash)
Battery charge is 50%
(one LED flashes)
Battery is fully charged

18
For extra cleanliness:
VACUMATE
universal detergent
www.djive.eu
FILLING AND DOCKING
THE MOPPING TANK \\\
Preparing and filling the mopping tank
1. Take the mopping tank and attach the microfibre cloth to the Velcro on the
bottom.
2. Turn the tank over and pull the water opening tab on the top to the side,
towards the middle of the water tank. Now carefully fill water into the
opening until the mopping tank is filled.
3. Close the lid and wipe off any drops of water on the outside of the tank with
a dry cloth.
Tip: A mild floor detergent can also be added to the mopping water. Read the
instructions on the bottle label for the correct detergent dosage.
19
English
1. 2. 3.
Docking the mopping tank onto the cordless vacuum cleaner
1. Lay the mopping tank flat on the ground so that the hollow is visible on the
top. Take the cordless vacuum cleaner and use the large sliding wheels of
the floor brush attachment to position the appliance above the mopping
tank recess.
2. Now push the cordless vacuum gently down until the appliance snaps into
the mopping tank with an audible “click”.
3. At the top of the mopping tank there is a button to start or stop the water
supply. If the button is raised towards the suction pipe, the water supply
starts after a few moments. The water supply is stopped if the button is
pressed down.
4. Each time you finish mopping, disconnect the mopping tank from the
cordless vacuum cleaner and store it separately, empty and with the tank
lid open.
20
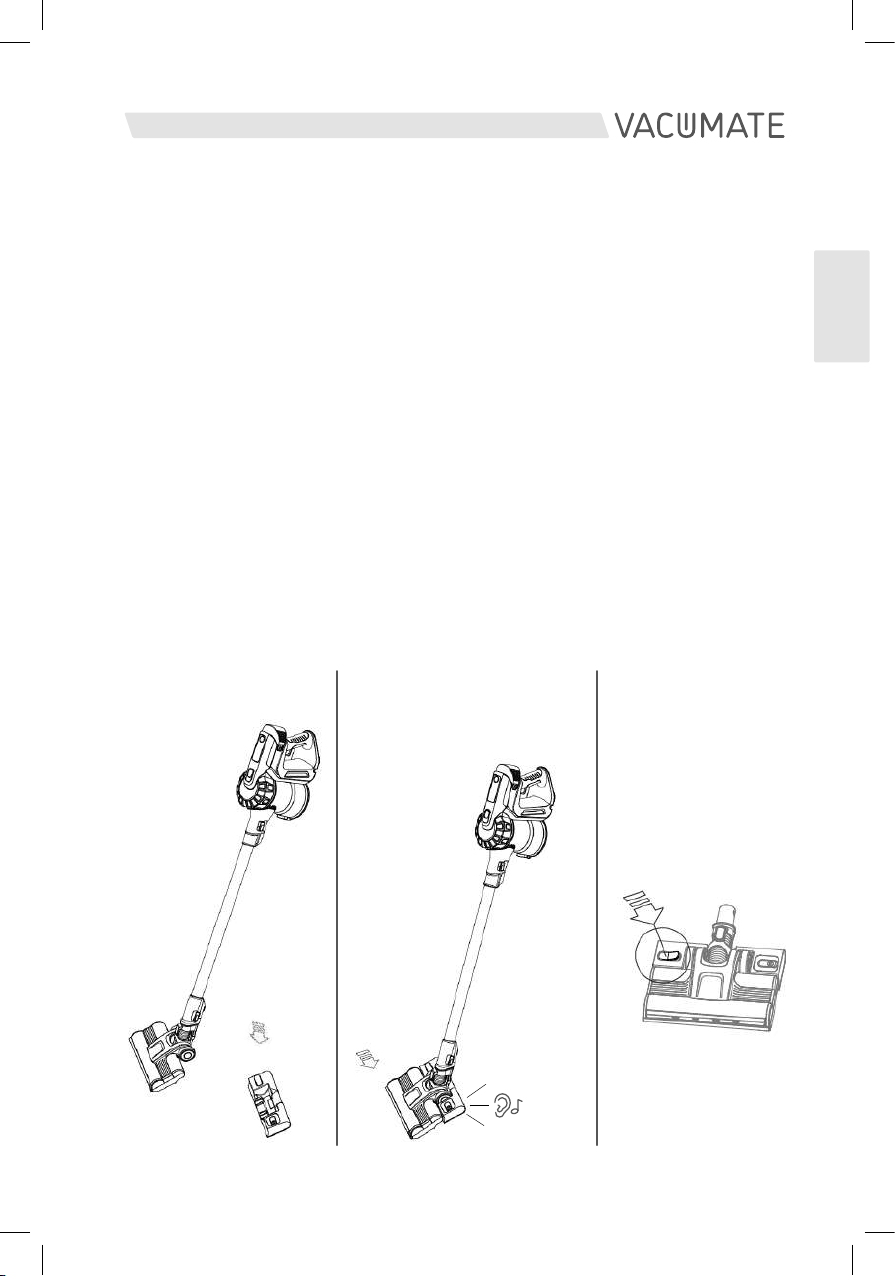
FIRST CLEANING
JOB \\\
Now you have already familiarised yourself with your new Vacumate one,
assembled it, learned the basics and the battery is charged.
At last, the cordless vacuum cleaner is now ready to be used for the first time.
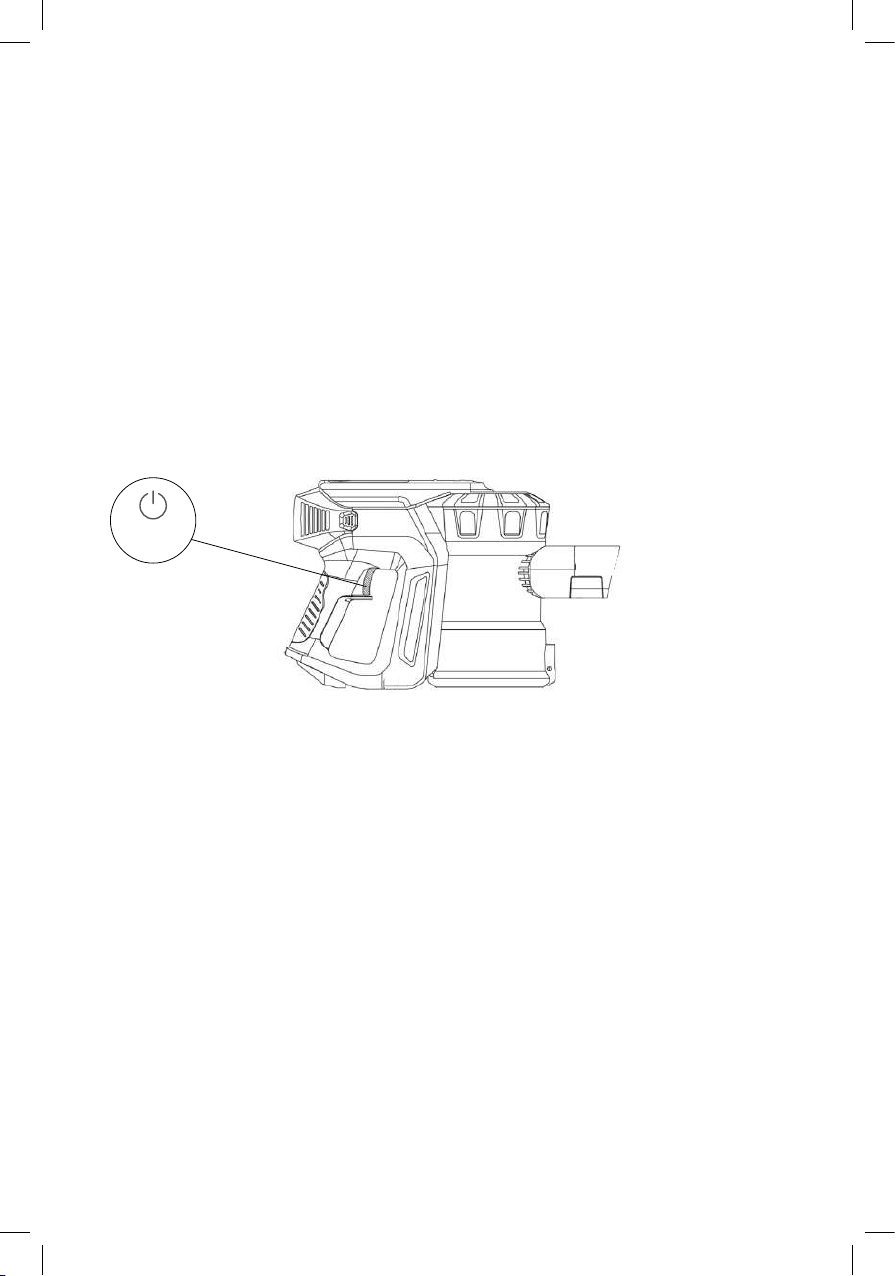
The on/off button is positioned on the handle
Simply press it and your Vacumate one starts the vacuum motor.
On/Off
Table of contents
Languages:
Other djive Vacuum Cleaner manuals


