DKM Motor GEARHEAD User manual

사용설명서
㈜디케이엠의 제품을 구입해
주셔서 대단히 감사합니다.
본 제품을 사용하시기 전에
반드시 사용설명서를 잘 읽고
제품에 관한 지식, 안전정보 그리고
주의사항 전반에 관해 숙지하신 후
바르게 사용하여 주십시오.
읽으신 후에는 언제든지 참고할
수 있도록 일정장소에 보관하여
주십시오.
Thanks for using products of
DKM Motor Co., Ltd.
Before using please read this
user’s manual for the product
knowledge and information
about safety, handling with
care and correct using. Also
keep this user’s manual for
your reference at any time.
User’s manual
GEARHEAD


목차
한글
1. 모델명보기
2. 제품인수 시 확인사항
3. 사용상 주의사항
4. 제품의 조립 및 설치
5. 비정상 작동의 경우 점검 항목
6. A/S 절차안내
English
1. Product Coding System
2. Check List of Product
Receiving
3. Caution Point in Operation
4. Installation of Products
and Assembly
5. Troubleshooting
6. Formalities of A/S
1
2
3 - 4
5 - 6
7
8
9
10
11 - 12
13 - 14
15
16
Index

1. 모델명보기
1

2
2. 제품 인수 시 확인사항
2.1 제품의 확인
다음의 부품이 모두 갖추어져 있는지 확인 하십시오. 부품이 부족한
경우나 파손되어 있을 경우에는 당사나 제품 구입처로 연락하여
주십시오.
· 감속기 (Gearhead) 1대
· 취부용 볼트, 너트, 스프링와셔 각 4개
· 평행키 1개
(출력축에 키홈 가공이 없는 것에는 들어있지 않습니다.)
· 사용설명서 (본 책자) 1부
2.2 모델명 확인
2.3 조립용 볼트 치수표
‘1. 모델명보기’를 참조하시어 구입한 제품의 모델명을 확인하시고,
이상이 발견되었을 경우 즉시 구입처에 문의하여 주시기 바랍니다.
설치각
품명
비율
명칭
*
길이
(mm)
60mm
6GBD3MH~250MH
3~250
M4*60
70mm
7GBD3BMH~18BMH
3~18
M5*50
7GBD25BMH~180BMH
25~180
M5*60
80mm
8GBK3BMH~18BMH
3~18
M5*50
8GBK25BMH~360BMH
25~360
M5*60
8XD10M
□
10
M5*9
0
90mm
9GBK2
B
MH~15
B
MH
2~15
M6*65
9GBK18
B
MH~180
B
MH
18~180
M6*80
9PBK2BH~180BH
2~180
M6*90
9PFK2BH~180BH
2~180
M6*25
9HBK3BH~180BH
3~180
M6*30
9HFK3BH~180BH
3~180
M6*30
9XD10M
□
10
M6*90, M6*12
0

3
3. 사용상 주의사항
3.1 사용요건
· 주위 온도가 10~40℃, 습도는 85% 이하인 곳에서 사용하여
주십시오.
· 직사광선이나 물, 기름이 많은 장소는 피하여 주십시오.
· 진동, 충격이 심한 곳이나 먼지가 많은 곳, 인화성 가스나 부식성
가스가 발생하는 장소는 피하여 주십시오.
3.2 Overhung 하중과 Thrust 하중
· 허용 Overhung 하중과 허용 Thrust 하중표
(그림 3-1)
품명
감속비
최대허용토크
허용
Overhung
하중
허용
Thrust
하중
N.m
Kgfcm
N
Kg
N
Kg
6GBD
□
MH
3~18
3
30
50
5
30
3
20~250
120
12
7GBD
□
BMH
3~18
5
50
80
8
40
4
25~180
150
15
8GBK
□
BMH
3~18
8
80
100
10
50
5
25~360
200
20
9GBK
□
B
MH
2~18
10
100
250
25
100
10
25~180
300
30
9PBK
□
BH
9PFK
□
BH
2~9
20
200
400
40
150
15
12.5~20
450
45
25~180
500
50
9HBK
□
BH
9HFK
□
BH
3~180
30
300
400
40
150
15
8WD
□
BL(R)
10~18
6
60
80
8
100
10
25~60
150
15
9WD
□
BL(R)
10~18
8
80
200
20
200
20
25~60
250
25
9WHD
□
7.5~80
40
400
500*
50*
250
25

4
3. 사용상 주의사항
* 중공축 타입의 경우, 허용 Overhung 하중은 플랜지 설치면으로부터의
10mm 지점의 하중입니다.
· 허용 Overhung 하중은 샤프트 앞 끝에서부터 10mm 지점의
하중입니다.
· 전달기구 Helical Gear, Worm Gear 등을 사용하는 경우에는
Overhung 하중과 동시에 Thrust 하중의 허용치를 초과하지
않도록 사용하여 주십시오.
· 또한 출력축에 직접 부하를 연결하여 사용하는 경우에는 편단
하중을 고려하여 감속기에 가깝게 부하를 취부하여야 합니다.
(그림 3-1)과 같이 Overhung 하중에 견딜 수 있는 구조로
설치하여 주십시오.
3.3 감속기의 최대허용토크
감속기의 출력토크는 감속비에 비례하지만 기어의 재질 등 기타
조건에 의해 감속기에 미치는 허용토크가 한정되는데 이것을
최대허용토크라고 하며, 최대허용토크는 감속기의 크기와
감속비에 따라 달라집니다.

4. 제품의 조립 및 설치
4.1 모터와 감속기의 조립방법
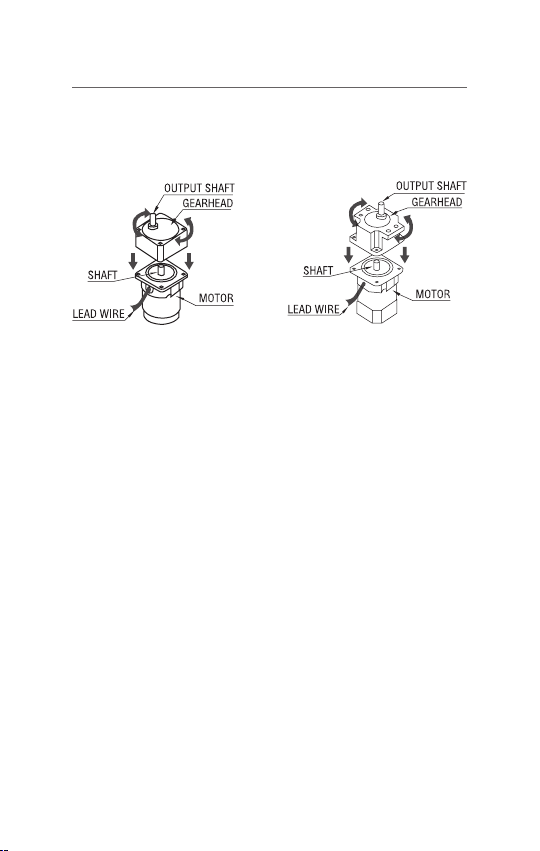
1) 모터 샤프트 쪽을 위로 향하게 한 상태에서, 모터의 리드선이 인출된
방향과 감속기 출력축 방향의 조립 위치 선정을 하십시오.
2) 모터의 샤프트 쪽 기어와 감속기 내부의 기어가 강하게 닿거나
부딪치지 않도록 감속기를 좌,우로 조금씩 회전시키면서 서서히
조립해 주십시오.
3) 모터와 감속기의 취부 시에는 부속품인 취부용 볼트를 사용하여
주십시오.
주의) 모터와 감속기를 무리하게 조립하거나 감속기에 금속 파편 등의
이물질이 들어가면 샤프트 치절부나 기어에 가스가 발생하여
이상음이 발생하거나 수명이 짧아지는 등 뜻하지 않은 사고의
원인이 되니 각별히 유의하여 주십시오.
4.2 설치 시의 주의사항
설치판에 구멍을 뚫고 부속품인 볼트 4개를 이용하여 설치면에 틈이
생기지 않도록 모터와 감속기를 설치하여 주십시오.
볼트의 결합길이를 충분하게 하기 위하여 5mm 이하 두께의 설치판을
사용하여 주십시오.
Box Type
Gearhead
Flange Type
Gearhead
5

6
조립볼트의 권장 체결토크
4. 제품의 조립 및 설치
4.3 전달 부품의 조립
· 감속기의 출력축은 외경 공차가
h7이며, Key Type과 D-Cut
가공이 있습니다.
· D-Cut 가공인 경우에 D-Cut
가공부에 부하가 공회전하지
않도록 볼트를 사용하여 확실하게
고정하여 주십시오.
· Key Type 가공인 경우에는 전달기구인 체인, 스프로켓 등에
Key 홈을 가공하여 부속품 Key를 사용하여 고정해 주십시오.
주의) 감속기 축에 전달 기구를 고정시킬 때 충격을 가하면 감속기의
파손, 수명 단축의 원인이 되므로 각별히 주의하십시오.
설치각
볼트
규격
권장
조임토크
60mm
M4
2.0N.m (20kgfcm)
70mm
M5
2.5N.m (25kgfcm)
80mm
M5
2.5N.m (25kgfcm)
90mm
M6
3.0N.m (30kgfcm)

5. 비정상 작동의 경우 점검 항목
모터 및 감속기가 정상적으로 작동하지 않을 경우에는 아래의 표를
참고하여 점검해 주십시오. 점검 결과가 모두 정상임에도 불구하고
모터가 바르게 작동하지 않을 경우에는 수리하거나 분해 또는 개조를
하지 마시고, 당사나 제품을 구입한 대리점으로 연락하여 주십시오.
사용자가 임의로 수리하거나 분해하여 사용했을 시에 발생한 문제에
대해서는 당사는 책임이 없으며 또한 A/S가 불가능할 수 있으므로
이점에 주의하여 주십시오.
현상
점검항목
출력축이
회전하지
않는다
.
1)
모터에
정규
전압이
가해져
있습니까
?
2)
전원의
접속부위가
바르게
연결되어
있습니까
?
3)
부하가
너무
크지
않습니까
?
4)
부속
콘덴서
또는
라벨에
기재되어
있는
용량의
콘덴서가
결선도
대로
연결되어
있습니까
?
이상한
소리가
들린다
.
1)
모터와
감속기를
바르게
장착했습니까
?
2)
모터와
동일한
치절
샤프트
타입
감속기를
장착했습니까
?
이상없이
회전하던
출력축이
갑자기
멈추어
버렸다
.
1)
모터가
Thermal Protector(TP)
부착
타입은
아닙니까
?
2)
전달기구인
Pulley
등이
파손되거나
연결
이
풀리지 않았습니까?
3)
모터
또는
감속기의
수명이
다한
것은
아닙니까
? (
수명은
카탈로그
참조
)
4)
출력축이
부러지지는
않았습니까
?
(
만일
부러졌다면
과도한
Overhung
하중일
가능성이
있습니다
.
‘
3.
사용상
주의사항
’
을
참조하여
재검토를
부탁
드립니다
.)
5)
모터는
회전하는데
감속기가
회전하지
않는다면
기어가
손상되었을
가능성이
있습니다
. (
만일
손상되었다면
감속기의
허용토크
이상으로
과부하가
작용한
것으로
‘
3.3
감속기의
허용토크
’
를
참조하여
재검토를
부탁
드립니다
.)
7

8
6. A/S 절차안내
참고사항: DKM은 접수된 제품을 당사의 검사규정에 따라 검사한 후
사용자의 과실인지 아니면 제조상의 과실인지를 판단하여 무상교환
또는 유상 A/S 여부를 결정하고 있습니다. 유상 A/S의 경우에는
소비자에게 미리 A/S견적을 통보한 후 A/S 절차를 진행합니다.
대리점안내
각 지역 대리점 정보는 당사 홈페이지 www.dkmmotor.com에서
확인하실 수 있습니다.
* 구입 제품의 CAD 도면이 필요하신 분은 당사 홈페이지 접속 후 다운로드
하시기 바랍니다.
제품의 성능 개선을 위하여 사양 및 외관은 고객에게 통보 없이 변경될 수
있습니다. 기타 자세한 문의사항은 당사로 연락 주시기 바랍니다.
DKM Motor Co., Ltd.
본사/공장: 인천광역시 서구 석남2동 223-38 인천테크피아 나동 4층
(우: 404-825) Tel. 032-574-7788 Fax. 032-578-7787
제품 불만 및 파손 발생
국내 대리점, 해외 대리점
DKM 본사
A/S 처리
및 완료
A/S 요청처리
불만 및
A/S 접수
A/S 요청

1. Product Coding System
9

10
2. Check List of Product Receiving
2.1 Confirmation products
Make sure that you have received all of the items listed below.
If there is any shortage or any damages, please contact the
sales department or local agent.
· Gearhead 1 pcs.
· Mounting bolts, nuts, spring washers each 4 pcs.
· Straight key (only for key-hole shaft type) 1 pcs.
· This user’s manual 1 pcs.
2.2 Confirmation of model name
Check the model name refers to ‘1. Product Coding System’
and contact to your purchasing place if there is any difference.
2.3 Mounting bolt size
Frame size
Model
Ratio
Na
m
e
*
Length
(mm)
60mm
6GBD3MH~250MH
3~250
M4*60
70mm
7GBD3BMH~18BMH
3~18
M5*50
7GBD25BMH~180BMH
25~180
M5*60
80mm
8GBK3BMH~18BMH
3~18
M5*50
8GBK25BMH~360BMH
25~360
M5*60
8XD10M
□
10
M5*90
90mm
9GBK2
B
MH~15
B
MH
2~15
M6*65
9GBK18
B
MH~180
B
MH
18~180
M6*80
9PBK2BH~180BH
2~180
M6*90
9PFK2BH~180BH
2~180
M6*25
9HBK3BH~180BH
3~180
M6*30
9HFK3BH~180BH
3~180
M6*30
9XD10M
□
10
M6*90, M6*120

3. Caution Point in Operation
3.1 Condition of using
·
Ambient temperature on -10�~+40℃� (14�~104℉), humidity max. 85%
· Avoid the place has a lot amount of straight sunlight, water and oil.
· Avoid the place has amount of dusty, inflammable gas or corrosive
gas.
3.2 Overhung load and thrust load
· Permissible overhung load and permissible thrust load
(Figure 3-1)
Model
Ratio
Max. Permissible
Torque
Overhung
Load
Thrust
Load
N.m
Kgfcm
N
Kg
N
Kg
6GBD
□
MH
3~18
3
30
50
5
30
3
20~250
120
12
7GBD
□
BMH
3~18
5
50
80
8
40
4
25~180
150
15
8GBK
□
BMH
3~18
8
80
100
10
50
5
25~360
200
20
9GBK
□
B
MH
2~18
10
100
250
25
100
10
25~180
300
30
9PBK
□
BH
9PFK
□
BH
2~9
20
200
400
40
150
15
12.5~20
450
45
25~180
500
50
9HBK
□
BH
9HFK
□
BH
3~180
30
300
400
40
150
15
8WD
□
BL(R)
10~18
6
60
80
8
100
10
25~60
150
15
9WD
□
BL(R)
10~18
8
80
200
20
200
20
25~60
250
25
9WHD
□
7.5~80
40
400
500*
50*
250
25
11

12
* Overhung load values for hollow shaft models are measured at
10mm distances from the flange mounting surface.
· Overhung load values are measured at 10mm distances from
shaft end.
· Do not exceed the torque of overhung load and thrust load
at the same time in case of uses of helical gear or worm gear is
employed as transmission equipments.
· Also, place the load to close in gearhead in case of connecting
the load to output shaft directly to avoid to loaded in one side.
Install the structure as (Figure 3-1) in case of overhung load is
over the torque in chart.
3.3 Max. permissible torque of gearhead
Permissible torque is limited by material although the output
torque of the gearhead is in proportion of gear ratio. It calls max.
permissible torque and determined by size of gearhead and gear
ratio.
3. Caution Point in Operation

4.1 Motor assembly with gearhead
1) Place motor to output shaft directs to up. Choose direction of
gearhead with considering direction of out-coming lead wire.
2) Needs to be careful between motor shaft and gear trails of
inside gearbox during mounting. Turning right and left slightly to
do not crush hardly and make easy of assembling.
3) Use the provided mounting screws for set mounting of gearhead
& motor.
Caution) Gears in gearhead can get damage, like scratches of
chopping during assembling motor and gearhead if forced to be
assembled. Then it can be caused abnormal noise or shorter life
of gearhead.
4.2 Precaution of assembly
· Make holes in mounting plate and use bolts, provided with
gearhead to fix a motor and gearhead on the mounting plate.
Also, be sure there is no-gab between motor flange, gearhead
surface and the mounting surface.
· Use provided bolts to assemble gearhead & motor sets.
Use mounting plate max. 5mm thickness to conclude assembly
properly.
Box Type
Gearhead
Flange Type
Gearhead
4. Installation of Products and Assembly
13

14
Recommended screw-in torque for mounting bolts
4.3 Assembly components of transmission
· There are Key type and D-Cut
type output shafts of gearhead for
assemble with transmission
components which has outer
diameter tolerance h7.
· In case of using D-Cut type shaft,
fix the bolt properly on D-Cut
shaft to do not slip.
· In case of using Key type shaft, fix the key on transmission
equipments such as chain pulley and sprocket.
Caution) Do not impact on shaft during fixing the transmission
components. It can be caused damage of shorter life on gearheads.
4. Installation of Products and Assembly
Frame Size
Screw Type
Recommended Torque
for Scew
-
in
60mm
M4
2.0N.m (20kgfcm)
70mm
M5
2.5N.m (25kgfcm)
80mm
M5
2.5N.m (25kgfcm)
90mm
M6
3.0N.m (30kgfcm)

In case of abnormal operation of motor and gearhead, please
refer to below table and make inspection. If motor doesn’t
operate normally even inspection result is normality even after
checking, do not repair voluntarily or disassemble motor but
contact DKM head office or local agent. Please be noted that
for the problem caused by user’s voluntary repair of disassembly,
DKM doesn’t take responsibility and A/S may be impossible.
5. Troubleshooting
PHENOMENON
CHECK
ING
POINT
Output
shaft does not
rotate or
runs
slow.
1) Is proper voltage applied to the motor?
2) Are lead wires connected correctly?
3) Is the load too large?
4) Is capacitor
connected as diagram
and same value as written on label?
Sounds abnormal noise
1) Are motor and gearhead
mounted
correctly?
2) Did you use same
type of gearhead
shaft
as motor shaft?
Output shaft stops
suddenly.
1) Is the motor TP
(Thermal Protector) type?
2) Did transmission components get
damaged or did not connect properly?
3) Does motor or gearhead end the life
expectation?
4) Does output shaft break down?
5) Gears can get damaged if only motor
runs. (If so, it may over loaded, please
check permissible torque refer to ‘3.3
Permissible Torque of Gear
head.)
15

16
Note: DKM decides whether it should be divided to free exchange
or compensated A/S after defining whether it is caused by user’s
fault or manufacturer’s fault by strict inspection rule.
Agents Information
Please visit our website: www.dkmmotor.com
* For the dimension data and more information, please visit
our website and download them.
Please be informed that the specification and dimension data
could be changed without information for product improvement.
DKM Motor Co., Ltd.
Head office/Factory: 4F., Incheon Techpia Na-Bldg., 223-38,
Seoknam2-dong, Seo-gu, Incheon, Korea 404-825
Tel. +82-32-574-7788 Fax. +82-32-578-7787
www.dkmmotor.com
6. Formalities of A/S
Damages / Complaints
Domestic, Overseas Agent
DKM Factory
A/S
Completion
A/S
Completion
Receipt of
Damages
or Complaints
Request
of A/S

DKM Motor Co., Ltd.
본사/공장: 인천광역시 서구 석남2동
223-38 인천테크피아 나동 4층
(우: 404-825)
Tel. 032-574-7788
Fax. 032-578-7787
DKM Motor Co., Ltd.
Head office/Factory: 4F.,
Incheon Techpia Na-Bldg.,
223-38, Seoknam2-dong,
Seo-gu, Incheon,
Korea 404-825
Tel. +82-32-574-7788
Fax. +82-32-578-7787
www.dkmmotor.com
Table of contents
Languages:
Popular Engine manuals by other brands

Briggs & Stratton
Briggs & Stratton 120000 Operator's manual

Yanmar
Yanmar 6LPA-STP2 Service manual

Honda
Honda GX120 owner's manual

SOMFY
SOMFY Elite Smart Shades R28 WireFree RTS Programming instructions

Engine distributors
Engine distributors DSG-423 Service manual

Kohler
Kohler LOMBARDINI MARINE LMG 4000 owner's manual