DLO TransDock micro User manual

TransDockmicro™
USER MANUA

Quick Start 04
Using TransDock micro 06
About TransDock micro 06
Setting Up Your TransDock micro 06
Turning TransDock micro On and Off 07
Finding Empty Radio Frequencies Using IntelliTune 08
Manually Finding Empty Radio Frequencies 08
Settings + Features 10
TransDock micro Settings 10
Getting the Best Sound Quality with TransDock micro 13
Frequently Asked Questions 14
Tech Specs 16
Warranty + Service 17
FCC Statement 18
| 3
©2009 KONINK IJKE PHI IPS E ECTRONICS N.V.
The DLO logo, Digital Lifestyle Outfitters, IntelliTune and
TransDock micro are trademarks of hilips Consumer
Lifestyle. i od is a trademark of Apple Inc., registered in
the U.S. and other countries.
rinted in China M97878-080129-H
2 | DLO TRANSDOCK MICRO USER GUIDE
| 5
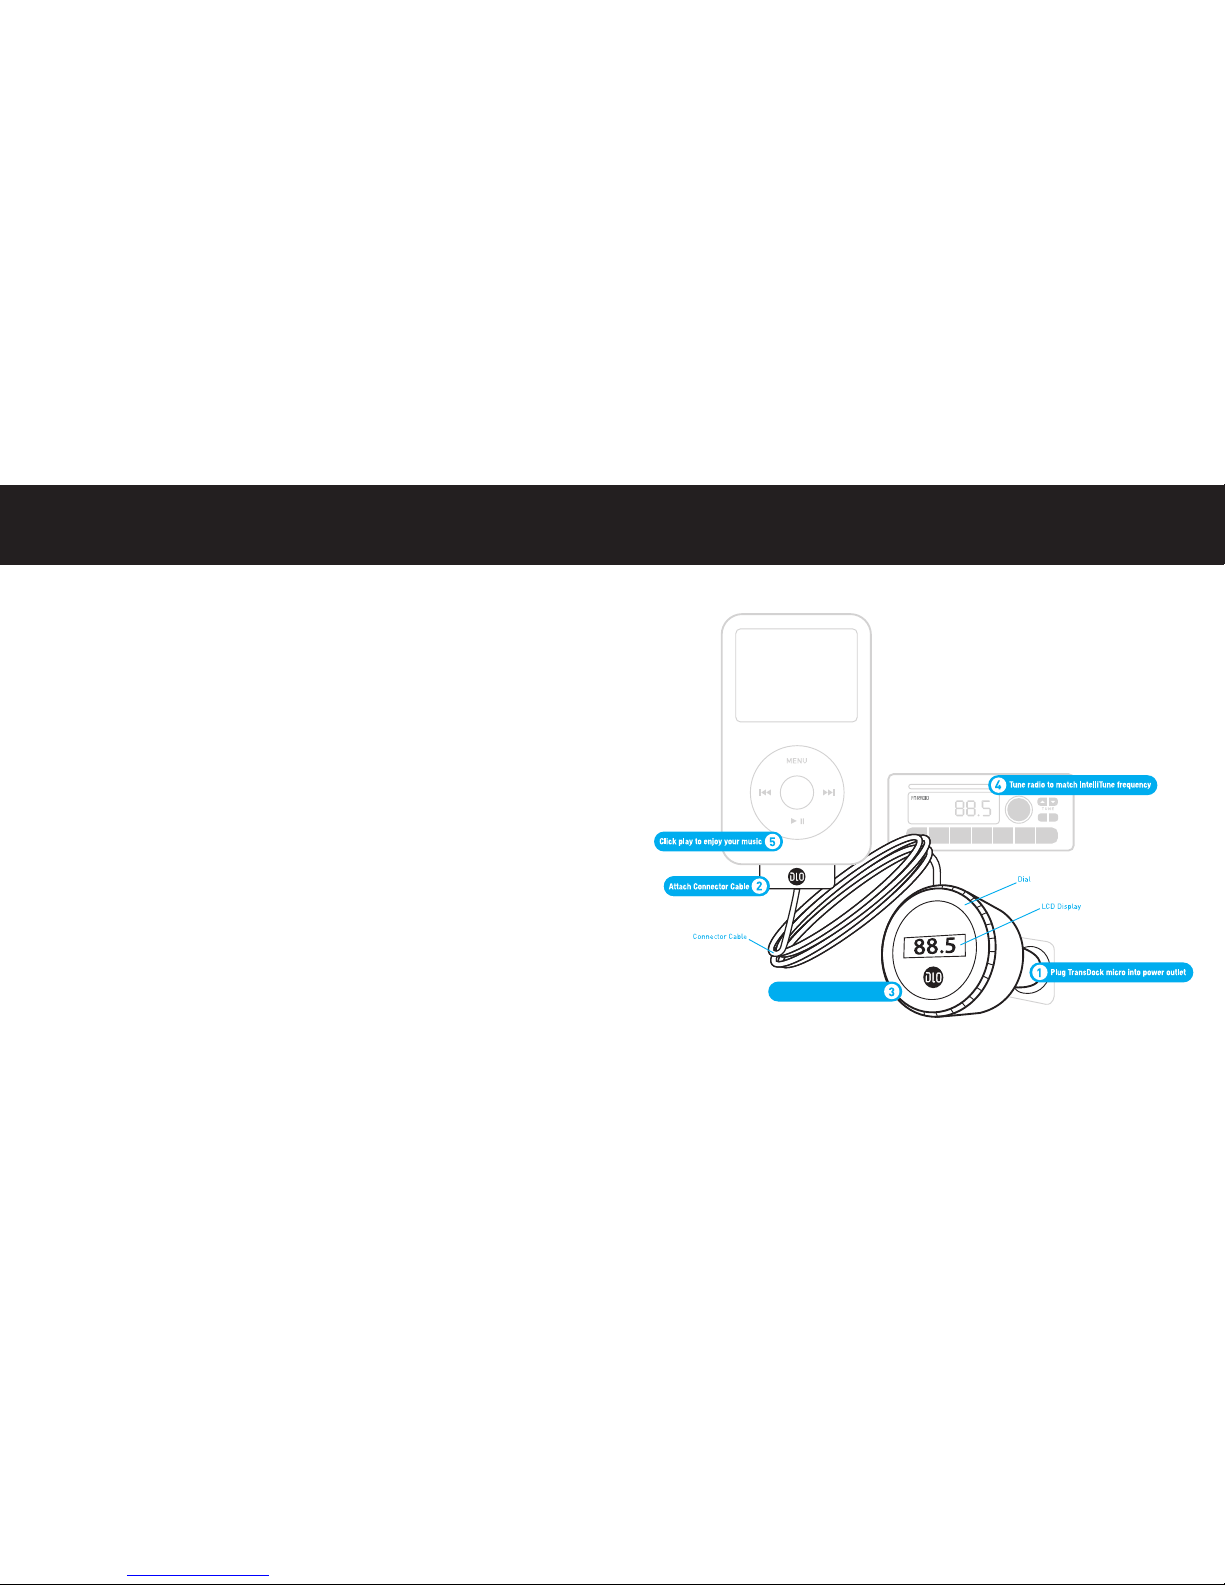
Quick Start
Thanks for purchasing the DLO TransDock micro. We will get you up and
running in a few easy steps. For more detailed instructions, please read
Using TransDock micro [pg. 6].
1. lug your TransDock micro into your auto power outlet.
2. Connect your i od to TransDock micro by inserting the Connector Cable into
the i od dock connector. Your i od will now begin charging if your car is on.
NOTE: The i od will automatically pause playback when TransDock micro is
powered off.
3. ress the dial on TransDock micro to activate IntelliTune. IntelliTune will au-
tomatically find the optimal frequency to broadcast your i od over your car’s
FM stereo.
4. Tune your car’s FM radio to the frequency displayed on TransDock micro.
5. Click lay on your i od to enjoy your music over your car’s FM radio.
For more info on optimizing the sound quality of TransDock micro, please read
Getting the Best Sound Quality with TransDock micro [pg. 13].
4 | DLO TRANSDOCK MICRO USER GUIDE
Press dial to activate IntelliTune

only take a few seconds. Once the search is complete, the display will
instruct you to tune your radio to the frequency found by IntelliTune.
5. Match the FM station on your radio with the corresponding FM frequency
shown on your TransDock micro’s display. Click lay on your i od to enjoy
your music over your car’s FM radio.
6. To control the overall volume of your music while using TransDock micro,
use the car radio’s volume control, not the i od volume.
Turning TransDock micro On and Off
TransDock micro will turn on and off automatically with your car.
To manually turn TransDock micro on or off while your car power is on, press
and hold the dial for approximately 5 seconds.
| 7
Using TransDock micro
About TransDock micro
TransDock micro is an FM transmitter that broadcasts your i od audio to
the FM radio in your car, while simultaneously charging your i od. Trans-
Dock micro features DLO’s IntelliTune technology, which scans the airwaves
and automatically finds the best frequencies for transmitting. TransDock
micro also features a unique dial-based interface which provides a simple
and intuitive way to adjust TransDock micro’s settings and tune to any
frequency from 88.1 to 107.9. Like all DLO transmitters, it comes with the
ability to set your own preset stations, so you can save the frequencies you
use most.
Setting Up Your TransDock micro
1. Turn on your car radio and set it to FM radio mode.
2. Insert TransDock micro into your car’s power outlet.
NOTE: You can slightly alter the angle of your TransDock
micro by tilting the dial head up or down. See drawing A
3. lug the Connector Cable into the i od dock connector.
4. To activate TransDock micro’s IntelliTune feature, press
the dial. TransDock micro will display the word INTELLI-
TUNE as it searches for the optimal frequency. This should
6 | DLO TRANSDOCK MICRO USER GUIDE
A

Tips for manually finding an empty station:
• Be sure to search the entire spectrum of FM frequencies, from 88.1 to 107.9.
Don’t just look to the low end of the dial. There are often empty FM stations
in the 100’s that work well.
• When using scan/seek on your car’s radio, if your tuner stops on 101 and
then jumps to 103, look in the 102 frequencies for empty stations.
• Try tuning to a strong station, then backing down two frequencies - for
example 103.5 to 103.1. You can often find empty frequencies this way.
If that frequency is taken, scan to the next station and try again.
NOTE: You can also visit www.dlo.com/openFM to find the best FM
frequencies in your area.
| 9
Finding Empty Radio Frequencies Using IntelliTune
If you live in a big city with a lot of FM radio stations, finding an empty FM fre-
quency can be tricky. DLO’s IntelliTune simplifies the process by doing all the
work for you.
To find an empty frequency using IntelliTune:
1. ress the dial on TransDock micro. This will activate the IntelliTune search.
While it is searching, the word INTELLITUNE will appear on TransDock
micro’s display.
2. Once IntelliTune finds an empty frequency, it will display TUNE RADIO
TO XXX.X. Then, tune your FM radio to that station and begin enjoying
your i od music over your car stereo.
Manually Finding Empty Radio Frequencies
TransDock micro also allows you to manually tune the
transmitter to desired FM frequencies. To do so, simply turn
TransDock micro’s dial to the right to tune to higher stations
and left to tune to lower stations. See drawing B
8 | DLO TRANSDOCK MICRO USER GUIDE
B

4. Repeat steps 1-3 to store the remaining presets.
NOTE: Your new preset will override the preset that was last saved, including
the default presets.
PRESET MODE
Preset Mode gives you the option to scroll through your presets in
Manual Mode.
To turn Preset Mode on, follow these simple steps:
1. ress and hold the dial to enter the Settings Menu.
2. Scroll to Preset Mode and press the dial to select. Then choose Preset Mode
On and press to select. Now you can scroll through the four presets (P1,P2,
P3,P4) in Manual Mode.
3. Leave TransDock micro on the desired preset and tune your radio to the cor-
responding frequency to begin broadcasting.
| 11
Settings + Features
TransDock micro Settings
To enter the Settings Menu press and hold the dial. Then, turn the dial to scroll
through the various settings, and press the dial to enter your desired setting.
Turn the dial to the right or left to view the chosen setting options, and press
the dial to confirm your selection. Once you’ve made your selection, you will
return to the Settings Menu. ress the center button to exit the Settings Menu.
NOTE: TransDock micro will automatically exit the Settings Menu after a few
seconds of inactivity.
Settings include:
PRESET STORE
Preset Store allows you to save up to four preset stations. The default presets
are 88.1, 94.9, 100.9, and 107.9.
To store your own preset stations, follow these simple steps:
1. Using the dial, tune TransDock micro to the station you’d like to set –
turning right to tune to higher stations and left to tune to lower stations.
2. ress and hold the dial to enter the Settings Menu.
3. Once in the Settings Menu, scroll to Preset Store and press the dial to select.
Next, scroll to and select the preset number (SET 1,SET 2,SET 3, or
SET 4) and press to select.
10 | DLO TRANSDOCK MICRO USER GUIDE

RESET SETTINGS
Reset Settings allows you to revert back to the factory settings. To do so, press
the dial when on Reset Settings. TransDock micro will ask you if you are sure
you would like to reset your settings. ress the dial once to accept, or turn right
or left to return to the Settings Menu.
Getting the Best Sound Quality with TransDock micro
• Use IntelliTune to automatically find the optimal frequency to broadcast your
i od over your car’s FM stereo. Then, tune your car’s FM stereo to the fre-
quency displayed on TransDock micro.
• Choosing between Mono and Stereo in istening Mode:Mono allows for
much better transmitter performance, while Stereo allows for the best sonic
musical performance.
NOTE: If static or distortion increases, switch to Mono for the best transmit-
ter performance possible.
• To get the best initial performance from TransDock micro, it is very important
that you set your i od EQ to Off and adjust your car’s bass and treble controls
to 0. Then you can experiment with adding bass and treble to your desired
level. But, we highly recommend that you start with everything at 0.
| 13
AUDIO EVE
Audio evel gives you the option of selecting the volume output level that fits
your particular audio. Turn the dial right or left to select from: ow,Medium
or High.
ISTENING MODE
istening Mode allows you to choose between Mono and Stereo. TransDock
micro defaults to Mono for optimal transmitter performance. To learn more
about istening Mode please read Getting the Best Sound Quality with
TransDock micro [pg. 13].
BRIGHTNESS TIME
Brightness Time allows you to change the length of time that the TransDock
micro’s display screen stays active. Scroll through to select: Always On,
2 seconds,5 seconds,10 seconds,15 seconds,or20 seconds
BRIGHTNESS EVE
Brightness evel controls the brightness of the OLED display while TransDock
micro is active. Turn the dial right for higher intensity and left for lower intensity.
DIM EVE
Dim evel controls the brightness of the OLED display while TransDock micro is
inactive. Turn the dial right for higher intensity and left for lower intensity or off.
12 | DLO TRANSDOCK MICRO USER GUIDE

My iPod does not appear to be charging when it’s connected to TransDock
micro.
Make sure TransDock micro is securely positioned in your car’s power outlet.
You may also check to ensure that the connector cable is all the way
into the i od’s dock connector.
If I leave TransDock micro plugged into my car’s power outlet, will it drain my
car battery?
robably not, but it’s always a good idea to unplug anything when leaving your
car for a long period of time.
NOTE: Your TransDock micro will continue to draw power from your car’s
battery as long as a device is attached.
Can I use TransDock micro with other devices?
No, TransDock micro is designed specifically for use with i ods.
| 15
Frequently Asked Questions
My music is playing, but there seems to be a lot of static.
Use IntelliTune to automatically find the optimal frequency to broadcast your
i od over your car’s FM stereo. Then, tune your car’s FM stereo to the frequency
displayed on TransDock micro.
You may also try setting the istening Mode to Mono, which will improve the
clarity of TransDock micro’s signal.
My radio will only scan/seek to occupied FM stations.
Many car radios default to scan/seek mode for tuning, so they automatically tune
to a radio station. Most of these radios can be switched to manual tuning (consult
your car or radio manual on how to do this).
My music sounds overdriven and distorted.
Be sure that the FM station you’re using is still unoccupied as you drive
through different areas. FM signals can intrude on an unused frequency.
Be sure to set your i od EQ to Off and adjust your car’s bass and treble controls
to 0. Then you can experiment with adding bass and treble to your desired level.
However, we highly recommend that you start with everything at 0.
14 | DLO TRANSDOCK MICRO USER GUIDE

For Customer Service please visit
http://www.dlo.com or call 1-800-233-8413.
One Year imited Warranty
DLO warrants that this product shall be free from defects in material,
workmanship and assembly, under normal use, in accordance with the
specifications and warnings, for a period of one year from the date of
purchase. This warranty extends only to the original purchaser of the
product, and is not transferable. To exercise your rights under this
warranty, you must provide proof of purchase in the form of an original sales
receipt that shows the product name and the date of purchase.
For customer support or to obtain warranty service, please visit www.dlo.com.
THERE ARE NO OTHER EX RESS OR IM LIED WARRANTIES. DLO liability is
limited to repair or, at its sole option, replacement of the product. Incidental,
special and consequential damages are disclaimed where permitted by law.
This warranty gives you specific legal rights.
You may also have other rights that vary from state to state.
| 17
Tech Specs
FM TRANSMITTER
Modulation: FM Stereo
Default Preset Frequencies (MHz): 88.1, 94.9, 100.9, and 107.9
Frequency Adjustment: 0.2 MHz per step
Frequency Response: 20Hz ~ 15KHz
Transmitter Range: Up to 27 feet (8.2M)
Tuning: Digitally controlled crystal oscillator
International frequency compatible
CONNECTIONS
30-Pin iPod Dock Connector Cable: Length 48”
POWER
Input Voltage: 12 – 16 DC
Input Current: <300mA @ DC12 ~16
Replaceable Fuse: 250 , T2AH
TEMPERATURE
Storage Temperature: -10° to 120° F (-23° to 49° C)
Operating Temperature: -4° to 113° F (-20° to 45° C)
16 | DLO TRANSDOCK MICRO USER GUIDE
Warranty + Service

| 19
FCC Statement
Federal Communications Commission Interference Statement
This device complies with art 15 of the FCC rules. Operation is subject to the
following two conditions: (1) This device may not cause harmful interference,
and (2) this device must accept any interference received, including interference
that may cause undesired operation.
CAUTION: Changes or modifications not expressly approved by the party respon-
sible for compliance could void the user’s authority to operate the equipment.
18 | DLO TRANSDOCK MICRO USER GUIDE

Thanks for purchasing TransDock micro
Enjoy the Ride
Other manuals for TransDock micro
5
Other DLO Automobile Accessories manuals


