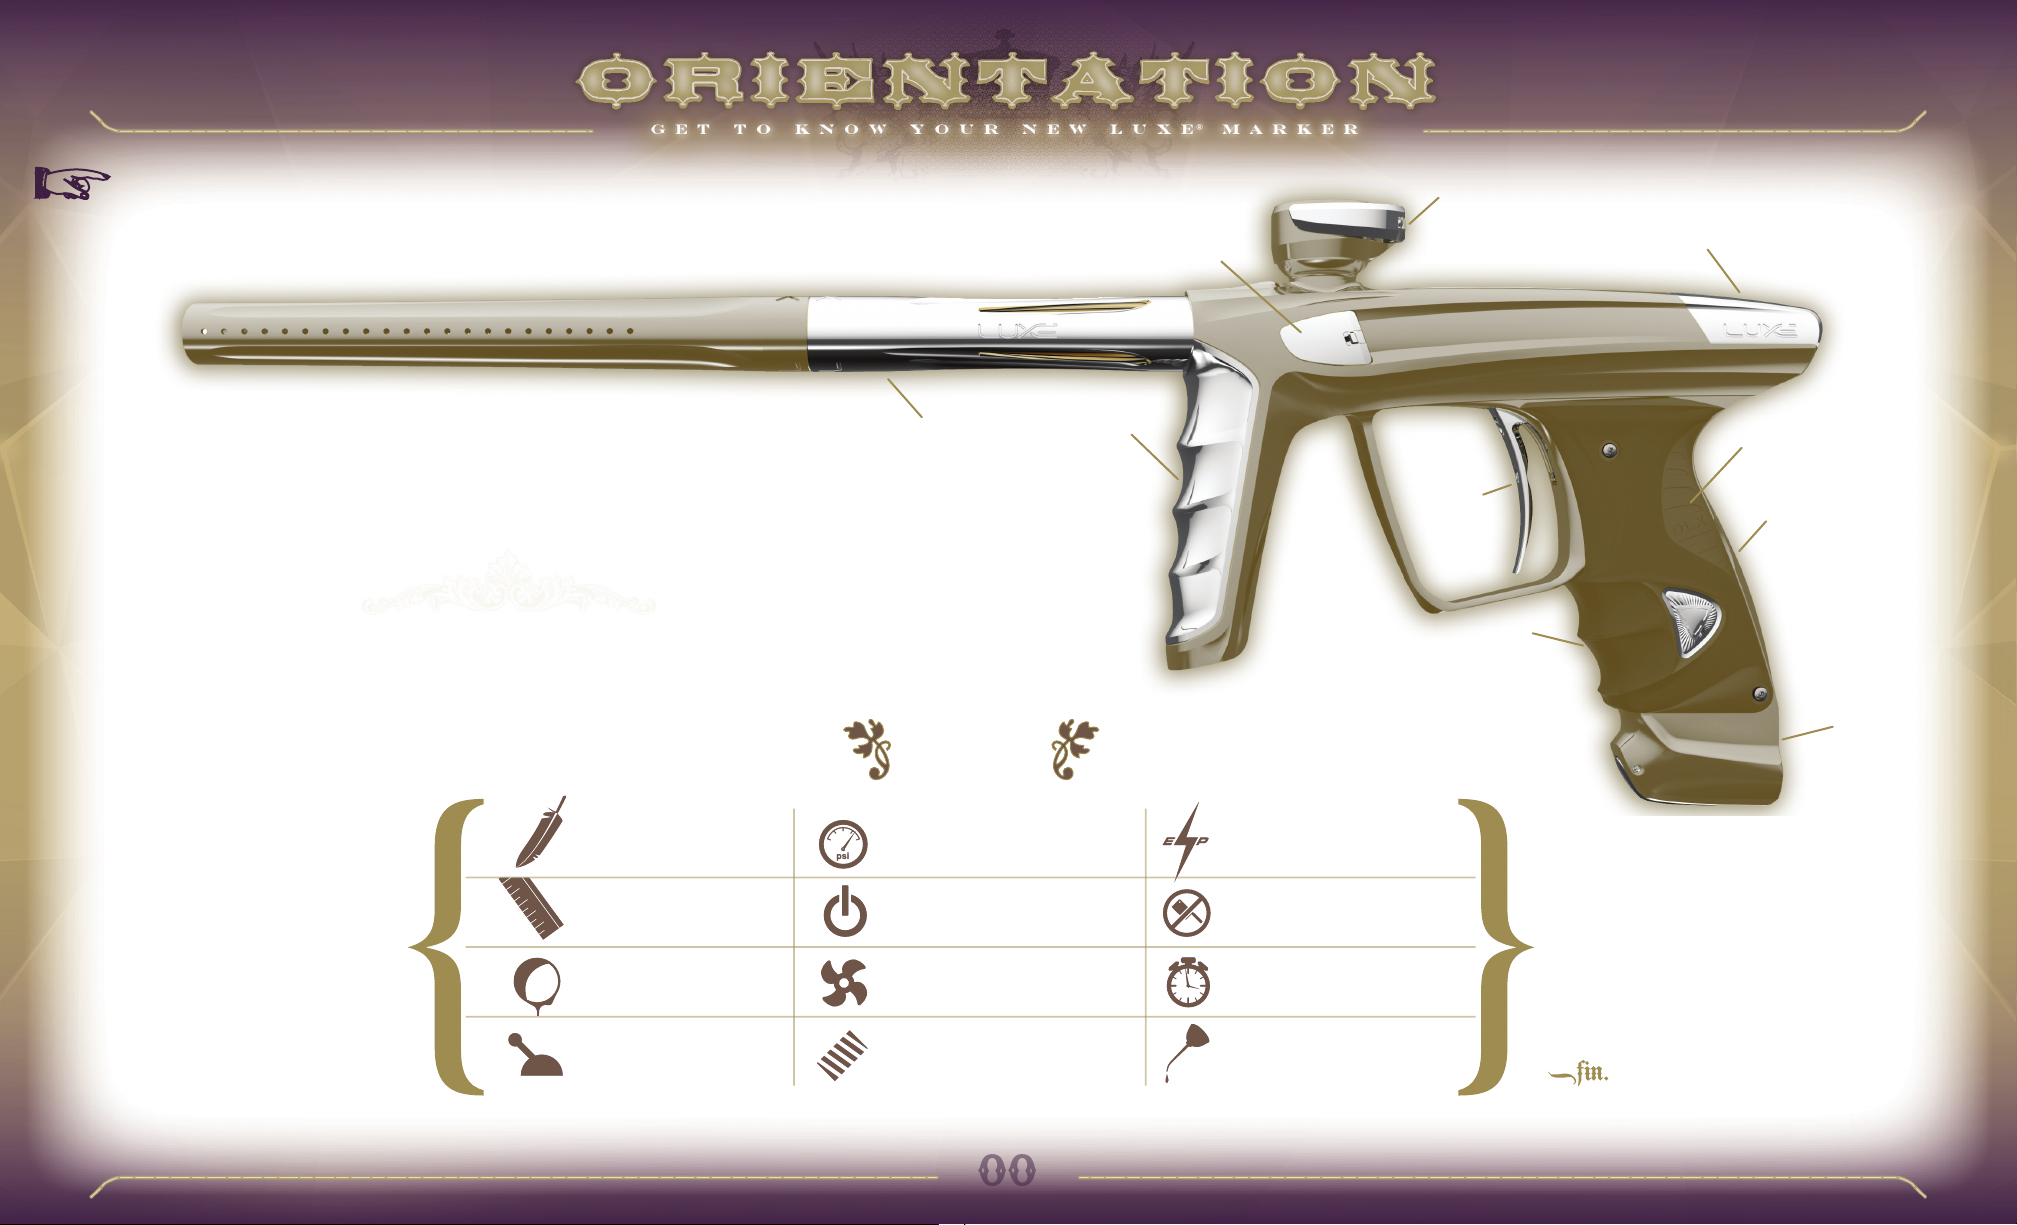
DLX Luxe X User manual

OWNER’S MANUAL
OWNER'S MANUAL

1ORIENTATION
WELCOME TO THE LUXE®EXPERIENCE. Please read this section thoroughly before you use
your Luxe®, to learn about important safety and operation procedures.
LUXE SPECS & FEATURES 00
1.1 QUICK START 01
1.2 INSTALLING THE BARREL BLOCKER 04
1.3 SELECTING AND INSTALLING A LOADER 04
1.4 HANDLING THE LiPo BATTERY 04
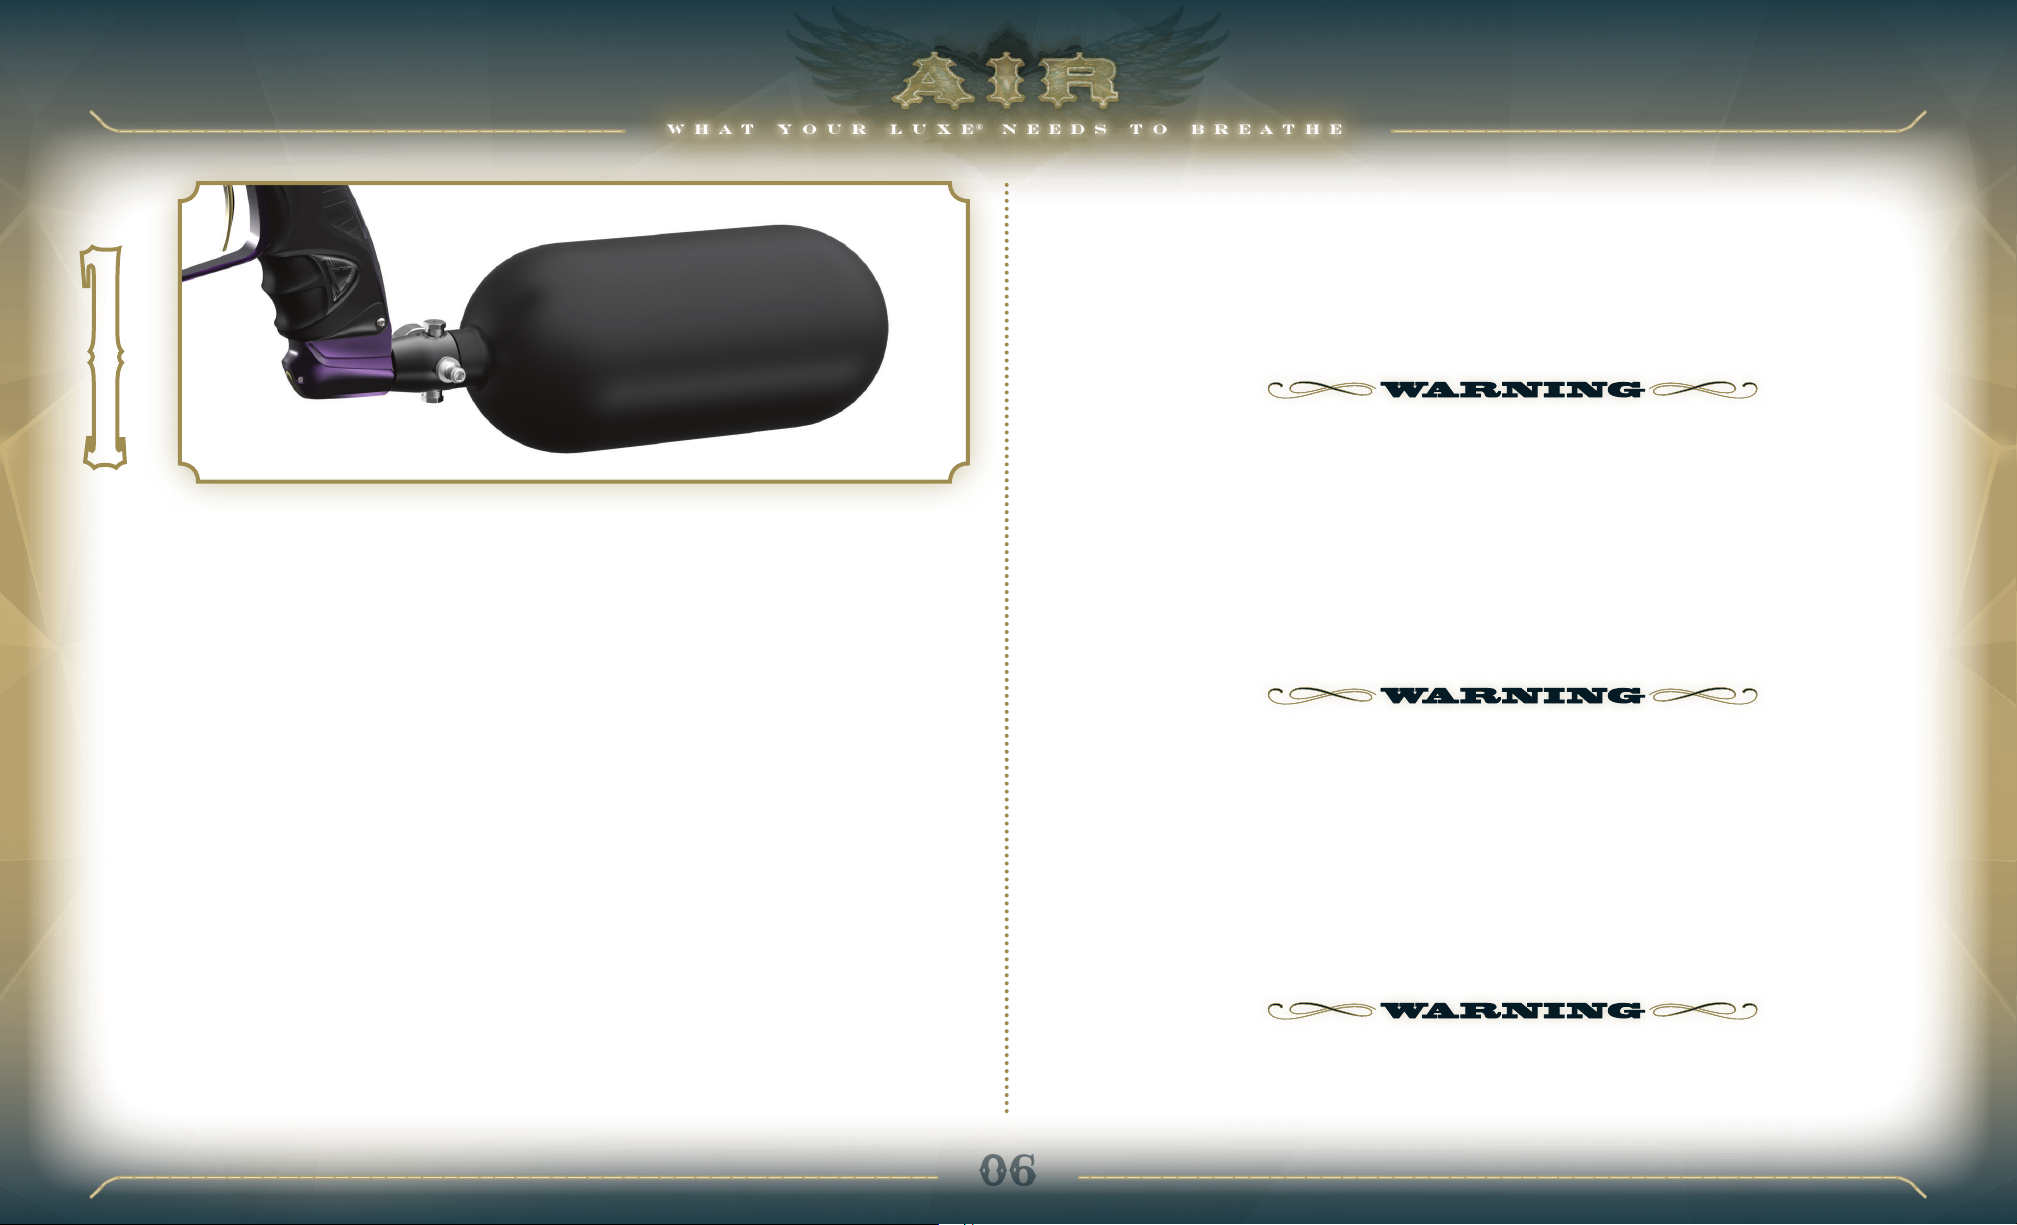
2AIR
YOUR LUXE®RELIES ON THE POWER of high-pressure compressed air for fast, quiet and
consistent operation. Proper air system handling is extremely important for your safety.
2.1 ABOUT COMPRESSED AIR 06
2.2 INSTALLING AN AIR SYSTEM 07
2.3 REGULATOR GRIP PANEL 07
3HARDWA RE
THE PHYSICAL ASPECTS OF OPERATING and adjusting your new Luxe®have been streamlined
to get you in the game fast. This section will inform you about trigger and velocity adjustment
as well as barrel tuning and battery maintenance.
3.1 LUXE®BARREL SYSTEM 08
3.2 ADJUSTING VELOCITY 09
3.3 DEGASSING THE SYSTEM 09
3.4 ADJUSTING THE TRIGGER 10
3.5 LiPo RECHARGEABLE BATTERY 11
3.6 REPLACING OR CHARGING THE BATTERY 11
THIS IS NOT A TOY. LUXE® ELECTROPNEUMATIC
.68 CALIBER PAINTBALL MARKER. Misuse/careless use
may cause serious injury or death. Eye protection in
compliance with ASTM Specification F1776, with
temple, ear and face protection must be worn
by anyone within range of the Luxe®.
Must be at least 18 years old
to purchase, 14 years old to use or operate with adult
supervision, 10 years or older to operate on insured
paintball fields meeting ASTM-standard F1777-97.
Thoroughly read entire operating manual before
using. DLX TECHNOLOGY GROUP, 100
STATION ST., LOYALHANNA , PA . 15661
WWW.LUXEPAINTBALL.COM
4S OF T WA R E
YOUR LUXE®HAS A COMPUTER on board to provide precise control of its operation. Fortunately,
you won't need to be a computer expert to use it. Voice menus, an OLED screen and trigger
programming interface put complete control at your fingertips.
4.1 INTRODUCTION TO PROGRAMMING 12
4.2 NAVIGATION MODES 13
4.3 ADDITIONAL POWER BUTTON FUNCTIONS 13
4.4 RESET TO FACTORY DEFAULTS 13
4.5 USB INTERFACE 13
4.6 FIRING MODES AND SETTINGS 14
4.7 MENU SETTINGS 15
5MAINTENANC E
REGULAR MAINTENANCE IS NECESSARY to keep your Luxe®in peak operating condition. Tool-free
access to the Luxe®Power Core and ball detents make this a quick and simple process.
5.1 LUXE® POWER CORE 17
5.2 BALL DETENTS & VISION™EYES 19
6ADVANCED MAINTENANCE
SHOULD ANYTHING GO WRONG with your marker, your Certified Luxe®Dealer is ready and able
to provide complete warranty support without the hassle or wait of shipping your marker.
For the more more technically inclined, advanced maintenance guides cover more complex
service procedures.
6.1 INTRODUCTION 21
6.2 SERVICING THE VERTICAL REGULATOR 22
6.3 BALL DETENT ASSEMBLIES 24
6.4 GRIP FRAME REMOVAL 25
6.5 VISION AND SOLENOID VALVE REMOVAL 26
6.6 THE LUXE® ICE ADVANTAGE 28
6.7 QUICK-STRIP PLUG DISASSEMBLY 29
6.8 A S A R EM OVA L 31
6.9 TRI GGER R E M OVA L 31
6.10 SPEAKER REMOVAL 32
6 .11 CIRCUIT BOARD REMOVAL 32
6.12 TROUBLESHOOTING 33
6.13 LIMITED WARRANTY 34

MAIN CONTROLS & FEATURES
1
POWER/OLED DISPLAY
2 TRIGGER
3
GRIP
4
REMOVABLE BATTERY (UNDER GRIP)
5
LUXE® POWER CORE
6
CLAMPING FEEDNECK
7
LUXE® XL 3-PIECE BARREL SYSTEM
8
LUXE® INTEGRATED AIR BOTTOM LINE
9
LUXE® INTEGRATED AIR VERTICAL REGULATOR
10
LUXE® QUICK-SNAP BALL DETENT ASSEMBLY (2)
8
10
1
7
5
2
9
BASIC GUIDE TO THE
LUXE®SPECS & FEATURES
WEIGHT (LESS BARREL)
1.48 lbs (0.675 kg)
OPERATING PRESSURE
110 psi (7.58 bar)
POWER SOURCE
LiPo Rechargeable Battery
OPERATING METHOD
Electropneumatic
ANTI-CHOP SYSTEM
630nm Vision Break Beam
LUBRICANT
GR33SE™
DIMENSIONS
8.25 x 7 in (21.0 x 17.8 cm)
PAINT SIZE
.68 caliber
PROPELLANT
Compressed Air
RATE OF FIRE
Uncapped
FIRING MODES
8
BARREL THREADS
Smart Parts
THE FINE
DETAILS
6
4
3
00

STEP ONE
CHARGE THE BATTERY (INCLUDED)
MAKE SURE THE LUXE®’S INTERNAL LITHIUM-POLYMER
BATTERY is fully charged. Open the rubber grip from
the left side your Luxe®and connect the charger to the
charging port before plugging the charger into a domestic
electrical outlet. The included charger will operate on
either 110 or 240 volt standard AC power. The LED on
the charger will glow when it is plugged in and receiving
power, whether it is charging a Luxe®or not. The Luxe®
X is compatible with standard USB and USB-C chargers,
allowing it to be charged directly from a portable phone
power pack, car USB power source, laptop computer or
other USB compliant power supply. The battery may also
be removed and charged separately with the optional
Luxe®battery charger. The battery may also be removed
and charged separately with the optional Luxe®battery
charger. It must be fully seated in the grip frame for on-
board charging.
STEP THREE AFFIX THE BARREL BLOCKER
(INCLUDED)
ASSEMBLE THE LUXE®BARREL (see HARDWARE 3.4)and
screw it into your Luxe®. Slide the included barrel blocker
over the barrel and secure its cord as far back on the Luxe®
body as possible, cinching it tight. The barrel blocker is
a critical piece of paintball safety equipment—nearly as
important as paintball goggles. The barrel blocker must be
fully seated on the marker's muzzle and secured in place
with its strap any time the marker is stored or handled
in an area where people are not properly protected by
paintball goggles or paintball field netting.
ORIENTATION 1.1 QUICK START
WELCOME TO THE LUXE®EXPERIENCE. Follow these simple steps to get your new Luxe®marker up and running in no time.
STEP TWO REINSTALL THE GRIP
REINSTALL THE LUXE®’S RUBBER GRIP by first sliding
its tab into the slots on either side of the grip frame, then
pop it back in place over the 2 snap grip screws and 2 grip
screws on the opposing side of the grip. Ensure that the
battery wedge extending from the center of the grip fills
the small gap above the top of the battery, locking it in
place.
01
1 2 3

STEP FIVE INSTALL YOUR LOADER (SOLD
SEPARATELY)
THE ANTI-CHOP VISION™ SYSTEM IN YOUR LUXE®will
allow it to work with any loader. Best performance and
highest rate of fire however, will only be possible with a
high performance force-feed loader system. Open the
marker's locking feedneck by pulling the lock lever away
from the neck, then insert the loader and secure it in place
by folding the lever back to its locked position. Loader
necks vary in size from brand to brand. If the loader does
not fit securely or the lock lever does not easily close,
see Orientation 1.3 in this manual for feedneck clamp
adjustment instructions.
STEP SIX TURN ON AIR
GENTLY GAS UP YOUR LUXE® BY
SLOWLY
PULLING the
Luxe®bottom-line charging handle back to the on position,
folding it into the body of the ASA. This will depress the
valve pin on your air system.
A GENTLE RISE IN PRESSURE IS IMPORTANT, AS A SUDDEN
BLAST MAY REDUCE THE SERVICE LIFE OF PRESSURE SEALS
WITHIN YOUR LUXE®.
The Luxe®bottom-line charging handle must be turned
off (pulled out) before removing screw-in compressed air
systems.
AIR OFF
AIR ON
STEP FOUR FILL & INSTALL YOUR AIR
TANK (SOLD SEPARATELY)
YOUR LUXE®IS DESIGNED TO OPERATE PROPERLY
with high pressure compressed air (HPA—also commonly
referred to in paintball as nitrogen or nitro) as its
power source. Have your air system filled, following its
manufacturer’s directions. Pull the Luxe®bottom-line
charging handle out and forward to the off position, then
screw the air system into the back of the ASA.
02
4 5 6

78
STEP SEVEN POWER ON YOUR LUXE®MARKER
TURN THE MARKER ON BY DOUBLE-CLICKING (quickly pressing twice) the power button, or
by holding it down for two seconds. Turn it off by pressing and holding the power button for two
seconds. When the Luxe®turns on, the OLED display will be activated, indicating the marker's
status.
ALTHOUGH THE POWER BUTTON SERVES AS THE LUXE®’S SAFETY SWITCH TO PREVENT ACCIDENTAL
FIRING, IT SHOULD NEVER BE RELIED UPON IN PLACE OF A BARREL BLOCKER AND PROPER PAINTBALL
EYE PROTECTION.
STEP EIGHT ADJUST LUXE® VELOCITY
FILL THE HOPPER WITH PAINTBALLS and turn it on. While wearing ASTM compliant paintball
goggles, in an area where all bystanders are protected, remove the barrel blocker and fire
over a chronograph to measure the velocity. Using a 5/32-inch allen wrench on the adjuster
in the bottom of the vertical regulator, turn clockwise to increase velocity/pressure, and
counterclockwise to decrease. Take three or four shots after every adjustment to allow the gas
pressure inside your Luxe®to stabilize before firing over the chronograph again to check velocity.
Adjust until the marker is firing consistently within the limits for the field where you are playing.
NEVER ADJUST YOUR LUXE®TO FIRE AT GREATER THAN 300 FEET PER SECOND.
+
–
03

ORIENTATION 1.2 INSTALLING THE BARREL BLOCKER
THE BARREL BLOCKING DEVICE IS A CRITICAL PIECE of paintball safety equipment—nearly as important
as paintball goggles. The Barrel Blocker serves to protect against accidental discharge of a paintball by
catching it before it can cause harm. A Barrel Blocker is included with the Luxe®and must be used every time
it is handled in an area where people or property are not properly protected by paintball goggles or paintball
field netting. To use the Barrel Blocker simply slip it over the end of the barrel and stretch its cord back over
the rear of the Luxe® [FIG. 1] Use the strap’s adjuster to cinch the strap tight, so that the Barrel Blocker can
provide protection against accidental discharge of a paintball.
THE BARREL BLOCKER SHOULD ONLY BE REMOVED WHEN THE LUXE®IS ON A “LIVE” PAINTBALL FIELD AND ALL
PERSONS INVOLVED ARE WEARING PROPER PAINTBALL PROTECTION.
OR IENTATIO N 1. 4 HANDLING THE LiPo BATTERY
INCLUDED WITH YOUR LUXE®IS A RECHARGEABLE LITHIUM-POLYMER BATTERY. The battery may be
removed for inspection, charging with the optional Luxe®battery charger or for a quick-change with a fully
charged battery. For battery removal instructions, see the Hardware section of this manual.
DO NOT IMMERSE THE BATTERY IN LIQUID. STORE IN A COOL, DRY ENVIRONMENT WHEN NOT IN USE. DO
NOT CONNECT THE BATTERY DIRECTLY TO AN ELECTRICAL OUTLET. DO NOT STRIKE OR THROW THE BATTERY
AGAINST A HARD SURFACE. DO NOT MODIFY, PIERCE, OR SOLDER NEW CONNECTIONS TO THE BATTERY. STORE
AND TRANSPORT THE BATTERY IN A CASE WHICH PROTECTS IT FROM DAMAGE OR CONTACT WITH SHARP OR
METAL OBJECTS WHEN NOT IN USE. BATTERY DAMAGE MAY LEAD TO FIRE OR EXPLOSION. IF THE BATTERY
LEAKS, AVOID CONTACT WITH FLUIDS. IN CASE OF EYE CONTACT DO NOT RUB, RINSE WITH CLEAN RUNNING
WATER AND SEEK IMMEDIATE MEDICAL ATTENTION. IF THE BATTERY SWELLS, EMITS SMOKE OR GIVES OFF AN
ODOR, DISCONNECT IT AND CONTACT A BATTERY RECYCLER FOR DISPOSAL ADVICE. DO NOT THROW USED
BATTERIES IN THE TRASH, TURN THEM OVER TO A BATTERY RECYCLING PROGRAM (COLLECTION POINTS ARE
FOUND AT MANY HARDWARE STORES AND HOME CENTERS).
ORIENTATION 1.3 SELECTING AND INSTALLING A LOADER
YOUR LUXE®IS A HIGH PERFORMANCE PROFESSIONAL GRADE PAINTBALL MARKER. Although its Vision
anti-chop system will allow it to operate properly with any paintball loader without fear of chopping paint, a high-
end forced-feed loader must be used to achieve high rates of fire.
The Luxe®is equipped with a locking feedneck which allows it to adapt to variance in hopper neck sizes and
to release hoppers quickly when desired, but hold them securely on the field [FIG. 2] Pulling the lock lever
away from the feedneck moves it to the open, or unlocked position. While it is open the locking mechanism
may be adjusted by turning its knurled knob, or using a 1/8-inch allen wrench if it is stiff. Turning clockwise
will cause the feedneck to grip tighter, while turning it counterclockwise will result in a better fit for larger
hopper necks. Place the hopper in the feedneck, and secure it by closing the lever. If the latch is difficult to
close, do not force it. Instead, open it fully, then turn the adjuster counter-clockwise and try again until you
have adjusted for a perfect fit.
OVER-TIGHTENING THE FEED NECK CAN CAUSE DAMAGE TO ITS LATCHING MECHANISM. DO NOT OVER-TIGHTEN.
FIG.
FIG.
04

BASIC GUIDE TO THE
LUXE®INTEGRATED AIR SYSTEM
INTEGRATED AIR DESIGN
The Luxe®X Integrated Air design means that
there are no hoses on the outside or inside of
the marker. Hoses and hose fittings are the most
common places for leaks to occur in paintball
markers. Air passages machined into the Luxe®
grip frame and body eliminate these possible
failure points, making the Luxe®X more reliable.
VERTICAL REGULATOR
The Integrated Air vertical regulator is the cul-
mination of more than a decade's worth of
design, testing and field experience. It delivers
the high flow rates and consistent output pres-
sure that the Luxe®X needs to compete at the
professional level. Its unique bi-directional ASA
connection allows it to work with the Luxe®X
Integrated Air system.
05

AIR 2 .1 ABOUT COMPRESSED AIR
YOUR LUXE®IS DESIGNED TO OPERATE ON HIGH-PRESSURE AIR (HPA) which is stored in cylinders
(tanks) at pressures of up to 3,000 or 4,500 psi [FIG. 1] The storage cylinder, along with the regulator
mounted in its neck forms an HPA system. There are two main types of HPA systems, those on which the
regulator’s output pressure is adjustable, and those for which their regulator is pre-set to deliver a fixed
output pressure. HPA systems designed to screw into an ASA are usually pre-set to provide 400 psi (low
pressure output) or 800 psi (high pressure output.) Best performance can be achieved between 450 and
550 psi.
DO NOT USE CO2WITH YOUR LUXE®. USE THE LUXE®ONLY WITH COMPRESSED AIR SYSTEMS FEATURING TWO
BURST DISKS, ONE FOR THE HIGH PRESSURE SIDE OF THE REGULATOR, AND AN 1800 PSI RATED BURST DISK
FOR THE DOWNSTREAM SIDE OF THE REGULATOR. THE 1800 PSI (ALSO SOMETIMES MARKED 1.8K) PROVIDES
CRITICAL PROTECTION IN CASE OF A REGULATOR LEAK, AND ITS ABSENCE MAY CAUSE DAMAGE TO THE LUXE®
AND OR SERIOUS INJURY.
If you are using your Luxe®with an adjustable output compressed air system, it should be set to deliver
about 650 psi. The Luxe®vertical regulator can accommodate a wide range of input pressures, and lower
them to the marker’s operating pressure, so exact adjustment of the air system is not critical, and either
low output, or high output pre-set HPA systems may be used. If using a screw-in style air system, the Luxe®
on/off bottom-line or similar is recommended, as the on/off control is important for proper set-up and
degassing.
NEVER USE OIL OR ANY PETROLEUM BASED CLEANER OR LUBRICANT IN A COMPRESSED AIR REGULATOR OR
CYLINDER. EXPOSURE TO PRESSURIZED AIR INCREASES OIL’S FLAMMABILITY AND CAN CAUSE A SERIOUS SAFETY
HAZARD. ONLY USE MANUFACTURER RECOMMENDED LUBRICANTS WITH COMPRESSED AIR SYSTEMS, AND
FOLLOW THE MANUFACTURER’S MAINTENANCE AND OPERATION INSTRUCTIONS EXPLICITLY.
Regardless of the type of air system used, be sure to turn it on by slowly opening its control valve (either
on the HPA system, or on/off bottom-line, depending on the configuration) so that the gas pressure in the
Luxe®rises gently, rather than jumping to full pressure. Slower pressurization will maximize the service
life of the seals and low pressure components in the Luxe®. The Luxe®offers multiple options for mounting
compressed air systems. Located on the bottom of the grip frame are a pair of industry standard 10-32
screw holes for air system mounting. Located forward and to the side of these holes is the Luxe®grip
integrated gas port. A small o-ring sitting in a recess at the gas port provides an airtight seal.
DEGAS AND UNLOAD THE LUXE®BEFORE MAKING ANY AIR SYSTEM CHANGES.
FIG.
06

AIR 2.2 INSTALLING AN AIR SYSTEM
WHEN MOUNTING THE BOTTOM-LINE ADAPTER DIRECTLY TO YOUR LUXE®GRIP FRAME, it must first be
disassembled by unscrewing and removing its pivot pin with a 1/16-inch allen wrench [FIG. 3].The charging
handle and actuating pin will then be free to slide out the front of the ASA. The actuating pin should be very
lightly lubricated with GR33SE™ before it is reinstalled.
The ASA may be removed by first taking out the charging handle and actuating pin then sliding a 5/32-inch
allen wrench through each of the access holes in the bottom of the ASA into the heads of the ASA mount
screws [FIG.4] and unscrewing them. Once the ASA is free from the grip frame, its mount screws may be
slid through the central slot one at a time towards the center hole and lifted out the top.
When installing a new air system, accessory or mount, the grip must be removed and the battery removed
from the Luxe®(see HARDWARE 3.6.) Only use mounting screws which will reach through the air system,
accessory or mount, and fully engage the screw threads in the grip frame, but not extend into the open
space of the grip frame far enough that they interfere with the placement of the battery. Installing mount
screws while the battery is removed will ensure that a screw which is too long does not accidentally damage
the lithium-polymer battery
AIR 2.3 REGULATOR GRIP PANEL
THE REGULATOR GRIP PANEL ON YOUR LUXE®CAN BE REMOVED to service the integrated air regulator
or simply to swap it out for another color or style.
Use a 3/8-inch allen wrench to unscrew the integrated air cover lock from the bottom of the foregrip. Once
the cover lock is removed, you may then lift out the grip panel by pulling forward from the bottom [FIG. 5].
The top of the grip panel will pivot and then release. When reinstalling the grip panel, seat the alignment pin
at its top first, then swing it into position before securing it with the cover lock.
FIG.
FIG.
FIG.
07

XL BACK
The Luxe®back accepts optional Freak®XL bore inserts,
allowing it to quickly adapt to changing paint conditions.
ACCEPTS ALL FREAK®XL FRONTS AND FREAK®XL INSERTS
XL FRONT
Linear pressure compensating ports make every shot quiet and accurate. Freak® XL barrel
compatibility lets you switch to optional fronts to keep pace with changing playing conditions.
FITS ANY FREAK®XL BACK, IN ADDITION TO THE LUXE® XL BACK.
INSERTS
AVAILABLE IN 10 COLOR CODED SIZES, FREAK BORE INSERTS
CREATE THE PERFECT FIT WITH ANY BRAND OF PAINT.
FITS SMALLER/SHRUNKEN PAINT
FITS LARGER/SWOLLEN PAINTT
MOST VERSITILE (INCLUDED)
.
675
.
677
.
679
.
682
.
684
.
687
.
689
.
691
.693
.695
BASIC GUIDE TO THE
LUXE®XL 3-PIECE BARREL SYSTEM
HARDWARE 3.1 LUXE®XL BARREL SYSTEM
EVEN THE BEST QUALITY PAINTBALLS WILL VARY in size from one batch to the next and as weather
conditions change. Although your Luxe®can work well even with a poor paint to barrel fit, optimal performance
will be achieved with a proper fit. The ideal fit between the paintball and the barrel is found when the ball is
inserted in the bore and does not slip or roll through to the muzzle on its own, yet can be blown out like a
blowgun, using a minimal amount of breath. The barrel can be adapted to fit a wide range of paintball sizes
through the use of Freak®XL inserts. The .687-inch ID Freak®XL bore insert is included with your Luxe®X.
Optional Freak®XL inserts may be purchased for use with your Luxe®X. The Freak®XL bore insert may be
removed by sliding it out the back of the barrel, and inserting an appropriate sized Freak®XL insert in its place.
The Luxe®Freak XL 3-piece barrel is compatible with all Freak®XL multi-piece barrel components, providing
access to a variety of optional fronts and inserts.
08

HARDWARE 3.2 ADJUSTING VELOCITY
THE VELOCITY, OR SPEED AT WHICH YOUR LUXE®FIRES a paintball, must be measured and adjusted to below
the paintball field’s velocity limit immediately before each day of play for player safety. Fill the hopper with
paintballs and turn it on.
While wearing ASTM compliant paintball goggles, in an area where all bystanders are protected, remove the barrel
blocker and fire over a chronograph to measure the velocity. Using a 5/32-inch allen wrench on the adjuster in the
bottom of the Luxe®Vertical Regulator, turn clockwise to increase velocity/pressure [FIG. 1] and counterclockwise
to decrease.
DO NOT ATTEMPT TO ADJUST THE LUXE®VERTICAL REGULATOR WITH LARGER SIZED ALLEN WRENCHES. THESE ARE
USED TO REMOVE AND DISASSEMBLE THE REGULATOR, WHICH MUST NOT BE DONE WHILE IT IS PRESSURIZED.
Take three or four shots after every adjustment to allow the gas pressure inside the Luxe® to stabilize. Adjust and
retest until the marker is firing consistently within the limits for the field where you are playing.
ALWAYS MEASURE THE VELOCITY OF PAINTBALLS FIRED BY THE LUXE®BEFORE USE, AND NEVER ADJUST TO FIRE
ABOVE 300FPS (91.44 M/S.)HARDWARE 3.3 DEGASSING THE SYSTEM
BEFORE STORAGE, TRANSPORT OR MAINTENANCE, your marker will need to be unloaded and degassed. In
an area where it is safe to shoot and while wearing paintball goggles, loosen the Luxe®’s clamping feedneck and
remove the loader. By turning the marker upside down, you can empty any extra paintballs from the feedneck into
your hand.
EVEN WITH ITS GAS SUPPLY TURNED OFF, THE REGULATOR AND GAS PASSAGES IN THE LUXE®WILL CONTAIN
ENOUGH PRESSURE TO FIRE MULTIPLE SHOTS UNTIL THE MARKER IS DEGASSED.
Turn off your HPA system either with its on/off valve, or the on/off valve of a connected bottom-line adapter. Lift
the quick-strip latch upward to vent pressure from the Power Core [FIG 2] As the Power Core is depressurized, it
will make a sound similar to a soda can being opened. If you hear the sound of escaping gas for more than a
second or two, your HPA system has not been turned off. Turn off your HPA system and repeat the degassing
procedure.
Once the Luxe®has completely degassed, there will be no more hissing sound. If performing maintenance on the
Luxe®, remove the Power Core (see MAINTENANCE 5.1) to protect against accidental pressurization—otherwise, re-
close the latch. If using a screw-in style HPA system, unscrew the system from the marker’s bottom-line ASA. Pay
careful attention to make sure the HPA system regulator is unscrewing from the Luxe®’s ASA, rather than the tank
unscrewing from its regulator.
DO NOT LIFT THE QUICK-STRIP LATCH UNTIL THE GAS SUPPLY HAS BEEN TURNED OFF. IF THIS IS DONE ACCIDENTALLY,
TURN OFF THE GAS SUPPLY IMMEDIATELY. THE LUXE®POWER CORE WILL FIRE A LOW-POWER SHOT IF REMOVED BEFORE IT
IS FULLY DEGASSED. ATTEMPTING TO CLOSE THE LATCH WHILE THE GAS SUPPLY IS ON MAY RESULT IN O-RING DAMAGE.
+
–
1} PUSH IN
with thumb
2} LIFT UP
FIG.
FIG.
09

HARDWARE 3.4 ADJUSTING THE TRIGGER
YOUR LUXE®IS EQUIPPED WITH A 4-POINT ADJUSTABLE TRIGGER, providing complete versatility to both the
feel and length of the trigger pull [FIG 3] The Luxe®can be adjusted to a super-sensitive hair trigger, though many
players find that a slightly longer, and heavier trigger pull is easier to walk to higher rates of fire. Perform trigger
adjustments while the Luxe® is unloaded and degassed. Luxe®Training Mode (see SOFTWARE 4.1) can be used to
determine the effectiveness of changes in trigger adjustment.
POS T-TR AVEL The post-travel adjustment sets how far back the trigger can travel, affecting the area of the
trigger pull that occurs after the Luxe®fires. Turning the adjustment screw clockwise with a 1/16-inch allen wrench
will reduce post-travel, limiting how far back the trigger can swing, while turning counterclockwise will increase it.
The post-travel limit must be set to stop the trigger before it is brought to a stop by the trigger switch.
PRE-TR AV EL The pre-travel adjustment determines how far forward the trigger can swing, affecting the area
of the trigger pull that occurs before the Luxe® fires. Pre-travel is adjusted with an 1/16-inch allen wrench in the
pre-travel adjustment screw. Turn clockwise to reduce pre-travel, and counterclockwise to increase.
ACTIVATION POINT The activation point setting determines the point in the trigger pull at which the
Luxe®trigger switch is activated, signaling the marker to fire. As the screw is turned clockwise with a 1/16-
inch allen wrench, it will extend out the back of the trigger, closer to the trigger switch, causing the trigger to
be activated earlier in the trigger pull. Due to the limited space to access this adjustment, use of a ball-end
allen wrench is advised.
USE CAUTION WHEN ADJUSTING THE ACTIVATION POINT AND POST-TRAVEL ADJUSTMENT. WHEN PROPERLY
ADJUSTED, THE TRIGGER SHOULD COME TO A SOLID STOP AGAINST THE POST TRAVEL ADJUSTMENT SCREW. IF IT
COMES TO A SOFTER STOP CAUSED BY THE ACTIVATION POINT ADJUSTMENT SCREW OR REAR OF THE TRIGGER
PRESSING AGAINST THE TRIGGER SWITCH, THEN TRIGGER SWITCH AND OR CIRCUIT BOARD DAMAGE MAY RESULT
FROM RAPID OR HARD PULLS ON THE TRIGGER.
TRIGGER RESISTANCE Trigger resistance, or the weight of the trigger pull may be adjusted with a 1/16-
inch allen wrench in the trigger resistance adjustment screw. Turning clockwise increases pressure on the trigger
return magnet, for increased resistance, while turning counterclockwise decreases pressure on the trigger.
1P O S T-T R AV E L
2P R E-T R AV E L
3ACTIVATION POINT
4R E S I S TA N C E
1
4
3
2
FIG.
10

HARDWARE 3.6 R EPLACING OR CHARGING THE BATTERY
CHANGING THE LUXE®BATTERY may become necessary to replace a worn out battery, or to swap in a fully charged battery between games to
get back out on the field without waiting for a charging cycle to complete.
Unload and degas your Luxe®following the instructions in this manual. The Luxe®battery may be removed to be charged in a Luxe®battery charger
or swapped with a freshly charged battery. To remove the battery, open the rubber grip (See QUICK-START: STEP 1) and press inward and upward on
the front of the battery to release it. Once released the battery will slide forward and can be easily grasped and removed. To reinstall, simply slide the
battery back in place, oriented so that its gold plated contacts are on the lower half of the rear edge. [FIG. 2] When pushed all the way back, press
slightly downward on the front of the battery so that it catches on the lip at the bottom of the battery slot and is retained in place. Close the rubber
grip, making sure that the rubber wedge fits in the gap above the battery, locking the battery in place. [FIG. 3]
HARDWARE 3.5 LiPO RECHARGEABLE BATTERY
YOUR LUXE®IS EQUIPPED WITH a Lithium-Polymer (LiPo) battery. Lithium-Polymer batteries provide consistent power output in a minimal size and
weight, without suffering from charge memory effects.
Open the rubber grip from the left side your Luxe®and connect the charger to the charging port before plugging the charger into a domestic electri-
cal outlet. The included charger will operate on either 110 or 240 volt standard AC power. The LED on the charger will glow when it is plugged in and
receiving power, whether it is charging a Luxe®or not. The Luxe®X is compatible with standard USB and USB-C chargers, allowing it to be charged
directly from a portable phone power pack, car USB power source, laptop computer or other USB compliant power supply. The battery may also be
removed and charged separately with the optional Luxe®battery charger. It must be fully seated in the grip frame for on-board charging.
Charge Luxe®batteries at least once every six months to maximize their operating life. A spare battery that is unused for more than six months or
stored completely empty may lose capacity or fail entirely.
ONLY USE GENUINE LUXE®BATTERIES. CRITICAL CHARGE AND DISCHARGE CONTROL CIRCUITS MAY CAUSE DAMAGE AND RISK OF FIRE OR EXPLOSION IF
USED WITH OTHER BATTERIES. BATTERIES MAY BE CHARGED EXTERNALLY WITH THE LUXE X BATTERY CHARGER. FOLLOW THE INSTRUCTIONS INCLUDED
WITH THE CHARGER.
When your Luxe®is turned on, it will display an estimate of the remaining battery charge [FIG. 1] This will be displayed at the bottom of the marker's
OLED display It is important to note that battery discharge rates can be affected by various factors, including temperature. The indicated charge
level is only an estimation of the expected remaining charge life.
BATTERY CHARGE LEVELS
FIG.
FIG.
FIG.
11
Grip Wedge
Battery Hook

S OF T WA RE 4 .1
INTRODUCTION TO PROGRAMMING
YOUR LUXE®COMBINES VOICE FEEDBACK with with its OLED display to make electronic adjustment simple. All adjustments are performed with the Luxe®turned on, but unloaded and degassed (see HARDWARE 3.3).
Adjustments are made with the trigger and power button when the Luxe®is unlocked. To access the tournament lock switch, pull the rubber grip off of the quick snap grip screws on the left side of the trigger frame. Slide the
tournament lock switch towards the barrel to allow access to the trigger programming menu.
Enter the Luxe®programming mode by turning the marker on while holding back the trigger. This will open the Main Menu, which is indicated by voice feedback and tabs which appear at the bottom and sides of the OLED
display.
Pull the trigger to scroll through the available settings, each of which is identified by a verbal response and the OLED display. To make a change, find the desired setting and tap the power button. The Luxe®will display the
currently selected value for that sub-menu on its OLED display with “SET” appearing on the bottom tab. Additionally it will speak the current value. Changes may be made to the setting by pulling the trigger to cycle through
the available values. Once a new setting has been chosen (changed dwell setting, new firing mode, etc.) tapping the power button will return to the main menu, allowing other settings to be checked or changed. Press the
power button for approximately 2 seconds to turn off the Luxe®and exit programming mode. When programming is complete, re-secure the grip. When the Luxe®tournament lock is engaged, programming mode is not
accessible. The Luxe®can be locked into any tournament or field legal mode required.
BASIC GUIDE TO THE
LUXE®SYSTEM NAVIGATION
12

S ETTIN G VALUES
The word "SET" appears on
the bottom tab, and the side
tabs disappear when a menu
item is selected for setting
The joystick controller or
trigger may be used to cycle
through the available values
for each setting.
MAIN MENU
Within the main menu, you
may choose which setting
you want to check or change.
The Main Menu is indicated
by tabs appearing on the
sides and bottom of the
OLED display and the Luxe®
verbally announcing that it is
in the main menu.
VISION CONTROL & BREECH STATUS
The Luxe®is equipped with a Vision break-beam anti-chop system.
The status of the Vision system is indicated in the OLED display. An
empty circle indicates the breech is empty, while a full circle indicates
a ball has been detected. "OFF" indictates that Vision has been de-
activated, and "FAULT" indicates an error, such as debris blocking the
Vision sensor. Vision may be deactivated by a quick double-tap of the
power button. It may be turned back on the same way.
TOURNAMENT LOCK
Paintball tournaments and field operators require that paintball
markers be locked so that their velocity and firing modes cannot be
changed on the field. The Luxe®Tournament Lock is turned on by
sliding the tournament lock switch to the right, towards the rear of the
marker. It is turned off by sliding it towards the barrel. Lock status is
indicated by a locked or unlocked padlock in the OLED display. When
the Luxe®Tournament Lock is on, holding the trigger back will not
access the Main Menu for adjustment. For events which require that
adjustments may not be made without the use of a tool, optional grip
screws may be used in place of the Luxe®rubber grip posts, securing
access to the tournament lock..
SOFTWARE 4.5 FACTORY RESET
PRESSING AND HOLDING THE TRIGGER FOR approximately 5
seconds while in programming mode will result in the Luxe®resetting
all menu items to their factory default values. Factory Reset is
confirmed by 3 chirps from the speaker.
SOFTWARE 4.2 NAVIGATING MODES
SOFTWARE 4.3
ADDITIONAL POWER BUTTON FUNCTIONS
SOFTWARE 4.4 USB INTERFACE
INCLUDED WITH YOUR LUXE®is a USB-C cable, which can be used
to read or adjust the marker's settings and re-flash the circuit board
with firmware updates, alternate language OLED firmware or alternate
voice sets. Download the latest version of the Luxe®USB Interface
software, instructions, voice files and firmware at LuxePaintball.com.
CONFIRM THAT BOTH THE INTERFACE SOFTWARE AND FIRMWARE FILE
VERSIONS ARE COMPATIBLE WITH THE LUXE®X BEFORE UPDATING
FIRMWARE OR CHANGING SETTINGS VIA USB. THE LUXE®X MUST BE
POWERED OFF TO RE-FLASH ITS SOFTWARE.
13
LOCK
UNLOCK

AUTO RESPONSE
Auto Response is a specialty mode which doubles firepower by firing
both when the trigger is pulled and when it is released. Auto Response
is affected by the BPS Limit setting.
BURST MODE
This mode fires a burst of shots when the trigger is pulled and held
down. The number of shots in each burst is determined by the Burst
setting.
FULL-AUTO
In Full-Automatic mode, the Luxe®fires repeatedly, while the trigger is
pulled and held. The rate of fire delivered will depend on the value of
the BPS Limit setting.
CUSTOM REBOUND MODE
User-definable Rebound mode allows the Luxe®to operate with
ramping built to meet nearly any imaginable rule set. Rebound mode
fires as semi-automatic until the set number of activation shots (Shots
To Enter) are fired at a minimum rate (Shots To Sustain) or faster, at
which point the Rebound mode kicks in and fires additional shots,
maximizing firepower. Once the rate of trigger pulls drops below the
Shots To Sustain setting, one shot is fired per trigger pull. To configure
Rebound mode, adjust the Shots To Enter and Shots To Sustain settings.
S EMI-AUTO
UNCAPPED
This is a traditional semi-automatic firing mode, delivering one shot
per complete trigger pull, and it is the factory default setting for the
Luxe®. Semi-Automatic mode is uncapped, and the maximum rate of
fire that can be achieved in this mode will depend on loader feed rates
and Luxe®Dwell settings. Semi-Automatic mode is appropriate for use
at most paintball fields and events.
SEMI-AUTO
CAPPED
While this mode functions like Semi-Automatic, with one shot per
trigger pull, it also takes into account the value set in the BPS (Balls
Per Second) Limit. By activating this cap, the Luxe®'s maximum rate of
fire can be restricted to meet the demands of special game rules, or to
handicap experienced players against those who are new to the sport.
NXL
NXL mode complies with the WPBO firing mode requirements. Initially
this mode acts like Semi-Automatic. After four trigger pulls in quick
succession (200ms or less each), it begins firing repeatedly at the
BPS Limit. If there is a delay between trigger pulls of more than 200
milliseconds, this mode reverts to firing one shot per trigger pull. The
BPS Limit must be set to 10.5 or lower. Check latest editions of league
rules for BPS Limit changes.
PSP BURST
For use in events following PSP rules. Initially this mode acts like Semi-
Automatic until three trigger pulls are made in quick succession. At
this point PSP mode begins a burst of shots with each trigger pull, as
long as the user continues to pull the trigger at least once per second.
Once the trigger is allowed to rest for more than a second, the cycle
begins again with one shot per trigger pull. The PSP mode can be
adjusted with the BPS Limit and BPS Fine settings.
MILLENNIUM
Millennium mode complies with the WPBO firing mode requirements.
Initially this mode acts like Semi-Automatic. After four trigger pulls in
quick succession (200ms or less each), it begins firing repeatedly at
the BPS Limit. If there is a delay between trigger pulls of more than
200 milliseconds, this mode reverts to firing one shot per trigger pull.
The BPS Limit must be set to 10.5 or lower. Check latest editions of
league rules for BPS Limit changes.
FIRING MODE
As its name implies, this setting selects one of the Luxe®'s eleven
available firing modes, each of which is identified by the Luxe®
speaking the mode name and displaying it near the top of the OLED
display. Settings which affect the performance of a firing mode are
stored specifically for the currently selected mode. Firing mode related
settings are only available for adjustment when their associated firing
modes are selected. For example, Burst Count may only be adjusted
when the firing mode is set to Burst.
SOFTWARE 4.6 FIRING MODES AND SETTINGS
BPS LIMIT
This setting adjusts how fast the Luxe®can fire in all modes except Semi-Auto. For
modes such as Capped Semi-Auto, this setting limits the maximum rate of fire.
For modes which provide automatic shots, like Burst and Full-Auto, it determines
the rate of fire. BPS limit is adjusted in whole numbers of Balls Per Second. The
value may be set from 4 BPS to 20 BPS. Default BPS and BPS Fine values vary
between firing modes.
Due to variances in the timing of both the Luxe®and paintball shot timers, it is
recommended that players confirm timing values with a field's shot timer before
competition to reduce the chance of a penalty.
DWELL
The Dwell setting determines how long the Luxe® sends power to
its solenoid valve, which in turn affects how long the bolt remains
forward and how much gas is released from the fire chamber to propel
each paintball. Dwell is adjustable from 4 to 25 milliseconds in one
millisecond increments. The default Dwell value is 16 milliseconds,
which provides an excellent balance between gas efficiency, speed and
reliable operation.
FIRST SHOT DROP
The o-rings in the Luxe®power core may become set in position when
resting between shots, causing slightly more friction than is seen
during rapid firing. This results in the first shot of a group having
decreased velocity, also known as First Shot Drop Off, or FSDO. In
order to overcome this friction, the anti-bolt-stick function of the Luxe®
firmware will slightly increase the dwell time of the first shot in a group,.
The increased dwell will compensate for the change in friction, keeping
velocity more consistent. The standard value for First Shot Drop is 7
milliseconds, and it may be adjusted between 0 and 25 milliseconds
in one millisecond increments. A setting of 0 turns off first shot drop
compensation.
FIRST SHOT DROP TIMER
This setting adjusts the amount of time which the Luxe®must be at
rest between shots before activating the anti-bolt-stick dwell increase.
Time is adjustable between 20 and 100 seconds in 20 second
increments. The default setting is 20 seconds.
14

BYPASS BPS
Bypass BPS is an additional rate of fire limit that is imposed when the
Vision system detects a fault, such as paint or debris that prevents
it from working properly. The Bypass BPS setting can be adjusted to
ensure that the Luxe®fires slower than its loader's slowest response
rate. Bypass BPS is adjustable between 6 and 16 bps, though the
Luxe®firmware will not allow it to be adjusted to a value higher than
the BPS limit.
BPS FINE
The rate of fire cap may be fine tuned through adjustment of the BPS Fine setting,
which is added to the BPS Limit value. BPS Fine ranges from 0 to 9 and adds
tenths of a ball per second to the rate of fire limit. For example, a BPS Limit of 12,
combined with a BPS Fine setting of 8 will result in a 12.8 BPS cap to maximize
firepower under a 13 BPS tournament limit while still providing a margin of error
to reduce the chance of a penalty.
Rebound, Auto Response and Capped Semi modes are limited to 20 BPS. All other
modes are limited to 15 BPS, except Semi-Auto, which has no cap.
SHOTS TO ENTER
Shots To Enter determines the number of trigger pulls that must be
made at the Shots To Sustain rate in order to activate Rebound mode
and deliver more than one shot per trigger pull. Shots To Enter may be
adjusted from 1 to 5 and has a default value of 3.
SHOTS TO SUSTAIN
The trigger must be pulled repeatedly at this rate for the Shots To
Enter number of times to activate Rebound mode, and must continue
to be pulled at this rate to keep Rebound mode active.This setting is
adjustable between 2 and 10 balls per second and has a default value
of 5 BPS.
VISION MODE
The Vision anti-chop system in the Luxe®may be programmed to operate
with one of two strategies. Vision®will stop the Luxe from firing if there is
not a ball detected in the breech when the trigger is pulled. Forced Shot
will still provide Vision operation during normal trigger pulls. If the trigger
is held down for a long trigger pull, Forced Shot Vision® will fire even if a
paintball is not detected in the breech.
TOURNAMENT LOCK
When turned on, the Tournament Lock blocks access to the Main
Menu via the power button and trigger, requiring use of a tool to open
the rubber grip and make adjustments (See 4.3 ADDITIONAL POWER
BUTTON FEATURES). The Tournament Lock is off by default. Because
the Tournament Lock may be turned on by the trigger and power
button, it is convenient to unlock the Luxe®at a paintball field's staging
area, close its grip, make adjustments at the chrono station with trigger
based programming, and then lock the marker with the Tournament
Lock before heading on to the field.
LOADER DELAY
The loader delay allows time for the paintball to seat fully in the
breech, after the Vision system has detected it, before the Luxe®fires.
For forced feed loaders, less time is necessary than with gravity fed
loaders. The loader delay is adjustable between 0 and 15 milliseconds
with a default setting of 3.
MECHANICAL DEBOUNCE
When a paintball marker's trigger is adjusted to an extremely short
pull, it is sometimes possible for the vibration of firing to activate the
trigger, causing a runaway condition where one shot triggers the next
shot. The Mechanical Debounce filtering function of the Luxe®firmware
can be set to discriminate against these mechanical bounces, allowing
for extremely sensitive trigger adjustment while meeting tournament
rule and field safety requirements. Mechanical Debounce is adjustable
over a range of 0 (off) to 10, and is off by default.
TRIGGER DEBOUNCE
When the Luxe®trigger switch is activated, it will create a series of very
fast electrical pulses before a complete connection is made. The Luxe®
firmware uses the Trigger Debounce setting to determine the difference
between this switch noise and the solid signal from a completed trigger
pull. Trigger signals which last longer than the Trigger Debounce value
are considered to be a valid trigger pull. The Trigger Debounce value is
adjustable between 1 and 25 milliseconds in 1 millisecond increments.
The default value is 7 milliseconds.
MAINTENANCE COUNTER
When active, the Maintenance Counter tracks the number of shots fired
by the Luxe®and displays the total each time the Luxe®is turned on.
Like the odometer in a car, it can be used to as a guide for replacing
wear components such as o-rings. The Maintenance Counter tracks bolt
cycles detected by the vision system during a firing cycle, and is not
increased by “dry firing” without gas in the marker. The Maintenance
Counter is reset by turning it off and powering off the Luxe®.
SPEAKER VOLUME
The Volume of the Luxe®speaker is adustable. Volume may be set to
1-silent, 2-quiet, or 3-loud.
VOICE SELECT
As configured from DLX Technology, the Luxe®speaks English, German,
Spanish and Russian. Alternatively, different voice sets may be loaded
into voice banks 2, 3 and 4 with the Luxe USB interface software and
cable (see SOFTWARE 4.5.) Selecting each voice bank allows its voice
set to be used.
AUTO SHUTDOWN
The Luxe®will automatically turn itself off to conserve battery power
if it is not fired for an extended period of time. The Auto Shutdown
Timer is set to 30 minutes by default, and may be adjusted from 5 to
60 minutes.
SOFTWARE VERSION
Although this item cannot be adjusted, selecting it to be set will cause
the Luxe®to read out the version number of the currently installed
Luxe®firmware.
15
SOFTWARE 4.7 MENU SETTINGS

GAME TIMER ENABLE
The Luxe®is equipped with a count-down timer. When Game Timer
Enable is turned on, the Luxe®switches to an alternate display
layout,showing the remaining game time. The game timer begins
counting down after a single short press of the power button.
GAME TIMER
The Game Timer may be set between 1 and 60 minutes, in 1 minute
increments.
SHOT
COUNTER
GAME
TIMER
MAINTENANCE
COUNTER
VISION
OFF
SHOT COUNTER
When set to on, the Shot Counter will be displayed on the Luxe®OLED
display. The counter will reset each time the marker is turned off, and
will not be displayed if the Game Timer is enabled.
WHILE REFERENCES TO PAINTBALL TOURNAMENT LEAGUE RULES ARE
ACCURATE AT THE TIME OF THIS WRITING, IT IS NOT UNCOMMON FOR
PAINTBALL LEAGUES TO MAKE CHANGES TO THEIR RULES. IN ADDITION TO
THE MODE CHOICE, SOME SERIES WILL REQUIRE THE USE OF THE LUXE®’S
BPS LIMIT TO LIMIT MAXIMUM RATE OF FIRE. BE SURE TO MAKE YOURSELF
FAMILIAR WITH THE RULES OF ANY TOURNAMENT, SCENARIO OR GAME
WHERE YOU WILL BE PLAYING, TO BE CERTAIN YOUR LUXE® SETTINGS ARE
IN COMPLIANCE.
16

2
STEP TWO REMOVE THE BOLT
BEGIN DISASSEMBLING THE LUXE®POWER CORE by unscrewing the core cap from the fire
chamber. This will release the bolt which is captive between the two parts.
1
MAINTENANCE 5.1 LUXE® POWER CORE
THE HEART OF YOUR LUXE®is the Luxe®Power Core. This single
module comprises both the marker's bolt and exhaust valve
system. Its compact, tool-free design makes the Luxe®incredibly
fast and simple to maintain. The Luxe®should be disassembled
and cleaned any time it shows erratic performance, becomes
contaminated with paint, dirt or other debris, or for preventative
maintenance after 3 or 4 days of use.
PULL
PUSH
With THUMB
BASIC GUIDE TO THE
LUXE®POWER CORE QUICK-STRIP
THE INNOVATIVE LUXE® POWER CORE CAN BE REMOVED IN SECONDS, NO TOOLS REQUIRED.
STEP ONE UNLOAD AND DEGAS YOUR LUXE®
UNLOAD AND DEGAS YOUR LUXE®(see HARDWARE 3.3.) Turn off and or remove the gas supply.
Remove the barrel then press in on the bottom-rear of the quick-strip latch, lift its front, and wait for
the Luxe®to completely depressurize before, pulling the Power Core out of the Luxe®receiver. If the
Power Core has not been removed recently it may need to be wiggled slightly to break o-ring friction.
The Luxe®will fire a low-power shot if the Power Core is removed while still under pressure.
17
Other manuals for Luxe X
1
Table of contents
Other DLX Paintball Equipment manuals