DNTLworks Equipment ProSeal II User manual

1
ProSeal IITM
Portable Sealant Unit
ProQuest I and IITM
Portable Delivery Units
OPERATION MANUAL
© Copyright 2010 DNTLworks Equipment Corporation
All Rights Reserved
DNTLworks Equipment Corporation
7300 South Tucson Way
Centennial, Colorado 80112 USA
Toll Free: (800) 847-0694
Main: (303) 693-1410
Fax: (303) 693-6189

2
Contents
Introduction ..................................................................................................................................................4
Customer Service ..........................................................................................................................................4
DNTLworks Limited Warranty....................................................................................................................... 4
Returns......................................................................................................................................................5
Description of Unit........................................................................................................................................ 5
Air System .................................................................................................................................................6
Water System............................................................................................................................................ 6
Vacuum System......................................................................................................................................... 6
Electrical System ....................................................................................................................................... 6
Specifications ................................................................................................................................................6
Unit Features.................................................................................................................................................7
Front View................................................................................................................................................. 7
Front View................................................................................................................................................. 8
Back View.................................................................................................................................................. 8
Inside View................................................................................................................................................9
Operation...................................................................................................................................................... 9
Setup ......................................................................................................................................................... 9
Optional Amalgam Separator .................................................................................................................12
Handpiece Operation..............................................................................................................................14
Three-way Syringe ..................................................................................................................................14
Vacuum System.......................................................................................................................................15
Water Bottle............................................................................................................................................15
Accessories..............................................................................................................................................16
Dental Office Infection Control Guidelines (CDC).......................................................................................16
Barrier Techniques..................................................................................................................................17
Cleaning and Disinfection of Dental Unit and Environmental Surfaces .................................................17
Use and Care of Handpieces and Other Intra-oral Dental Devices.........................................................17
Other Important Issues...........................................................................................................................18
Shut Down Instructions...............................................................................................................................18
Packing Instructions....................................................................................................................................20
Maintenance ...............................................................................................................................................20

3
Electrical Diagram Compressor Unit .......................................................................................................22
Electrical Diagram Delivery Unit .............................................................................................................23
Tubing Diagram Compressor Unit...........................................................................................................24
Tubing Diagram Delivery Unit ProSeal II.................................................................................................25
Tubing Diagram Delivery Unit ProQuest I, II...........................................................................................26
Delivery Unit, Inside View....................................................................................................................... 27
Compressor Unit, Inside View.................................................................................................................27
Foot Control Adjustment ........................................................................................................................ 28
Handpiece Not Working.......................................................................................................................... 29

4
Introduction
Thank you for purchasing the ProSeal IITM or ProQuest I or IITM Portable Delivery Unit from DNTLworks
Equipment Corporation. The information contained in the manual should answer any questions
regarding service and operation of your ProSeal IITM or ProQuest I or IITM unit.
All authorized personnel who operate, maintain, or service your ProSeal IITM or ProQuest I or IITM unit
should carefully review this manual before attempting to operate, perform maintenance on or service
the unit. Your ProSeal IITM or ProQuest I or IITM unit should be operated and maintained by trained
personnel only. Should questions or problems arise, contact our Customer Service Department.
Although your ProSeal IITM or ProQuest I or IITM unit has been designed and tested for maximum safety
and optimum performance, it is sold with the express understanding that DNTLworks, its subsidiaries,
agents and representatives will not accept any responsibility for the following, including, but not limited
to:
1) Operator’s lack of knowledge, negligence or carelessness in the operation of this equipment.
2) Equipment not properly maintained or serviced.
3) Injury to personnel or patients from improper use.
4) Modification or tampering of any kind.
Customer Service
In the event you require assistance with your unit, please call 1-800-847-0694 or 303-693-1410 and
speak with one of our customer service representatives. Our service hours are from 8:00 a.m. to 5:00
p.m., Mountain Standard Time, Monday through Friday.
In most instances, service problems may be solved over the telephone. If service is required, you may
ship the unit to our manufacturing facility for repair. Warranty service will be performed in accordance
with the DNTLworks’ Limited Warranty. Non-warranty service will be provided at reasonable parts and
labor costs.
DNTLworks Limited Warranty
DNTLworks warrants to the purchaser that these products are free of defects in materials and/or
workmanship for three (3) full years from date of delivery, on a “parts only” basis. In addition,
DNTLworks extends a ninety (90) day labor warranty from the date of delivery for all products we
manufacture. Shipping charges incurred to the factory under warranty purposes will be the
responsibility of the owner.
During the warranty period, all parts which, upon inspection and examination by DNTLworks, are proven
to be defective, will be replaced free of charge. All decisions concerning whether a part will be repaired
or replaced and the manner, method, and extent of such repair or replacement will be at the sole

5
discretion of DNTLworks. The responsibility of DNTLworks does not include repair and replacement cost
resulting from misuse, abuse, improper maintenance, or normal wear and tear.
DNTLworks will pay for labor costs for warranty service for a period of 90 days from the date of
purchase. DNTLworks sole obligation under said warranty is to repair, or, at its option, replace the
defective part. The buyer will have no options.
Warranties for products not manufactured by DNTLworks, but sold in combination with DNTLworks
products, will be honored by DNTLworks for the entire duration of the original manufacturer’s warranty
period.
The warranty will be voided by alterations, tampering with, improper installation or maintenance,
accident or modification of the equipment, with the exception of work performed by DNTLworks or one
of its authorized service agents. This warranty expressly excludes all damage to the products resulting
from careless or neglectful transportation. DNTLworks will in no event be responsible for any work done
without first obtaining DNTLworks’ written consent.
This warranty is made expressly in lieu of all other warranties, expressed or implied, including any
implied warranties of merchantability or fitness for a particular purpose. No employee, agent, franchise,
dealer or other person is authorized to give any warranties of any nature on behalf of DNTLworks.
Except as provided herein, DNTLworks will have no liability or responsibility to the customer or any
other person or entity with respect to any liability, loss or damage caused or alleged to be caused
directly or indirectly by equipment sold, leased, or furnished by DNTLworks, including, but not limited
to, any interruption of services, loss of business or anticipatory profits or consequential damage arising
out of or connected with the sale, lease, use, or anticipated use of equipment. Notwithstanding the
above limitations and warranties, DNTLworks liability hereunder for damages incurred by customer or
other will not exceed the amount paid by customer for the particular equipment involved.
Returns
Purchased goods may not be returned without the express written consent of DNTLworks and a Return
Goods Authorization Number (RGA#). All items must be returned within 14 days of initial delivery and
are subject to a 15% restocking charge. Special order items cannot be returned for credit consideration.
Freight charges on approved return items shall be borne by the customer.
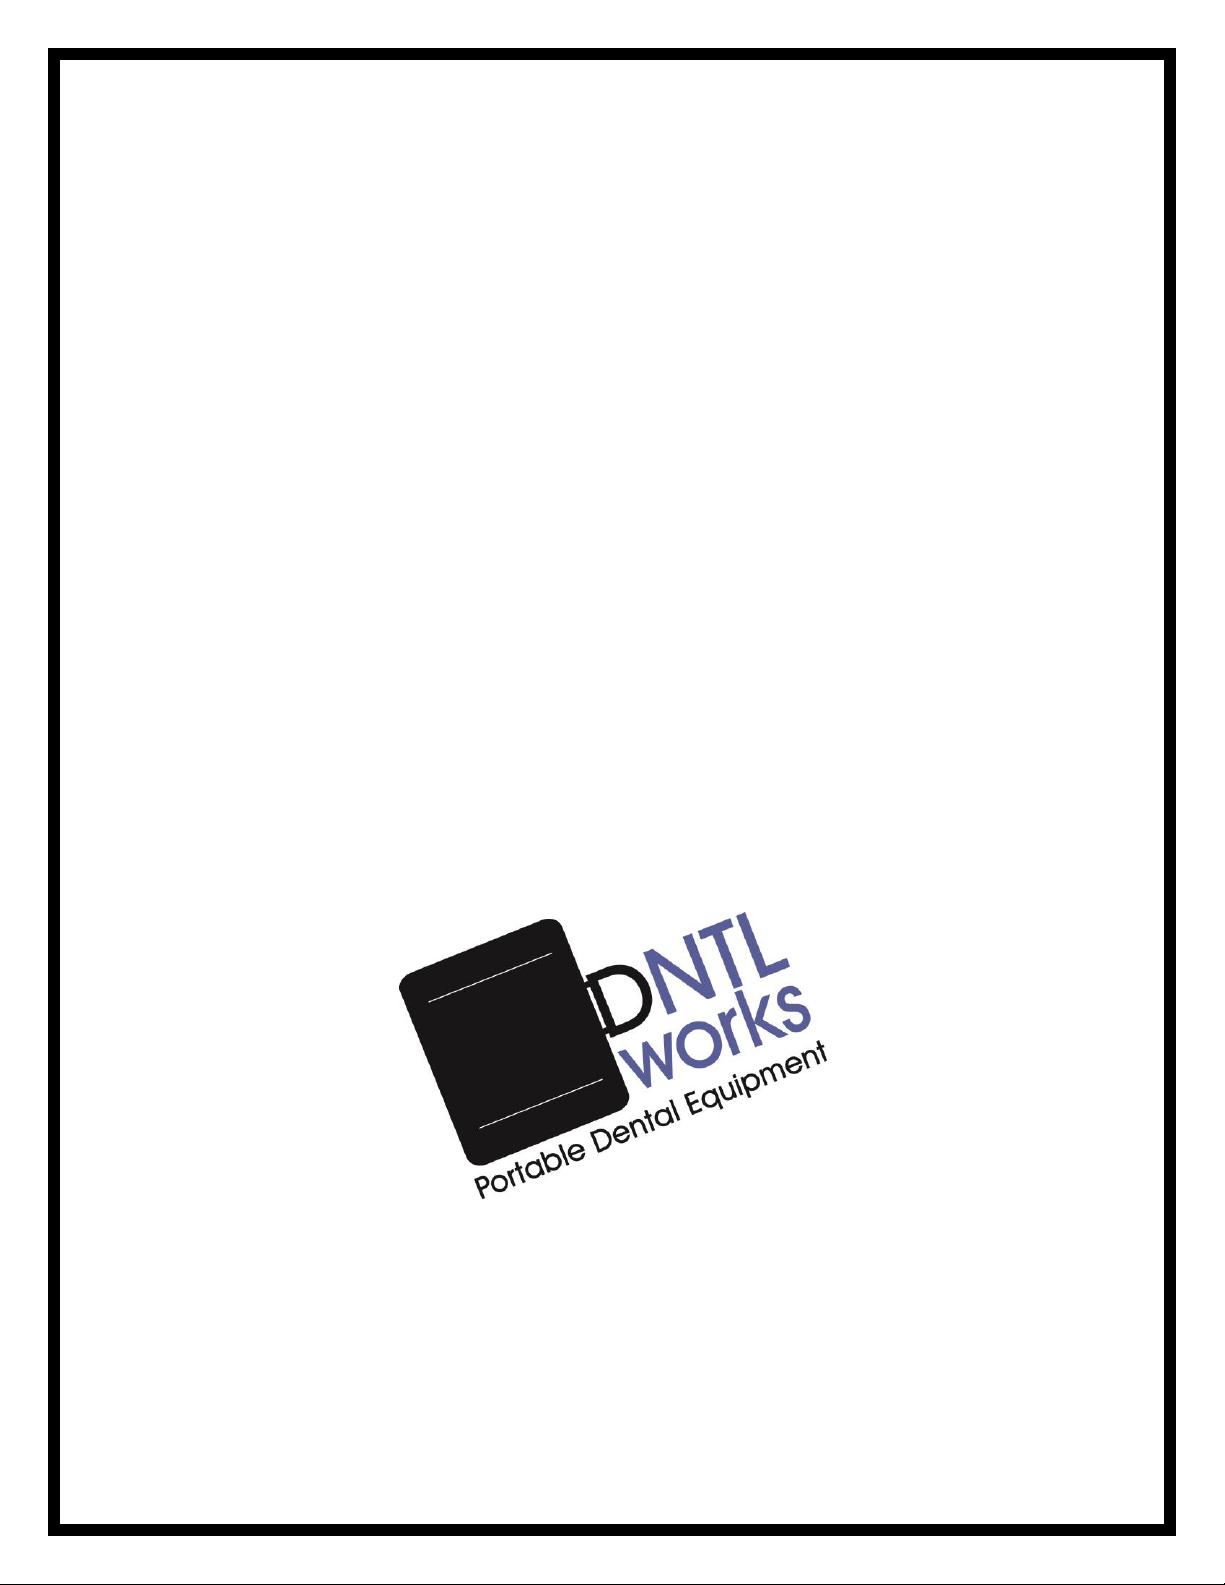
Description of Unit
The ProSeal IITM is a lightweight, powerful sealant, prophy, and vacuum unit which allows the operator
to irrigate and dry prepared surfaces, perform prophy treatments, and quickly aspirate liquid dental
waste. This unit includes a non-water-capable lowspeed handpiece.
While visually similar to the ProSeal IITM, the ProQuest I or IITM is equipped with a highspeed electric
handpiece with water adjustment, enabling the operator to perform most dental procedures. The
ProQuest IITM features fiber-optic capability. ProSeal IITM or ProQuest I or IITM units may be upgraded
with a piezo-electric scaler.

6
The diagrams in this manual are of a ProQuest ITM, and you will see notes of differences between the
units.
Air System
The internal air compressor will activate when main power switch is turned on, filling the water
container. The compressor will deactivate when air pressure reaches 65psi and will recycle at 58psi.
Water System
Water container should be filled 1/2 full. Water to handpieces is controlled by the foot control and the
valves on the side of the unit (ProQuest I or IITM only). The water for the air/water syringe is controlled
by depressing the water button on the syringe.
Vacuum System
The internal vacuum system is activated by removing saliva ejector valve or HVE from the holder. You
may use either the saliva ejector or HVE as needed. Inside the vacuum container is an automatic shut
down system to prevent spillage.
Electrical System
You may use a maximum of 3 amps on the optional external outlet. The unit is protected by a 15 amp
circuit breaker.
Specifications
Description
ProSeal II
ProQuest I, II
Length
21.9” (55.6cm)
21.9” (55.6cm)
Width
8.4” (21.3cm)
8.4” (21.3cm)
Height
18” (45.7cm)
18” (45.7cm)
Total Weight
58lbs (26.3kg)
60lbs (27.2kg)
Voltage
115 or 220Vac
115 or 220Vac
Frequency
60 or 50 Hz
60 or 50 Hz
Wattage
1100 to 1440 W
1100 to 1440 W
Water Container
34oz (1liter)
34oz (1liter)
Sound Level Full Load
46dB @ 3’
46dB @ 3’
Case Type
Polypropylene
Polypropylene
Electric Handpiece
0-40,000rpm
0-160,000rpm
Compressor
Horsepower
1/16 Hp
1/16 Hp
Working Pressure
58 to 65psi
58 to 65psi
Vacuum Pump
Horsepower
1/3 Hp
1/3 Hp
Pressure
10 inHg
10 inHg
Flow Rate
4.6 scfm
4.6 scfm

7
Unit Features
Front View
Electric Handpiece
Handpiece Water Adjustment
(ProQuest I, II Only)
Air/Water Syringe
Saliva Ejector
HVE
Delivery Unit
Water Bottle
Electrical Connector
Air, Saliva Ejector and
HVE Connections
Compressor Unit
Foot Control
Handle Assembly

8
Front View
Back View
Electric Handpiece
Electric Handpiece
Forward/Reverse
Switch
Handpiece Water Adjustment
(ProQuest I, II Only)
Air/Water Syringe
Saliva Ejector
HVE
Water Bottle
Foot Control Connector
Electrical Connector
Power Receptacle
Circuit Breaker
Power Switch
Cooling Fan
Feet

9
Inside View
Operation
Setup
[Type a quote from the document or
the summary of an interesting point.
You can position the text box
anywhere in the document. Use the
Text Box Tools tab to change the
formatting of the pull quote text box.]
Vacuum Container
Cover Compressor
Cover Electrical
Vacuum Relief Valve
DO NOT ADJUST
Unpack delivery unit.
Unpack water bottle.
Unpack foot control.
Unpack power
cord.

10
Unpack HVE and
saliva ejector lines.
Unpack handpieces.
Connect small
vacuum line.
Connect large
vacuum line.
Close lid and
extend handle.
Install delivery
unit.
Connect
electrical
connector.
Connect air
line.
Place handpiece tubing
and syringe in handpiece
holders.
Connect tubing with
red washer to vacuum
container.

11
Connect saliva
ejector tubing.
Place saliva
ejector in
holder.
Connect HVE
line.
Place HVE in holder.
Connect foot
control.
Place foot control near
the operator.
Fill water bottle to the
blue line.
We recommend
distilled water.
Connect handpiece
motor to handpiece
tubing.
Be careful not to cross
thread handpiece
tubing too handpiece
motor.
Connect handpiece
attachment to handpiece
motor.
Install water
bottle.

12
Optional Amalgam Separator
Place handpiece in
handpiece holder.
Plug power cord into
power receptacle
and into wall outlet.
Turn on
power switch.
Place separator
on the unit.
Disconnect saliva
ejector line.
Connect saliva
ejector to tee.
Disconnect HVE
line.
Connect HVE
line.
Connect line
from separator
to unit.

13
Changing Cartridge
Dispose of old cartridge according to your state or local regulations. Or call the number provided on the
separator cartridge.
Install plug to
bulkhead.
Loosen knob.
Move bracket
to side and
remove
cartridge.
Remove caps from
new cartridge.
Make sure o-rings are
installed on new
cartridge.
Install new cartridge.
The IN port of the
cartridge should be
on the side with
arrow pointing in.
Slide bracket
that supports
the cartridge.
Tighten knob.
Replace caps on
old cartridge.

14
Handpiece Operation
Always clean handpieces between patients.
See Dental Office Infection Controls Guidelines CDC, below.
Three-way Syringe
Remove handpiece
from holder.
Depress foot control.
For handpiece
coolant water,
adjust water valve
while depressing
foot control.
(ProQuest I,II Only)
Water only.
Air only.
Air and water (mist).
You can use disposable syringe tip kits. (A-dec type disposable tip kit)
Always clean syringe between patients.
See Dental Office Infection Controls Guidelines CDC, below.
You can change
rotation of
handpiece
motor

15
Vacuum System
Cleaning Between Patients and End of Day
1) Remove any waste in vacuum container by purging and disposing of contents in a CDC-approved
manner. See Dental Office Infection Control Guidelines CDC, below.
2) Mix one quart of evacuation cleaner, turn on evacuation system and suction cleaner into waste
bottle using the HVE valve, and the saliva ejector.
3) Dispose of cleaner waste in CDC-approved manner.
4) Wipe down outside of the bottle and tubings with a surface cleaner.
5) Clean tubings and handpieces in CDC-approved manner.
6) Clean unit surfaces CDC-approved manner.
Water Bottle
When using either saliva ejector or HVE, make sure the other valve
is closed.
Always clean vacuum system between patients.
See Dental Office Infection Controls Guidelines CDC, below.
Never adjust vacuum relief valve.
When using saliva ejector, vacuum relief valve will have an air leak
sound.
Open valve.
Before using saliva ejector always check screen.
Disconnect air line.
Push plunger down
to remove pressure
from water bottle.
Remove water
bottle.
Place o-ring
lube or
petroleum jelly
on o-rind as
needed.

16
Accessories
Dental Office Infection Control Guidelines (CDC)
DENTAL OFFICE INFECTION CONTROL GUIDELINES FOR THE PROTECTION OF
PATIENTS AND DENTAL CARE PERSONNEL AS RECOMMENDED BY THE UNITED
STATES CENTERS FOR DISEASE CONTROL (CDC)
Install water
bottle.
Fill water bottle to the
blue line.
We recommend
distilled water.
Connect air line. Compressor will start to fill water bottle at which
time the air pressure will move water bottle into locked position.
Optional Scaler:
To operate
scaler, remove
from holder and
depress foot
control.
Scaler Adjustment Control
Scaler water adjustment
Make sure scaler tip is screwed on
tight.
Scaler Water Solenoid
Scaler Control

17
NOTE: A medical history should be taken at the initial patient visit and on recall, updated
with notations made on the chart.
Barrier Techniques
1) Dentists, hygienists and assistants should wear new gloves for each patient treated. Hands
should always be washed with liquid soap before and after treatment, contact with patients or after
touching inanimate objects likely contaminated by blood or saliva, and before leaving the operatory.
Remove torn, cut or punctured gloves immediately, wash hands, and re-glove before completion of
dental procedures.
2) During all treatment procedures, dentists, hygienists and assistants should wear face masks
and protective eyewear, or in lieu of both of these, a chin-length plastic face shield.
3) Reusable and/or disposable gowns, laboratory coats or uniforms should be worn when
street clothing may be soiled with blood or other body fluids. Gowns should be changed at least
daily or when visibly soiled with blood.
Cleaning and Disinfection of Dental Unit and Environmental Surfaces
1) After treatment of each patient and at the completion of daily work activities, countertops
and dental unit surfaces that may have become contaminated with patient material should be cleaned
with disposable toweling, using an appropriate cleaning agent and water as necessary. Surfaces then
should be disinfected with a suitable chemical germicide.
2) A chemical germicide registered with the EPA as a “hospital disinfectant” and labeled for
“tuberculocidal” (i.e., mycobactericidal) activity is recommended for disinfecting surfaces that have
been soiled with patient material. These intermediate level disinfectants include phenolics,
iodophors, and chlorine-containing compounds. Because mycobacteria are among the most
resistant groups of microorganisms, germicides effective against mycobacteria should be effective
against many other bacterial and viral pathogens. A fresh solution of sodium hypochlorite
(household bleach) prepared daily is an inexpensive and effective intermediate-level germicide.
Concentrations ranging from 500 to 800 ppm of chlorine (a 1:100 dilution of bleach and tap water
or 1/4 cup of bleach to 1 gallon water) are effective on environmental surfaces that have been
cleaned of visible contamination. Caution should be exercised, since chlorine solutions are corrosive
to metals, especially aluminum.
3) Low-level disinfectants - EPA registered “hospital disinfectants” that are not labeled for
“tuberculocidal” activity (e.g., quatemary ammonium compounds) - are appropriate for general
housekeeping purposes such as cleaning floors, walls and other housekeeping surfaces. Intermediate
and low level disinfectants are not recommended for reprocessing critical or semi-critical dental
instruments.
4) Before high-level disinfection or sterilization, and while wearing heavy duty rubber
(household) gloves, ultrasonically clean (preferably) or scrub instruments in order to remove debris.
Use and Care of Handpieces and Other Intra-oral Dental Devices
1) Routine between-patient use of a heating process capable of sterilization (i.e., steam under
pressure (autoclaving), dry heat, or heat/chemical vapor) is recommended for all highspeed dental
handpieces, lowspeed handpiece components used intra-orally, and reusable prophylaxis angles.
Manufacturers’ instructions for cleaning, lubrication, and sterilization procedures should be followed

18
closely to ensure both the effectiveness of the sterilization process and the longevity of these
instruments. According to manufacturers, virtually all highspeed and lowspeed handpieces in
production today are heat tolerant and most heat-sensitive models manufactured earlier can be
retrofitted with heat-stable components.
2) Internal surfaces of highspeed handpieces, lowspeed handpiece components, and
prophylaxis angles may become contaminated with patient material during use. This retained patient
material then may be expelled intra-orally during subsequent uses. Restricted physical access -
particularly to internal surfaces of these instruments - limits cleaning and disinfection or sterilization
with liquid chemical germicides. Surface disinfection by wiping or soaking in liquid chemical
germicides is not an acceptable method for reprocessing highspeed handpieces, lowspeed handpiece
components used intra-orally, or reusable prophylaxis angles.
3) Highspeed handpieces should be run to discharge water and air for a minimum or 20-30
seconds after use on each patient. Handpieces, in addition, should be heat sterilized between uses
on patients. This procedure is intended to aid in physically flushing out patient material that may
have entered the turbine and air or water lines. Use of an enclosed container or high-velocity
evacuation should be considered to minimize the spread of spray, splatter, and aerosols generated
during discharge procedures. Additionally, there is evidence that overnight or weekend microbial
accumulation in water lines can be reduced substantially by removing the handpiece and allowing
water lines to run and to discharge water for several minutes at the beginning of each clinic day.
Sterile saline or sterile water should be used as a coolant/irrigation when surgical procedures
involving the cutting of bone are performed.
Other Important Issues
1) A “no-touch” technique (e.g., hemostats or needle holders), should be utilized when using
“sharps” (needles, scalpels, blades, etc.).
2) In the operatory, sterilized and decontaminated instruments, charts, and other objects should
be protected from patient contact.
3) “Sharps” should be disposed of in puncture proof containers; hazardous and/or infectious
waste materials, which include “sharps,” should be disposed of in a manner consistent with
prevailing local laws.
4) All dental personnel should be encouraged to receive immunization protection whenever
possible, e.g., hepatitis B immunization.
5) All impressions, models and devises should be disinfected before submission and upon
receipt from the dental laboratory.
Shut Down Instructions
Depressurize
and remove
water bottle.
Remove water
bottle.
pressure relief
valve.

19
Empty water
bottle.
Depress syringe
water button until
all water is purged.
Mix non-foaming
vacuum system
cleaning solution
and run solution
through HVE
valve.
Run cleaning
solution through
saliva ejector
valve.
Install water
bottle.
Connect air line.
Turn on handpiece
coolant water.
(ProQuest I, II Only)
Place handpiece over
container and depress
foot control until all
water is purged.
(ProQuest I, II Only)
Purge Scaler (Optional)
Remove any waste in vacuum container and disposing of contents
in a CDC-approved manner. See Dental Office Infection Control
Guidelines CDC, above.

20
Packing Instructions
Maintenance
The following visual checks should be performed before operating the unit:
1) Look for mechanical damage that could affect safe operation, including, but not limited to, the
following:
Disconnect
vacuum
container and
remove from
unit.
Wrap tubing
around
handpiece
holders.
Pack delivery
unit into case.
Pack foot
control.
Pack water
bottle.
Pack power
cord.
Pack vacuum
container.
Pack manual.
Pack saliva
ejector and
HVE lines.
Pack
handpiece
motor an
attachment.
This manual suits for next models
2
Table of contents
Other DNTLworks Equipment Dental Equipment manuals
Popular Dental Equipment manuals by other brands

Dabi Atlante
Dabi Atlante Spectro 70X Series owner's manual

Ivoclar Vivadent
Ivoclar Vivadent Programat P710 G2 Short instructions

Nevadent
Nevadent SMD 24 A1 Operating instructions and safety instructions

Acteon
Acteon MINILED SUPERCHARGED user manual

Komet
Komet CeraBur Instructions for use

Wassermann
Wassermann Wapo-Mat III user manual

EMS
EMS FT-200 Operation instructions

Sendoline
Sendoline S1-E operating instructions

Airel Quetin
Airel Quetin K2 Manual for use

Wassermann
Wassermann Sidomix II user manual

Ivoclar digital
Ivoclar digital PrograPrint Clean Short instructions

Carestream DENTAL
Carestream DENTAL RVG OPTIMA User and installation guide