DOD Technologies DOD64-FTIR User manual

DOD 64 FTIR
Gas Monitor User Manual

2
DC-ITD-FTIR-MAN01 www.dodtec.com
FEB 2020 815-788-5200
FTIR Manual
©DOD Technologies, INC
675 Industrial Drive Bldg. A.
Cary, IL 60013
Phone 815.788.5200 • Fax 815.788.5300

3
DC-ITD-FTIR-MAN01 www.dodtec.com
FEB 2020 815-788-5200
FTIR Manual
Table of Contents
Chapter 1 –Overview........................................................................................................................................................................6
1.1 Introduction ..............................................................................................................................................................................6
1.2 Sampling and Analyzing..........................................................................................................................................................6
1.3 Nitrogen Purging ......................................................................................................................................................................6
1.4 Sample Line & Exhaust Connections .....................................................................................................................................7
1.5 Electrical Connections.............................................................................................................................................................7
1.6 Spectra and Event/Trend File .................................................................................................................................................7
Chapter 2 –Features ........................................................................................................................................................................8
2.1 External Layout.........................................................................................................................................................................8
2.1.1 Warning Labels, Descriptions, & Danger Zones.................................................................................................................8
2.2 Touch Screen Display..............................................................................................................................................................9
2.3 Compact Flash Drive on PC and Solid-State Storage ..........................................................................................................9
2.4 Reliable Linear Pump Technology and Control Manifolds ..................................................................................................9
2.5 FTIR Interferometer................................................................................................................................................................10
2.6 Keyed Maintenance Door & Control Access........................................................................................................................10
2.7 Transport Selectable Valve Manifold Trays ........................................................................................................................10
2.8 Status Lamp (Optional) .........................................................................................................................................................10
2.9 Tubing Connections...............................................................................................................................................................10
2.10 Service Areas........................................................................................................................................................................11
2.11 Password and Security .......................................................................................................................................................12
2.12 USB Memory Stick or Solid State.......................................................................................................................................12
Chapter 3 –Installation..................................................................................................................................................................13
3.1 Selecting A Location..............................................................................................................................................................13
3.2 Sample Tubing .......................................................................................................................................................................14
3.2.1 End of Line Particulate Filters............................................................................................................................................14
3.3 Exhaust Tubing ......................................................................................................................................................................14
3.4 Zero Gas Inlet .........................................................................................................................................................................14
3.5 A/C Power ...............................................................................................................................................................................14
3.6 Output Wiring..........................................................................................................................................................................15
3.6.1 Standard Output Module Wiring........................................................................................................................................15
3.6.2 I/O Connection Details .......................................................................................................................................................15
Chapter 4 –Setup & Configuration................................................................................................................................................16
4.1 Touch Screen Calibration......................................................................................................................................................16
4.2 Gas Selection..........................................................................................................................................................................16
4.3 Alarm Settings........................................................................................................................................................................16
4.4 Output Relays .........................................................................................................................................................................16
4.5 Concentration Log .................................................................................................................................................................16
4.6 USB Memory Stick or Solid-State Drive ..............................................................................................................................16
4.7 Setup Complete......................................................................................................................................................................17

4
DC-ITD-FTIR-MAN01 www.dodtec.com
FEB 2020 815-788-5200
FTIR Manual
Chapter 5 –Basic Operation and Menus......................................................................................................................................18
5.1 Menu Overview.......................................................................................................................................................................18
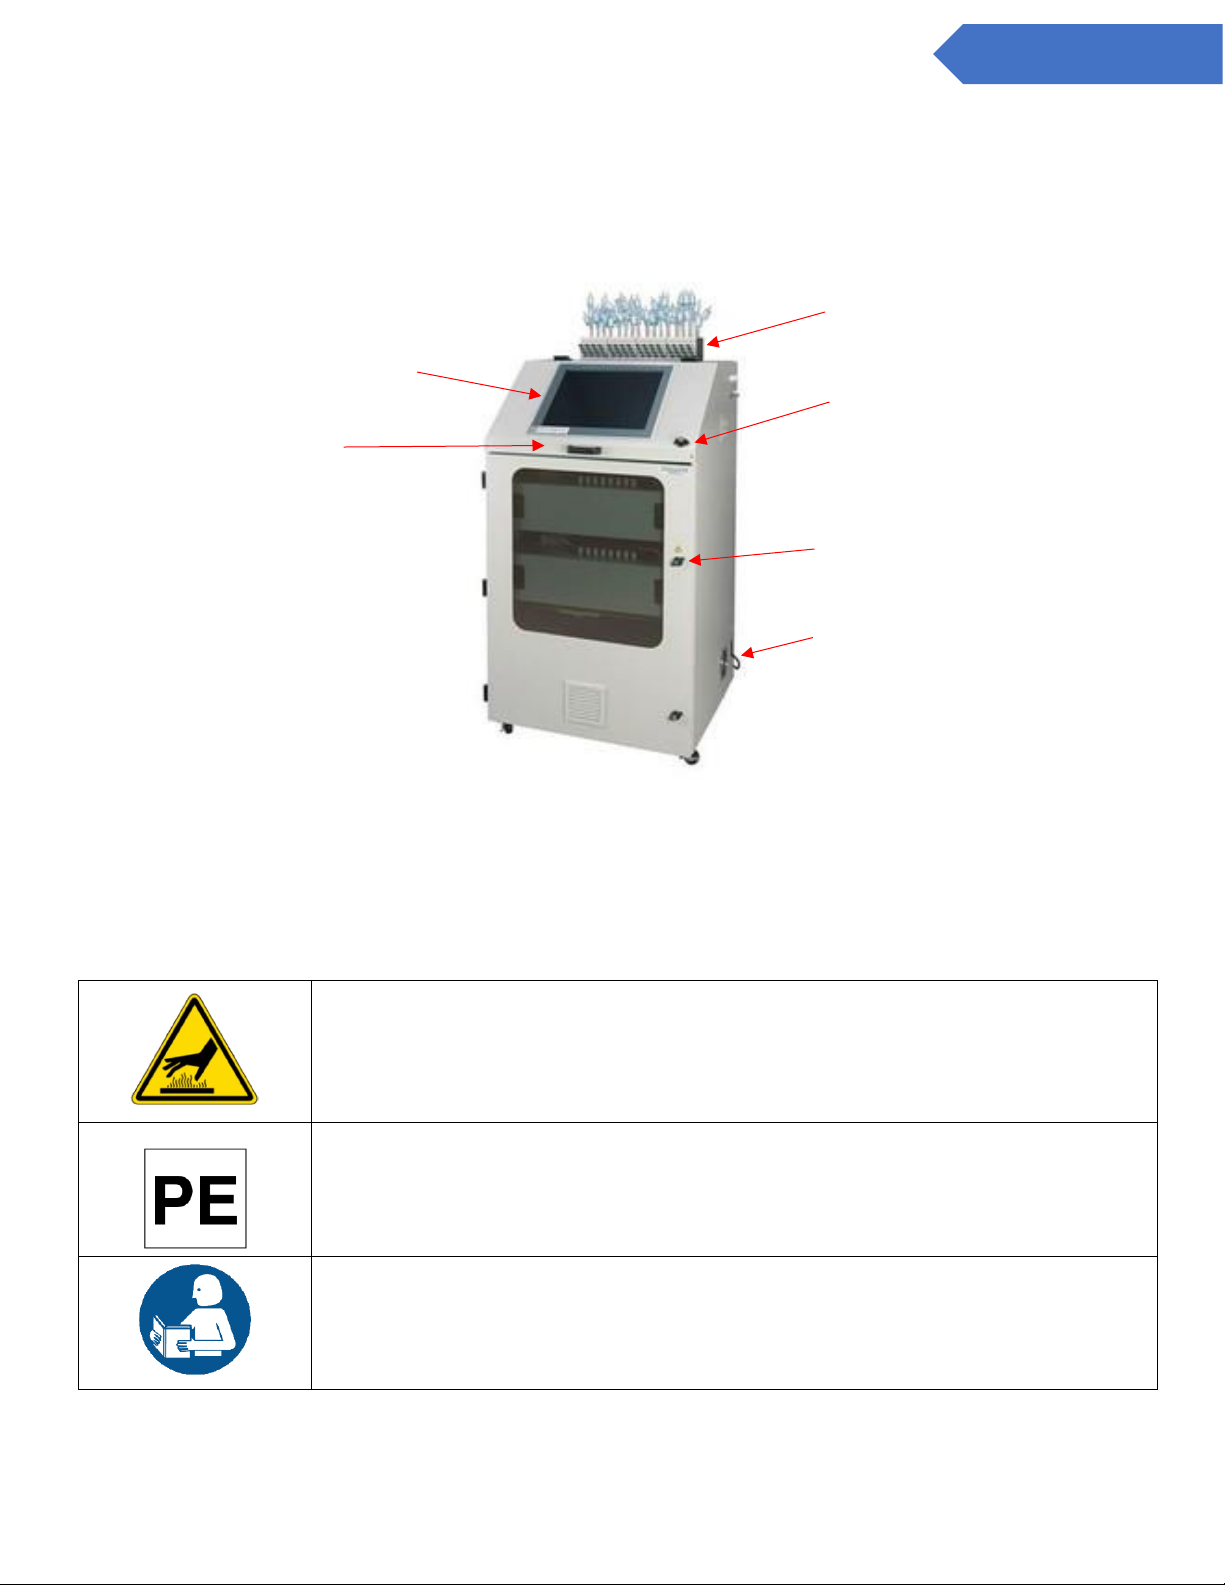
5.2 General Machine Operation ..................................................................................................................................................18
5.2 Analysis Screen......................................................................................................................................................................19
5.2.1 Faults and Events ...............................................................................................................................................................23
5.2.2 Concentration......................................................................................................................................................................24
5.2.3 Spectra.................................................................................................................................................................................24
5.3 Setup Menu.............................................................................................................................................................................25
5.3.1 Setup > Adjust Flow............................................................................................................................................................25
5.3.2 Setup > Configuration.........................................................................................................................................................26
5.3.2.1 Setup > Configuration > Machine...................................................................................................................................27
5.3.2.2 Setup > Configuration > Point Names ...........................................................................................................................27
5.3.2.3 Setup > Configuration > Alarm Levels ...........................................................................................................................28
5.3.3 Setup > FTIR ........................................................................................................................................................................28
5.3.3.1 Setup > FTIR > Point Gas ................................................................................................................................................28
5.3.3.2 Setup > FTIR > Sequencing.............................................................................................................................................29
5.3.3.3 Setup > FTIR > Diagnostics.............................................................................................................................................30
5.3.3.4 Setup > FTIR > Basic Diags.............................................................................................................................................30
5.3.3.5 Setup > FTIR > RDP..........................................................................................................................................................31
5.3.4 Setup > Testing ...................................................................................................................................................................31
5.3.4.1 Setup > Testing > Alarm Outputs ...................................................................................................................................31
5.3.4.2 Setup >Testing > Values .................................................................................................................................................31
5.3.4.3 Setup > Testing > Ethernet/IP ........................................................................................................................................32
5.3.4.4 Setup > Testing > 4-20 Ma .............................................................................................................................................33
5.3.5 Setup > File Transfer...........................................................................................................................................................34
5.3.6 Setup > History....................................................................................................................................................................34
5.3.6.1 Setup > History > Faults Events .....................................................................................................................................35
5.3.6.2 Setup > History > Concentration ....................................................................................................................................35
5.3.6.3 Setup > History > Spectra ...............................................................................................................................................35
Chapter 6 –Maintenance ...............................................................................................................................................................36
6.1 Return the DOD64-FTIR to A Safe State After Service .......................................................................................................36
6.2 Service Area Door Access .....................................................................................................................................................36
6.3 End-of-Line Particulate Filter Replacement........................................................................................................................37
6.4 Flow Adjustment ....................................................................................................................................................................37
6.5 USB and Solid-State Storage Drive Replacement ..............................................................................................................37
6.6 Fuse Replacement .................................................................................................................................................................38
6.7 Detector Service.....................................................................................................................................................................38
Chapter 7 –Service & Support.......................................................................................................................................................39
Appendix A –Parts List ..................................................................................................................................................................40
Appendix B –I/O Connection Details (Cont.) ...............................................................................................................................41

5
DC-ITD-FTIR-MAN01 www.dodtec.com
FEB 2020 815-788-5200
FTIR Manual
B.1 EK1101 Coupler......................................................................................................................................................................41
B.2 Standard Output Module (24 v Sinking) ..............................................................................................................................42
B.2.1 DOD64 General Outputs.....................................................................................................................................................42
B.2.2 Analyzer General.................................................................................................................................................................42
B.2.3 Point Outputs**...................................................................................................................................................................43
Appendix C –System Specifications ............................................................................................................................................44
Appendix D –System Event Message ..........................................................................................................................................45
Appendix F –Optional Communication Interfaces......................................................................................................................47
F.1 Ethernet IP ..............................................................................................................................................................................47
F.2 MODBUS TCP/IP ....................................................................................................................................................................48
F.3 Pump Panel Diagram.............................................................................................................................................................51
F.4 Flow Diagram..........................................................................................................................................................................52
F.4 Control Box Diagram..............................................................................................................................................................52

6
DC-ITD-FTIR-MAN01 www.dodtec.com
FEB 2020 815-788-5200
FTIR Manual
Chapter 1 –Overview
1.1 Introduction
The DOD Technologies DOD64-FTIR can sequentially monitor 16 to 64 locations (called sample points) and is
designed for fast and accurate multi-sequential analysis of a variety of gases. The DOD64-FTIR incorporates
Fourier Transform Infrared gas detection technology to detect low levels of many Infrared active gases.
Sample points can be placed up to 400 ft. (121 m) from the central unit, allowing operators to monitor gas
concentrations in areas removed from the detector’s location. A sample from each point is drawn to the
central location of the monitor via tubing and analyzed for toxic, corrosive and flammable gases based on the
applications requirements. Contact DOD for specific gas calibration details or for interest in specific
calibration requirements which may require a development partnership.
The DOD64-FTIR system can be configured with a maximum of 4 manifolds and each manifold has 16
sample points. Gas detection and analysis occurs in the DOD64’s Interferometer located above the pump
panel within the service door. Sample activity, data collection and corresponding output action occurs in the
DOD64-FTIR onboard PC located in the control box.
The system responds to gases that exceed a programable alarm level or a system fault by:
• Triggering outputs or communication method installed on the unit.
• Displaying the point number, gas type, and gas concentrations in red.
• Electronically storing Alarms, Concentrations, Spectra data, and History.
The DOD64-FTIR triggers outputs for each individual point at two levels of gas concentrations. These
programmable limits are selectable and have default factory settings for their respective gas ranges. The
DOD64-FTIR is designed for maximum uptime, so routine maintenance and service can be performed quickly
and easily. The DOD64-FTIR uses FTIR technology which includes an interferometer with either MCT Sterling
cooled detector or a DTGS detector. The preferred detector type should be specified at the time of purchase.
1.2 Sampling and Analyzing
The DOD64 FTIR extracts a sample continuously from each point to reduce sample transport time. Reduction
in transport time is achieved with one dedicated transport pump per 16 sampling locations continuously
pulling a sample. There is also one independent analysis pump which draws the sample line intended to be
analyzed through the DOD64-FTIR’s sampling cell after the individual point valve is opened. The DOD64-FTIR
also allows for continuous sampling of a single location through the “lock on point feature”.
1.3 Nitrogen Purging
Nitrogen purging is a critical to the operation of the DOD64-FTIR. Nitrogen is used to perform periodic
background checks to eliminate detector output drift due to humidity and temperature shifts that can occur in
different environments. The Nitrogen background function also assist in the correction of changes that occur
naturally within the interferometer. These background checks can be initiated manually or can be set to occur
automatically at user-defined time intervals.
The nitrogen supply connection is located on the right-hand side of the machine, in the upper left corner. If
the system is located in an enclosed area, be sure to take all the safety requirements necessary in the use of
nitrogen, which may include monitoring for loss of oxygen in this area. Contact DOD Technologies for
additional oxygen deficiency monitoring if needed.

7
DC-ITD-FTIR-MAN01 www.dodtec.com
FEB 2020 815-788-5200
FTIR Manual
1.4 Sample Line & Exhaust Connections
Flow connections for sample lines and exhaust lines are installed using “quick-connect” ports on the inlet
manifolds and right-side panel of the DOD64-FTIR. Sample ports are labeled by number, from 1 to 64
depending on your specific instrument configuration. Exhaust ports are located on the right-side panel of the
DOD64-FTIR and are also labeled. Each sample line should be extended a maximum of 400 ft. and each
exhaust line should be extended a maximum of 25 ft.
IMPORTANT: Be sure to exhaust system to an appropriate scrubber vent as all samples drawn from location
exhaust here at the systems exhaust ports. If gas is present at the locations monitored it will be transported
to this area so be sure to place the exhaust appropriately.
1.5 Electrical Connections
Knock out panels for external electrical connections are provided on the right-side panel of the DOD64-FTIR
(See installation Package). The DOD64-FTIR can be purchased with a side mounted power switch or internal
hard wire option with A/C filter.
1.6 Spectra and Event/Trend File
The DOD64-FTIR stores both Spectra and Event/Trend history to an external solid-state hard drive. All files
are transferable to a USB memory stick. A periodic process should be set up to remove this data from the
system to avoid memory capacity issues. Trend/Event files will be saved as .CVS files and can easily be
opened in common programs such as Excel. The Spectra files are saved in .LAB format or .SPC depending on
the interferometer type purchased with the DOD64-FTIR. The files can be viewed on an external PC using the
DOD spectra viewer. Spectra data stored in .LAB format can also be converted.SPC format, which is
compatible with other spectra open source viewers. Contact DOD Technologies for further information on
Spectra Format and viewers. All historical Spectra and Event/Trend files can be retrieved locally on the
system if needed. (Section 5.2.3)

8
DC-ITD-FTIR-MAN01 www.dodtec.com
FEB 2020 815-788-5200
FTIR Manual
Chapter 2 –Features
2.1 External Layout
Figure. 2.1
2.1.1 Warning Labels, Descriptions, & Danger Zones
The below table references all warning labels and their meanings that may be encountered while
operating and servicing the DOD64-FTIR gas detection system.
WARNING:
Hot Surface. This surface will be hot to touch and may cause injury. Please avoid or
take caution when working near this zone.
WARNING:
Protective Earth Ground. Terminal Intended for connection to external conductor
for protection against electric shock in case of fault.
ATTENTION:
Please read operators manual for all instruction for this machine. If manual is not in
country’s native language, requested updated manual before use of equipment.
Sample Manifold
Keyed Control Box Access
Keyed Door for analyzer
and pump panel access
Power and Exhaust Fan
Service Area Door
19” Touch Screen Interface

9
DC-ITD-FTIR-MAN01 www.dodtec.com
FEB 2020 815-788-5200
FTIR Manual
WARNING:
Electric Shock is possible, please use caution when accessing this zone.
WARNING:
Moving Parts and Hand Crushing possible. Please watch hand placement when
working near this zone.
2.2 Touch Screen Display
The DOD64-FTIR features a 19”, full color, LCD touch screen display, enhancing the presentation and visibility
of data. All DOD64-FTIR menus and data points are accessible through this state-of-the-art HMI. (Figure
2.1). The display also offers the ability to use USB type mouse and keyboard during data analysis.
2.3 Compact Flash Drive on PC and Solid-State Storage
The system is controlled using a reliable din mounted PC controller. Achieving of data and system
operational software are all based on compact flash technologies or solid-state drive which gives the system
optimum performance with high reliability. (Figure 2.4)
2.4 Reliable Linear Pump Technology and Control Manifolds
The systems transport and analyzing flow is performed through a reliable linear pump technology
(Figure 2.5). The DOD64-FTIR transport and flow pumps require no maintenance with an anticipated two to
three-year life (application specific). The option to replace pumps or rebuild pumps is available.
Figure 2.2

10
DC-ITD-FTIR-MAN01 www.dodtec.com
FEB 2020 815-788-5200
FTIR Manual
2.5 FTIR Interferometer
The DOD64-FTIR features an MKS MCT Detector or Perk & Elmer DTGS detector. The MKS detector comes
with a patented 400ml IR cell with a 10-meter optical path and an internal cooling system. This design allows
a fast sampling time that leads to reduced total time for analysis. The optical path length and MCT detector
allow the DOD64-FTIR to obtain the lowest detectable limits in the multi-channel FTIR market today. FTIR
Interferometer and Manifold trays slide out on brackets and can be easily removed for modular quick
serviceability. (See Figure 2.3)
2.6 Keyed Maintenance Door & Control Access
In order to ensure only trained personnel, have access to the system, both upper and lower service areas are
equipped with a key lock. (See Figure 2.1)
IMPORTANT: The maintenance doors should remain closed and latched except when servicing the machine.
Do not open the doors while in Analysis Mode.
2.7 Transport Selectable Valve Manifold Trays
The DOD64-FTIR system can be upgraded to implement up to 4 individual manifolds, each capable of
transporting sixteen points. The main analysis occurs in the FTIR Interferometer located in the central unit.
(See Figure 2.3)
2.8 Status Lamp (Optional)
An optional status lamp is available on the DOD64-FTIR. This lamp indicates status with four different colors
(Red, Orange Blue and Green), allowing the status of the machine to be seen quickly and from a distance.
2.9 Tubing Connections
Sample and exhaust tubing use a quick connection system for simple installation. The connections are made
on the side-panel of the DOD64-FTIR. See section 3.3 for information on connecting the sample and exhaust
tubing. See also Appendix C for important information on transport times for gas from sampling point to the
DOD64-FTIR.
End of line filters are required at all times on each channel- See section 6.3.

11
DC-ITD-FTIR-MAN01 www.dodtec.com
FEB 2020 815-788-5200
FTIR Manual
2.10 Service Areas
The service areas allow easy access to the valves, manifolds, pumps, power supply, and the interferometer.
Figure 2.3 shows the internal layout with the service areas open. Service areas are equipped with a lock to
restrict internal access.
Figure 2.3
DANGER: Turn off the unit, disconnect A/C power and unplug the 14 pin I/O connector on the
side of the unit (if installed) before opening the service door.
Manifold
Tray
Interferomet
er Tray
Manifold
Tray
Pump and
Power Supply
Tray

12
DC-ITD-FTIR-MAN01 www.dodtec.com
FEB 2020 815-788-5200
FTIR Manual
2.11 Password and Security
Access to many of the features is controlled through password protection which is entered through the
screen displayed in figure 2.4.
Figure 2.4
Whenever someone attempts to access a screen that is password protected, the screen shown in figure 2.4
will appear (see important note below). Several of the setup & configuration screens of the DOD64-FTIR
require entry of an administrative password. Factory service screens require entry of a service password -
see section 5.
IMPORTANT: Once a password is entered it remains active for 30 seconds after entry so that it does not need
to be repeatedly entered when switching between screens. Please remember that anyone using the touch
screen may access restricted screen locations during this time if the machine is left unattended.
NOTE: The Administrative Password is included on the first page of this manual. It is suggested that you
remove the page and keep in a safe and secure place. If you forget or lose your password please contact DOD
Technologies, INC. See Chapter 7 for contact information.
2.12 USB Memory Stick or Solid State
The DOD64-FTIR uses a USB Memory or a Solid-State Drive to store historical information including
concentration logging, event history, configuration information, and spectra files. The use of higher speed
USB Memory Sticks (2x, etc.) may not be compatible with the DOD64-FTIR. USB Memory Sticks may be
purchased through DOD Technologies –see Appendix A.

13
DC-ITD-FTIR-MAN01 www.dodtec.com
FEB 2020 815-788-5200
FTIR Manual
Chapter 3 –Installation
3.1 Selecting A Location
The DOD64-FTIR is designed for safe use under the following conditions:
•Indoor use only
•Altitude up to 2,000 m
•Temperatures 5°C - 40°C
•Maximum relative humidity 80% for temperatures up to 31°C decreasing linearly to 50% relative
humidity at 40 °C
•110 VAC or 220 VAC supply voltage fluctuations up to +/- 10% of the nominal voltage
The DOD Technologies Model DOD64-FTIR is supplied with wheels to allow for easy installation. The system
is transported in a wooden crate. The front opening panel door is designed to be used as ramp to roll the
system out of the crate (see installation package for details). The DOD64-FTIR rests on four rollers which can
be locked in place and bolted to the floor if necessary.
CAUTION: Care must be taken when loading, unloading and moving the DOD64-FTIR. The DOD64-FTIR is a
heavy piece of equipment which could cause injury or death if not handled properly. Make sure the rollers are
operating properly and only move the DOD64-FTIR on a level surface.
The DOD64-FTIR should be placed in a location as central as possible to the locations being monitored while
considering the following restrictions:
•The maximum sample line length is 400 ft. (121 m). Using the shortest possible sample line length will
reduce transport times and increase the response time of the DOD64-FTIR. (see Appendix C)

14
DC-ITD-FTIR-MAN01 www.dodtec.com
FEB 2020 815-788-5200
FTIR Manual
•A/C power is required to the unit. A/C power is required to the unit (110VAC +/- 10% OR 230VAC +/-
10% 50/60 Hz). See serial number label on the right-hand side of instrument for voltage requirements.
•Locate near proper ventilation keeping in mind the maximum length of the exhaust tubing is 25 ft.
•The DOD64-FTIR requires stable temperature and humidity levels within range to operate properly.
3.2 Sample Tubing
Sample tubing is connected to the DOD64-FTIR on the top the unit. All sample tubes require 1/4” OD x 3/16”
ID Teflon FEP (400 ft max length) which may be purchased from DOD Technologies, INC (See Appendix A).
Fully depress each sample tube into the proper hole when attaching. To detach the tube, push on the collet
while pulling the tubing out.
IMPORTANT: All sample tubing used with the DOD64-FTIR must be 1/4"OD x 3/16"ID FEP Teflon. Use of any
other tubing may damage the DOD64-FTIR and/or cause inaccurate gas concentration readings.
3.2.1 End of Line Particulate Filters
End of line particulate filters must be installed on all sample lines at all times to prevent damage to the unit.
Unused lines must either be plugged or have a filter installed. Filters require regular maintenance –see
chapter 6.
End of line particulate filters should be purchased from DOD technologies (see appendix A).
IMPORTANT: All points require filtration to prevent dust accumulation in tubing and internal damage to the
DOD64-FTIR. Dust that collects in the tubing or the internal system may cause sample loss and inaccurate
concentration readings.
3.3 Exhaust Tubing
The exhaust line must be 3/8” OD x 1/4” ID tubing with a maximum length of 25 ft. per sample pump.
Excessive lengths will inhibit the flowrate and affect system performance Polyethylene is recommended
although polypropylene or Teflon may also be used. Exhaust tubing may be purchased from DOD
technologies (see appendix A).
3.4 Zero Gas Inlet
The DOD64-FTIR requires a pure Nitrogen source regulated between 20 and 60 PSI. The DOD64-FTIR
periodically uses the inert gas to ensure a clean background. A ¼” OD stainless steel compression fitting is
provided for the nitrogen inlet.
3.5 A/C Power
When connecting the A/C power to the DOD64-FTIR assure that all of the following requirements are met:
•A building circuit breaker is required
•The circuit breaker must be installed in a suitable location that is easily reached
•The circuit breaker must be labeled as the disconnect device for the DOD64-FTIR
•The circuit break must break both poles.
See system specifications in Appendix C for power requirements.

15
DC-ITD-FTIR-MAN01 www.dodtec.com
FEB 2020 815-788-5200
FTIR Manual
3.6 Output Wiring
See Appendix B for a listing of output module connections.
DANGER: Turn off the unit, disconnect A/C power and unplug the 14 pin I/O connector on the
side of the unit (if installed) before any wiring modifications.
3.6.1 Standard Output Module Wiring
The standard output modules included with the system require an external 24V supply connected to the
DOD64-FTIR to supply power for the outputs. Use only AWG22 to AWG18 twisted wire (wire sizes UL1015 and
UL1007) Strip from 0.25” to 0.31” (6.5mm to 8.0mm) from each wire to insert into the connector. To connect
the wires to the spring-loaded output connector:
•Insert the screwdriver into the square shaped hole which will open the round hole for the wire.
•Continue to hold the screwdriver while inserting the wire into the round shaped hole.
•While holding the wire in place, remove the screwdriver which closes the clamp onto the wire.
•IMPORTANT: Be sure the wire is inserted completely into the hole. Failure to do so could result in
system failure, electrical shock.
•To remove a wire, re-insert the screwdriver in the hole as described in step 1 and gently pull the wire
out while the spring is compressed.
3.6.2 I/O Connection Details
Each analyzer tray (16 or 32 point) has its own output module section and each section is coupled together
with an EK1101 module. Two different power sources are used for the module. Power to operate the module
itself is supplied by the DOD64-FTIR power and prewired by DOD Technologies - Do NOT remove. Power for
all outputs must be supplied by the customer on pins 6 & 7. See Appendix B for detailed information.
IMPORTANT: Verify that all I/O unit terminal screws are securely tightened even if they are not used.

16
DC-ITD-FTIR-MAN01 www.dodtec.com
FEB 2020 815-788-5200
FTIR Manual
Chapter 4 –Setup & Configuration
4.1 Touch Screen Calibration
After powering on the DOD64-FTIR, the machine will display a crosshair in each corner of the screen. Press
the center of each crosshair to configure the touchscreen. Without the correct calibration of the screen and
touch function will not work correctly. Power cycle the DOD64-FTIR to access the touch screen set up again.
4.2 Gas Selection
See section 5.3.3.1 for information on selecting a specific gas for each point.
4.3 Alarm Settings
See section 5.3.2.3 for information on how to adjust the alarm settings after the gas has been selected for
each point.
4.4 Output Relays
The DOD64-FTIR supports both energized and de-energized relays and may be configured for either latching
or non-latching faults/events and alarms. See section 5.3.4 for more information on testing outputs.
When configured for energized relays, the outputs are normally in a high state and change to a low state
when the corresponding fault/alarm occurs. De-energized relays work in the opposite manner. When the
power is ON, the Power Loss Relay is always in the normally high state.
When latched outputs are selected (Section 5.2.6), any fault or alarm that occurs will remain until the “fault
reset” button is touched. If non-latching outputs are selected the output will reset automatically if and when
the condition that caused the fault/alarm returns to its normal state.
NOTE: A message is added to the event log each time the “fault reset” button is touched.
4.5 Concentration Log
Three levels of concentration logging can be configured in the DOD64-FTIR.
1. >0 - All concentrations detected >= LDL are added to the concentration log.
2. AP1 - Anytime alarm level 1 is reached, the concentrations are added to the log.
3. AP2 - Anytime alarm level 2 is reached, the concentrations are added to the log.
Regardless of which point the gas is detected on, all points are logged as long as the trigger is active. For AP1
or AP2 logging the system will continue to log concentrations as long as the alarm level is still active.
4.6 USB Memory Stick or Solid-State Drive
The use of a USB Memory or Solid-state drive is highly recommended to retain historical and performance
information including spectra, events, alarms, and gas concentrations. USB Memory or solid-state drive is
available from DOD technologies (see Appendix A) and at most retail electronic stores. See section 6.4 for
information on inserting and replacing a USB Memory Stick or SSD. See also Appendix F for information on
the data stored on the USB Memory Stick or SSD. Purging old data is also recommended at a minimum
interval of six months.

17
DC-ITD-FTIR-MAN01 www.dodtec.com
FEB 2020 815-788-5200
FTIR Manual
4.7 Setup Complete
It is now safe enter analysis.

18
DC-ITD-FTIR-MAN01 www.dodtec.com
FEB 2020 815-788-5200
FTIR Manual
Chapter 5 –Basic Operation and Menus
5.1 Menu Overview
5.2 General Machine Operation
When the DOD64-FTIR is powered on it will begin with the initialization screen which is followed by a
countdown (figure 5.1). The machine will then go into analysis and display the analysis screen. If the operator
touches the ‘SETUP MODE’ button before the timer reaches 0 the, setup screen will appear.
Start/setup
Analysis Screen
Fault/Events
Concentration
Spectra
Help
Manual
Drawings
Contact DOD
About
Setup
Adjust Flow
Configure
Machine
Point Names
Alarm Levels
FTIR
Point Gas
Sequencing
Diagnostics
Basic Diagrams
RDP
Testing
Alarm Outputs
Valves
Ethernet/IP
File Transfer
History
Alarm Outputs

19
DC-ITD-FTIR-MAN01 www.dodtec.com
FEB 2020 815-788-5200
FTIR Manual
Figure 5.1
The touchscreen on the DOD64-FTIR is used for all configuration and control of the unit. Analysis mode is
active by default approximately two minutes after power on unless an operator intervenes. At this point the
DOD64-FTIR is designed to continuously monitor for gas. Various tasks can be completed while remaining in
analysis, including viewing faults/events, concentration history, individual spectra files and TWA logs, or
checking point configuration and flow limits. Access to the help menu is also available while remaining in
analysis.
Analysis can be started by either:
1. Powering on without user intervention. (approximately 2 minutes)
2. Returning from setup menu back to the main menu.
Analysis will continue until one of the following occur:
1. Power loss.
2. A Critical System Fault
3. Entering Setup by touching the Setup button on the main menu and entering an appropriate
password which will halt analysis on all analyzers.
5.2 Analysis Screen
The analysis screen will appear after the initial countdown upon starting the DOD64-FTIR. Figure 5.3 shows a
16-point system with analysis active. (Figure 5.2). From here, you can view all gas levels detected and live
spectra files as the files are collected.
Black points indicate that the points are not installed or inactive on the DOD64-FTIR.

20
DC-ITD-FTIR-MAN01 www.dodtec.com
FEB 2020 815-788-5200
FTIR Manual
Figure 5.2
From here, you can see the status of each point. If more than one analyzer is installed, additional points can
be viewed by pressing the left and right buttons at the top left of the screen.
As the machine analyzes through its programmed sequence, the display will scroll through to each new point.
This feature can be disabled by pressing the Disable Auto Scroll button.
Press Setup to end
analysis
Spectra of Last Point
Analyzed
Live Diagnostics
Point and Gas Grid
Table of contents