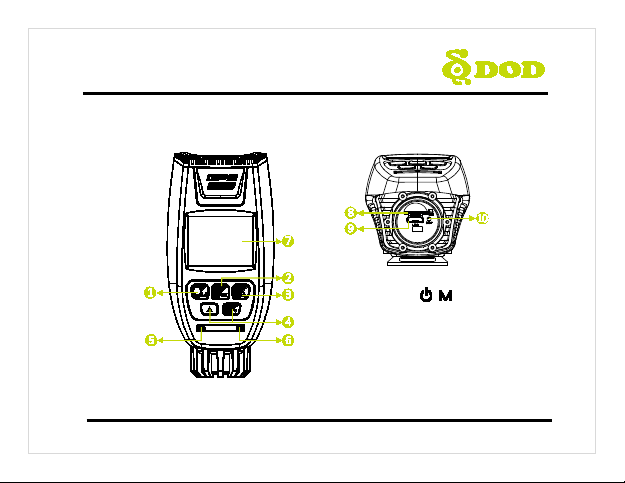
DOD hummer User manual


Copyright ©2016 DOD Tech
All Rights Reserved

1
Table of Contents
Safety Precautions···················································································· 2
Package Contents ····················································································· 4
Camera Controls······················································································· 5
Installing Your Camera·············································································· 7
Mount Your Camera ················································································15
Getting Started························································································16
Basic Camera Operation ··········································································18
Camera Settings ······················································································24
Playback on PC / DOD Video Player ··························································31
Mobile Viewer / DOD Dashcam App·························································35
Firmware Update ····················································································44

2
Safety Precautions
Product
Do not disassemble, repair, modify your camera or power related accessories.
For warranty service, please contact DOD Tech Support.
Do not adjust camera while riding.
Avoid exposing your camera to extended periods of humidity and/or heat.
Prolonged exposure may reduce the product’s lifespan.
Keep away from fluids may cause fire, electric shocks, or malfunctions.
Avoid installing camera where it may obstruct the driver’s view
Power Cable
Use only the power adapter supplied with your unit.
Other power adapters may create a safety hazard or damage the unit.
Do not use damaged power adapters or cords. If damaged, please disconnect
the power adapter and contact DOD Tech Support for assistance.

3
Safety Precautions
Power Cable
Do not pull, insert, or bend the power cable using excessive force.
Do not operate or handle power cable with wet hands.
Battery
Keep the device away from heaters or other hot objects.
Store the camera at lower temperatures to reduce the rate of self-discharge
and preserves the initial energy stored in the battery. The battery in the device
self discharges over a period of time naturally whether the battery is used or
not.
Charge the unit for 5 minutes if you are unable to turn on the camera.

4
Package Contents
●
1
●
2
●
3
DOD Hummer User Manual
Hardwiring Cable
(Mini & Low profile fuse adaptor)
●
4
●
5
●
6
Waterproof Power Charger Handlebar Mount DOD Player Installation CD
Note: Supplied accessories may vary by region.

5
Camera Controls
●
1Power/Mode[ / ]
Press and hold to turn on/off the unit.
Press to switch between 3 Modes:
Video Recording-Starts/Stops recording.
Photo-Takes a photo.
Video Playback-Plays/Pauses video.

6
Camera Controls
●
2Record/Shutter/Confirm[ /OK]
Video Recording-Starts/Stops recording.
Photo-Takes a photo.
Video Playback-Plays/Pauses video.
Settings-Selects highlighted item.
●
3Menu/SOS Emergency File Lock
[ / ]
Access the settings menu.
Press while recording videos to lock the
current file from being overwritten.
Note: Cannot access menu while recording.
●
4Arrow Key [▲]/[ /▼]
Used to navigate through menus and
select videos for playback.
During Standby mode, press[ /▼]to
turn on the Wi-Fi.
●
5Power LED
Steady Blue- Charging.
●
6Recording Status
Flashing Red- Recording.
Steady Red- Standby mode.
●
71.5”LCD Screen
●
8Micro SD Slot
●
9USB Port
●
10 Reset Button
Press to force the device to reboot.
If camera freezes, use a small pin to press
button.

7

8
Installing Your Camera
Waterproof PowerCharger
Cigarette Plug Adaptor
Rubber Grommet
Connector Cable
Dust Cover

9
Installing Your Camera
Hardwiring Cable
For your own safety, please read this instruction carefully before installing the camera to
your motorcycle’s fuse box.
Grounding Cord
12V/24V to 5V Converter
Waterproof Connector
Fuse Holder
Fuse Holder Connector

10
Installing Your Camera
Hardwiring Cable
Tools for Installation
‧1x Fuse Puller (Optional)
‧1x Multi-meter / Circuit Tester (Optional)
‧1x Vehicle Fuse (Max. 2 Amps at 12 Volts)
Installation Guide
Black Wire – Ground
Red Wire – Fuse Holder Connector
Fuse Slot
Fuse Adaptor

11
Installing Your Camera
Hardwiring Cable
Installation
1. Turnoff Your motorcycle
Before installing the hardwire kit, ensure that your motorcycleis switched off.
2. Locate the Interior Fuse Box
For most motorcycles, the fuse box is located under the seat. Refer to your vehicle’s owner’s
manual for more details.
Never install the hardwiring kit under the hood of the motorcycle.
3. Locate a Constantly Powered Circuit
Find a fuse connected to a constantly powered circuit. Common examples are dome and
emergency lights. Please refer to your vehicle’s owner’s manual. The hardwiring kit can be
installed into an occupied fuse slot. Use a multi-meter or a circuit tester to verify if the fuse
slot is constantly powered.

12
Installing Your Camera
Hardwiring Cable
4. Remove Fuse
If there is an existing fuse in the desired fuse slot, carefully remove the fuse using pliers. A
fuse puller may be available in the main fuse box, typically located in the engine bay. If the
fuse slot you wish to utilize is not occupied, purchase a compatible fuse (Max 10 Amp rating)
from any automotive parts store.
5. Selecting the Correct Fuse Adapter for installation
Identify your fuse type by comparing it to the images
below. Select the matching fuse adapter.
6. Assemble the Hardwiring Kit
●
1Connect the Fuse Adapter into the Parking
Module’s RED Lead Cable
The wire of the parking module should be fully
seated into the rear electrical connector.

13
Installing Your Camera
Hardwiring Cable
●
2Crimp the Electrical Connector
After verifying the connection, hold the two cables in place and take a pair of pliers and
apply pressure over the electrical connection. Gently pull both side of the wire to test if the
connection is solid. If the connection is solid, there should be no movement from either
side of the cable.
●
3Refer to the Diagram on the Right for Fuse
Insertion Placement
Ensure the fuse is rated at Maximum 15 Amps.
7. Plug the Fuse Adapter into the Fuse Slot
Please note that the fuse adapter is directional. If inserted correctly, the hard wiring device
will function properly. If inserted incorrectly, turn the fuse adapter around and reinsert.
8. Secure the BLACK Cable (GROUND) to a Grounding Point
The black wire must be connected to a metallic, non-painted grounding point on your
motorcycle. You r motorcycle will often have a factory installed grounding point such as a bolt
to which the exposed wire can be secured under.

14
Installing Your Camera
Hardwiring Cable
9. Test Setup
Insert the USB connector into the dash camera to test if the wiring solution is operational. If
the camera turns on with the ignition off, your installation is successful. If the dash
cameradoes not power on, the fuse adapter may be installed incorrectly. Verify that steps 3, 6
and 7 were performed correctly.
Before verifying steps 6 and/or step 7, first unplug the fuse adapter to prevent
possible electrical shock
10. Clean Up & Tidy Installation
Ensure the camera is securely mounted to your motorcycle. Connect the USB plug into the
USB port of your camera. At this point, the remaining cables can be bound together and
tucked into the fuse box compartment.

15
Mount Your Camera
Please mount the camera on to the included DOD mount. The mount can be placed on
handlebars or forks.
•Round: 22.23mm to 31.75mm(7/8” to 11/4”)
•Oblong: 19.05mmx25.40mm to 22.23mm x 34.93mm (3/4”x1” to 7/8”x1 3/8”)
Find a location which does not obstruct your view when riding.

16
Getting Started
Setting Up Your Camera
1. Turn on/off Your Camera.
Press [ /M] to turn on or turn off the unit.
2. Select Language→Set the Time Zone→Select the Speed Unit of Your Choice
Upon powering up the camera for the first time or after upgrading the firmware on the device,
you will need to go through the Settings below.
Select Language
Select the language of your choice by pressing [▲]/[ /▼]
Press [ /OK] to confirm your selection.
Set the Time Zone
Scroll down and select your respective time zone.
Press [ /OK]

17
Getting Started
Your camera will automatically sync with the time and date to the atomic clock
once the time zone is correctly set.
Note: The time zone must be manually adjusted for daylight savings.
3. Turn on Your Motorcycle
Power from your motorcycle through the outlet will automatically turn on your camera, and
when power is turned off your camera will shut off automatically. The camera automatically
begins recording every time it is turned on and stops recording when it is turned off.
Note: If you connect the camera directly to your fuse box, the recording will continue even
when the motorcycle is turned off.

18
Basic Camera Operation
Everyday Operation
You r camera will automatically turn on and start recording when it starts receiving power. By
default, the camera will record over the oldest videos when the memory card is full (loop
recording).
Continuously Powered Electrical Outlet
If your camera is continuously powered, the camera will not automatically shut down when
your motorcycle is turned off. To turn off your camera, the USB cable can be pulled out or the
power button can be pressed (see the below section).
The camera may be left on while parked to capture video while you are away.
“Continuously-Powered-Electrical-Outlet” operation will slowly drain your
motorcycle’s battery and may eventually prevent your motorcycle from
starting.
Manually Turning On / Off Your Camera
Press [ /M]to turn on /off your camera.
Press [/OK]to begin recording.
Table of contents
Other DOD Action Camera manuals