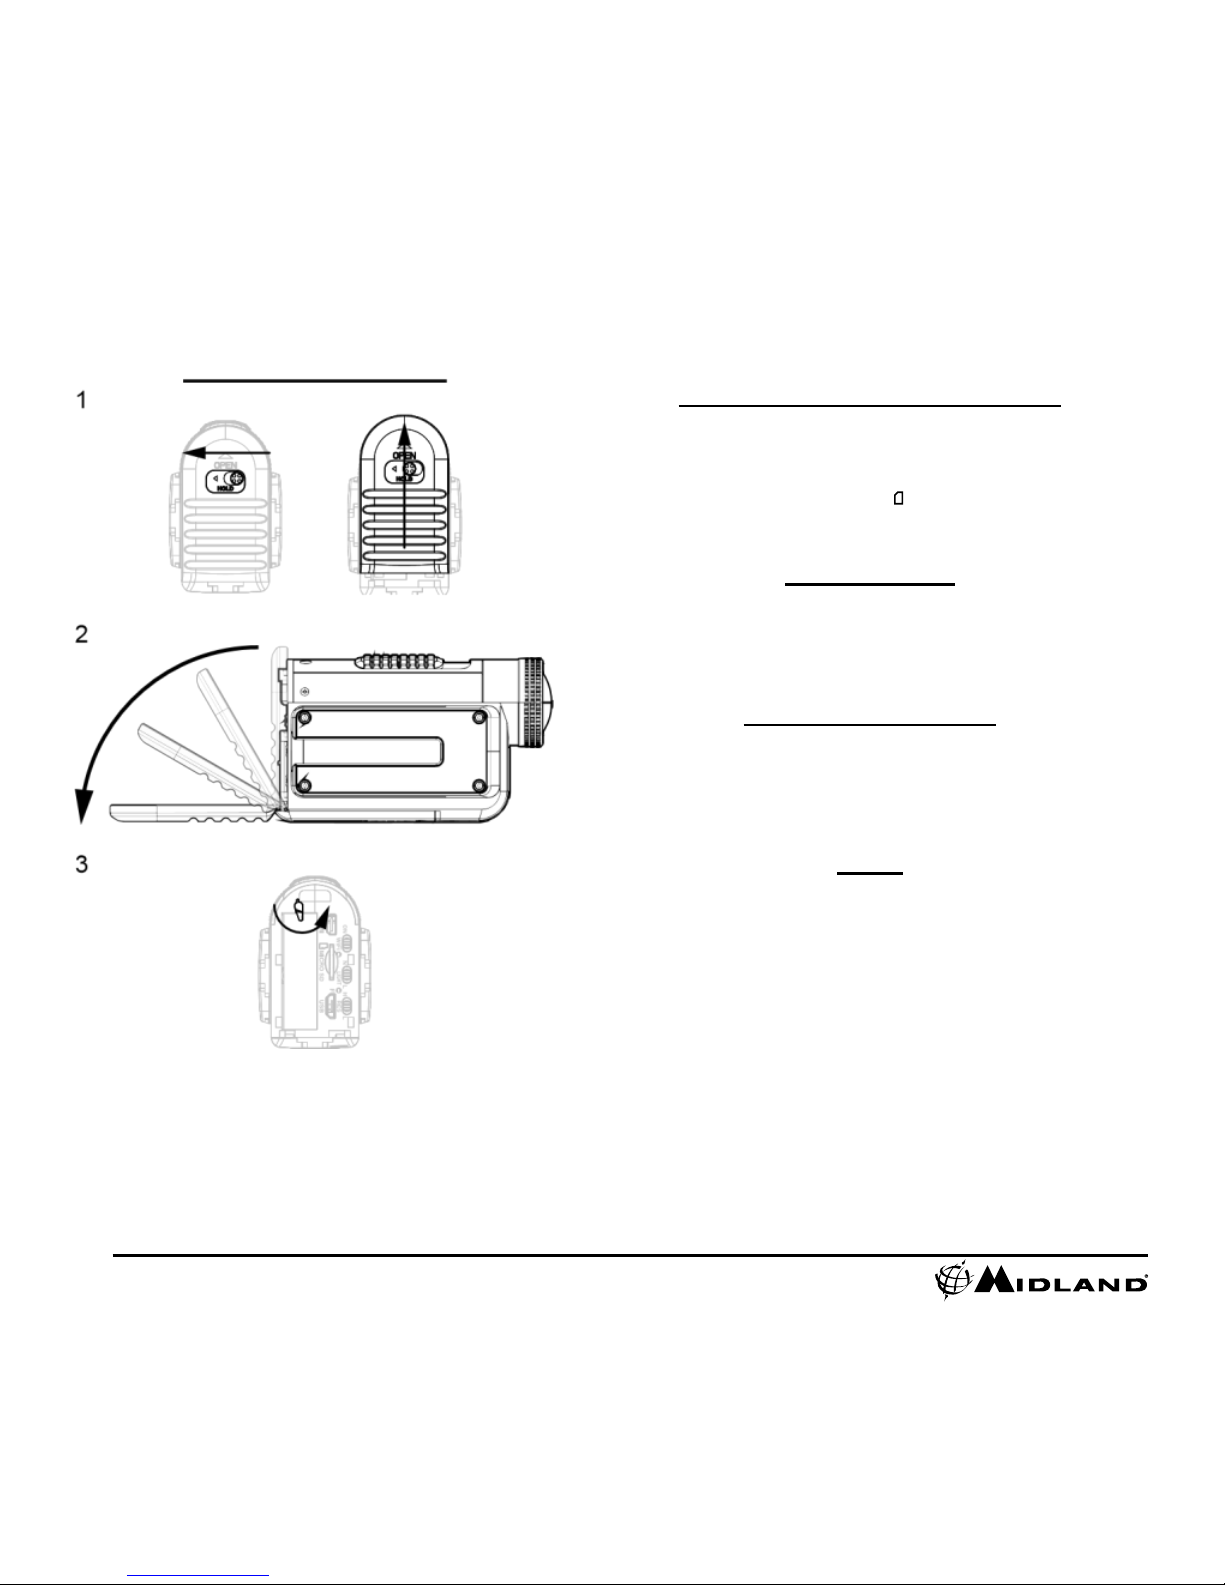
Midland XTC400 HD User manual


2
midlandusa.com
INDEX
Quick Start Guide
..................................................................................................................................................................................1
Welcome to the XTC HD Camera Experience
......................................................................................................................................3
What’s in the Box
..................................................................................................................................................................................3
Features and Controls
...........................................................................................................................................................................3
Removing the Battery
............................................................................................................................................................................4 Reformatting the
Micro SD card ............................................................................................................................................................4
Rotating Lens
........................................................................................................................................................................................4
External Microphone
.............................................................................................................................................................................4
HDMI
.....................................................................................................................................................................................................4
Battery
...................................................................................................................................................................................................4
Mounting and Aiming Your Camera
......................................................................................................................................................5 Compatible Systems
.............................................................................................................................................................................6
Minimum System Requirements
...........................................................................................................................................................6 Wi-Fi
......................................................................................................................................................................................................6
Indications
.............................................................................................................................................................................................7
Battery Status
..................................................................................................................................................................................7
Memory Card LED Status
...............................................................................................................................................................7
Front LED Status
.............................................................................................................................................................................7

3
midlandusa.com
Switch Position
................................................................................................................................................................................7
Recording Time
...............................................................................................................................................................................7
Sounds..........................................................................................................................................................................................
...7
Tips and Tricks
......................................................................................................................................................................................8
Limited Warranty (United States and Canada)
.....................................................................................................................................9
Service
.............................................................................................................................................................................................9
Accessories
.........................................................................................................................................................................................11
Accessories Order Form
.....................................................................................................................................................................12
Other Midland Products
......................................................................................................................................................................13
Welcome to the XTC HD Features and Controls
Camera Experience 1080 Features: 720 Features:
- 30 frames per second - 60 frames per second
Thank you for purchasing the XTC400 HD video camera. We are proud
- 105° viewing angle - 142° viewing angle
to offer you an exciting camera to record your life’s adventures. With
- 16:9 aspect ratio - 16:9 aspect ratio
an easy slide-on switch, Wi-Fi capability, and long battery life, you’ll
- 1920 x 1080 resolution - 1280 x 720 resolution

4
midlandusa.com
never miss a moment. Easily connect to your computer and upload
- Records as mp4 - Records as mp4to share with your
friends. See what other people are doing with their XTC cameras at
facebook.com/midlandusa, and post your own video too. Enjoy!

5
midlandusa.com
1.Midland XTC400 Camera
2.Submersible Case
3.Micro USB Cable
4.Lithium-Ion Battery Pack
5.Basic Adhesive Mount
6.Mini Spider Mount (5° and 45°)

6
midlandusa.com
Removing the Battery
1. Press the lock release to the left. Slide the door upwards.
2. Pull the door open.
3. After rotating the latch counter-clockwise, the battery can easily be
removed.
Reformatting the Micro SD card
The micro SD card can be reformatted while in the camera. This allows
you to completely delete all the files at one time. Follow these steps:
1. Press and hold the format button
2. Move the RECORD switch to the forward/ON position.
3. The camera will beep 4 times and the icon will alternate blinking red
and blue
When complete, the camera will beep twice, then turn off.
Rotating Lens
To maintain upright orientation for your video when the camera is
mounted at an angle, the XTC400’s lens can rotate 180° in one direction
and -90° in the other. There are indentations every 90° to enable you to
twist the lens into place at commonly used angles.
External Microphone
To connect your camera to an external microphone, first open the
rubber cover and then insert the 3.5 mm microphonejack into the plug.
If you are using a headset, the left speaker will be used as the
microphone. In addition, you may also connect a music player to directly
record music to your video.
HDMI
Connect your micro HDMI cable (not included) to both devices –
camera and tv/monitor. Once connected, switch the camera to the ON
(forward) position. This will enable live streaming, but will not record.
When the switch is moved back to the OFF position, video playback will
start from the micro SD card. To skip to the next file, toggle the switch
ON. For the next file, toggle the switch OFF. Continue in this manner to
flip through your files. You can always skip forward to the following file,
but cannot move backward to previous files. If you would like to return to
a previous file, you must either unplug the device from the HDMI cable
and plug it in again, or loop through all of your files.

7
midlandusa.com
Battery
The included lithium-ion battery comes partially charged. To charge,
connect the included micro USB cable to camera and connect the
other end of the cable to a power source such as a computer, wall
charger or vehicle charger. No damage will occur to the camera or
battery if used prior to a full charge. See page 7 for battery status
indications.
Mounting and Aiming Your Camera
Mount on Dual Track System
The XTC400 was designed with aninnovative 3 point mount system
on both sides and the bottom of the camera. This allows youto
mount it on any side with ease.
To mount the camera on the basic mount, slide the camera onto the
track system with the notches on the mount facing toward the back
of the camera.
To detach the camera from the mount, squeeze the mount release
tabs and slide the camera forward.
Aiming the Camera when mounted with the dual track mount:
When mounting the camera on a helmet, you must do the following:
1. Consider what you would like to shoot and mount the camera
accordingly- left side, right side or top.
2. Find a flat surface and ensure the area is clean of dirt and debris.
Remove the cover of the adhesive pad and adhere to the helmet.
3. Once attached, adjust the camera to be sure you are filming in
the intended direction
4. If needed, rotate the lens to maintain an upright viewing angle
5. To see where your camera is aimed, enable Wi-Fi (pg 6) and use
your Android / IOS device with the app as a viewfinder.
Mounting and Aiming Your Camera
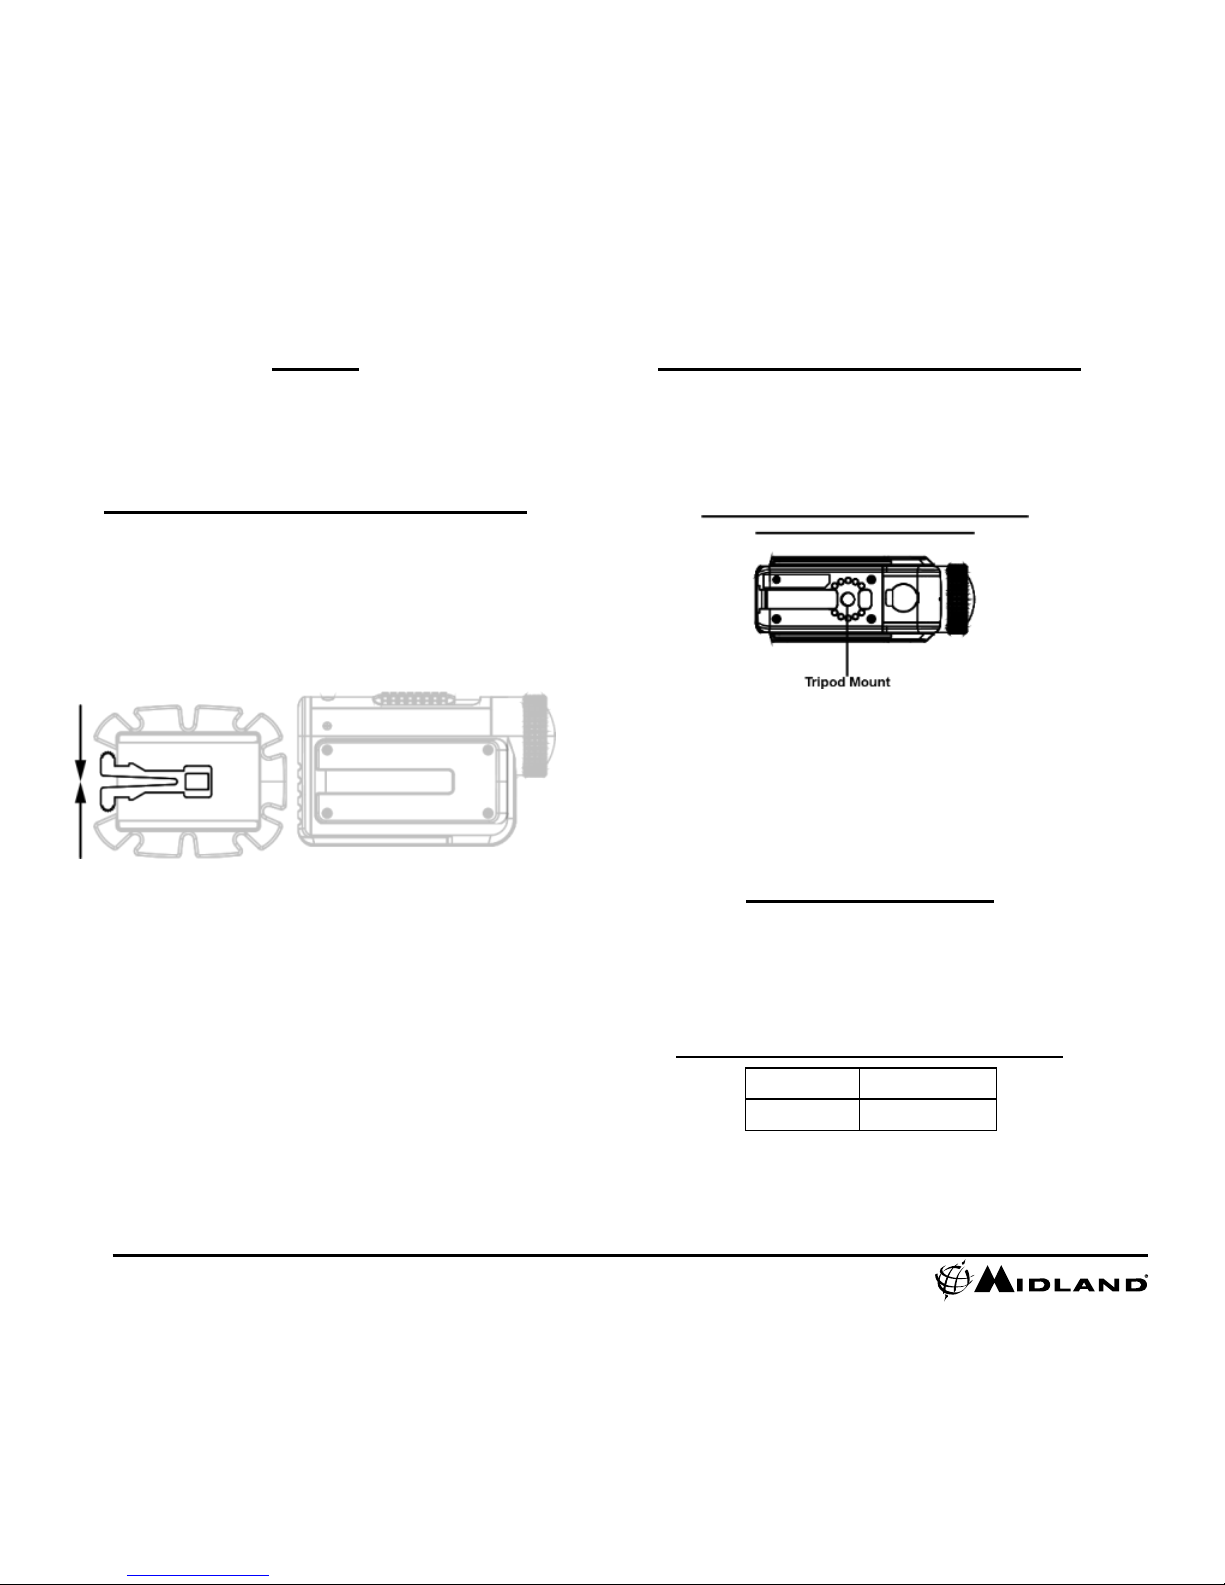
Mount using the Thread Mount
On the bottom of the XTC400 is a standard thread mount that allowsthe
camera to be mounted to a tripod or other fixture with a 1/4-20 (1/4”
diameter, 20 threads per inch) 5/16 deep thread. To attach the camera,
insert the screw on the mount into the camera thread and rotate the
camera clockwise to tighten down onto the screw.
Note: Over tightening may cause damage
to
the mount and/or camera
Aiming the Camera when mounted with the thread mount:
When mounting the camera on a thread mount, follow these steps:
1. Consider what you would like to shoot and mount accordingly.
2. Ensure, once attached, that the camera is aimed straight and not
toward the ground or at the sky.
3. If needed, rotate the lens to maintain an upright viewing angle
4. To see where your camera is aimed, enable Wi-Fi (pg 6) and use
your smartphone with the app as a viewfinder.
Compatible Systems
The XTC400 can be used on both a PC or MAC. Below are the
compatible operating systems:Windows XP SP2, Vista, 7, 8
Macintosh OSX 10.4 and higher
For video playback, we recommend Windows Media Player or Quick
Time.
Minimum System Requirements
Processor
3.2GHz or faster
Ram
1GB or greater

8
midlandusa.com
Video Card
256MB or
greater
Video playback requires H.264 codec. To
obtain more information go to
midlandusa.com
Downloading Videos
There is no need to install any software with the XTC400. It is a
plug and play device. To download video, follow the instructions
below depending upon whether you have a PC or a MAC.
Downloading Videos on a PC with a WINDOWS Operating
System
1. Connect the camera to the
computer using included micro USB cable.
2. Ensure the record switch is in the
OFF position3. Double click “My Computer” and locate
“Removable Disk.” 4. PC:
a.If “Removable Disk” is not showing, close “My Computer” folder
and reopen it. The “Removable Disk” icon should appear.
b.Open the “Removable Disk” icon.
5. MAC
a.MAC should automatically recognize the camera external hard
drive.
b.Click on the icon on the desktop.
6. Open the “DCIM” folder icon.
7. Open the “100MEDIA” icon.
8. Your videos will be in this folder.
Wi-Fi
The XTC400’s built in Wi-Fi allows you to connect and control the
camera using an smartphone or tablet.
1. Toggle the Wi-Fi switch inside the back cover to the ON position.
2. Slide the record switch forward.
3. Allow a few seconds for the camera to power on and initiate the
Wi-Fi
a.The camera will double beep twice and the front indicator will
be blue.
b.When theWi-Fi is ready, the camera will beep once and the
front indicator will be solid green
Note: If the camera does not detect a connection to the app within 1
minute, it will automatically disable Wi-Fi and begin recording.
Many features and options are available with the smartphone app:
•Live Preview
•Customize Video Settings
•Zoom
•Pictures
•Time Delayed Pictures
•Time lapse
•Wi-Fi Settings
•And many more

9
midlandusa.com
*Note: When the red battery LED begins blinking, be prepared
to charge the battery because the camera will stop recording
at this point.
Memory Card LED Status
Memory Card LED
Meaning
Solid Blue
66% - 100% Available
Blinking Blue
33% - 66% Available
Solid Red
0% - 33% Available
Blinking Red
0% Available
No Light
No Card / Card Error
Blinking
Red / Blue
Formatting
Upgrading Firmware
Front LED Status
Front LED
Meaning
Blinking Green
Recording 1080p
Blinking Blue
Recording 720p
Blinking Red
Recording WVGA
Solid Blue
Wi-Fi Enabling
Solid Green
Wi-Fi On
Solid Red
USB Connected
Recording Time
Memory Size
720 Record
Time
1080 Record
Time
512 MB
6.5 Minutes
5.5 Minutes
1 GB
13 Minutes
11 Minutes
2 GB
26 Minutes
22 Minutes
4 GB
52 Minutes
44 Minutes
8 GB
104 Minutes
88 Minutes
16 GB
208 Minutes
176 Minutes
32 GB
416 Minutes
352 Minutes
64 GB
832 Minutes
704 Minutes
Note: The camera automatically splits the video into 29 minute
segments.
Sounds
Sounds
Meaning
Indications Indications
Battery Status Switch Position
Battery LED
Meaning
Position
Meaning
Solid Blue
Full battery level
(Fully charged)
Wi-Fi Up (On)
Wi-Fi Enabled
Wi-Fi Down
Wi-Fi Disabled
Blinking Blue
Medium battery level
(Battery Charging)
Light Setting Up (N)
Normal Light Mode
Solid Red
Low battery level
Light Setting Down (L)
Low LIght Mode
Blinking Red*
Battery level too low
Resolution Up (H)
Record at 1080p30
No Light
Battery is depleted
Resolution Down (L)
Record at 720p60

1
0
midlandusa.com
1 Beep
Power on (Wi-Fi Off)
2 x 2 Beeps
Power on (Wi-Fi On)
3 Beeps
Start Recording
5 x 3 Beeps
Memory Card Full
2 Beeps
Power Off
1 Beep (Wi-Fi On)
App Confirmation
4 Beeps
Formatting Memory Card
Note: The beeps can be turned off via smartphone app.

Tips and Tricks Tips and Tricks

Problem
Solution
Batteries
Camera not turning on
Be sure battery is fully charged.
Recording
Camera not recording
Make sure the switch is pushed all the
way forward. If the record LED does
not come on, turn off the device and
reinstall the battery.
Verify available memory.
Micro SD card
Problem
Solution
Video Downloading
Slow data transfer
Verify the camera is plugged into a USB
2.0 or 3.0 device. If registering as 1.1,
unplug and the re-plug the device.
Remove other unused USB devices.
Computer does not
recognize camera
Ensure record switch is in the OFF
position while connected to computer.
Ensure the Micro SD card is inserted
properly.
Micro SD card may be corrupted.
Attempt formatting process.
File won’t transfer off
memory card
In the run command type:
chkdsk volume:/f
then press enter

Micro SD card not reading
Ensure the Micro SD card is inserted
properly.
Plug camera into the computer to
verify it has available storage.
Attempt formatting process.
Ensure Micro SD card is class 6
or higher
Video Playback
Slow or choppy video
Verify the camera is plugged into a
USB 2.0 or 3.0 device.
Remove other unused USB devices.
Transfer video to computer before
viewing.
Verify computer meets minimum
requirements.
Verify proper codec is installed.
Sound
Excessive Wind Noise
Place piece of tape over microphone
hole.
Try using an external microphone
Try using the submersible case
Wi-Fi
Can’t connect to App
Verify the device’s Wi-Fi settings and
ensure it is connected to the XTC400’s
Wi-Fi.

LIMITED WARRANTY (United States and Canada)
Subject to the exclusions set forth below, Midland Radio Corporation will repair or replace, at its option without charge, any Midland XTC Action Camera which
fails due to a defect in material or workmanship within Three Years following the initial consumer purchase.
This warranty does not apply to water damage, battery leak, abuse or misuse of unauthorized accessories, unauthorized service or modification or altered
products. Accessories have a 90 day warranty from date of purchase, including any chargers, mounts, and cables.
This warranty does not include the cost of labor for removal or re-installation of the product in a vehicle or other mounting.
ANY IMPLIED WARRANTIES, INCLUDING, WITHOUT LIMITATION THE IMPLIED WARRANTIES OF MERCHANTABILITY AND FITNESS FOR A
PARTICULAR PURPOSE,
SHALL BE LIMITED AS SET FORTH HEREIN AND TO THE DURATION OF THE LIMITED WARRANTY, OTHERWISE THE REPAIR OR REPLACEMENT AS
PROVIDED
UNDER THIS EXPRESS LIMITED WARRANTY IS THE EXCLUSIVE REMEDY OF THE CONSUMER AND IS PROVIDED IN LIEU OF ALL OTHER
WARRANTIES,
EXPRESS OR IMPLIED. IN NO EVENT SHALL MIDLAND BE LIABLE, WHETHER IN CONTRACT OR TORT (INCLUDING BUT NOT LIMITED TO
NEGLIGENCE, GROSS
NEGLIGENCE, BODILY INJURY, PROPERTY DAMAGE AND DEATH) FOR DAMAGES IN EXCESS OF THE PURCHASE PRICE OF THE PRODUCT OR
ACCESSORY,
OR FOR ANY INDIRECT, INCIDENTAL, SPECIAL OR CONSEQUENTIAL DAMAGES OF ANY KIND, OR LOSS OF REVENUE OR PROFITS, LOSS OF
BUSINESS, LOSS OF INFORMATION OR DATA OR OTHER FINANCIAL LOSS ARISING OUT OF OR IN CONNECTION WITH THE ABILITY OR INABILITY
TO USE THE PRODUCTS OR ACCESSORIES TO THE FULL EXTENT THESE DAMAGES MAY BE DISCLAIMED BY LAW.
For Product Purchased in the USA:
Performance of any obligation under this warranty may be obtained by returning the warranted product, prepaid freight, along with proof of purchase to:
Midland Radio Corporation
Warranty Service Department
5900 Parretta Drive
Kansas City, MO 64120
This warranty gives you specific legal rights, and you may also have other rights, which vary from state to state.
Note: The above warranty applies only to merchandise purchased in the United States of America or any of the territories or possessions thereof, or from a U.S.
Military exchange.

For Product Purchased in Canada:
Performance of any obligation under this warranty may be obtained by returning the warranted product, along with proof of purchase, to your place of purchase in
Canada. This warranty gives you specified legal rights. Additional warranty rights may be provided by law in some areas within Canada.
Service
If you have a problem which you believe requires service, please first check the FAQ section of the website, check your Owner’s Manual, or call and speak with a
service technician. Many problems can be remedied without returning the unit for service. If necessary, return as follows:
Pack the unit in its original box and packing. Then pack the original box in a suitable shipping carton. Caution: Improper packing may result in damage during
shipment. Include the following:
a. Full description of any problems
b. Daytime telephone number, name & address
For warranty service include a photocopy of the bill of sale from an authorized dealer or other proof of purchase showing the date of sale.
You do not need to return accessory items (AC/DC Adapter, Batteries, and Owners Guide) unless they might be directly related to the problem.
Repairs not covered by warranty or units that are over Three year old are subject to a repair fee. Please call for a quote on repair service cost at 816-241-8500.
Send only cashier’s check, money order, Master Card or Visa card number.
Midland Radio Corporation
5900 Parretta Drive
Kansas City, Missouri 64120
Phone: (816) 241-8500
Fax: (816) 241-5713
E-mail: mail@midlandradio.com
This manual suits for next models
2
Table of contents
Other Midland Action Camera manuals

Midland
Midland H5+ User manual

Midland
Midland XTC 450 Manual

Midland
Midland XTC 400 User manual

Midland
Midland H5 PRO User manual

Midland
Midland H360 FULL HD User manual

Midland
Midland XTC200VP3 User manual

Midland
Midland H5 User manual

Midland
Midland BIKE GUARDIAN User manual

Midland
Midland H180 FULL HD User manual

Midland
Midland H3 User manual

Midland
Midland H3+ User manual

Midland
Midland XTC-200 User manual

Midland
Midland XTC300 User manual

Midland
Midland XTC-100 User manual

Midland
Midland XTC-200 User manual

Midland
Midland H9 User manual

Midland
Midland H7 User manual

Midland
Midland XTC 400 Manual

Midland
Midland H5 PRO User manual

Midland
Midland H5 PRO User manual