Dometic AIR Break Pro 1 User manual

AIR Break Pro 1/3/5, AIR Break All-Season 1/3/5
Inflatable windbreak
Installation Manual. . . . . . . . . . . . . . . . . . . . . 9
Aufblasbarer Windschutz
Montageanleitung. . . . . . . . . . . . . . . . . . . . 13
Paravent gonflable
Instructions de montage . . . . . . . . . . . . . . . 18
Cortavientos inflable
Instrucciones de montaje . . . . . . . . . . . . . .23
Para-vento insuflável
Instruções de montagem . . . . . . . . . . . . . .28
Frangivento gonfiabile
Indicazioni di montaggio . . . . . . . . . . . . . .33
Opblaasbaar windscherm
Montagehandleiding . . . . . . . . . . . . . . . . .38
Oppustelig læskærm
Monteringsvejledning. . . . . . . . . . . . . . . . .43
Uppblåsbart vindskydd
Monteringsanvisning . . . . . . . . . . . . . . . . . 47
Oppblåsbar vindskjerm
Monteringsanvisning . . . . . . . . . . . . . . . . . 51
Ilmatäytteinen tuulisuoja
Asennusohje . . . . . . . . . . . . . . . . . . . . . . . . 55
Nadmuchiwany wiatrochron
Instrukcja montażu . . . . . . . . . . . . . . . . . . . 59
Nafukovací vetrolam
Návod na montáž . . . . . . . . . . . . . . . . . . . . 64
Nafukovací protivětrná zástěna
Návod k montáži . . . . . . . . . . . . . . . . . . . . . 68
Felfújható szélfogó
Szerelési útmutató . . . . . . . . . . . . . . . . . . . 73
EN
DE
FR
ES
PT
IT
NL
DA
SV
NO
FI
PL
SK
CS
HU
AWNINGS
WINDBREAKS

© 2022 Dometic Group. The visual appearance of the contents of this manual is
protected by copyright and design law. The underlying technical design and the
products contained herein may be protected by design, patent or be patent
pending. The trademarks mentioned in this manual belong to Dometic Sweden AB.
All rights are reserved.

4445103839 3
1
AIR Break Pro / AIR Break All-Season
2250 mm
1400
2250 mm
6800 mm
1400
2250 mm
11400 mm
1.
2.
2

4 4445103839
3
4
5

4445103839 5
6
1.
2.
9 psi/0.62 bar
AIR Break 1AIR Break 3/5
4. 3.
7
8

6 4445103839
2.
1.
9
2.
1.
1.
0
a

4445103839 7
1.
2.
b
1.
2.
9 psi/0.62 bar
c
d

8 4445103839
e
f

4445103839 9
EN
Please read these instructions carefully and follow all instructions, guide-
lines, and warnings included in this product manual in order to ensure that
you install, use, and maintain the product properly at all times. These instruc-
tions MUST stay with this product.
By using the product, you hereby confirm that you have read all instructions,
guidelines, and warnings carefully and that you understand and agree to
abide by the terms and conditions as set forth herein. You agree to use this
product only for the intended purpose and application and in accordance
with the instructions, guidelines, and warnings as set forth in this product
manual as well as in accordance with all applicable laws and regulations. A
failure to read and follow the instructions and warnings set forth herein may
result in an injury to yourself and others, damage to your product or damage
to other property in the vicinity. This product manual, including the instruc-
tions, guidelines, and warnings, and related documentation, may be subject
to changes and updates. For up-to-date product information, please visit
dometic.com.
Contents
Explanation of symbols . . . . . . . . . . . . . . . . . . . . .9
General safety instructions . . . . . . . . . . . . . . . . . .9
Scope of delivery . . . . . . . . . . . . . . . . . . . . . . . . . .9
Accessories . . . . . . . . . . . . . . . . . . . . . . . . . . . . . .9
Intended use . . . . . . . . . . . . . . . . . . . . . . . . . . . .10
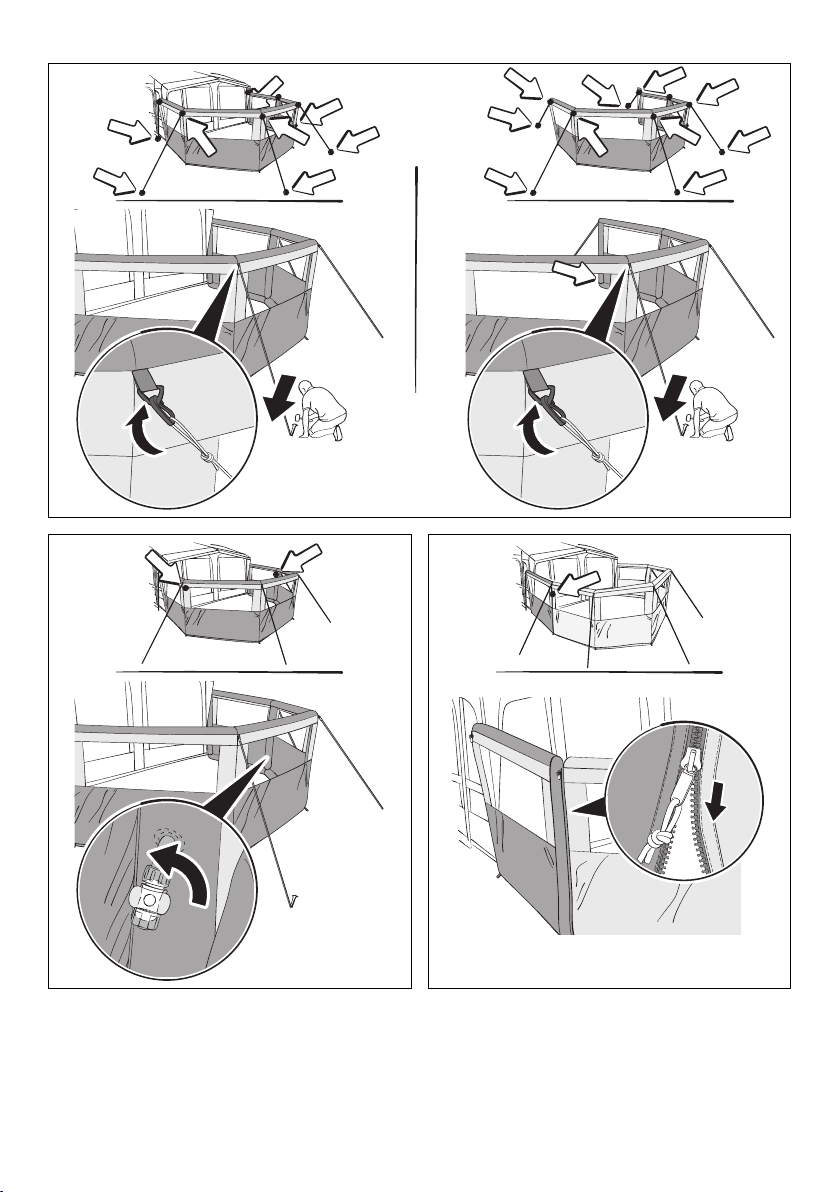
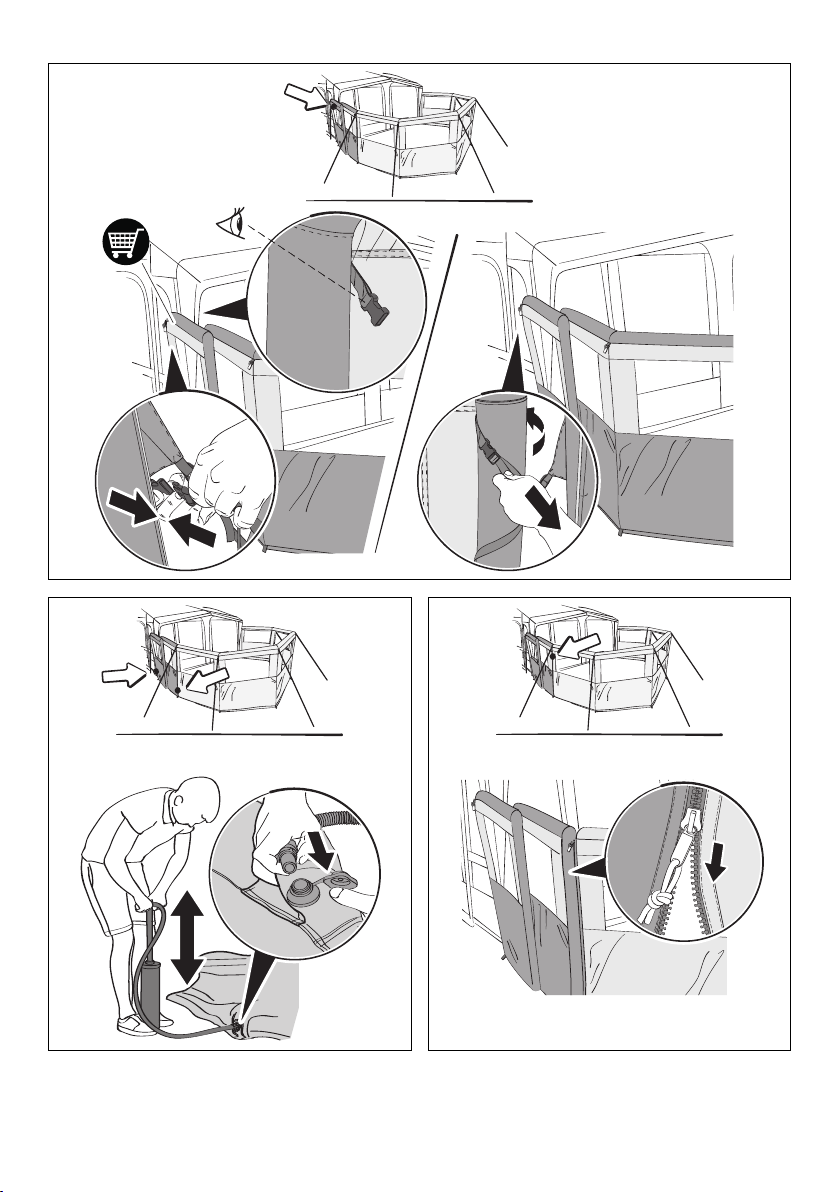
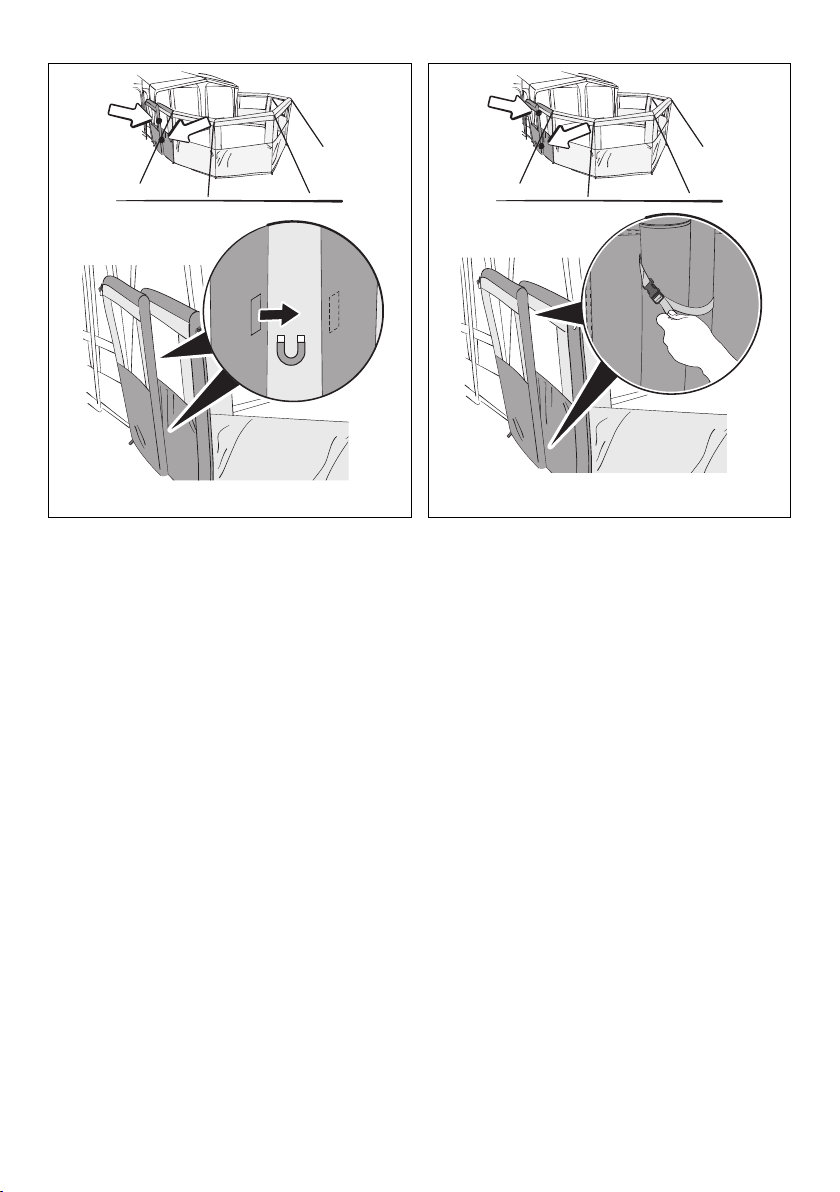
Using the windbreak . . . . . . . . . . . . . . . . . . . . . .10
Cleaning and maintenance . . . . . . . . . . . . . . . . . 11
Troubleshooting . . . . . . . . . . . . . . . . . . . . . . . . .12
Disposal . . . . . . . . . . . . . . . . . . . . . . . . . . . . . . . .12
Warranty. . . . . . . . . . . . . . . . . . . . . . . . . . . . . . . .12
Explanation of symbols
!
!
A
I
General safety instructions
!WARNING! Failure to obey these
warnings could result in death or
serious injury.
Fire hazard
• Ensure you know the fire precaution arrange-
ments on the site.
• Do not cook inside or near the windbreak or use
open flames.
!CAUTION! Failure to obey these cau-
tions could result in minor or moder-
ate injury.
Risk of injury
• This device is not intended for use by persons
(including children) with reduced physical, sen-
sory or mental capabilities, or lack of experience
and knowledge, unless they have been given
supervision or instruction concerning use of the
device by a person responsible for their safety.
• Do not allow children to play around the wind-
break and ensure that suitable protective foot-
wear is worn. Guy lines are a trip hazard and
pegs can be sharp.
• Cleaning and user maintenance may not be car-
ried out by unsupervised children.
• Keep passage ways clear.
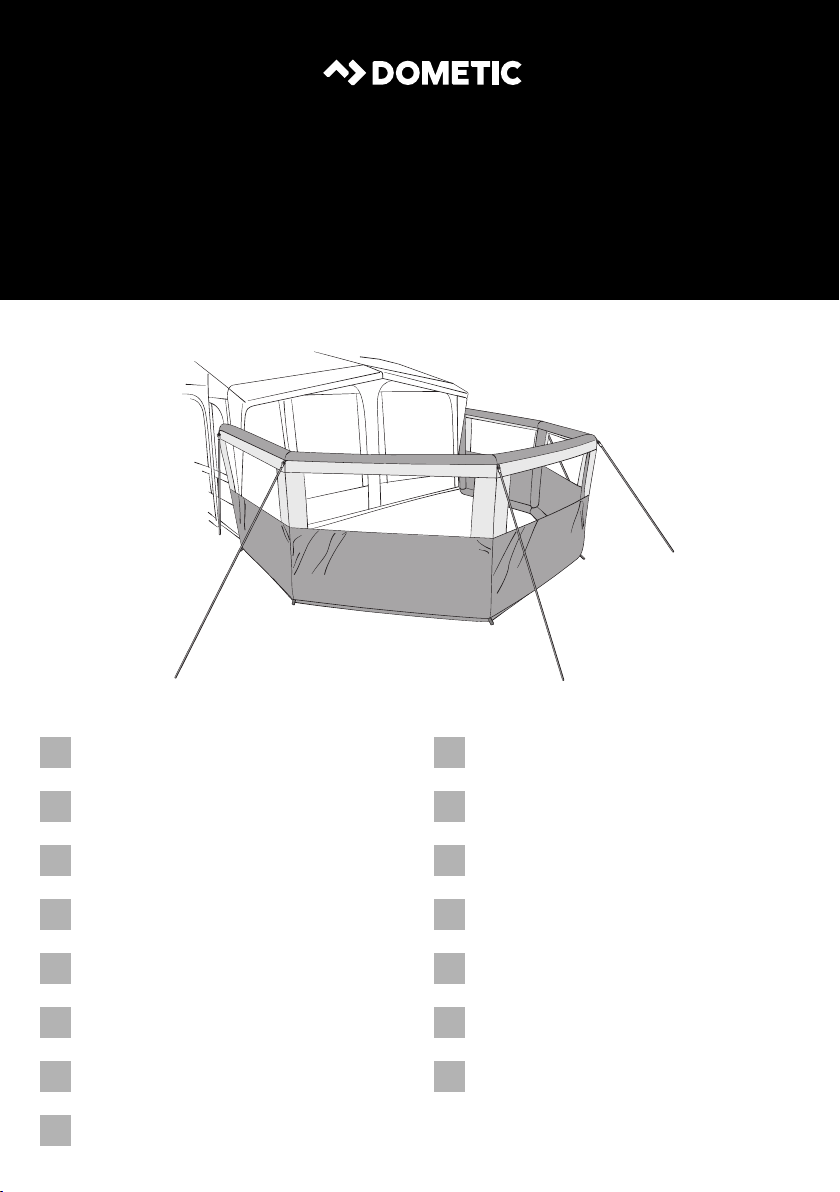
Scope of delivery
Accessories
Available as accessories (not included in the scope
of delivery):
WARNING!
Safety instruction: Indicates a hazard-
ous situation that, if not avoided, could
result in death or serious injury.
CAUTION!
Safety instruction: Indicates a hazard-
ous situation that, if not avoided, could
result in minor or moderate injury.
NOTICE!
Indicates a situation that, if not avoided,
can result in property damage.
NOTE
Supplementaryinformation foroperating
the product.
Component Quantity
Windbreak 1
Peg pack 1
Carry bag 1
Component Ref. no.
AIR Break Pro Door 9120001987
AIR Break All-Season Door 9120001991
Caravan connector 9120002162

10 4445103839
EN
Intended use
The windbreak is suitable for:
• Light to moderate weather
•Touring
The windbreak is not suitable for:
• Very strong winds or snowfall
• Seasonal pitch* or commercial use
* All-Season models have been designed for use
on seasonal pitches.
This product is only suitable for the intended pur-
pose and application in accordance with these
instructions.
This manual provides information that is necessary
for proper installation and/or operation of the
product. Poor installation and/or improper operat-
ing or maintenance will result in unsatisfactory per-
formance and a possible failure.
The manufacturer accepts no liability for any injury
or damage to the product resulting from:
• Incorrect assembly or connection, including
excess voltage
• Incorrect maintenance or use of spare parts
other than original spare parts provided by the
manufacturer
• Alterations to the product without express per-
mission from the manufacturer
• Use for purposes other than those described in
this manual
Dometic reserves the right to change product
appearance and product specifications.
Using the windbreak
!
Before first use
Familiarize yourself with the product by carrying
out a test set up before the product is used for the
first time. Check if the scope of delivery is
complete.
Choosing a site
1. Choose a flat site.
2. Choose a shaded site to avoid UV degradation
of the fabric.
3. Avoid pitching under trees as falling branches,
resin, etc. can damage the product.
4. Clear the site of sharp stones and debris.
5. If used freestanding, set up the windbreak
with the opening facing away from the wind.
Preparing the set up
1. To protect the windbreak from dirt and dam-
age, lay down a groundsheet or footprint
before unpacking.
2. Unpack the windbreak.
3. Separate and identify the different compo-
nents.
Connecting the windbreak to an
awning tent
➤To connect the windbreak to an awning tent,
proceed as shown (fig. 2, page 3).
Connecting the windbreak to a
recreational vehicle
➤To connect the windbreak to a recreational
vehicle such as a caravan, use the caravan
connector (available as accessory) and proceed
as shown (fig. 3, page 4 to fig. 5, page 4).
Setting up the windbreak
!
A
CAUTION! Risk of injury and dam-
age hazard
Never open the zipper on the protective
sleeve while an air pole is inflated. This
will result in the air pole bursting.
CAUTION! Risk of injury and dam-
age hazard
• Do not use any type of compressor
designed to inflate car tires.
• Only inflate the air poles into the green
zone of the pressure gauge of the
hand pump supplied with the main
awning tent (9 psi/0.62 bar).
NOTICE! Damage hazard
Do not open or close the zippers by
force.

4445103839 11
EN
I
Keep thefollowing tips inmindwhilesetting upthe
windbreak:
• The illustrations provide a general overview of
the set up. The actual set up will vary slightly
based on the model of windbreak.
• Get help. The set up is easier with more people.
• Peg the guy lines so that the windbreak is under
tension without distorting the shape.
• Check the guy lines from time to time to ensure
adequatetension,if necessaryusethe runnersto
adjust.
The windbreak can be set up
• Connected to an awning tent (chapter “Con-
necting the windbreak to an awning tent” on
page 10)
• Connected to a recreational vehicle (chapter
“Connecting the windbreak to a recreational
vehicle” on page 10) or
• Freestanding
➤To set up the windbreak, proceed as shown
(fig. 6, page 5 to fig. 9, page 6).
Extending the windbreak
➤To connect the windbreaks use the zippers on
the sides (fig. a, page 6).
➤To set up the AIR Break Pro Door/ AIR Break
All-Season Door (available as accessory)
proceed as shown (fig. b, page 7 to fig. f,
page 8).
Dismantling the windbreak
1. Remove all dirt from the windbreak.
2. Unpeg all pegging points and unclip all guy
lines.
3. Deflate the windbreak:
➤AIR Break Pro 3/5 and AIR Break All-Sea-
son 3/5: Open the deflation valves
(fig. 0, page 6).
➤AIR Break Pro 1/ Door and AIR Break
All-Season 1/ Door: Open the inflation
valves.
4. Fold/roll the windbreak towards the valves to
expel more air.
5. When deflated, roll the windbreak to fit into
the carry bag.
6. Zip and tighten the compression straps.
7. Ensure that all parts are clean before packing
them into the carry bag.
8. If the windbreak is wet or damp, dry fully as
soon as possible.
Storing the windbreak
I
1. Clean the windbreak.
2. Air fully and ensure the windbreak is totally dry
before packing away.
3. Store in a well ventilated dry place.
Cleaning and maintenance
A
1. If necessary, clean the product with clean
water and a soft brush.
2. Apply impregnation against water and UV
radiation before each trip.
NOTE
• The supplied pegs will be suitable for
many sites but for some types of
ground special pegs will be needed.
Ask your dealer.
• Drive the pegs at a 45° angle away
from the windbreak into the ground.
• Peg each guy line in-line with the seam
they start from.
NOTE
• Fully set up the windbreak for clean-
ing.
• Choose a sunny day for cleaning to
ensure the material will dry thoroughly.
NOTICE! Damage hazard
• Do not use sharp or hard objects or
cleaning agents for cleaning.
• Do not use alcohol based materials,
chemicals, soap and detergents for
cleaning.
• Remove bird droppings and tree
resin as soon as possible to avoid per-
manent damage to the material.

12 4445103839
EN
Troubleshooting
I
Disposal
Warranty
The statutory warranty period applies. If the prod-
uct is defective, please contact your retailer or the
manufacturer's branch in your country (see
dometic.com/dealer).
For repair and warranty processing, pleaseinclude
the following documents when you send in the
product:
• A copy of the receipt with purchasing date
• A reason for the claim or description of the fault
Note that self-repair or non-professional repair can
have safety consequences and might void the war-
ranty.
The warranty covers manufacturing defects, mate-
rials and parts. The warranty does not cover fading
of the cover and wear and tear due to UV radiation,
misuse, accidental damage, storm damage, or
permanent, semi-permanent* or commercial use.
It does not cover any resulting damage. Please
contact your dealer for claims. This does not affect
your statutory rights.
* All-Season models have been designed for use
on seasonal pitches.
NOTE
A fully equipped spare parts kit should
include:
• Waterproofer
• Repair tape and repair solution
• Silicone spray for the zippers
• Spare pegs
Problem Solution
Windbreak only
inflates with
difficulties
➤Check that the valve is fully
screwed into the air pole.
➤Check if the inflation tube is
twistedatthevalve.Thismay
be indicated by noise.
Untwist the inflation tube.
➤Check that the hand pump
is working.
Air poles are kinked ➤Add more air
(9 psi/0.62 bar).
Air leak ➤Check that the valve is fully
screwed into the air pole
and the ring seal is in place.
➤Check that the cap of the
valve is done up tightly.
Rip in the fabric ➤Use repair tape to seal the
fabric.
➤Have repairs carried out by
an authorized service agent.
➤Place the packaging material in the appro-
priate recycling waste bins wherever pos-
sible.
➤Consult a local recycling center or special-
ist dealer for details about how to dispose
of the product in accordance with the
applicable disposal regulations.

4445103839 13
DE
Lesen und befolgen Sie bitte alle Anweisungen, Richtlinien und Warnhin-
weise in diesem Produkthandbuch sorgfältig, um sicherzustellen, dass Sie
das Produkt ordnungsgemäß installieren und stets ordnungsgemäß betrei-
ben und warten. Diese Anleitung MUSS bei dem Produkt verbleiben.
Durch die Verwendung des Produktes bestätigen Sie hiermit, dass Sie alle
Anweisungen, Richtlinien und Warnhinweise sorgfältig gelesen haben und
dass Sie die hierin dargelegten Bestimmungen verstanden haben und ihnen
zustimmen. Sie erklären sich damit einverstanden, dieses Produkt nur für
den angegebenen Verwendungszweck und gemäß den Anweisungen,
Richtlinien und Warnhinweisen dieses Produkthandbuchs sowie gemäß
allen geltenden Gesetzen und Vorschriften zu verwenden. Eine Nichtbeach-
tung der hierin enthaltenen Anweisungen und Warnhinweise kann zu einer
Verletzung Ihrer selbst und anderer Personen, zu Schäden an Ihrem Produkt
oder zu Schäden an anderem Eigentum in der Umgebung führen. Dieses
Produkthandbuch, einschließlich der Anweisungen, Richtlinien und Warn-
hinweise, sowie die zugehörige Dokumentation können Änderungen und
Aktualisierungen unterliegen. Aktuelle Produktinformationen finden Sie
unter documents.dometic.com.
Inhalt
Erläuterung der Symbole. . . . . . . . . . . . . . . . . . .13
Grundlegende Sicherheitshinweise . . . . . . . . . .13
Lieferumfang. . . . . . . . . . . . . . . . . . . . . . . . . . . . .14
Zubehör . . . . . . . . . . . . . . . . . . . . . . . . . . . . . . . .14
Bestimmungsgemäßer Gebrauch. . . . . . . . . . . .14
Windschutz verwenden. . . . . . . . . . . . . . . . . . . .14
Reinigung und Pflege . . . . . . . . . . . . . . . . . . . . .16
Fehlersuche und Fehlerbehebung . . . . . . . . . . .16
Entsorgung. . . . . . . . . . . . . . . . . . . . . . . . . . . . . .17
Garantie . . . . . . . . . . . . . . . . . . . . . . . . . . . . . . . .17
Erläuterung der Symbole
!
!
A
I
Grundlegende Sicherheits-
hinweise
!WARNUNG! Nichtbeachtung dieser
Warnungen kann zum Tod oder
schwerer Verletzung führen.
Brandgefahr
• Machen Sie sich mit den Brandschutzmaßnah-
men vor Ort vertraut.
• Kochen Sie nicht im oder in der Nähe des Wind-
schutzes und verwenden Sie keine offenen
Flammen.
!VORSICHT! Nichtbeachtung dieser
Hinweise kann zu leichten bis mittel-
schweren Verletzungen führen.
Verletzungsgefahr
• Dieses Produkt ist nicht für die Benutzung durch
Personen (inkl. Kindern) mit eingeschränkten
physischen, sensorischen oder mentalen Fähig-
keiten oder fehlender Erfahrung und Kenntnis
geeignet, es sei denn, diese werden durch eine
für ihre Sicherheit verantwortliche Person beauf-
sichtigt oder wurden hinsichtlich der Benutzung
des Produkts eingewiesen.
• Erlauben Sie Kindern nicht, in der Nähe des
Windschutzes zu spielen, und vergewissern Sie
sich, dass passende Schutzschuhe getragen
werden. Abspannschnüre stellen eine Stolper-
gefahr dar und Heringe können spitz sein.
• Reinigung und Pflege dürfen nicht von Kindern
ohne Beaufsichtigung durchgeführt werden.
• Halten Sie Durchgänge frei.
WARNUNG!
Sicherheitshinweis: Kennzeichnet
eine Gefahrensituation, die zum Tod
oderschwererVerletzungführen könnte,
wenn die jeweiligen Anweisungen nicht
befolgt werden.
VORSICHT!
Sicherheitshinweis: Kennzeichnet
eine Gefahrensituation, die zu geringer
oder mittelschwerer Verletzung führen
könnte, wenn die jeweiligen Anweisun-
gen nicht befolgt werden.
ACHTUNG!
Kennzeichnet eine Situation, die zu Sach-
schäden führen kann, wenn die jeweili-
gen Anweisungen nicht befolgt werden.
HINWEIS
Ergänzende Informationen zur Bedie-
nung des Produktes.

14 4445103839
DE
Lieferumfang
Zubehör
Als Zubehör erhältlich (nicht im Lieferumfang ent-
halten):
Bestimmungsgemäßer
Gebrauch
Der Windschutz ist geeignet für:
• milde bis mäßige Wetterbedingungen
• Reisetouren
Der Windschutz ist nicht geeignet für:
• sehr starken Wind oder Schneefall
• einen Saisonplatz* oder eine kommerzielle Nut-
zung
* All-Season-Modelle sind für den Einsatz auf Sai-
sonplätzen geeignet.
Dieses Produkt ist nur für den angegebenen Ver-
wendungszweck und die Anwendung gemäß die-
ser Anleitung geeignet.
Dieses Handbuch enthält Informationen, die für
die ordnungsgemäße Installation und/oder den
ordnungsgemäßen Betrieb des Produkts erforder-
lich sind. Installationsfehler und/oder ein nicht
ordnungsgemäßer Betrieb oder eine nicht ord-
nungsgemäße Wartung haben eine unzurei-
chende Leistung und u. U. einen Ausfall des Geräts
zur Folge.
Der Hersteller übernimmt keine Haftung für Verlet-
zungen oder Schäden am Produkt, die durch Fol-
gendes entstehen:
• Unsachgemäße Montage oder falscher
Anschluss, einschließlich Überspannung
• UnsachgemäßeWartung oderVerwendungvon
anderen als den vom Hersteller gelieferten Ori-
ginal-Ersatzteilen
• Veränderungen am Produkt ohne ausdrückliche
Genehmigung des Herstellers
• Verwendung für andere als die in der Anleitung
beschriebenen Zwecke
Dometic behält sich das Recht vor, das Erschei-
nungsbild des Produkts und dessen technische
Daten zu ändern.
Windschutz verwenden
!
Vor dem ersten Gebrauch
Machen Sie sich mit dem Produkt vertraut, indem
Sie einen Testaufbau durchführen, bevor Sie das
Produkt zum ersten Mal verwenden. Prüfen Sie, ob
die Lieferung vollständig ist.
Auswahl des Standorts
1. Wählen Sie einen ebenen Standort.
2. Wählen Sie einen schattigen Standort, um
Schäden am Gewebe durch UV-Strahlung zu
vermeiden.
3. Vermeiden Sie das Aufstellen unter Bäumen,
da herabfallende Äste, Harz usw. das Produkt
beschädigen können.
4. Entfernen Sie scharfe Steine und Unrat vom
Standort.
5. Bauen Sie den Windschutz bei freistehender
Verbindung so auf, dass die Öffnung sich auf
der vom Wind abgewandten Seite befindet.
Komponente Anzahl
Windschutz 1
Packung Heringe 1
Tragetasche 1
Komponente Art.-Nr.
AIR Break Pro Door 9120001987
AIR Break All-Season Door 9120001991
Wohnwagenanschluss 9120002162
VORSICHT! Gefahr von Verletzun-
gen und Sachschäden
Öffnen Sie niemals den Reißverschluss
der Schutzhülle, während ein AirPole auf-
gepumpt ist. Dies führt dazu, dass der
AirPole platzt.

4445103839 15
DE
Aufbau vorbereiten
1. Um den Windschutz vor Schmutz und Beschä-
digungen zu schützen, legen Sie vor dem Aus-
packen eine Bodenplane oder Unterlage aus.
2. Packen Sie den Windschutz aus.
3. Sortieren und bestimmen Sie die verschiede-
nen Komponenten.
Windschutz mit einem Vorzelt verbin-
den
➤Um den Windschutz mit einem Vorzelt zu ver-
binden, gehen Sie wie gezeigt vor (Abb. 2,
Seite 3).
Windschutz mit einem Freizeitfahrzeug
verbinden
➤Um den Windschutz mit einem Freizeitfahrzeug
wie einem Wohnwagen zu verbinden, verwen-
den Sie den Wohnwagenanschluss (als Zubehör
erhältlich) und gehen Sie wie gezeigt vor
(Abb. 3, Seite 4 bis Abb. 5, Seite 4).
Windschutz aufstellen
!
A
I
Beachten Sie beim Aufbau des Windschutzes die
folgenden Tipps:
• Die Abbildungen geben einen allgemeinen
Überblick über den Aufbau. Der tatsächliche
Aufbau kann je nach Windschutzmodell leicht
variieren.
• Holen Sie sich Unterstützung. Mit mehreren Per-
sonen ist der Aufbau einfacher.
• Verankern Sie die Abspannschnüre so, dass der
Windschutz gespannt ist, ohne dass er sich ver-
formt.
• Überprüfen Sie von Zeit zu Zeit die Abspann-
schnüre auf ausreichende Spannung und ziehen
Sie sie bei Bedarf mithilfe der Spanner nach.
Der Windschutz kann wie folgt aufgebaut werden
• Verbunden mit einem Vorzelt (Kapitel „Wind-
schutz mit einem Vorzelt verbinden“ auf
Seite 15)
• Verbunden mit einem Freizeitfahrzeug (Kapitel
„Windschutz mit einem Freizeitfahrzeug verbin-
den“ auf Seite 15) oder
• freistehende Verwendung
➤Um den Windschutz aufzustellen, gehen Sie wie
gezeigt vor (Abb. 6, Seite 5 bis Abb. 9,
Seite 6).
Windschutz erweitern
➤Verwenden Sie die Reißverschlüsse an den Sei-
ten, um die Windschutze zu verbinden
(Abb. a, Seite 6).
➤Um die Tür von AIR Break Pro Door bzw. die Tür
von AIR Break All-Season Door (als Zubehör
erhältlich) aufzubauen, gehen Sie wie gezeigt
vor (Abb. b, Seite 7 bis Abb. f, Seite 8).
Windschutz abbauen
1. Entfernen Sie allen Schmutz vom Windschutz.
2. Ziehen Sie alle Heringe und lösen Sie alle
Abspannschnüre.
3. Lassen Sie die Luft aus dem Windschutz ab:
➤AIR Break Pro 3/5 und AIR Break All-Sea-
son 3/5: Öffnen Sie die Entlüftungsventile
(Abb. 0, Seite 6).
VORSICHT! Gefahr von Verletzun-
gen und Sachschäden
• Verwenden Sie keine Kompressoren,
die zum Aufpumpen von Autoreifen
bestimmt sind.
• Pumpen Sie die AirPoles nurim grünen
Bereich des Manometers der im Liefer-
umfang des Hauptvorzelts enthalte-
nen Handpumpe auf (9 psi/0,62 bar).
ACHTUNG! Beschädigungsgefahr
Öffnen oder schließen Sie die Reißver-
schlüsse nicht mit Gewalt.
HINWEIS
• Die im Lieferumfang enthaltenen
Heringe sind für viele Standorte geeig-
net. Bei manchen Böden sind jedoch
Spezialheringe erforderlich. Fragen
Sie Ihren Händler.
• Schlagen Sie die Heringe in einem
Winkel von 45° vom Windschutz weg
in den Boden ein.
• Richten Sie die Abspannschnüre an
der Naht aus, von der sie ausgehen.

16 4445103839
DE
➤AIR Break Pro 1/Door und AIR Break
All-Season 1/Door: Öffnen Sie die Aufblas-
ventile.
4. Falten bzw. rollen Sie den Windschutz zu den
Ventilen hin, um mehr Luft abzuführen.
5. Wenn die Luft abgelassen ist, rollen Sie den
Windschutz so auf, dass er in die Tragetasche
passt.
6. Schließen Sie den Reißverschluss und ziehen
Sie die Kompressionsriemen fest.
7. Stellen Sie sicher, dass alle Teile sauber sind,
bevor Sie sie in die Tragetasche packen.
8. Wenn der Windschutz nass oder feucht ist, las-
sen Sie ihn so bald wie möglich vollständig
trocknen.
Windschutz einlagern
I
1. Reinigen Sie den Windschutz.
2. Lüften Sie den Windschutz gründlich und ver-
gewissern Sie sich vor dem Verpacken, dass er
komplett trocken ist.
3. Lagern Sie es an einem gut belüfteten, trocke-
nen Ort.
Reinigung und Pflege
A
1. Reinigen Sie das Produkt bei Bedarf mit saube-
rem Wasser und einer weichen Bürste.
2. Tragen Sie vor jeder Reise eine Imprägnierung
gegen Wasser und UV-Strahlung auf.
Fehlersuche und
Fehlerbehebung
I
HINWEIS
• Bauen Sie den Windschutz zur Reini-
gung vollständig auf.
• Wählen Sie einen sonnigen Tag für die
Reinigung, um sicherzustellen, dass
das Material gründlich trocknet.
ACHTUNG! Beschädigungsgefahr
• Verwenden Sie zur Reinigung keine
scharfen oder harten Gegenstände
oder Reinigungsmittel.
• Verwenden Sie zur Reinigung keine
Materialien auf Alkoholbasis, Chemi-
kalien, Seife und Reinigungsmittel.
• Entfernen Sie Vogelkot und Baumharz
so schnell wie möglich, um dauerhafte
Schäden am Material zu vermeiden.
HINWEIS
Ein vollständig ausgestattetes Ersatzteil-
set enthält:
• Imprägniermittel
• Reparaturband und Reparaturlösung
• Silikonspray für die Reißverschlüsse
• Ersatzheringe
Problem Lösung
Windschutz
lässt sich nur
schwer
aufblasen
➤Überprüfen Sie, ob das Ventil
vollständig in den AirPole einge-
schraubt ist.
➤Überprüfen Sie, ob der Luft-
schlauch am Ventil verdreht ist.
Ein Geräusch kann darauf hin-
weisen. Drehen Sie den Luft-
schlauch in die richtige Position.
➤Überprüfen Sie, ob die Hand-
pumpe funktioniert.
Die AirPoles
sind geknickt
➤Pumpen Sie mehr Luft ein
(9 psi/0,62 bar).
Luft entweicht ➤Überprüfen Sie, ob das Ventil
vollständig in den AirPole einge-
schraubt ist und die Ringdich-
tung richtig sitzt.
➤Überprüfen Sie, ob die Ventil-
kappe fest zugedreht ist.
Riss im
Gewebe
➤Reparieren Sie das Loch mit
Reparaturband.
➤Lassen Sie Reparaturen von
einem autorisierten Kunden-
dienst durchführen.

4445103839 17
DE
Entsorgung
Garantie
Es gilt die gesetzliche Gewährleistungsfrist. Sollte
das Produkt defekt sein, wenden Sie sich bitte an
Ihren Fachhändler oder die Niederlassung des
Herstellers in Ihrem Land (siehe dome-
tic.com/dealer).
Bitte senden Sie bei einem Reparatur- bzw.
Gewährleistungsantrag folgende Unterlagen mit
dem Produkt ein:
• Eine Kopie der Rechnung mit Kaufdatum
• Einen Reklamationsgrund oder eine Fehlerbe-
schreibung
Bitte beachten Sie, dass eigenständig oder nicht
fachgerecht durchgeführte Reparaturen die
Sicherheit gefährden und zum Erlöschen der
Garantie führen können.
Die Gewährleistung deckt Herstellungsfehler,
Materialien und Teile ab. Die Gewährleistung
erstreckt sich nicht auf das Ausbleichen des
Bezugs und die Abnutzung durch UV-Strahlung,
fehlerhafte Verwendung, versehentliche Beschädi-
gung, Sturmschäden, eine Nutzung auf Dauer-
und Saisonstellplätzen* oder eine kommerzielle
Nutzung. Sie deckt keine daraus resultierenden
Schäden ab. Bitte wenden Sie sich an Ihren Händ-
ler, um Ansprüche geltend zu machen. Dies beein-
flusst nicht Ihre gesetzlichen Rechte.
* All-Season-Modelle sind für den Einsatz auf Sai-
sonplätzen geeignet.
➤Geben Sie das Verpackungsmaterial mög-
lichst in den entsprechenden Recyc-
ling-Müll.
➤Wenden Sie sich an ein örtliches Recyc-
lingzentrum oder einen Fachhändler, um
zu erfahren, wie Sie das Produkt gemäß
den geltenden Entsorgungsvorschriften
entsorgen können.

18 4445103839
FR
Veuillez lire et suivre attentivement l’ensemble des instructions, directives et
avertissements figurant dans ce manuel afin d’installer, d’utiliser et d’entre-
tenir le produit correctement à tout moment. Ces instructions DOIVENT res-
ter avec le produit.
En utilisant ce produit, vous confirmez expressément avoir lu attentivement
l’ensemble des instructions, directives et avertissements et que vous com-
prenez et acceptez de respecter les modalités et conditions énoncées dans
le présent document. Vous acceptez d’utiliser ce produit uniquement pour
l’usage et l’application prévus et conformément aux instructions, directives
et avertissements figurant dans le présent manuel, ainsi qu’àtoutes les lois et
réglementations applicables. En cas de non-respect des instructions et aver-
tissements figurant dans ce manuel, vous risquez de vous blesser ou de bles-
ser d’autres personnes, d’endommager votre produit ou d’endommager
d’autres biens à proximité. Le présent manuel produit, y compris les instruc-
tions, directives et avertissements, ainsi que la documentation associée
peuvent faire l’objet de modifications et de mises à jour. Pour obtenir des
informations actualisées sur le produit, veuillez consulter le
site documents.dometic.com.
Sommaire
Signification des symboles . . . . . . . . . . . . . . . . .18
Consignes générales de sécurité . . . . . . . . . . . .18
Contenu de la livraison . . . . . . . . . . . . . . . . . . . .19
Accessoires . . . . . . . . . . . . . . . . . . . . . . . . . . . . .19
Usage conforme . . . . . . . . . . . . . . . . . . . . . . . . .19
Utilisation du paravent. . . . . . . . . . . . . . . . . . . . .19
Nettoyage et entretien . . . . . . . . . . . . . . . . . . . .21
Dépannage . . . . . . . . . . . . . . . . . . . . . . . . . . . . .21
Mise au rebut . . . . . . . . . . . . . . . . . . . . . . . . . . . .21
Garantie . . . . . . . . . . . . . . . . . . . . . . . . . . . . . . . 22
Signification des symboles
!
!
A
I
Consignes générales de
sécurité
!AVERTISSEMENT ! Le non-respect de
ces mises en garde peut entraîner des
blessures graves, voire mortelles.
Risque d’incendie
• Assurez-vous de connaître les dispositions en
matière de prévention des incendies sur le site.
• Ne cuisinez pas dans ou à proximité du paravent
et n’utilisez pas de flammes nues.
!ATTENTION ! Le non-respect de ces
mises en garde peut entraîner des
blessures légères ou de gravité
modérée.
Risque de blessure
• Cet appareil ne doit pas être utilisé par des per-
sonnes (y compris les enfants) souffrant de défi-
ciences physiques, sensorielles ou mentales ou
manquant d’expérience ou de connaissances,
sauf si une personne garante de leur sécurité les
surveille ou leur fournit toutes les instructions
adéquates concernant son utilisation.
• Ne laissez pas les enfants jouer autour du
paravent et assurez-vous de porter des chaus-
sures de protection. Les cordons d’ancrage pré-
sentent un risque de trébuchement et les
piquets peuvent être coupants.
• Le nettoyage et la maintenance ne doivent pas
être effectués par des enfants sans surveillance.
• Gardez les voies de passage libres.
AVERTISSEMENT !
Consignes de sécurité : indiquent une
situation dangereuse qui, si elle n’est pas
évitée, est susceptible d’entraîner des
blessures graves, voire mortelles.
ATTENTION !
Consignes de sécurité : indiquent une
situation dangereuse qui, si elle n’est pas
évitée, est susceptible d’entraîner des
blessures légères ou de gravité modé-
rée.
AVIS !
indiquent une situation dangereuse qui,
si elle n’est pas évitée, peut entraîner des
dommages matériels.
REMARQUE
Informations complémentaires sur l’utili-
sation de ce produit.

4445103839 19
FR
Contenu de la livraison
Accessoires
Disponibles comme accessoires (non compris
dans la livraison) :
Usage conforme
Le paravent est adapté à ce qui suit :
• Intempéries légères à modérées
• Excursions
Le paravent n’est pas adapté à ce qui suit :
• Vents très forts ou chutes de neige
• Emplacement saisonnier* ou usage commercial
* Les modèles All-Season ont été conçus pour une
utilisation sur les emplacements saisonniers.
Ce produit convient uniquement à l’usage et à
l’application prévus, conformément aux présentes
instructions.
Ce manuel fournit les informations nécessaires à
l’installation et/ou à l’utilisation correcte du pro-
duit. Une installation, une utilisation ou un entre-
tien inappropriés entraînera des performances
insatisfaisantes et une éventuelle défaillance.
Le fabricant décline toute responsabilité en cas de
blessure ou de dégâts sur le produit résultant :
• D’un montage ou d’un raccordement incorrect,
y compris d’une surtension
• D’un entretien inadapté ou de l’utilisation de
pièces de rechange autres que les pièces de
rechange d’origine fournies par le fabricant
• De modifications apportées au produit sans
autorisation explicite du fabricant
• D’usages différents de ceux décrits dans ce
manuel
Dometic se réserve le droit de modifier l’appa-
rence et les spécifications produit.
Utilisation du paravent
!
Avant la première utilisation
Familiarisez-vous avec le produit en effectuant un
test de mise en place avant la première utilisation
du produit. Vérifiez que le contenu de la livraison
est complet.
Choix d’un emplacement
1. Choisissez un endroit plat.
2. Choisissez un emplacement ombragé pour
éviter la dégradation du tissu par les UV.
3. Évitez les emplacements sous les arbres car la
chute de branches, la résine, etc. peuvent
endommager le produit.
4. Retirez les pierres et débris coupants éven-
tuels de l’emplacement.
5. Si vous l’utilisez en mode autonome, installez
le paravent en plaçant les ouvertures dos au
vent.
Préparation de l’installation
1. Pour protéger le paravent de la saleté et de
tout dégât, posez un revêtement de sol avant
de le déballer.
2. Déballez le paravent.
3. Séparez et identifiez les différents compo-
sants.
Connexion du paravent à un auvent
➤Pour connecter le paravent à un auvent, procé-
dez comme indiqué (fig. 2, page 3).
Composant Quantité
Paravent 1
Sac de piquets 1
Housse de transport 1
Composant N° d’article
AIR Break Pro Door 9120001987
AIR Break All-Season Door 9120001991
Connecteur de caravane 9120002162
ATTENTION ! Risque de blessure et
de dégâts matériels
N’ouvrez jamais la fermeture éclair de la
housse de protection lorsqu’un tube
d’air est gonflé. Cela entraînerait l’éclate-
ment du tube d’air.

20 4445103839
FR
Connexion du paravent à un véhicule de
plaisance
➤Pour connecter le paravent à un véhicule de plai-
sance tel qu’une caravane, utilisez leconnecteur
de caravane (disponible en accessoire) et procé-
dez comme indiqué (fig. 3, page 4 à fig. 5,
page 4).
Installation du paravent
!
A
I
Gardez les consignes suivantes à l’esprit lorsque
vous installez le paravent :
• Les illustrations fournissent un aperçu généralde
l’installation. L’installation réelle varie légère-
ment en fonction du modèle de paravent.
• Demandez de l’aide. L’installation s’effectue
plus facile avec plusieurs personnes.
• Fixez les cordons d’ancrage sur les piquets, afin
que le paravent soit tendu sans se déformer.
• Vérifiez de temps en temps les cordons
d’ancrage pour vous assurer qu’ils sont bien
tendus ; si nécessaire, utilisez les rails de coulis-
sement pour les ajuster.
Le paravent peut être installé
• En le connectant à un auvent (chapitre
« Connexion du paravent à un auvent »,
page 19)
• En le connectant à un véhicule de plaisance (cha-
pitre « Connexion du paravent à un véhicule de
plaisance », page 20) ou
• Utilisation autonome
➤Pour installer le paravent, procédez comme indi-
qué (fig. 6, page 5 à fig. 9, page 6).
Extension du paravent
➤Utilisez les fermetures éclair sur les côtés
(fig. a, page 6) pour connecter les paravents.
➤Pour installer la porte du AIR Break Pro/AIR
Break All-Season (disponible en accessoire),
procédez comme indiqué (fig. b, page 7 à
fig. f, page 8).
Démontage du paravent
1. Retirez toute la poussière du paravent.
2. Retirez tous les piquets et détachez tous les
cordons d’ancrage.
3. Dégonflez le paravent :
➤AIR Break Pro 3/5 et AIR Break All-Season
3/5 : Ouvrez les valves de dégonflage
(fig. 0, page 6).
➤AIR Break Pro 1/ Door et AIR Break All-Sea-
son 1/ Door : Ouvrez les valves de gon-
flage.
4. Pliez/roulez le paravent vers les valves pour
expulser plus d’air.
5. Une fois dégonflé, roulez le paravent pour le
faire rentrer dans le sac de transport.
6. Fixez et ajustez les bandes de serrage.
7. Assurez-vous que toutes les pièces sont
propres avant de les mettre dans le sac de
transport.
8. Si le paravent est mouillé ou humide,
séchez-le complètement dès que possible.
ATTENTION ! Risque de blessure et
de dégâts matériels
• N’utilisez pas de compresseurs
conçus pour gonfler les pneus de voi-
ture.
• Ne gonflez les tubes d’air que dans la
zone verte du manomètre de la
pompe manuelle fournie avec l’auvent
principal (9 psi/0,62 bar).
AVIS ! Risque d’endommagement
N’ouvrez pas et ne fermez pas les ferme-
tures éclair par la force.
REMARQUE
• Les piquets fournis sont adaptés à de
nombreux emplacements, toutefois,
pour certains types de sols, des
piquets spéciaux sont nécessaires.
Consultez votre revendeur.
• Enfoncez les piquets dans le sol à un
angle de 45° par rapport au paravent.
• Fixez chaque cordon d’ancrage en
l’alignant sur la couture d’où il part.
This manual suits for next models
5
Table of contents
Languages:
Other Dometic Camping Equipment manuals