Dometic Mini Heki S User manual

1
≤1,5 Nm
1 – 2 mm
1 – 2 mm
H
A
B
1
5
4
2
3
12 mm
12 mm
Ø 24 mm
A
C
B
400 mm
400 mm
1.
2.
W
Mini Heki S
1
2
5
6
7
3
4
mm 23 – 24 25 – 26 27 – 28 29 – 30 31 – 32 33 – 34 35 – 36 37 – 38 39 – 40 41 – 42
mm 0246810 12 14 16 18
mm 25 32
mm 43 – 44 45 – 46 47 – 48 49 – 50 51 – 52 53 – 54 55 – 56 57 – 58 59 – 60
mm 20 22 24 26 28 30 32 34 36
mm 40 52
W
H
W
H
8
9

2
Dometic WAECO International GmbH
Hollefeldstrasse 63
D-48282 Emsdetten
www.dometic.com
B
A
140 mm
140 mm
140 mm
140 mm
105 mm 105 mm
105 mm 105 mm
a
b
e
f
0
c
d
4445100545 F 02/2016 MO1109B

Dachfenster
Montage- und Bedienungsanleitung . 2
Roof light
Installation and Operating Manual . . . 9
Dôme de toit
Instructions de montage
et de service . . . . . . . . . . . . . . . . . . 16
Claraboya
Instrucciones de montaje y de uso . 24
Oblò
Istruzioni di montaggio e d’uso . . . . 32
Dakraam
Montagehandleiding en
gebruiksaanwijzing . . . . . . . . . . . . . 40
Tagvindue
Monterings- og
betjeningsvejledning . . . . . . . . . . . . 47
Takfönster
Monterings- och bruksanvisning . . . 54
Takvindu
Monterings- og bruksanvisning . . . . 61
Kattoikkuna
Asennus- ja käyttöohje . . . . . . . . . . 68
Окно для крыши
Инструкция по монтажу и
эксплуатации . . . . . . . . . . . . . . . . . 75
DE
EN
FR
ES
IT
NL
DA
SV
NO
FI
RU
Okno dachowe
Instrukcja montażu i obsługi . . . . . . 83
Střešní okno
Návod k montáži a obsluze. . . . . . . 90
Strešné okno
Návod na montáž a uvedenie do
prevádzky . . . . . . . . . . . . . . . . . . . . 97
PL
CS
SK
Mini Heki S

DE
Erklärung der Symbole Mini Heki S
2
Bitte lesen Sie diese Anleitung vor Einbau und Inbetriebnahme sorg-
fältig durch und bewahren Sie sie auf. Geben Sie sie im Falle einer
Weitergabe des Produktes an den Nutzer weiter.
Inhaltsverzeichnis
1 Erklärung der Symbole . . . . . . . . . . . . . . . . . . . . . . . . . . . . . . . . . . . 2
2 Sicherheits- und Einbauhinweise. . . . . . . . . . . . . . . . . . . . . . . . . . . . 3
3 Lieferumfang . . . . . . . . . . . . . . . . . . . . . . . . . . . . . . . . . . . . . . . . . . . 4
4 Zubehör . . . . . . . . . . . . . . . . . . . . . . . . . . . . . . . . . . . . . . . . . . . . . . . 4
5 Bestimmungsgemäßer Gebrauch . . . . . . . . . . . . . . . . . . . . . . . . . . . 4
6 Hinweise vor dem Einbau . . . . . . . . . . . . . . . . . . . . . . . . . . . . . . . . . 5
7 Mini Heki S montieren . . . . . . . . . . . . . . . . . . . . . . . . . . . . . . . . . . . . 6
8 Mini Heki S benutzen . . . . . . . . . . . . . . . . . . . . . . . . . . . . . . . . . . . . . 7
9 Mini Heki S pflegen und reinigen . . . . . . . . . . . . . . . . . . . . . . . . . . . . 8
10 Gewährleistung . . . . . . . . . . . . . . . . . . . . . . . . . . . . . . . . . . . . . . . . . 8
11 Entsorgung. . . . . . . . . . . . . . . . . . . . . . . . . . . . . . . . . . . . . . . . . . . . . 8
1 Erklärung der Symbole
!VORSICHT!
Sicherheitshinweis: Nichtbeachtung kann zu Verletzungen
führen.
AACHTUNG!
Nichtbeachtung kann zu Materialschäden führen und die Funktion
des Produktes beeinträchtigen.
IHINWEIS
Ergänzende Informationen zur Bedienung des Produktes.
➤Handlung: Dieses Symbol zeigt Ihnen, dass Sie etwas tun müssen. Die
erforderlichen Handlungen werden Schritt für Schritt beschrieben.

DE
Mini Heki S Sicherheits- und Einbauhinweise
3
✓Dieses Symbol beschreibt das Ergebnis einer Handlung.
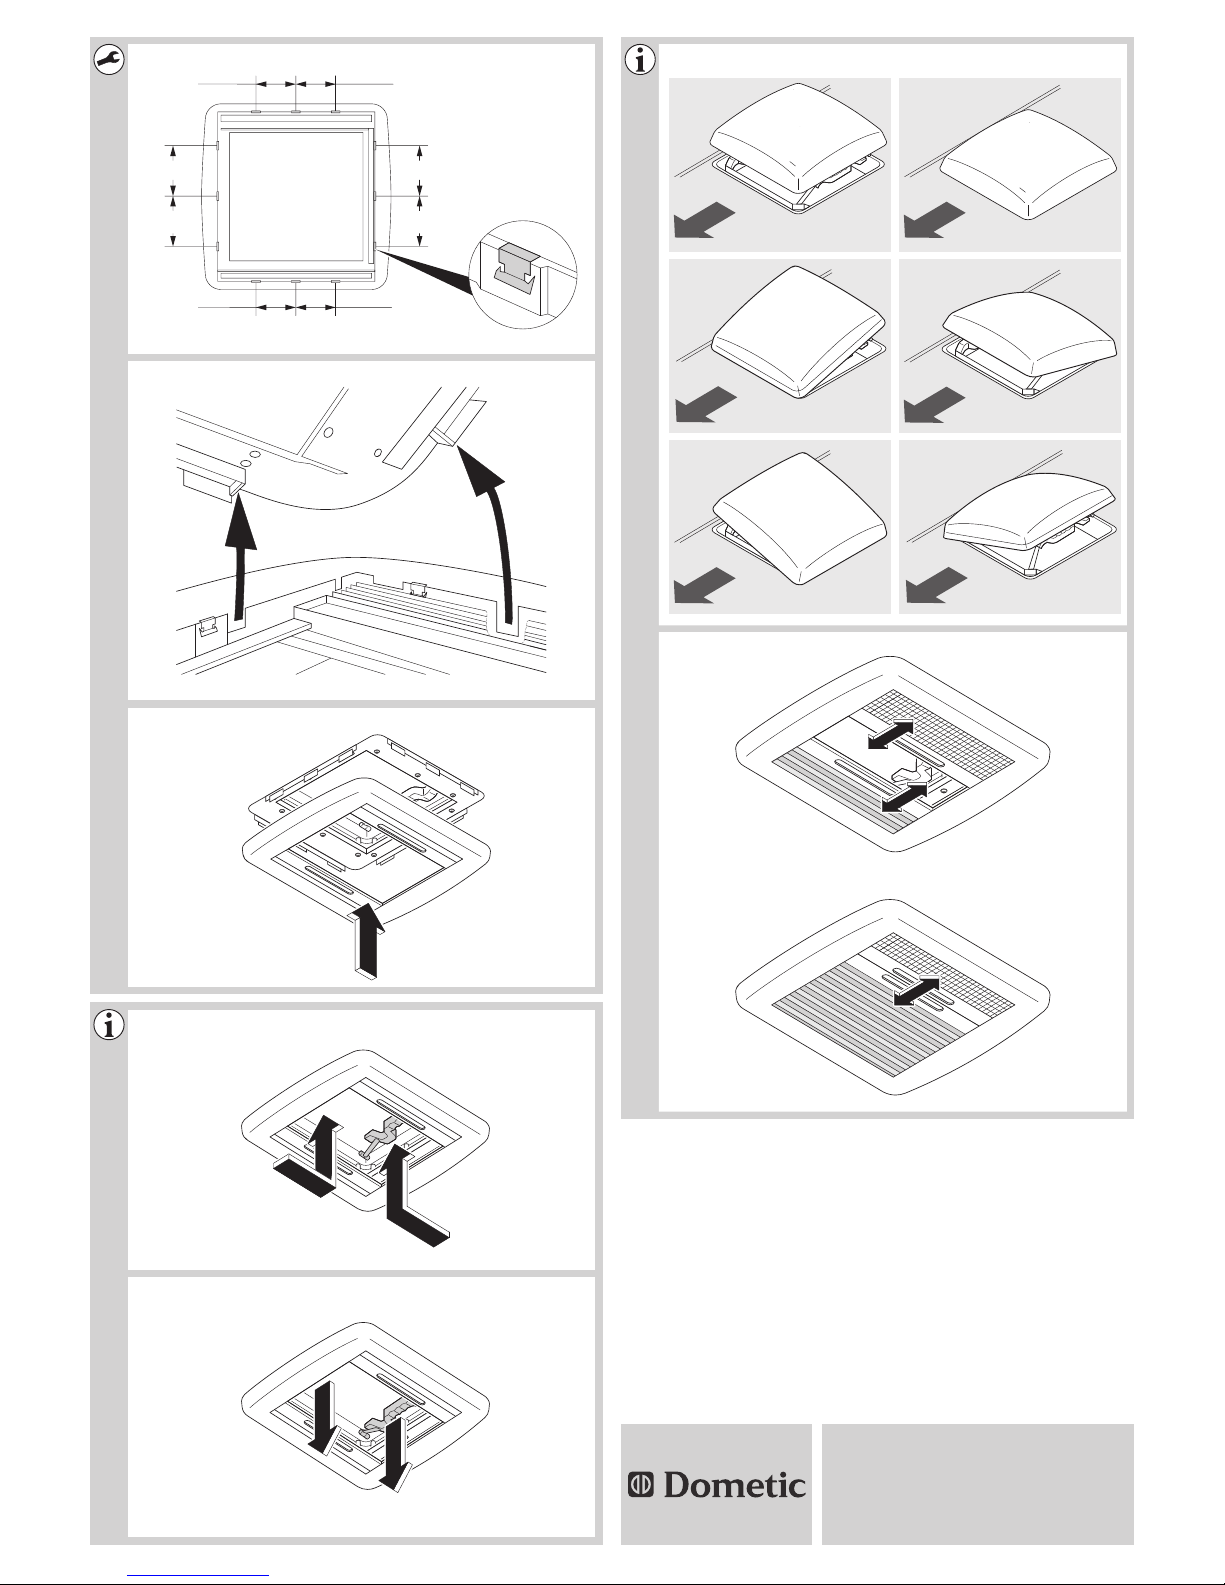
Abb. 15, Seite 3: Diese Angabe weist Sie auf ein Element in einer Abbil-
dung hin, in diesem Beispiel auf „Position 5 in Abbildung 1 auf Seite 3“.
2 Sicherheits- und Einbauhinweise
Beachten Sie die vom Fahrzeughersteller und vom Kfz-Handwerk vor-
geschriebenen Sicherheitshinweise und Auflagen!
Der Hersteller übernimmt in folgenden Fällen keine Haftung für Schäden:
Beschädigungen am Produkt durch mechanische Einflüsse
Veränderungen am Produkt ohne ausdrückliche Genehmigung vom
Hersteller
Verwendung für andere als die in der Anleitung beschriebenen Zwecke
IHINWEIS
Wenn Sie nicht über ausreichende technische Kenntnisse zum
Einbauen von Komponenten in Fahrzeugen verfügen, sollten Sie
sich das Dachfenster von einem Fachmann ins Fahrzeug einbauen
lassen.
Beachten Sie folgende Hinweise:
Suchen Sie umgehend eine Fachwerkstatt auf, wenn Fehler oder
Störungen auftreten.
Einbruchgefahr! Betreten Sie die Glaskuppel nicht.
Kontrollieren Sie vor Fahrtantritt, ob das Dachfenster ordnungsgemäß
verriegelt ist.
Kontrollieren Sie vor Fahrtantritt das Dachfenster auf Beschädigungen
(z. B. Spannungsrisse im Acrylglas).
Öffnen Sie das Dachfenster nicht während der Fahrt.
Öffnen Sie das Dachfenster nicht bei starkem Wind oder Regen.
Schließen Sie das Dachfenster bei Regen und Schneefall.
Verlassen Sie das Fahrzeug nicht bei geöffnetem Dachfenster.
Halten Sie das Dachfenster schnee- und eisfrei.

DE
Lieferumfang Mini Heki S
4
3Lieferumfang
4 Zubehör
5 Bestimmungsgemäßer Gebrauch
Das Dachfenster Mini Heki S ist geeignet zum Einbau in Wohnwagen:
Dachstärken 23 – 42 mm: Art.-Nr. 9104100289
Dachstärken 43 – 60 mm: Art.-Nr. 9104100290
Nr. in
Abb. 1Menge Bezeichnung
1 1 Außenrahmen mit Glaskuppel
2 1 Montagerahmen
3 1 Innenrahmen
412
12
lange Befestigungsschraube
kurze Befestigungsschraube
5 12 Befestigungsklammer
Bezeichnung Artikel-Nr.
SunShade Dachhaubenabdeckung 9103500008
Spoiler 9104100260

DE
Mini Heki S Hinweise vor dem Einbau
5
6 Hinweise vor dem Einbau
➤Prüfen Sie vor der Montage die Dachstärke lhres Fahrzeugs. Bei Fragen
wenden Sie sich an den Fahrzeughersteller.
➤Beachten Sie bei der Wahl des Einbauortes:
– Angrenzende Bauteile (Dachreling oder Befestigungs- und Verstär-
kungsteile), Leitungen und Einbauschränke im Fahrzeuginnenraum
dürfen beim Sägen des Ausschnitts nicht beschädigt werden.
– Montieren Sie das Dachfenster nur an planen und parallelen Innen-
und Außendachflächen mit einer maximalen Schrägstellung von 15°
gegenüber der Horizontalen.
– Sie können einen vorhandenen Dachauschnitt verwenden, wenn das
Dachfenster hinein passt.
6.1 Ausschnitt ausarbeiten
Siehe Abb. 2
6.2 Verstärkungsleisten verwenden
Ergänzung zu Abb. 3
➤Klären Sie vor dem Einbau, ob der Dachausschnitt verstärkt werden
muss.
➤Entfernen Sie die Ausschäumung entsprechend der Breite Ihrer
Verstärkungsleisten (nicht im Lieferumfang) (A).
➤Passen Sie die Verstärkungsleisten ein (B).

DE
Mini Heki S montieren Mini Heki S
6
7 Mini Heki S montieren
Ergänzung zu Abb. 4
Der Lieferumfang enthält einen Montagerahmen, der entweder für die Dach-
stärken 23 – 42 mm oder für die Dachstärken 43 – 60 mm geeignet ist:
Dachstärken 23 – 42 mm: Art.-Nr. 9104100289
Dachstärken 43 – 60 mm: Art.-Nr. 9104100290
➤Messen Sie Ihre Dachstärke W.
➤Kürzen Sie die Hülsen auf das Maß H (siehe Tabelle).
➤Verwenden Sie die Schrauben mit der passenden Länge (siehe Tabelle).
Siehe Abb. 5
➤Prüfen Sie, ob das Dachfenster rundum genügend Abstand (ca. 1 bis
2 mm) zum Dachausschnitt hat.
Siehe Abb. 6
➤Reinigen Sie den Dachausschnitt im Montagebereich.
Siehe Abb. 7
AACHTUNG!
Beachten Sie die Hinweise des Dichtmittel-Herstellers.
➤Dichten Sie den Montagerahmen mit einem plastischen nicht aus-
härtenden Butyldichtstoff (z. B. Sika-Lastomer-710) ab.
Siehe Abb. 8
➤Beachten Sie bei der Montage die Fahrtrichtung.
➤Setzen Sie den Außenrahmen mittig in den Dachausschnitt ein.
Siehe Abb. 9
➤Montieren Sie den Montagerahmen.
➤Ziehen Sie die Schrauben 10 Minuten nach der Montage nach.
Siehe Abb. 0
➤Montieren Sie die Befestigungsklammern in den angegebenen
Abständen am Innenrahmen.

DE
Mini Heki S Mini Heki S benutzen
7
Siehe Abb. a
➤Setzen Sie den Innenrahmen in den Montagerahmen ein.
Siehe Abb. b
➤Drücken Sie den Innenrahmen auf den Montagerahmen.
➤Prüfen Sie nach der Montage die Funktion des Dachfensters.
➤Ziehen Sie die PE-Schutzfolie vom Acrylglas ab.
IHINWEIS
Falls die PE-Schutzfolie zu lange dem Sonnenlicht ausgesetzt war,
kann sie nicht mehr rückstandsfrei abgelöst werden.
➤Lassen Sie die geänderte Fahrzeughöhe und das geänderte Gewicht in
die Fahrzeugpapiere eintragen, falls erforderlich.
8 MiniHekiSbenutzen
8.1 Mini Heki S öffnen und schließen (Abb. cbis
Abb. e)
➤Öffnen und schließen Sie das Dachfenster wie dargestellt.
8.2 Rollos öffnen und schließen (Abb. f)
AACHTUNG! Beschädigungsgefahr durch Hitzestau zwischen
Rollo und Glasscheibe
Bei starker Sonneneinstrahlung dürfen Sie das Verdunklungsrollo
nur zu zwei Dritteln schließen.
IHINWEIS
Sie können das Verdunklungsrollo und das Insektenschutzrollo
unabhängig voneinander stufenlos verstellen.
➤Greifen Sie in die Griffmulde des jeweiligen Rollos, und ziehen Sie es in
die gewünschte Stellung.

DE
Mini Heki S pflegen und reinigen Mini Heki S
8
9 Mini Heki S pflegen und reinigen
AACHTUNG!
Keine scharfen oder harten Mittel zur Reinigung verwenden, da
dies zu einer Beschädigung des Acrylglases führen kann.
Verwenden Sie ausschließlich die vom Hersteller empfohlenen
Reinigungsmittel: Acrylglas-Politur (Art.-Nr. 9104100242), Spezial-
Politurtuch (Art.-Nr.9104100243) und Acrylglas-Reiniger
(Art.-Nr.9104100244).
IHINWEIS
Bei starker Sonneneinstrahlung trübt sich die Dachkuppel. Sie wird
wieder klar, sobald sie sich abkühlt.
➤Reinigen Sie die Rollos mit milder Seifenlauge und viel Wasser.
10 Gewährleistung
Es gilt die gesetzliche Gewährleistungsfrist. Sollte das Produkt defekt sein,
wenden Sie sich bitte an einen Service-Partner in Ihrem Land (Adressen
siehe Rückseite der Anleitung).
Unsere Spezialisten helfen Ihnen gerne weiter und besprechen mit Ihnen
den weiteren Verlauf der Gewährleistung.
11 Entsorgung
➤Geben Sie das Verpackungsmaterial möglichst in den entsprechenden
Recycling-Müll.
MWenn Sie das Produkt endgültig außer Betrieb nehmen, infor-
mieren Sie sich bitte beim nächsten Recyclingcenter oder bei
Ihrem Fachhändler über die zutreffenden Entsorgungsvorschriften.

EN
Mini Heki S Explanation of symbols
9
Please read this instruction manual carefully before installation and
first use, and store it in a safe place. If you pass on the product to an-
other person, hand over this instruction manual along with it.
Table of contents
1 Explanation of symbols . . . . . . . . . . . . . . . . . . . . . . . . . . . . . . . . . . . 9
2 Safety and installation instructions. . . . . . . . . . . . . . . . . . . . . . . . . . 10
3 Scope of delivery . . . . . . . . . . . . . . . . . . . . . . . . . . . . . . . . . . . . . . . 11
4 Optional extras. . . . . . . . . . . . . . . . . . . . . . . . . . . . . . . . . . . . . . . . . 11
5 Intended use . . . . . . . . . . . . . . . . . . . . . . . . . . . . . . . . . . . . . . . . . . 11
6 Instructions before installation . . . . . . . . . . . . . . . . . . . . . . . . . . . . . 12
7 Installing the Mini Heki S . . . . . . . . . . . . . . . . . . . . . . . . . . . . . . . . . 13
8 Using Mini Heki S. . . . . . . . . . . . . . . . . . . . . . . . . . . . . . . . . . . . . . . 14
9 Maintaining and cleaning Mini Heki S . . . . . . . . . . . . . . . . . . . . . . . 15
10 Guarantee . . . . . . . . . . . . . . . . . . . . . . . . . . . . . . . . . . . . . . . . . . . . 15
11 Disposal . . . . . . . . . . . . . . . . . . . . . . . . . . . . . . . . . . . . . . . . . . . . . . 15
1 Explanation of symbols
!CAUTION!
Safety instruction: Failure to observe this instruction can lead to
injury.
ANOTICE!
Failure to observe this instruction can cause material damage and
impair the function of the product.
INOTE
Supplementary information for operating the product.
➤Action: This symbol indicates that action is required on your part. The
required action is described step-by-step.

EN
Safety and installation instructions Mini Heki S
10
✓This symbol describes the result of an action.
fig. 15, page 3: This refers to an element in an illustration. In this case,
item 5 in figure 1 on page 3.
2 Safety and installation instructions
Please observe the prescribed safety instructions and stipulations
from the vehicle manufacturer and service workshops.
The manufacturer accepts no liability for damage in the following cases:
Damage to the product resulting from mechanical influences
Alterations to the product without express permission from the manu-
facturer
Use for purposes other than those described in the operating manual
INOTE
If you do not have sufficient technical knowledge for installing the
components in vehicles, you should have a specialist install the
roof window in your vehicle.
Please note the following:
If faults or disturbances occur, consult a specialist workshop immediately.
Risk of breakage! Do not tread on the glass dome.
Before starting your journey, check that the roof window is locked
properly.
Before starting your journey, check the roof window for damage (such as
tension cracks in the acrylic glass).
Do not open the roof window while driving.
Do not open the window in strong wind or rain.
Close the roof window if it rains or snows.
Do not leave the vehicle with the roof window open.
Keep the roof window free of snow and ice.

EN
Mini Heki S Scope of delivery
11
3 Scope of delivery
4 Optional extras
5 Intended use
The Mini Heki S roof light is suitable for installing in caravans:
Roof thicknesses 23–42 mm: Item no. 9104100289
Roof thicknesses 43–60 mm: Item no. 9104100290
No. in
fig. 1Quantity Designation
1 1 Outer frame with glass dome
2 1 Mounting frame
3 1 Inner frame
412
12
Long fastening screws
Short fastening screws
5 12 Fastening clip
Designation Item no.
SunShade roof hood cover 9103500008
Spoiler 9104100260

EN
Instructions before installation Mini Heki S
12
6 Instructions before installation
➤Before installation, check the roof thickness of your vehicle. Consult the
vehicle manufacturer if you have any questions.
➤When choosing the installation location, observe the following:
– Adjoining components (roof rack or attachment and reinforcing parts),
cables and cabinets in the vehicle interior must not be damaged when
sawing the hole.
– Only fit the roof light on flat and parallel interior and exterior roof areas
with a maximum inclination of 15° to the horizontal.
– You may use an existing roof hole provided the roof light fits into it.
6.1 Pressing out the hole
See fig. 2
6.2 Using the reinforcing rails
Supplementary to fig. 3
➤Before installation, check whether the roof hole needs reinforcing.
➤Remove the foam according to the width of your reinforcing rail (not in
scope of delivery) (A).
➤Fit the reinforcing rails (B).

EN
Mini Heki S Installing the Mini Heki S
13
7 Installing the Mini Heki S
Supplementary to fig. 4
The scope of delivery contains a mounting frame, which is suitable for roof
thicknesses of 23–42 mm or 43–60 mm:
Roof thicknesses 23–42 mm: Item no. 9104100289
Roof thicknesses 43–60 mm: Item no. 9104100290
➤Measure your roof thickness W.
➤Shorten the sleeves to size H (see table).
➤Use the screws with appropriate lengths (see table).
See fig. 5
➤Check that the roof light has sufficient space around (approx. 1 to 2 mm)
it in the roof opening.
See fig. 6
➤Clean the roof opening in the mounting area.
See fig. 7
ANOTICE!
Observe the instructions of the sealant manufacturer.
➤Seal the mounting frame with a flexible non-hardening sealing compound
(e.g. Sika - Lastomer-710).
See fig. 8
➤Observe the direction of travel when installing.
➤Place the outer frame in the middle of the roof opening.
See fig. 9
➤Install the mounting frame.
➤Tighten the screws 10 minutes after installation.
See fig. 0
➤Install the fastening clips on the inner frame at the specified distances.

EN
Using Mini Heki S Mini Heki S
14
See fig. a
➤Fit the inner frame into the mounting frame.
See fig. b
➤Push the inner frame onto the mounting frame.
➤After installing, check the roof light works properly.
➤Remove the protective film from the acrylic glass.
INOTE
If the protective film is exposed to sunlight for too long, it cannot be
taken off without leaving a residue.
➤If necessary, enter the new vehicle height and weight in the vehicle doc-
uments.
8 Using Mini Heki S
8.1 Opening and closing the Mini Heki S (fig. cto
fig. e)
➤Open and close the roof light as shown.
8.2 Opening and closing the roller blinds (fig. f)
ANOTICE! Risk of damage due to a build-up of heat between
the roller blind and the window.
In strong sunlight, only close the blackout roller blind two thirds of
the way.
INOTE
You can adjust the blackout roller blind and the flyscreen
separately.
➤Hold the recessed handle of the roller blind and pull it into the required po-
sition.

EN
Mini Heki S Maintaining and cleaning Mini Heki S
15
9 Maintaining and cleaning Mini Heki S
ANOTICE!
Do not use any sharp or hard objects for cleaning since they may
damage the acrylic glass.
Only use cleaning agents that are approved by the manufacturer.
Acrylic glass polish (item no. 9104100242), special polishing cloth
(item no. 9104100243) and acrylic glass cleaning agent (item no.
9104100244).
INOTE
The roof dome clouds over in bright sunshine. It becomes clear
again as soon as it cools down.
➤Clean the roller blind with mild soap and plenty of water.
10 Guarantee
The statutory warranty period applies. If the product is defective, please
contact the service partner in your country (addresses on the back on the
instruction manual).
Our experts will be happy to help you and will discuss the warranty process
with you in more detail.
11 Disposal
➤Place the packaging material in the appropriate recycling waste bins
wherever possible.
MIf you wish to finally dispose of the product, ask your local recycling
centre or specialist dealer for details about how to do this in
accordance with the applicable disposal regulations.

FR
Mini Heki S
16
Veuillez lire attentivement cette notice avant le montage et la mise en
service. Veuillez ensuite la conserver. En cas de passer le produit,
veuillez le transmettre au nouvel acquéreur.
Table des matières
1 Explication des symboles. . . . . . . . . . . . . . . . . . . . . . . . . . . . . . . . . 17
2 Consignes de sécurité et instructions de montage . . . . . . . . . . . . . 17
3 Contenu de la livraison . . . . . . . . . . . . . . . . . . . . . . . . . . . . . . . . . . 18
4 Accessoires . . . . . . . . . . . . . . . . . . . . . . . . . . . . . . . . . . . . . . . . . . . 18
5 Usage conforme. . . . . . . . . . . . . . . . . . . . . . . . . . . . . . . . . . . . . . . . 19
6 Consignes préalables au montage . . . . . . . . . . . . . . . . . . . . . . . . . 19
7 Montage du Mini Heki S. . . . . . . . . . . . . . . . . . . . . . . . . . . . . . . . . . 20
8 Utilisation du Mini Heki S . . . . . . . . . . . . . . . . . . . . . . . . . . . . . . . . . 21
9 Entretien et nettoyage du Mini Heki S . . . . . . . . . . . . . . . . . . . . . . . 22
10 Garantie . . . . . . . . . . . . . . . . . . . . . . . . . . . . . . . . . . . . . . . . . . . . . . 23
11 Elimination . . . . . . . . . . . . . . . . . . . . . . . . . . . . . . . . . . . . . . . . . . . . 23

FR
Mini Heki S Explication des symboles
17
1 Explication des symboles
!ATTENTION !
Consigne de sécurité : le non-respect de ces consignes peut
entraîner des blessures.
AAVIS !
Le non-respect de ces consignes peut entraîner des dommages
matériels et des dysfonctionnements du produit.
IREMARQUE
Informations complémentaires sur l'utilisation du produit.
➤Manipulation : ce symbole vous indique une action à effectuer. Les
manipulations à effectuer sont décrites étape par étape.
✓Ce symbole décrit le résultat d’une manipulation.
fig. 15, page 3 : cette information renvoie à un élément figurant sur une
illustration, dans cet exemple à la « position 5 de l'illustration 1 à la page 3 ».
2 Consignes de sécurité et instructions
de montage
Respectez les consignes de sécurité et autres prescriptions imposées
par le fabricant du véhicule et par les professionnels de l’automobile !
Le fabricant décline toute responsabilité pour des dommages dans les cas
suivants :
des influences mécaniques ayant endommagé le matériel
des modifications apportées au produit sans autorisation explicite de la
part du fabricant
une utilisation différente de celle décrite dans la notice

FR
Contenu de la livraison Mini Heki S
18
IREMARQUE
Si vos connaissances techniques en matière d’installation d’élé-
ments dans un véhicule sont insuffisantes, nous vous recomman-
dons de faire installer le dôme de toit par un spécialiste.
Tenez compte des remarques suivantes :
Contactez immédiatement une entreprise spécialisée si des pannes ou
des dysfonctionnements surviennent.
Risque de rupture ! Ne marchez pas sur le dôme de toit.
Vérifiez avant le départ que le dôme de toit est correctement verrouillé.
Avant le départ, vérifiez que le dôme de toit ne présente aucun dommage
(p. ex. des fissures dues aux tensions dans le plexiglas).
N’ouvrez pas le dôme de toit pendant le trajet.
N’ouvrez pas le dôme de toit en cas de fort vent ou de forte pluie.
Fermez le dôme de toit en cas de pluie et de neige.
Ne quittez pas le véhicule en laissant le dôme de toit ouvert.
Protégez le dôme de toit de la neige et de la glace.
3 Contenu de la livraison
N° dans
fig. 1Quantité Désignation
1 1 Cadre extérieur avec dôme en verre
2 1 Cadre de montage
3 1 Cadre intérieur
412
12
Longue vis de fixation
Courte vis de fixation
5 12 Pince de fixation
Table of contents
Languages:
Other Dometic Motorhome manuals