manuals.online logo
Brands
  1. Home
  2. •
  3. Brands
  4. •
  5. Domex
  6. •
  7. Storage
  8. •
  9. Domex DMX-8611FC2 User manual

Domex DMX-8611FC2 User manual

Popular Storage manuals by other brands

IBM 40/80 GB HH DLTVS user guide

IBM

IBM 40/80 GB HH DLTVS user guide

Synology DiskStation DS716+II Quick installation guide

Synology

Synology DiskStation DS716+II Quick installation guide

Vantec NexStar-HX4 user manual

Vantec

Vantec NexStar-HX4 user manual

LaCie Christofle Galet datasheet

LaCie

LaCie Christofle Galet datasheet

LaCie Rugged Thunderbolt user manual

LaCie

LaCie Rugged Thunderbolt user manual

OCZ IBIS datasheet

OCZ

OCZ IBIS datasheet

Transcend JetFlash 110 Brochure & specs

Transcend

Transcend JetFlash 110 Brochure & specs

QNAP TS 32PXU Series user guide

QNAP

QNAP TS 32PXU Series user guide

LaCie RUGGED RAID user manual

LaCie

LaCie RUGGED RAID user manual

Freecom CLS DOCK Quick install guide

Freecom

Freecom CLS DOCK Quick install guide

PNY Attache P-FD64MBATT3 install guide

PNY

PNY Attache P-FD64MBATT3 install guide

OWC Mercury Elite Pro Dual mini Assembly manual

OWC

OWC Mercury Elite Pro Dual mini Assembly manual

OLT 6x6 Maximizer Assembly manual

OLT

OLT 6x6 Maximizer Assembly manual

Transcend JetFlash 160 Specifications

Transcend

Transcend JetFlash 160 Specifications

Thunderbolt 600 user manual

Thunderbolt

Thunderbolt 600 user manual

Intel RAID High Availability user guide

Intel

Intel RAID High Availability user guide

LaCie 12big Thunderbolt 3 Quick install guide

LaCie

LaCie 12big Thunderbolt 3 Quick install guide

Spectra Logic T-Series Spectra T50e quick start guide

Spectra Logic

Spectra Logic T-Series Spectra T50e quick start guide

manuals.online logo
manuals.online logoBrands
  • About & Mission
  • Contact us
  • Privacy Policy
  • Terms and Conditions

Copyright 2025 Manuals.Online. All Rights Reserved.

Smart
PhotoStorage CD-RW
DMX-8611FC2
Operation Manual
Revision 1 1
© DOMEX TECHNOLOGY CORP. All rights reserved.
This manual may not be copied in any media or form without the written consent of DOMEX.
www.domex.com.tw
TEL : 886-3-5772115
FAX : 886-3-5772558
Contents_______________________________________
1.Indroduction
1.1 Features ------------------------------------------------------------------- ii
1.2 Safety Guide ------------------------------------------------------------- ii
2. Product Description
2.1 Top View ------------------------------------------------------------------01
2.2 Front View ----------------------------------------------------------------01
2.3 Rear View -----------------------------------------------------------------01
2. Side View -----------------------------------------------------------------01
3. Installation
3.1 Hardware Installation
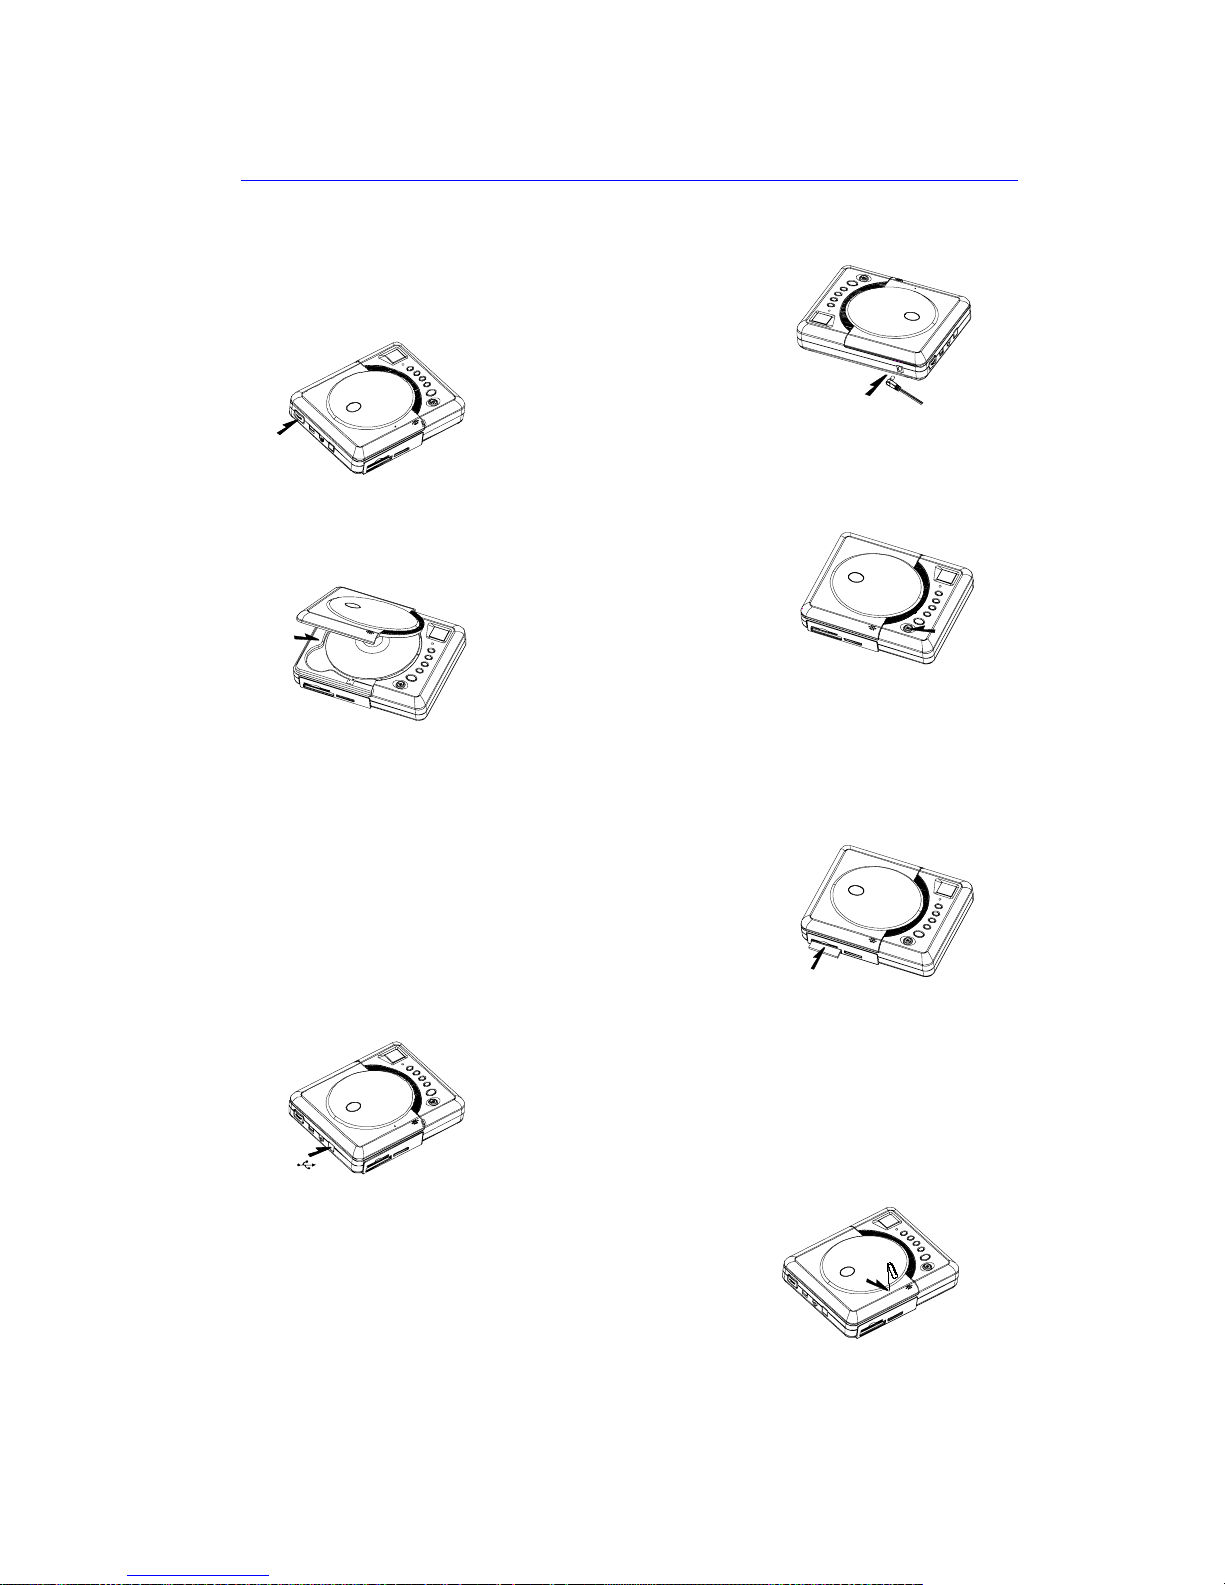
* Before To Use! ----------------------------------------------------------02
* How to Load & Remove a Disc -------------------------------------02
* How to Insert & Remove a Flash Memory Card ----------------02
* How to Connect to Computer -------------------------------------02
* How to Emergency Eject --------------------------------------------02
3.2 Device Driver & Burning Software Installation
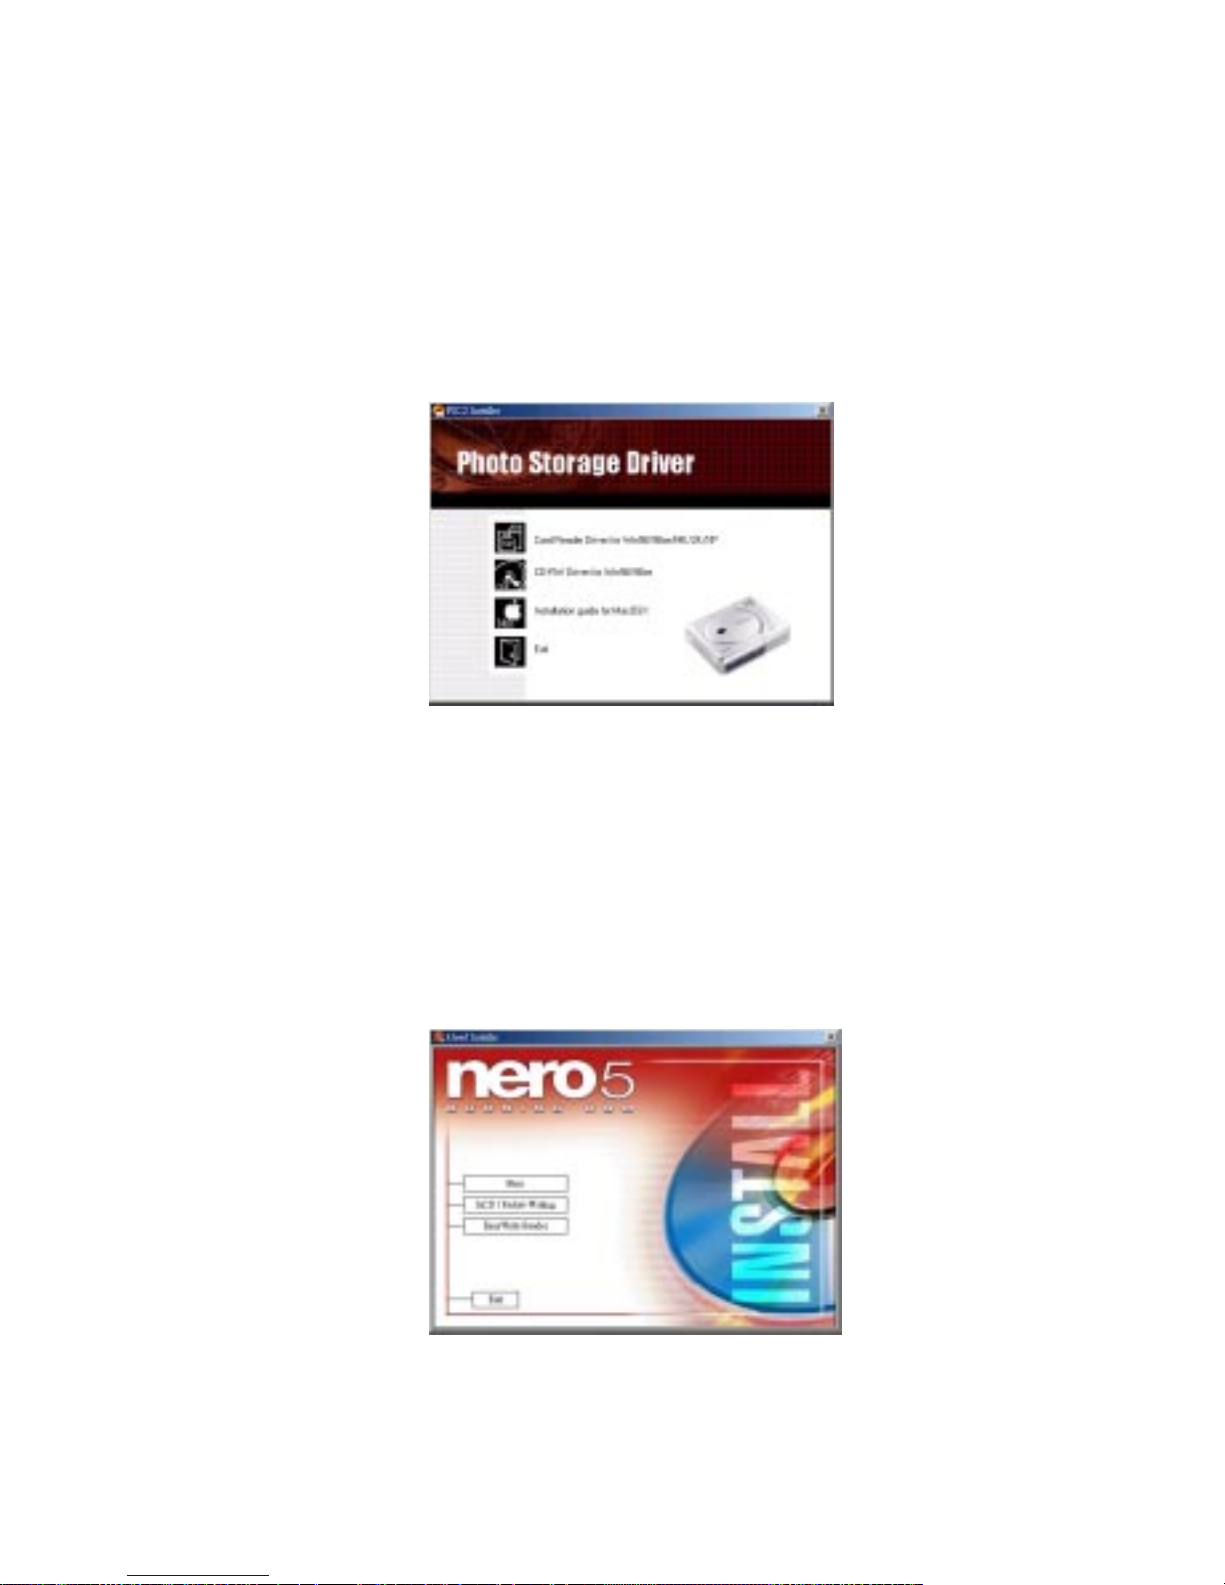
* Installing the USB Driver ---------------------------------------------03
* Installing the Burning Software ------------------------------------03
. Operation Instructions
.1 Basic Operation Mode
* Duplicate ------------------------------------------------------------------0
* Duplicate & Verify -------------------------------------------------------05
* Audio Play ----------------------------------------------------------------06
* External Mode -----------------------------------------------------------07
* Erase CD-RW Disc -------------------------------------------------------07
.2 Advance Operation Mode
* Firmware Upgrade ------------------------------------------------------08
* Time Zone Setup ------------------------------------------------------08
5. Hardware Spec. ---------------------------------------------------------------------09
6. Appendix
6.1 LCD Code List ------------------------------------------------------------10
6.2 Time Zone List ----------------------------------------------------------10
6.3 Driver Compatibility List ------------------------------------------------12
i
1 Introduction__________________________________
This DigitalStorage device provides an friendly way to duplicate your digital data
to CD-R/CD-RW without connecting to a computer. You can record your favorite
digital photo and others files from Flash card or Computer to CD-R/CD-RW. The
DigitalStorage device supports 7 different flash card formats: CF, MD (TypeI/
TypeII), SM, MMC, SD, MS and MS pro. This device can be easily used at anytime
and anywhere.
1 1 Features
* Digital Photo Storage Device
* Data Backup from Card Reader to CD-R/CD-RW without linking to a Computer
* Friendly LCD Functions Indicator
* High-Speed USB 2.0 interface
* Support various Flash Memory Card
1 2 Safety Guide
This product is equipped with a laserdevice. Be sure to observe the following
precautions when operating. Failure to observe these precautions could result
in fire, bodily injury and damage to the equipment.
1. Do not operate the controls, make any adjustments, or perform any procedures other
than as specified in this manual
2. Allow only authorized service technicians to repair the laser equipment.
Do not open the top cover of this device when it is in operating mode because
of invisible laser radiation. Avoid direct exposure to the laser beam.
Warning:
TO REDUCETHE RISK OF FIRE, ELECTRIC SHOCK OR PRODUCT DAMAGE,
DO NOT EXPOSE THIS APPARATUS TO RAIN, MOISTURE, DRIPPING OR
SPLASHING AND THAT NO OBJECTS FILLED WITH LIQUIDS, SUCH AS VASES,
SHALL BE PLACED ON THE APPARATUS.
ii
2 Product Description________________________________
2 1 Top View
1. Clear Window: To see the Disc in the
compartment.
2. LCD Panel: To show the status of the device
3. LED: Green light for ready. Orange light for
busy.
. Backward: To return to the previous track or
number
5. Forward: To skip the next track or number
6. Stop: To stop the disc playing
7. Mode: To combine other buttons for different
functions
8. Play/ REC: To play and duplicate
9. Open: To open the top cover for disc loading
10. Eject hole: for emergency eject.
1.
2.
3.
4.
5.
6.
7.
8.
9.
10.
2 2 Front View
1. The Top Cover: To protect the Disc during
playback
2. SM slot: To support Smart Media Card
3. CF/MD: To support Compact Flash Card
type I / type II
. SD/MMC/MS: To support Security Digital Card,
MultiMedia Card and Memory Stick
2 3 Rear View
1. DC IN 12V: Power connector (DC in)
1.
2 4 Side View
1. Power: Press this button to turn on / off the
power
2. Volume: To adjust the sound level
3. Phones: To connect the headphones
. USB: USB 2.0 connector
1.
2.
4.
3.
1.
2.
3.
4.
1
* How to Connect to Computer?
1. Press the power button to turn on the device.
2. Connect the computer and the device with the
USB cable. as Fig 6
* How to Emergency Eject?
1. Turn off the Power.
2. Insert a straightened paper clip into the eject hole
then the lid will be ejected. as Fig 7
Note If the lid can not open automatically, press the Open button.
* How to Load & Remove a Disc?
1. Press the Open button
to lift the lid on the device. as Fig 3
2. Put a Disc on the tray or remove
a Disc from the tray. as Fig
3. Close the lid.
3 Installation______________________________________
3 1 Hardware Installation
* Before To Use !
1. Remove the device from package.
2. Plug the power cord and adapter.
3. Put the plug of adapter into the
socket  DC IN 12V .
. Insert the plug of power cord into
the outlet. as Fig 1
5. Turn on the Power Button. as Fig 2
* How to Insert & Remove a Flash Memory Card?
1. Insert or remove your flash memory card into (or from) one of the slots located
on the front panel of the device. a slot of device or
remove your flash memory card from the slot. as Fig 5
Note Please follow the memory card indicators on the
panel.
Fig 1
Fig 3
Fig 2
Fig
Fig 5
Fig 6
Fig 7
2
*Installing the Burning Software
1. Load the burning software Disc enclosed in the Package.
2. Turn on the Computer and load the Burning Software Disc to
the CD-ROM device.
3. Run the burning disk and follow the instructions on the screen that
software indicator. as Fig 9
3 2 Device Driver & Burning Software Installation
*Installing the USB Driver
1. Load the Driver Disc enclosed in the Package.
2. Turn on the Computer and load the Driver Disc to the CD-ROM
device.
3.Run the driver disk and follow the instructions on the screen that
software indicator. as Fig 8
Fig 8
Fig 9
3
4 Operation Installations_____________________________
4 1 Basic Operation Mode
* Duplicate:
1. Connect the power cable to the back of the device.
2. Power on the device and open the top cover.
3. Insert a Flash card to the Card reader and load a
CD-RW disk in the computer. as Fig 10
. Press the Play/ REC button to begin duplicat ing your
Flash card. as Fig 11
5. When duplicating is completed, a short beep will sound
6. Remove the Flash card and the Disc.
7. Please refer to the diagrams below.
Fig 10
Fig 11
Orange
Green
DUPL.
DUPL.
DUPL.
DUPL.
DUPL.
DUPL.
DUPL.
DUPL.
DUPL.
code
% left
% left
% left
over
Insert memory card
Press REC. Button
LED
LED
Show m e mor y ca rd s ou rce
Show d up licate s our ce a n d
Remaining capacity *ranges from 99 to 00
Duplicate data
Show the process from 99 to 00
Duplicate doneSource > target Duplicate failure
show error code
* Duplicate & Verify:
1. Connect the power cable to the back of the device.
2. Power on the device and open the top cover.
3. Insert a Memory card to the Card reader and a CD-RW disk to the
CD-RW drive.
. Press the Mode+Play/ REC buttons to duplicate your Flash
Memory card. as Fig 12
5. When duplicating is complete, a short beep will sound.
6. Remove the Flash Memory card and the Disc.
7. Please refer to the diagrams below.
DUPL.
DUPL.
DUPL.
DUPL.
DUPL.
DUPL.
DUPL.
DUPL.
DUPL.
DUPL.
DUPL.
% left
% left
Insert memory card
Press REC. ButtonMode +
LED
Show memory card source
Show duplicate source and
Remaining capacity
*ranges from 99 to
On duplicating
Show the process from 99 to
Duplicate and verify done
V
erify duplicate data
Show verify process from to 99
code
Duplicate failure
show error code
LED
Orange
Fig 12
Green
5