DoorBird A1071 Series User manual

1
Installation Manual (Pages 2-6)
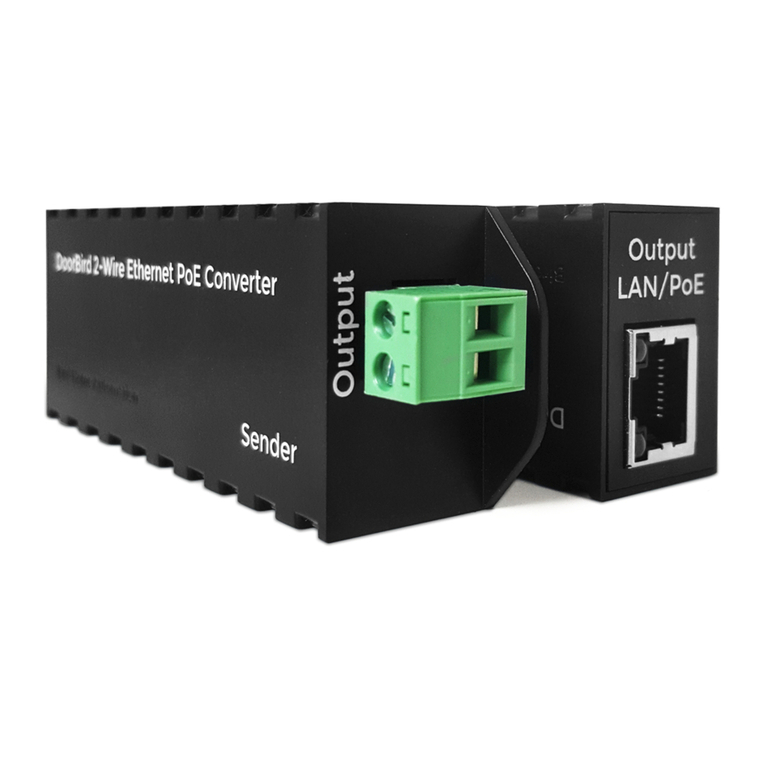
2-WIRE ETHERNET
POE CONVERTER
A1071 Series
VERSION ., MIN. HW .
Installationsanleitung (Seiten 7-11)
2-DRAHT ETHERNET
POE KONVERTER
A1071 Serie

22
Input LAN/PoE
RJ45 jack (with Diagnostic-LEDs) to
connect a standard Network cable Cat.5
or better, coming from the Internet
Router and PoE-Switch / PoE-Injector.
Output
To connect a 2-wire cable, going to
the Receiver.
Output LAN/PoE
RJ45 jack (with Diagnostic-LEDs) to
connect a standard Network cable Cat.5
or better, going to the device to supply
with PoE and network data.
Input
To connect the 2-wire cable, coming
from the Sender.
Sender
Receiver
1
2
3
4
INSTALLATION MANUAL
You can always find the most up-to-date version of the installation manual
on www.doorbird.com/support.
To make things easier we use the term ″Sender″ for the product ″2-Wire
Ethernet PoE Converter Sender″ and ″Receiver″ for the product ″2-Wire Ether-
net PoE Converter Receiver″.
COMPONENTS
Contents
1x Sender
1x Receiver
1x RJ45 network cable (300 cm)
1x RJ45 network cable (30 cm)
1x DIN-Rail adapter
1x Installation manual

3
ENGLISH
VIDEOS
Need help with the installation? Be sure to watch our installation videos
which can be found on http://www.doorbird.com/support.
Each individual step of the installation is clearly documented in the videos.
INSTALLATION
All steps below should be carried out carefully by a competent adult, taking
into consideration any applicable safety regulations. Should you have any
questions, please contact us or a competent specialist directly. Please ensure
that all wires used for the installation are undamaged along their entire
length and approved for this type of use.
Network speed and network components
Please ensure that the upload speed of your Internet connection is at least
0.5 Mbps. You can also carry out a speed test at any time via the DoorBird
App. The user experience is only as good as your network speed, network
stability and quality of your network components, such as your Internet router
and WiFi access points or WiFi repeaters. Please also make sure that your net-
work components are not older than two years, have been manufactured by a
well-known manufacturer, and have the latest firmware installed.
Should these requirements not be fulfilled, it may happen, for example that
the performance of audio and video is poor or push notifications are delayed
or do not arrive on your smartphone or tablet at all.
High-speed Internet (via landline): DSL, cable or optical fibre
Network: 802.11 b/g/n 2.4 GHz or Ethernet, with DHCP
STEP 1: SWITCHING OFF POWER
Switch off the power to all wires leading to the assembly location, i.e. the door
chime, electric door opener, power supply unit, PoE-Switch / PoE-Injector etc..
STEP 2: DETERMINING THE ASSEMBLY LOCATION
The Sender and Receiver are IP50 certified (not water-proof). Please make
sure to put them in a appropriate housing if you want to use them outdoors.

44
STEP 3: SENDER INSTALLATION
Place the Sender at he end of your network cable (coming from your Internet
Router followed by a PoE-Switch / PoE-Injector) and your 2-wire cable begins.
Connect the network cable to the RJ45 jack of the Sender and the 2-wire
cable to the Port ″1″ and ″2″ of the Sender. Please take care of the polarity of
the 2-wire cable (″1″ and ″2″).
A PoE-Switch (e.g. D-Link DGS-1008P) or PoE-Injector (e.g. DoorBird Gigabit
PoE Injector or TP-Link TL-PoE150S) in accordance with the PoE standard IEEE
802.3af Mode A (network cable wires 1, 2, 3 and 6) must be used to power the
Sender. You can find further information about PoE here:
http://www.doorbird.com/poe
A Cat.5 network cable with RJ45 plug or better must be used to connect to
the ″LAN/PoE″ jack of the Sender.
Caution: When using unshielded wires as 2-wire cable (e.g. simple bell-
wire) between the Sender and Receiver please make sure that no other
electricity-carrying wires are close to the 2-wire cable at any time.
Electricity creates a magnetic field which disturbs the transmission of
the Sender and Receiver seriously and leads to instable transmission
of power (PoE) and network data.
The 2-wire cable between the Sender
and Receiver are limited to maximum
length of 80 meters.
PoE +
Ethernet data
PoE +
Ethernet data

5
ENGLISH
STEP 4: RECEIVER INSTALLATION
Place the Receiver at the end of your 2-wire cable ends. Connect the 2-wire
cable coming from the Sender to the Port ″1″ and ″2″ of the Receiver. Please
take care of the polarity of the 2-wire cable (″1″ and ″2″). The port ″1″ of the
Sender must be connected to the port ″1″ of the Receiver and the port ″2″ of
the Sender must be connected to the port ″2″ of the Receiver.
Now connect a network cable to the RJ45 jack of the Receiver. A Cat.5
network cable with RJ45 plug or better must be used to connect to the
″LAN/PoE″ jack of the Receiver.
Connect the spare end of the network cable connected to the Receiver to the
device you would like to establish a PoE and network data connection with, e.g.
an IP Video Door Station or IP Camera.
STEP 5: ACTIVATING THE DEVICES
Switch on the power leading to the assembly location again. Make sure
to switch on power of the PoE-Switch / PoE-Injector you have connected the
Sender to.
The Diagnostic-LEDs of RJ45 jack of the Sender and Receiver should be blinking
and thus signaling an established power- (PoE) and network connection.
Please check the polarity of the 2-wire cable between the Sender and Receiver
and check also your PoE-Switch / PoE-Injector if the Diagnostic-LEDs are
not blinking.
DIAGNOSTIC-LEDS
You can check if the Sender and Receiver are properly connected by checking
the Diagnostic-LEDs. The Diagnostic-LEDs of RJ45 jack of the Sender and
Receiver should be blinking and thus signaling an established power- (PoE)
and network connection.

66
LEGAL NOTES
General remarks
1. DoorBird is a registered trademark of Bird
Home Automation GmbH.
2. Apple, the Apple logo, Mac, Mac OS, Macintosh,
iPad, Multi-Touch, iOS, iPhone and iPod touch are
trademarks of Apple Inc.
3. Google, Android and Google Play are trade-
marks of Google, Inc.
4. All other company and product names may
be trademarks of the respective companies with
which they are associated.
5. We reserve the right to make changes to our
products in the interests of technical advance-
ment. The products shown may also look different
from the products supplied based on ongoing en-
hancement.
6. Reproducing or using texts, illustrations and
photos from this instruction manual in any media
– even if only in the form of excerpts – shall only be
permitted with our express written consent.
7. The design of this manual is subject to copy-
right protection. We do not accept any liability for
any errors or any erroneous content or printing
errors (even in the case of technical specifications
or within graphics and technical sketches).
Product Liability Act
1. All products covered by this instruction manual
may only be used for the purpose specified. When
in doubt, consult a qualified specialist or our sup-
port team.
2. Products that are supplied with voltage (in
particular 110-240V mains voltage) need to be
disconnected from the power supply prior to
opening them or connecting cables.
3. Any losses or consequential damage caused
by intervention or changes made to our products
or improper handling are excluded from liability.
The same applies to improper storage or external
effects.
4. When dealing with 110-240V mains voltage
or with mains-operated or battery-operated
products, the applicable guidelines are to be
observed, e.g. guidelines on adhering to the
electromagnetic compatibility; or the low-voltage
directive. The respective work should only be
carried out by a qualified specialist.
5. Our products are in compliance with all
technical guidelines and telecommunications
regulations applicable in Germany, the EU and
the USA.
Publisher
Bird Home Automation GmbH
Joachimsthaler Str. 12
10719 Berlin
Germany
Web: www.doorbird.com
Email: [email protected]

7
Input LAN/PoE
RJ45 Buchse (mit Diagnose-LEDs) um
ein Standard Netzwerkkabel Cat.5
oder besser, vom Internet Router und
PoE-Switch / PoE-Injektor kommend,
anzuschließen.
Output
Für den Anschluss eines 2-Draht Kabels,
das zum Empfänger geht.
Output LAN/PoE
RJ45 Buchse (mit Diagnose-LEDs) um
ein Standard Netzwerkkabel Cat.5 oder
besser anzuschließen, das zu dem Gerät
geht, das Sie mit PoE und Netzwerk-
daten versorgen möchten.
Input
Für den Anschluss eines 2-Draht Kabels,
das vom Sender kommt.
Sender
Empfänger
1
2
3
4
INSTALLATIONSANLEITUNG
Die stets aktuelle Version der Installationsanleitung finden Sie unter
www.doorbird.com/de/support.
Zur Vereinfachung der Begriffe verwenden wir „Sender“ für das Produkt
„2-Draht Ethernet PoE Konverter Sender“ sowie „Empfänger“ für das Produkt
„2-Draht Ethernet PoE Konverter Empfänger“.
KOMPONENTEN
Inhalt
1x Sender
1x Empfänger
1x RJ45 Netzwerkkabel (300 cm)
1x RJ45 Netzwerkkabel (30 cm)
1x Hutschienenadapter
1x Installationsanleitung
DEUTSCH

8
VIDEOS
Sie können die Installation durch unsere Installationsvideos auf
www.doorbird.com/de/support begleiten lassen. In den Videos wird jeder
Installationsschritt einzeln und gut dokumentiert dargestellt.
INSTALLATION
Alle folgenden Schritte sollten von einem fachkundigen Erwachsenen sorg-
sam und unter Berücksichtigung sämtlicher geltender Schutzvorschriften
durchgeführt werden. Sollten Sie Fragen haben, wenden Sie sich bitte direkt
an uns oder einen kompetenten Fachmann. Achten Sie darauf, dass alle
Drähte, die Sie für die Installation verwenden, über die gesamte Länge un-
beschädigt und für die Verwendungsart zugelassen sind.
Netzwerkgeschwindigkeit und Netzwerkkomponenten
Stellen Sie sicher, dass Ihre Internetverbindung über mindestens 0,5 Mbit/s
Uploadgeschwindigkeit verfügt. Sie können über die DoorBird App jederzeit
auch einen Geschwindigkeitstest durchführen. Das Nutzererlebnis ist nur
so gut wie die Netzwerkgeschwindigkeit, Netzwerkstabilität und Qualität Ihrer
Netzwerkkomponenten, wie z.B. Ihr Internetrouter und W-LAN Access Point
oder W-LAN Repeater. Stellen Sie sicher, dass Ihre Netzwerkkomponenten nicht
älter als 2 Jahre sind, von einem namenhaften Hersteller gefertigt wurden und
über die neuste Firmware verfügen. Sind diese Voraussetzungen nicht erfüllt,
kann es z.B. dazu kommen, dass Audio- und Videoverbindungen schlecht sind
oder Push-Nachrichten verzögert oder gar nicht auf Ihrem Smartphone oder
Tablet ankommen.
High Speed Internet (Festnetz): DSL, Kabel oder Glasfaser
Netzwerk: 802.11b/g/n 2.4GHz oder Ethernet Netzwerk, mit DHCP
SCHRITT 1: STROM ABSCHALTEN
Schalten Sie den Strom sämtlicher zum Montageort führenden Leitungen
ab, d.h. z.B. den Strom für den Türgong, elektrischer Türöffner, PoE-Switch /
PoE-Injektor etc..
SCHRITT 2: MONTAGEORT FESTLEGEN
Sender und Empfänger sind IP50 zertifiziert (nicht wasserdicht).
Bitte verbauen Sie diese in einem geeigneten Gehäuse, falls Sie diese im
Freien einsetzen möchten.

99
DEUTSCH
SCHRITT 3: INSTALLATION DES SENDERS
Platzieren Sie den Sender an dem Ort, an dem Ihr Netzwerkkabel endet
(kommend vom Internet Router, gefolgt von einem PoE-Switch / PoE-Injektor)
und Ihr 2-Draht Kabel beginnt. Verbinden Sie das Netzwerkkabel mit der RJ45
Buchse des Senders und das 2-Draht Kabel mit dem Port „1“ und „2“ des Sen-
ders. Bitte beachten Sie die Polarität des 2-Draht Kabels („1“, „2“).
Zur Stromversorgung des Senders muss ein PoE-Switch (z.B. D-Link DGS-1008P)
oder PoE-Injektor (z.B. DoorBird Gigabit PoE Injektor oder TP-Link TL-PoE150S)
nach PoE Standard IEEE 802.3af Mode A (Netzwerkkabeladern 1, 2, 3, 6) ver-
wendet werden. Weiterführende Informationen zu PoE finden Sie hier:
http://www.doorbird.com/de/poe
Es muss zwingend ein Cat.5 Kabel oder besser zum Einsatz kommen, um es
mit der Buchse „LAN/PoE“ des Senders zu verbinden.
Achtung: Bei Verwendung von ungeschirmten Drähten als 2-adriges
Kabel (z.B. einfacher Klingeldraht) zwischen Sender und Empfänger ist
darauf zu achten, dass sich keine anderen stromführenden Drähte in
der Nähe des 2-adrigen Kabels befinden. Elektrizität erzeugt ein Magnet-
feld, das die Übertragung von Sender und Empfänger erheblich stört und
zu einer instabilen Übertragung von Strom (PoE) und Netzwerkdaten führt.
PoE +
Ethernet data
PoE +
Ethernet data
Das 2-Draht Kabel zwischen Sender
und Empfänger darf eine Länge von
80 Metern nicht überschreiten.

1010
SCHRITT 4: INSTALLATION DES EMPFÄNGERS
Platzieren Sie den Empfänger an dem Port, an dem Ihr 2-Draht Kabel endet.
Verbinden Sie das vom Sender kommende 2-Draht Kabel mit dem Port „1“ und
„2“ des Empfängers. Bitte beachten Sie die Polarität des 2-Draht Kabels („1“,
„2“). Der Port „1“ des Senders muss mit dem Port „1“ des Empfängers verbun-
den werden. Der Port „2“ des Senders muss mit dem Port „2“ des Empfängers
verbunden werden.
Verbinden Sie anschließend ein Netzwerkkabel mit der RJ45 Buchse des Emp-
fängers. Es muss zwingend ein Cat.5 Kabel oder besser zum Einsatz kommen,
um es mit der Buchse „LAN/PoE“ des Empfängers zu verbinden.
Verbinden Sie dann das lose Ende des Netzwerkkabels, das Sie mit dem
Empfänger verbunden haben, mit dem Gerät, mit dem Sie eine PoE und
Netzwerkdatenverbindung aufbauen möchten, z.B. eine IP Video Türstation
oder IP Kamera.
SCHRITT 5: INBETRIEBNAHME
Schalten Sie den Strom der zum Montageort führenden Leitungen wieder an.
Stellen Sie sicher, auch den Strom zum PoE-Switch / PoE-Injektor einzuschal-
ten. Die Diagnose-LEDs des Senders und Empfängers sollten blinken und
dadurch anzeigen, dass eine Strom- (PoE) und Netzwerkverbindung besteht.
Falls die Diagnose-LEDs nicht blinken, überprüfen Sie bitte die Polarität des
2-Draht Kabels zwischen Sender und Empfänger sowie Ihren PoE-Switch /
PoE-Injektor.
DIAGNOSE-LEDS
Sie können sehen, ob Sender und Empfänger richtig verbunden sind, indem
Sie die Diagnose-LEDs überprüfen. Die Diagnose-LEDs des Senders und Emp-
fängers sollten blinken und dadurch anzeigen, dass eine Strom- (PoE) und
Netzwerkverbindung besteht.

11
DEUTSCH
RECHTLICHE HINWEISE
Allgemeines
1. DoorBird ist ein registriertes Warenzeichen der
Bird Home Automation GmbH.
2. Apple, das Apple Logo, Mac, Mac OS, Macintosh,
iPad, Multi-Touch, iOS, iPhone und iPod touch sind
Warenzeichen von Apple Inc.
3. Google, Android und Google Play sind Waren-
zeichen von Google, Inc.
4. Alle anderen Firmen- und Produktnamen kön-
nen Warenzeichen der jeweiligen Firmen sein,
mit denen sie in Verbindung gebracht werden.
5. Änderungen an unseren Produkten, die dem
technischen Fortschritt dienen, behalten wir uns
vor. Die abgebildeten Produkte können im Zuge
der ständigen Weiterentwicklung auch optisch
von den ausgelieferten Produkten abweichen.
6. Abdrucke oder Übernahme von Texten, Ab-
bildungen und Fotos in beliebigen Medien aus
dieser Anleitung – auch auszugsweise – sind nur
mit unserer ausdrücklichen schriftlichen Geneh-
migung gestattet.
7. Die Gestaltung dieser Anleitung unterliegt
dem Urheberschutz. Für eventuelle Irrtümer,
sowie inhaltliche- bzw. Druckfehler (auch bei
technischen Daten oder innerhalb von Grafiken
und technischen Skizzen) übernehmen wir kei-
ne Haftung.
Produkthaftungsgesetz
1. Alle Produkte aus dieser Anleitung dürfen nur
für den angegebenen Zweck verwendet werden.
Wenn Zweifel bestehen, muss dies mit einem
kompetenten Fachmann oder unserem Support
abgeklärt werden.
2. Produkte, die spannungsversorgt sind (insbe-
sondere 110-240V Netzspannung), müssen vor
dem Öffnen oder Anschließen von Leitungen von
der Spannungsversorgung getrennt sein.
3. Schäden und Folgeschäden, die durch Ein-
griffe oder Änderungen an unseren Produkten
sowie unsachgemäßer Behandlung verursacht
werden, sind von der Haftung ausgeschlossen.
Gleiches gilt für eine unsachgemäße Lagerung
oder Fremdeinwirkungen.
4. Beim Umgang mit 110-240V Netzspannung
oder mit am Netz oder mit Batterie betriebenen
Produkten, sind die einschlägigen Richtlinien
zu beachten, z.B. Richtlinien zur Einhaltung der
Elektromagnetischen Verträglichkeit oder Nie-
derspannungsrichtlinie. Entsprechende Arbei-
ten sollten nur von einem Fachmann ausgeführt
werden, der damit vertraut ist.
5. Unsere Produkte entsprechen sämtlichen
in Deutschland, der EU und USA geltenden
technischen Richtlinien und Telekommunika-
tionsbestimmungen.
Herausgeber
Bird Home Automation GmbH
Joachimsthaler Str. 12
10719 Berlin
Deutschland
Web: www.doorbird.com
Email: [email protected]

www.doorbird.com
Other manuals for A1071 Series
1
Table of contents
Languages:
Other DoorBird Media Converter manuals
Popular Media Converter manuals by other brands

Texas Instruments
Texas Instruments TMS320 Series user guide

Transition Networks
Transition Networks FXC1115T user guide

DirectOut Technologies
DirectOut Technologies ANDIAMO 2.AD Hardware guide

Toxic
Toxic PC-2A instruction manual

Lindy
Lindy 41005 user manual

Sollae Systems
Sollae Systems CSE-M73A user manual

XINDAK
XINDAK DAC instructions

Miranda
Miranda DENSITE XVP-1801 Guide to installation and operation

Patton electronics
Patton electronics 2030 user manual

TR-Electronic
TR-Electronic LMRI-46-270 ANA-I+JUSTAGE manual

CYP
CYP CV-401D Operation manual

Miranda
Miranda DENSITE IRD-3802 Guide to installation and operation