Dorel Juvenile Group COSCO PRONTO User manual

PRONTO
BOOSTER CAR SEAT
40-100 lb and 43-57 in.
(18.1-45.4 kg and 110.1-144.8 cm)
KEEP INSTRUCTIONS FOR FUTURE USE.
Read all instructions before using this booster seat.
www.coscokids.com
FUNSMARTSIMPLE
©2017 Dorel Juvenile.All Rights Reserved. 4358-7289
6.1.17
Failure to follow the warnings on the labels
and in the instruction manual can result in
serious injury or death to your child.

1
XXXXXX
Table of Contents
Getting Started......................................1
Parts of the Booster Seat.............................................1
Installing Seat Pad.......................................................2
Installing Headrest Pad................................................3
Attaching Headrest to Backrest.....................................5
Attaching Backrest to Base..........................................6
Adjusting and Removing Headrest.................................7
Adjusting and Removing Backrest.................................8
Cup Holder .................................................................9
Removing Seat Pad for Cleaning...................................10
Safety Information.................................12
Booster Seat Use.........................................................12
Vehicle Seating Position...............................................12
Installation in Vehicle...................................................13
Vehicle Information................................14
Understanding Your Vehicle..........................................14
Knowing Your Vehicle Belts...........................................15
Aircraft Information .....................................................15
Booster Seat with Backrest....................16
Lap and Shoulder Belt Installation......................17
Booster Seat without Backrest...............19
Lap and Shoulder Belt Installation......................20
Important Information ...........................22
Dorel Juvenile Group Information..................................22
Troubleshooting...........................................................23
Registration and Safety Notices....................................24
Replacement Parts Order Form.....................................25
Warranty.....................................................................27
Parts of the Booster Seat
Front View
Bottom View
A
D
C
E
A. Headrest
B. Shoulder Belt-Positioning
Guides
C. Backrest
D. Arm Rests
E. Seat Base
F. Cup Holder (see page 9)
Back View G. HeadrestAdjustment
Tab
H. BackrestAdjustment
Tab
F
I
G
H
I. Instruction Manual
Storage (under seat base)
B

2 3
Installing Seat Pad
Depending on your model,you may need to install the seat pad.
Type A headrest pad has sewn
on plastic strip. See step 1a.
Type B headrest pad does
not have the plastic strip. See
step 1b.
Type
A
1. Attach Seat Pad
Slide seat pad onto the front of the
base.Slide the elastic strap over the
armrest,one side at a time.
2. Wrap Elastic Straps Under
Seat as Shown
3. Pull Pad Down and
Around Cup Holder
4. Attach Arm Covers
(on select models)
Slide armrest covers over armrests
and attach the armrest cover’s
elastic straps to bottom of seat as
shown.
5. Attach Elastic To Tab
Attach the elastic on back of armrest
cover to bottom of seat.
continued on next page
Type
B
Attach Headrest
Pad Type A
Attach headrest pad to the
headrest by sliding the pad
over one side of the head
rest, then the other.
1a.
Installing Headrest Pad
Depending on your model,you may need to install the headrest
pad.Your booster seat will have one of two headrest pad types.

4 5
Attach Backrest Pad
Headrest pad Type B will go
behind only the backrest pad
as shown.
Slide backrest pad onto one
side of the backrest.
Pull pad tight and slide the
pad over the other side of
the backrest.
2.
Attach Headrest to
Backrest
Headrest pad Type A will
slide behind the backrest
with the headrest.
With the headrest and
backrest facing down, slide
the headrest into the track
on the back of the headrest.
Lift headrest adjuster lock
up and pull headrest down
into a locked position.
1.
Attach bottom of headrest
pad by attaching pad to
tabs near the bottom of
the headrest.
Attach Headrest
Pad Type B
Attach headrest pad to
the headrest by sliding the
pad over one side of the
headrest, then the other.
1b.
Attach Elastic Straps
From the back of headrest,
attach the elastic straps
to the hooks above the
shoulder belt positioning
guide.
2.
Attaching Headrest to Backrest
Depending on your model you may need to install the headrest
and backrest in order to use this seat as a backed booster.

6 7
Attach Backrest to
Base
Lay backrest flat (horizontal)
and pull back the seat base
fabric.
Insert the hook on the
backrest into the large opening on back of seat base pad. Then
insert the hook on the backrest into the large opening on the
back of the seat base.
NOTE: Make sure seat pad does not get caught between the
moving parts. The backrest may not connect properly if the pad
is in the way. Rotate Backrest Up
Until It Clicks
Tuck backrest connection
hole flap under the backrest
pad.
3.
WARNING: Do not use this booster seat without the seat
pad. Failure to do this can result in serious injury.
Adjusting and Removing Headrest
To Adjust Headrest
This booster seat has multiple
headrest positions.
Grasp top of headrest and push
down with one hand while
pulling out on the headrest
adjustment lock with the other.
Raise and lower headrest into
selected position. Release the
headrest adjustment lock into
one of the multiple headrest
heights.
Make sure headrest is locked by
pulling headrest up and down.
Headrest may move slightly
when it is locked.
The backrest/headrest are
removable.
NOTE: Headrest MUST always be used when using backrest.
If headrest has been removed from backrest,see page 5 to
attach headrest.
To Remove Headrest
from Backrest
Move backrest to most
upright position.
Grasp top of headrest and
push down with one hand
while pulling out on the
headrest adjustment lock
with the other.
Pull out and hold headrest
adjustment lock and raise
headrest up until it comes
out of the backrest track
completely.
2.
Locate the Backrest
Connection Hole
Hold the rectangular shaped
tab on the rear of the seat
base pad back to expose the
backrest connection hole.
1.
Attaching Backrest to Base

8 9
Adjusting and Removing Backrest
To Recline Backrest
Recline the backrest by pushing
on the backrest release tab and
rotate top of seat back about an
inch.
The restraint is now in semi-
reclined position.
The backrest has 2 positions,
upright and semi-reclined.
The semi-recline position is
to be used only to install the
booster seat flush against the
vehicle seat back, if needed.
To Remove Backrest
Press in firmly on backrest
release tab and rotate backrest
back until it lays flat (horizontal).
Lift backrest hook out of the
opening in seat base. Store
backrest for future use.
Cup Holder
The cup holder is located on the side of
the booster seat as shown.
Pull out cup holder to use.
Push cup holder in when not needed.

10 11
WARNINGS: Do not use booster seat without the seat
pad. Failure to do this can result in serious injury or death.
Cleaning Pad
Machine wash separately with cold water on a gentle cycle. Do not
use bleach. Tumble dry separately for 10-12 minutes on low heat.
Remove immediately.
Cleaning Headrest Pad TYPE A
Hand wash and line dry only.
Replace Pad
See pages 2-5.
1. Undo Armrest Cover
Elastic Straps from
Bottom of Shell and
Remove Armrest Cover
(on select models)
2. Undo Seat Pad
Elastic Straps from
Under Seat Bottom and
Remove Seat Pad
Removing Seat Pad for Cleaning
NOTE: Headrest and backrest must be removed
from seat bottom to remove complete seat pad
set. See page 8 to remove headrest/backrest from base.
4. Remove Headrest from
Backrest
Move backrest to most upright
position. Pull out and hold headrest
adjustment lock and raise headrest
up until it comes out of the backrest
track completely.
5. Remove Pad from
Headrest
Undo the elastic straps.
If you have headrest pad Type B,
remove pad from tabs at bottom
of headrest, as shown.
3. Remove Pad from
Backrest Type
A

12 13
Check the vehicle owner’s manual for more
information about air bag/child restraint use.
For vehicles without a back seat, refer to your vehicle
owner’s manual.
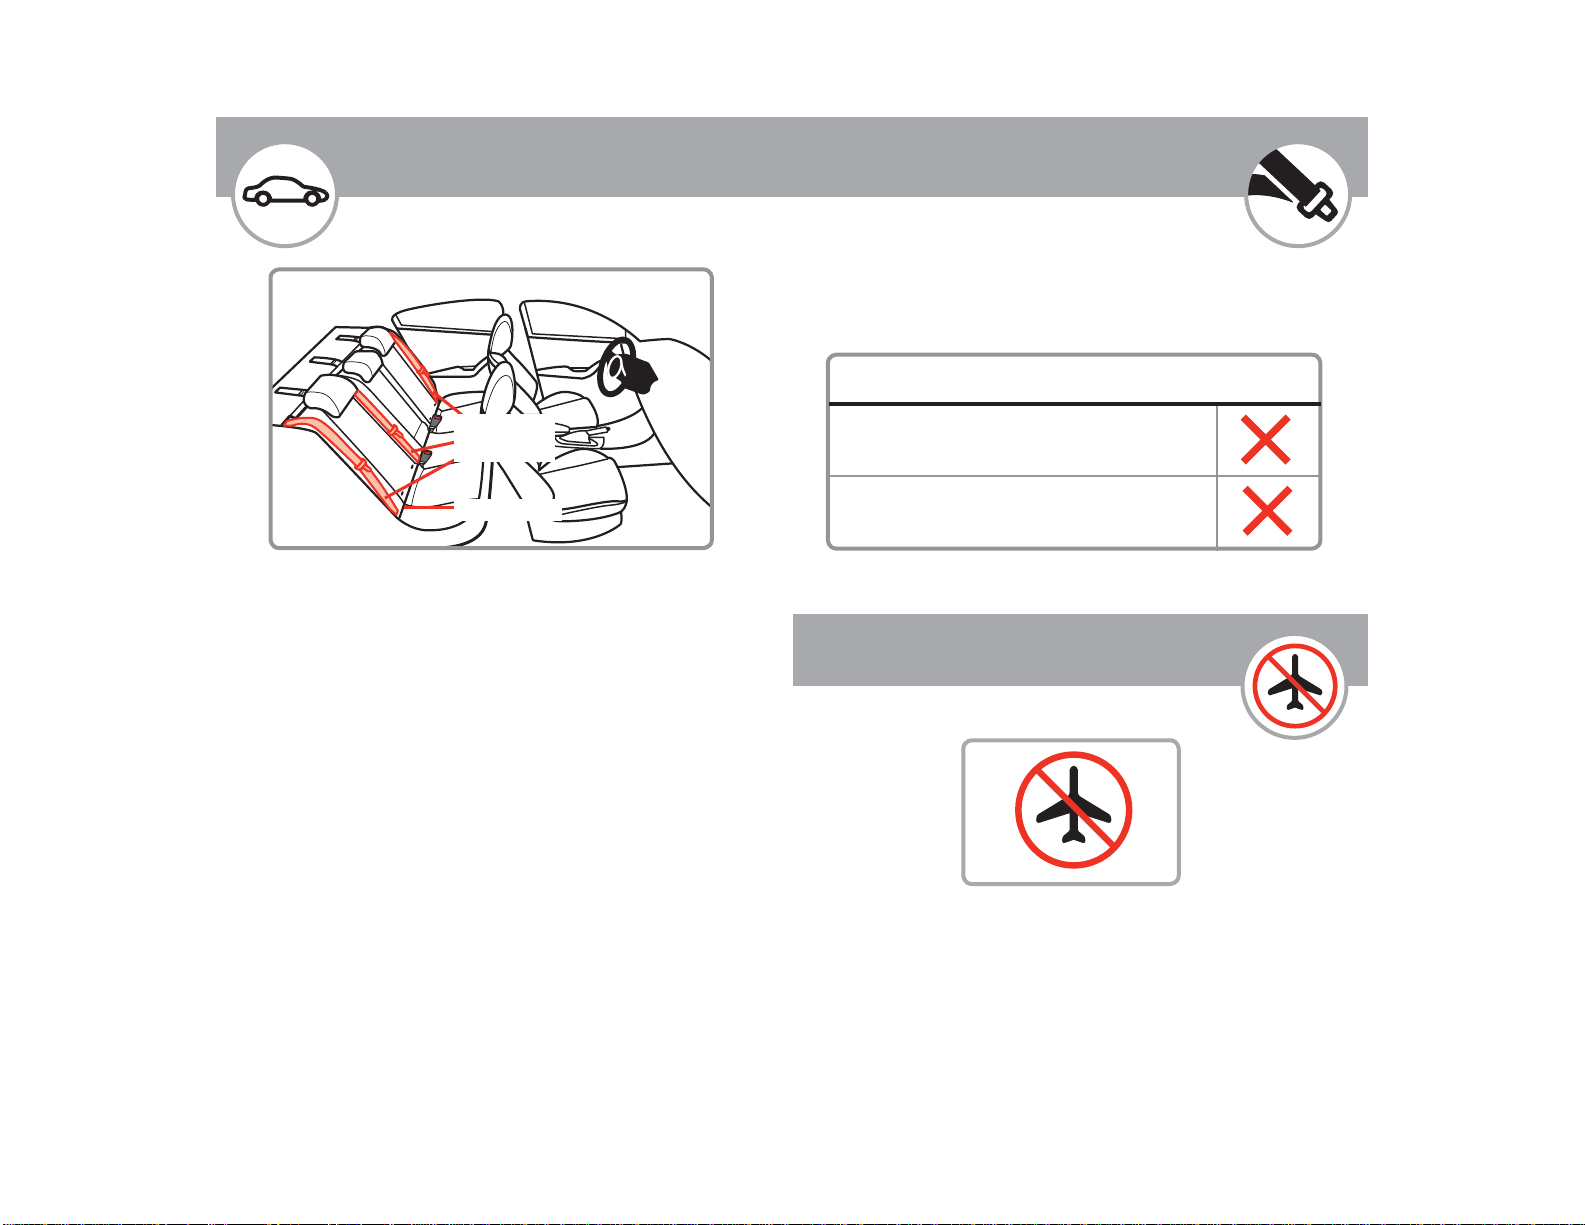
Use the booster seat only on vehicle seats
that face forward.
Do not use on seats that face the sides or
rear of the vehicle.
Some vehicles do not have a seating position that can be used
safely with this booster seat.
If you are not sure where to place the booster seat in your
vehicle, consult your vehicle owner’s manual, contact Dorel
Check the vehicle belt before each use. Use
only if the belt can be tightened properly and
securely.
This booster seat should be securely belted in the vehicle
even when not in use. In a crash or sudden stop, an
unsecured booster seat could injure occupants.
Do not use a booster seat that has been in a crash. You
must get a new booster seat.
Installation in Vehicle
Booster Seat Use
Never take your child out of the booster seat while
the vehicle is moving. Never leave child unattended.
Placing your child in a hot booster seat may result in burns.
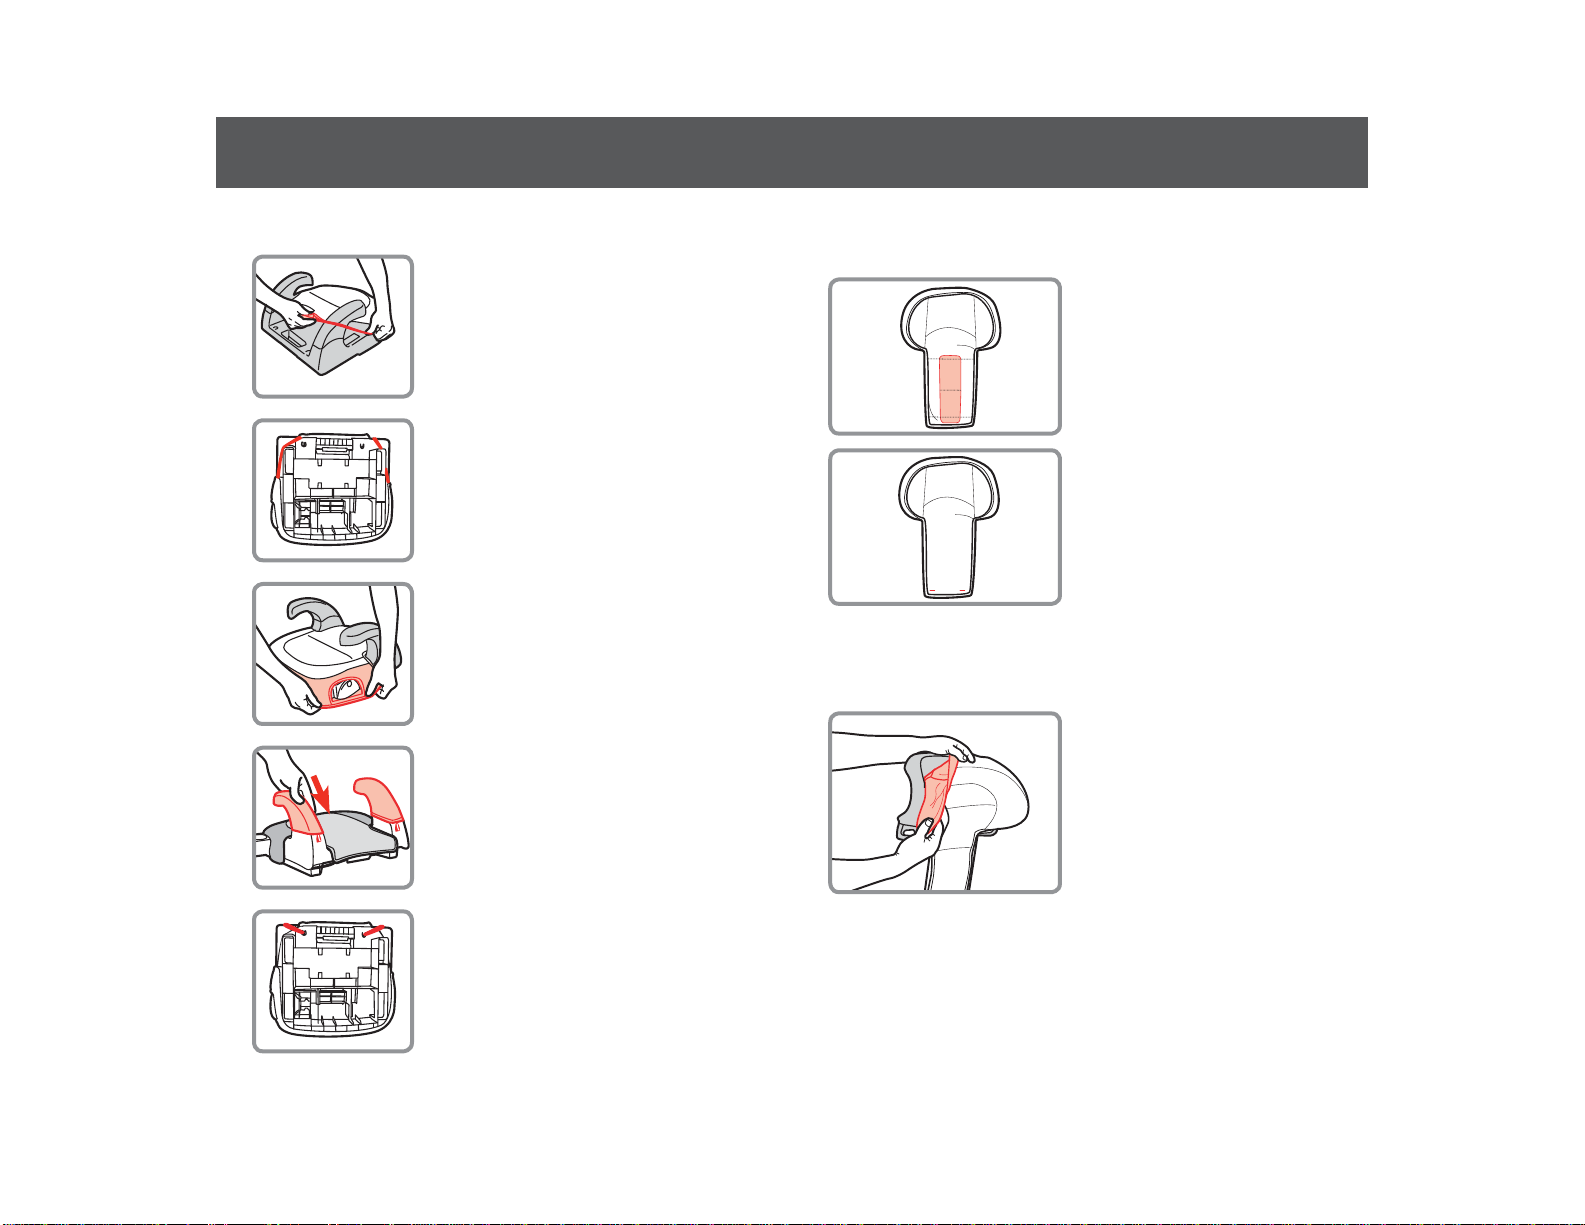
Do not use a booster seat with damaged or missing parts.
Do not substitute parts or try to modify the booster seat in any
way.
Do not use any booster seat accessory except those
approved by Dorel Juvenile Group.
Never allow any child to play with this booster seat; it is not a
toy.
Do not remove or cover up any of the warning labels or other
labels on the booster seat.
Read all instructions for additional warnings.
On the side of the booster seat there is a date of manufacture
label. Do not use this booster seat more than 10 years after
date of manufacture.
Vehicle Seating Position
Juvenile Group Consumer Care Department, or visit your
local Child Passenger Inspection Station. Go to http://www.
safercar.gov/cpsApp/cps/index.htm to find your closest
station. Children are safer when properly
restrained in rear seating
positions than in the front seating
positions.
According to National Highway Traffic Safety Administra-
tion information, children in rear seating positions are
statistically safer, whether you have air bags, advanced air
bags, or no air bags at all.
To avoid your child being seriously burned, take the
following precautions:
1. Park in the shade or where sun does not directly hit the
booster seat.
2. Always use the booster seat with the seat pad.

14 15
Knowing Your Vehicle Belts
Aircraft Information
Not all vehicle belts and seating positions will work with this
booster seat.You must review your vehicle owner’s manual for
vehicle seat belt use with booster seats.
Lap Belt Only
Inflatable Seat Belts
Never UseWithThis Booster Seat
This restraint is not certified for
aircraft use because aircraft seats
do not have shoulder belts.
Understanding Your Vehicle
Your vehicle’s features may be considerably different
than those pictured here.
Consult your vehicle owner’s manual to help identify
your vehicle’s specific features and locations.
Seat Bight
Vehicle
Seat Belts

16 17
Lap and Shoulder Belt Installation
1. Place Booster Seat
Forward-Facing Flush
Against Vehicle Seat Back
2. Place Child in Booster
Seat
Child should sit with their back flat
against the vehicle seat and bottom
flat against the seat.
3. Position Lap Belt on
Child
Route lap portion of the lap/shoulder
belt under both armrests.
The shoulder belt MUST GO UNDER
the armrest on the vehicle buckle
side.
The lap belt should lay snugly across the child’s upper thighs
and not on the stomach.
WARNINGS: Do not use this booster
seat if the tops of your child’s ears are
above the top of the vehicle seat back or
vehicle headrest.
Use only the vehicle’s lap and shoulder
belt system when restraining the child in
this booster seat.
Do not use only the lap belt.
The shoulder belt must always be
adjusted snugly across the child’s chest.
NEVER place the shoulder belt under the
child’s arms.
Failure to follow these warnings can
result in serious injury or death.
Booster Seat with Backrest
Lap/Shoulder Belt
40-100 lb (18.1-45.4 kg)
43-57 in. (110.1-144.8 cm)
The American Academy of Pediatrics recommends that children
remain in a five-point harness until they outgrow their forward-
facing harnessed child restraint.
This typically occurs around age 4, but some children outgrow
them sooner and others not until later.
Please talk to your doctor about the best option for your child.
continued on next page
To attach headrest to backrest,see pages 5-6.

18 19
Booster Seat without Backrest
WARNINGS: Do not use this booster
seat if the tops of your child’s ears are
above the top of the vehicle seat back or
vehicle headrest.
Use only the vehicle’s lap and shoulder
belt system when restraining the child in
this booster seat.
Do not use only the lap belt.
The shoulder belt must always be adjusted
snugly across the child’s chest. NEVER
place the shoulder belt under the child’s
arms.
Failure to follow these warnings can result
in serious injury or death.
By the nature of the design, backless booster car seats do
not have a back or headrest. These types of booster car
seats help position the vehicle belt across the body.
Any additional protection of the body or head is dependent
on the protection systems of your vehicle.
Please consider this when choosing where this booster will
be used in your vehicle and always consult your vehicle
owner’s manual.
Lap/Shoulder Belt
40-100 lb (18.1-45.4 kg)
43-57 in. (110.1-144.8 cm)
TheAmericanAcademy of Pediatrics recommends that children
remain in a five-point harness until they outgrow their forward-
facing harnessed child restraint.
This typically occurs around age 4,but some children outgrow
them sooner and others not until later.
Please talk to your doctor about the best option for your child.
4. Buckle Vehicle Belt
5. Position Shoulder Belt
on Child
Pull up on shoulder belt to tighten.
The shoulder belt should lay snugly
across the center of the child’s
shoulders and across the chest and
not on the face or neck.
To help position the shoulder belt,
you may need to secure the shoulder
belt in the shoulder belt-positioning
guide.
NOTE: Use the shoulder belt
positioning guide only if necessary to
correctly position the shoulder belt
on the child.
Check periodically to ensure your
child has not moved out of position
and loosened the shoulder belt.

20 21
4. Buckle Vehicle Belt
5. Position Shoulder Belt
on Child
Pull up on the shoulder belt to
tighten.
The shoulder belt should lay snugly
across the center of the child’s
shoulders and across the chest and
not on the face or neck.
Check periodically to ensure your
child has not moved out of position
and loosened the shoulder belt.
1. Place Booster Seat
Forward-Facing Flush
Against Vehicle Seat Back
2. Place Child in Booster
Seat
Child should sit with their back flat
against the vehicle seat and bottom
flat against the seat.
3. Position Lap Belt on
Child
Route lap portion of the lap/shoulder
belt under both armrests.
The shoulder belt MUST GO UNDER
the armrest on the vehicle buckle
side.
The lap belt should lay snugly across the child’s upper thighs
and not on the stomach.
Lap and Shoulder Belt Installation
To remove backrest/headrest, see page 8.

22 23
Troubleshooting
1. Locate a Child Safety Seat Inspection Station for
hands on training on how to use your booster seat:
Visit your local Child Passenger Inspection Station or go to
http://www.safercar.gov/cpsApp/cps/index.htm to find your
closest station.
WARNING: NEVER place the shoulder belt behind
the child’s back.
Thank you for choosing this booster seat.The DJG family
is committed to creating child restraints with the most
comfort and convenience available today.
Remember,parents are a child’s first teachers and
examples.If you always buckle your seat belt, your child
will think it is the natural thing to do.Make it a firm rule
that the vehicle does not go until everyone is buckled up.
Make no exceptions.
No one can predict if use of a child restraint will prevent
injury or death in a particular crash. However,when
combined with careful driving,proper use of a booster seat
can lower a child’s risk of injury or death in most crashes.
Your child’s safety is worth the time it will take to read and
follow these instructions.After reading,if you still have
questions or have any concerns with this booster seat,
please contact our Consumer Care Department at:
Website:www.coscokids.com
Telephone: 1-800-544-1108
M-TH from 8A.M.to 6 P.M. EST
FRI from 8A.M.to 4:30 P.M. EST
MailingAddress:
Dorel Juvenile Group,Inc.
Consumer Care Department
P.O.Box 2609
Columbus,IN 47202-2609
Dorel Juvenile Group Information

24 25
Replacement Parts Order Form
Complete the form.Your model number with color code and
manufacturer date code MUST be included on the form to
ensure proper replacement parts.The codes can be found on
a label on side of child restraint.Payment in U.S.dollars must
accompany your order.Choose parts needed from the list on the
next page.
Return the form with payment to:
Dorel Juvenile Group, Inc.
Consumer Care Department
P.O.Box 2609
Columbus,IN 47202-2609
Please make money orders payable to Dorel Juvenile Group,Inc.
Fill in the area on the next page to charge credit card.(Visa or
MasterCard
only
).We do not accept cash,personal checks,or
other credit cards.All outside of U.S. and Canada MUST use
credit card.
Ship To:
(Please Print)
Name:_______________________________________
Address:_____________________________________
City:_________________________________________
State/Province:________________ Zip Code:_________
Telephone: ___________________________________
Email Address: ________________________________
We MUST have this information:
Model Number (8 to 9 characters):_________________
Manufacture Date (mm/dd/yyyy):__________________
AB123CDE COSCO CARSEAT
If you don’t have the card or if your
address changes,you will find the
model number,manufacture date,
and line code on the label located
on side of shell.
Example of model number, manufacture date, and line code.
Please complete the postage-paid registration card that came
with your booster seat,and send it to us.Booster seats could be
recalled for safety reasons.You must register this restraint to be
reached in a recall.Send your name,address, email address if
available and the restraint’s model number and manufacturing
date to:
Dorel Juvenile Group,Inc.
Consumer Care Department
PO Box 2609
Columbus,IN 47202-2609
or call 1-800-544-1108 or register online at www.djgusa.
com/registration/carseat/us.For recall information,call the U.S.
Government’s Vehicle Safety Hotline at 1–888–327–4236 (TTY:
1–800–424–9153),or go to http://www.NHTSA.gov.
Registration and Safety Notices
Manufacture
Date
Model
Number Line
Code

26 27
Replacement Parts List
CUT ON DOTTED LINE
NOTE: If requested color is not available, similar color will be
substituted.Prices are subject to change.
Part Cost Qty Total Cost
Seat Pad Set.............................$18.00....___........$_______
Instructions.................................$0.00....___........$_______
Merchandise Total: ..............................................$_______
Shipping and handling:........................................$_______
Fill Out For Credit Card
qVisa qMasterCard
Card Exp. Date:
___________________________________________
Cardholder’s Name:
___________________________________________
Card Number:
___________________________________________
Signature:
___________________________________________
Sales Tax:..............................................................$_______
(Arizona, California, Georgia, Indiana, Missouri, South Carolina, and Texas
residents add applicable sales tax.)
Grand Total:...........................................................$_______
No shipping and handling on instructions for quantities under 6. Add $.50 for each
instruction over 6,then add applicable shipping and handling.
Up to $25.00..................... $5.95
$25.01 to $50.00.............. $6.95
$50.01 to $75.00.............. $8.95
$75.01 to $100.00............$9.95
$100.01 to $150.00.......... $10.95
$150.01 to $200.00.......... $11.95
$200.01 and up.................$13.95
Outside Continental USA....$10.00
Dorel Juvenile Group,Inc. (DJG) warrants this product to
the original retail purchaser as follows:
This product is warranted against defective materials or
workmanship for
one year
from the date of original pur-
chase.
An original receipt is required to validate your
warranty.
DJG will,at its option,provide replacement
parts or replace this product.DJG reserves the right to sub-
stitute if the part or model has been discontinued.
To make a claim under this warranty you may contact us at
www.djgusa.com,write to:
DJG Consumer Care Department
P. O. Box 2609
Columbus,IN 47202-2609
or call 1-800-544-1108 from 8:00 a.m.to 6:00 p.m. EST
Monday throughThursday and from 8:00 a.m.to 4:30 p.m.
on Friday.
Proof of purchase is required and shipping charges
are the responsibility of the consumer.
Warranty Limitations:
This warranty does not include
damages which arise from misuse or abuse of this product.
Limitation of Damages:
The warranty and remedies as
set forth are exclusive and in lieu of all others,oral or
written,expressed or implied. In no event will DJG or the
dealer selling this product be liable to you for any damages,
including incidental or consequential damages,arising out
of the use or inability to use this product.
Limitation of warranties and other warranty terms
and state law rights:
Any implied warranties,including implied warranties of the
merchantability and fitness for a particular purpose,shall be
limited to the duration and terms of the express written
warranty. Some states do not allow limitations as to how
Warranty
continued on next page

28
long an implied warranty lasts or the exclusion or limita-
tion of incidental or consequential damages,so the above
limitations may not apply to you.This warranty gives you
specific legal rights,and you may have other rights, which
vary from state to state. Neither DJG nor the dealer selling
this product authorized any person to create for it any
other warranty, obligation,or liability in connection with this
product.
Table of contents
Other Dorel Juvenile Group Car Seat manuals

Dorel Juvenile Group
Dorel Juvenile Group Commuter User manual

Dorel Juvenile Group
Dorel Juvenile Group Backless Pronto Belt-Positioning Booster User manual

Dorel Juvenile Group
Dorel Juvenile Group COSCO User manual

Dorel Juvenile Group
Dorel Juvenile Group Infant Restraint User manual

Dorel Juvenile Group
Dorel Juvenile Group 4358-3832A User manual

Dorel Juvenile Group
Dorel Juvenile Group Scenera User manual

Dorel Juvenile Group
Dorel Juvenile Group Dream Ride SE User manual

Dorel Juvenile Group
Dorel Juvenile Group Cosco Apt 40RF User manual

Dorel Juvenile Group
Dorel Juvenile Group Scenera User manual

Dorel Juvenile Group
Dorel Juvenile Group ALPHA OMEGA ELITE 4358-3340A User manual