Doro PHONEEASY RECORD 327CR User manual

PhoneEasy record
327cr

4
2
5
16
1
3
11
8
7
6910
12
13
15
14
1718
19
English
1 Ring signal indicator
2 Socket for handset cord
3 Handset volume control
4 Flash button/programming
5 Redial
6 Volume control,
answer machine
7 Display
8 Answering machine
ON/OFF
9 Delete message
10 Playback/Pause
11 Repeat and record OGM
12 Next Message
13 Switch,
number of ring signals
14 Flash button switch
15 Ring signal switch
16 Speed dial
17 R/Pswitch
18 Socket for power supply
19 Telephone cord socket

1 Témoin de sonnerie
2 Prise du combiné
3 Touche de réglage du
volume du combiné
4 Touche R et de
programmation
5 Touche Bis
6 Touche de réglage du
volume du répondeur
8 Mise en marche/Arrêt
du répondeur
9 Touche de suppression
du message
10 Lecture/Pause
11 Touche de répétition
et d’enregistrement
de l’annonce
12 Message suivant
13 Réglage,
nombre de sonneries
14 Réglage du délai
de la touche R
15 Réglage de la sonnerie
16 Touches des
mémoires directes
17 Réglage, R/P
18 Prise du cordon
d’alimentation
19 Prise du câble
téléphonique
Français
1 Indicador de señal
de llamada
2 Conector para cable
de auricular
3 Control de volumen
del auricular
4 Tecla R/programación
5 Rellamada
6 Control de volumen,
contestador automático
7 Pantalla
8 Contestador automático
desactivado/activado
9 Borrar mensaje
10 Reproducción/Pausa
11 Repetir y grabar
mensaje saliente
12 Mensaje siguiente
13 Conmutador,
número de señales
de llamada
14 Conmutador de tecla R
15 Conmutador de
señal de llamada
16 Marcación rápida
17 Conmutador R/P
18 Conector de alimentación
19 Conector del cable
del teléfono
Español

OFF/ON
R/P
Ελληνικά
1 Indicatore di chiamata
2 Presa per cavo cornetta
3 Regolazione volume
cornetta
programmazione
5 Richiamata
6 Regolazione volume,
segreteria telefonica
7 Display
8 Segreteria telefonica
OFF/ON
9 Cancella Msg
10 Riproduzione/Stop
11 Ripeti e registra
messaggio in uscita
12 Messaggio successivo
13 Interruttore,
numero di squilli
16 Composizione rapida
17 Interruttore R/P
18 Presa di alimentazione
19 Presa per cavo telefonico
Italiano

1
English
Operation
Making a call
Ordinary dialling
1. Pick up the handset.
2. Enter the desired number.
Redial
If a number was engaged or if you wish to redial the most recently
entered number, pick up the handset and press the redial button .
Memories
This telephone has 3 speed dial memories.
Once a number has been saved in a memory location, you only
need to press one button to make the call. A picture or symbol can
be placed under the transparent cover over the speed dial buttons
so it is easy to remember to whom the speed dial number belongs.
Dialling with speed dial
1. Pick up the handset and wait for the dialling tone.
2. Select the desired speed dial number by pressing the
corresponding button.
Volume control
The handset volume may be adjusted during a call with the rotary
control .
Hearing loop
The handset has a built-in hearing loop for those who wish to use
their hearing aids while using the telephone. Select the T mode
on your hearing aid to enable this feature.

2
English
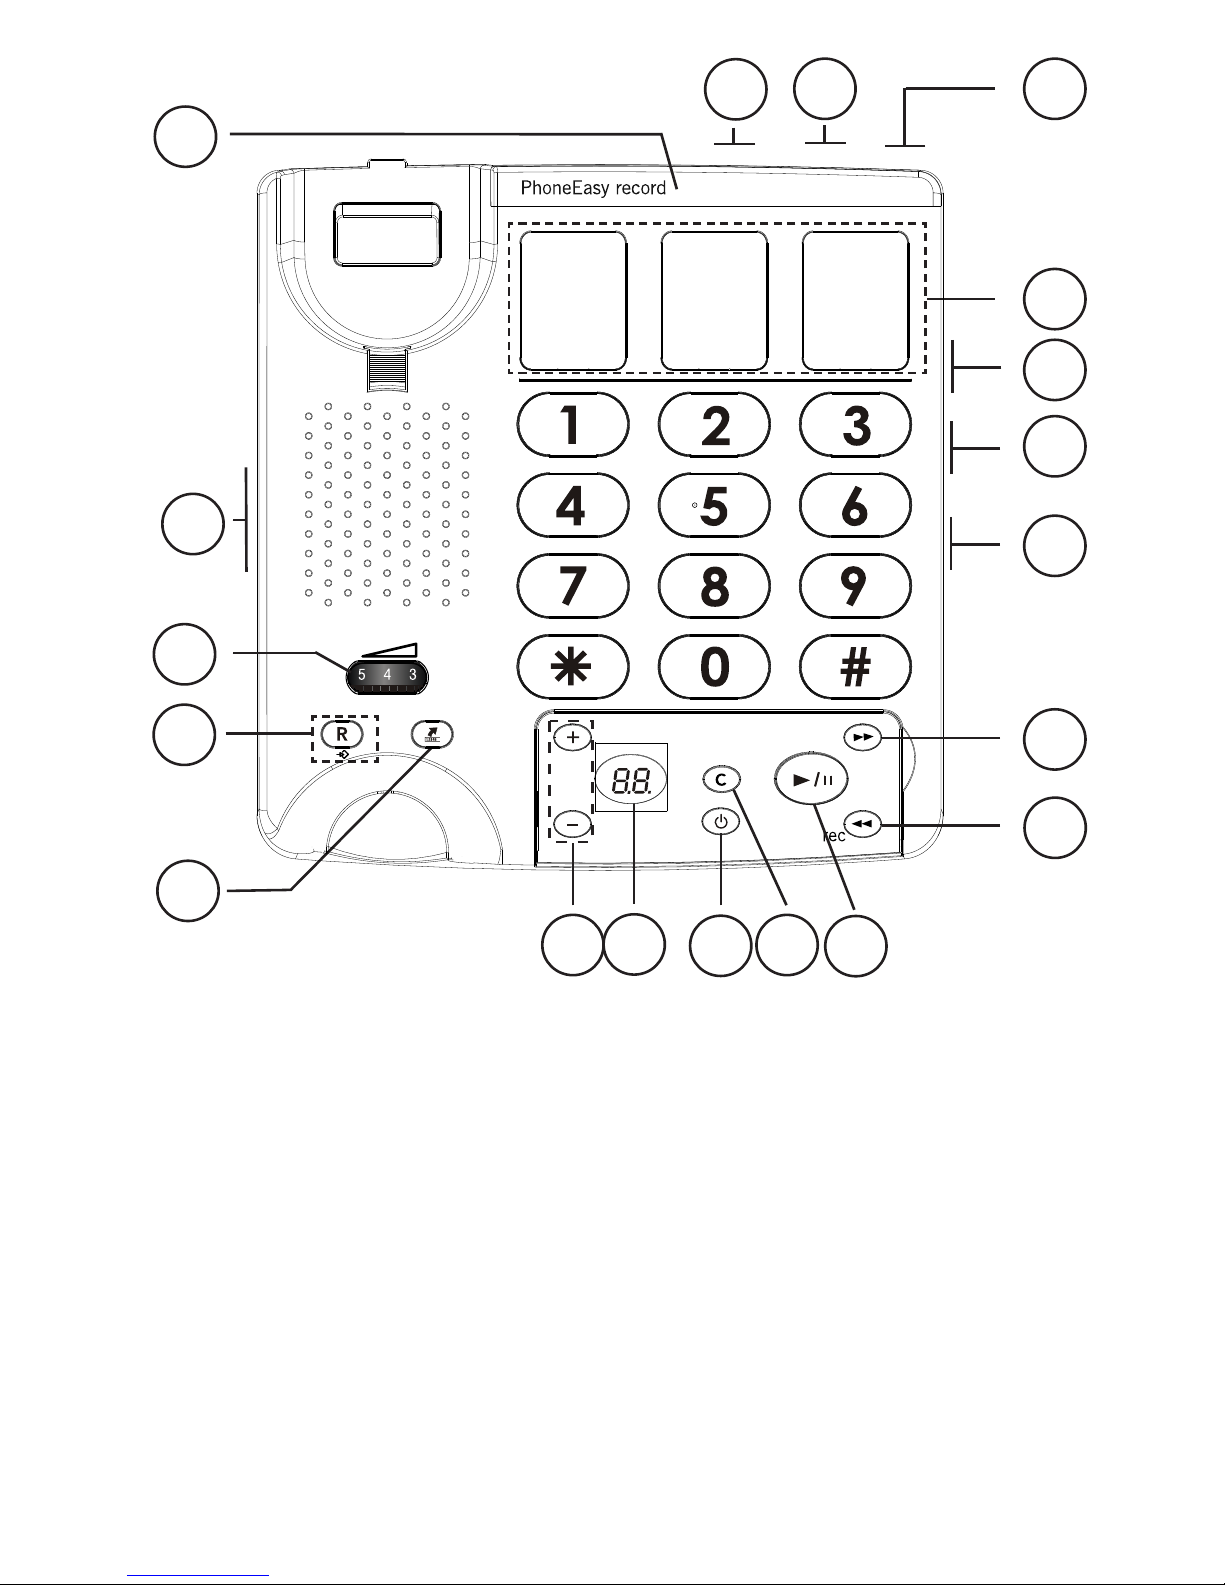
Operation of Answer Machine
The answer machine must be switched on in order to be able to
receive messages. Turn the answer machine on/off by pressing
!under the cover. -- is shown if the answer machine is
switched off, otherwise the number of messages is shown. In
the ON position, incoming calls will be answered by the answer
machine if you miss a call, and in the OFF position no calls will be
answered.
When the phone rings, calls will be answered after the set
Answer Machine Settings
When the answer machine answers an incoming call, the caller
will hear your outgoing message. The caller will then hear a short
beep, and can leave a message of up to 2 minutes.
The memory will store approximately 15 minutes of incoming
Playback of messages
Playback will always begin with new messages. If for instance
there are three old messages and two new ones, only the two
new ones will be played back, then the answer machine will
return to standby mode. Press the playback button once again to
listen to all messages, starting with the oldest message.
1. PressPress 9/to start playback.
2.
the machine then returns to standby mode. All messagesAll messagesAll messages
The following functions are available during playback:
Button Function
8 8 Repeat or hold down until you hear a beep to skip back
9 9
!
CDelete message in progress.
+/-
9/ 9/
again to continue.

3
English
Delete messages
If you want to delete a single message, press Cduring playback.
Deletion of all messages simultaneously is only possible after playback:
Press and hold Cuntil you hear a long beep.
Please note that new messages cannot be deleted until they have
been played.
Screening
Incoming messages will be heard from the machine’s
loudspeaker as they are received. If there is no sound adjust the
volume with +/-.
You can also lift the receiver and speak directly to the caller. If the
recording is not interrupted automatically, press !on the answer
machine, or press * on the telephone you are using to answer.
Remote activation
The answer machine can be activated using the remote access
functions by calling your own home phone number and following
these instructions.
1. Call your own number, after approximately 10 rings, the
machine will answer with a long tone.
2. Enter the remote code, see below. If the code is correct you will
hear two short beeps.
3.
on. Replace the handset.
Remote access
This machine can be remotely accessed using the keys of an
ordinary tone dialling telephone. To use remote access, call the
answer machine by dialing home and enter the remote code
while the outgoing message is being played. If the code is correct
several remote access commands are available.
Remote Code
A three digit remote code is needed to access the remote access
functions of the answer machine. The remote code is printed
underneath the machine.

4
English
Remote accessing
1. Call the answer machine.
2. Enter the remote code while the outgoing message is being
played. If the code is correct you will hear two short beeps.
3.
Command Function
25 .............................Play new messages
2# .............................Play all messages
During playback
3# .............................Erase single message during playback
6# .............................Skip to previous message
7# .............................Skip to next message
8# .............................Repeat message
## .............................Stop playback
After playback
3# .............................Delete all messages
7# .............................Record new outgoing message. Stop
recording =7#
9# .............................On/off Two beeps = on and three beeps = off.
0# .............................Room monitoring in 30 seconds.
Press 5# to end.
At the end of the manual these remote access commands are
available in credit card size format to cut out.
Please note!
If the machine doesn’t respond to the remote access commands,
try pressing the telephone buttons for a longer or shorter time.
In normal cases, the answer machine should react to tones
approximately 0.5 – 1 seconds in length, but longer tones may be
necessary with certain telephone networks.
If you do not enter any remote access command, the answer
machine will disconnect after a few seconds.
If you listen to messages for longer than 2 minutes and 40
seconds, you will hear a tone. Press any key to continue.

5
English
Voice control
The answer machine will record the message as long as the
stops speaking, the answer machine will disconnect after a few
seconds.
Out of memory
The total capacity of the answer machine’s memory is
approximately 15 minutes including outgoing and incoming
messages. This memory space is shared by the outgoing
message and the regular incoming ones. If the memory is full, no
new messages will be accepted until the existing messages have
been played and deleted.
When the memory is full, the display shows FL, and the answer
machine will answer after 10 rings to allow remote playback and
deletion of messages.
Power cuts
This answer machine uses a type of memory that will not be
deleted in the event of a power cut or if the power is disconnected
when you want to move the answer machine. The power supply
must be connected in order for the answer machine to be able to
receive new messages.

6
English
Settings
Connection
1. Connect the telephone cord to a network wall socket and to the
Tsocket on the back of the telephone.
2. Connect the mains adapter to the mains power socket and to
the Ysocket on the back of the telephone.
3. Connect the spiral cord to the handset and to the qsocket
on the telephone’s left side.
4. You will hear a click when the modular plug is correctly in
place.
5. Set correct Flash
6. Lift the handset and listen for the dial tone.
Ring signal
There is a ring signal volume switch on the right side of the
telephone.
Memories
Saving speed dial numbers
1. Make sure that the R/Pswitch on the back of the telephone
is set to P.
2. Lift the handset and press PR
3.
Press PR
4. Select the memory position by pressing the corresponding
button.
5. Replace the handset. The number has now been saved.
Remember to return the R/Pswitch on the back of the
telephone to the Rposition when all the telephone numbers have
been saved.
Press if you want a pause in the telephone number.

7
English
Answer Machine Settings
Outgoing message
The outgoing message is your message that plays when there is
an incoming call.
The message could for example tell the caller that he or she may
start talking after the beep, which will be heard following your
outgoing message.
An example of an outgoing message:
-“Hello and welcome to the Andersons. We can’t get to the phone
right now, but please leave a message at the sound of the beep,
and we’ll return your call as soon as possible. Thanks for calling.”
Recording an Outgoing Message
1. Press and hold down 88
2. Record the outgoing message. Speak clearly into the top of the
machine from a distance of about 15-20 cm.
3. Release 88 to stop recording.
4. The message will be repeated after a few seconds. Repeat
the same procedure if you want to change the message. Any
previous outgoing message will be automatically erased when
a new one is recorded.
Checking the Outgoing Message
88. The outgoing message will be played.
Number of ring signals
Use the 2/6/TS switch on the right side of the machine to set how
and when the answer machine will answer incoming calls.
2 = calls are answered after two rings.
6 = calls are answered after six rings.
TS = activates the toll save function.
The Toll Save function answers calls after six ring signals, until
machine switches to answering after approximately two signals.
This is useful when using remote access: if there is no answer
after three rings there have been no messages recorded and you
can hang up before you are charged for the call. If however the
machine does answer after two rings, there are new messages.

8
English
Technical Information
On the right side of the telephone there is a switch for Flash time.
100 is the standard setting for most countries including the UK.
Troubleshooting
Check that the telephone cord is undamaged and properly
plugged in. Disconnect any additional equipment, extension cords
and other phones. If the problem is resolved, the fault is with
some other equipment. Test the equipment on a known working
then the fault is probably with your telephone line. Please report
this to your network operator.
The answer machine is not answering
- Check that the unit is switched on.
- Check that the telephone cable and the mains adapter are
correctly connected.
The answer machine does not respond to remote access
- Check that the telephone you are using to remotely access the
answer machine is a tone dialling telephone.
- Some telephones only emit a short tone beep when buttons
are pressed, and this may not be enough to activate remote
access. Use a separate tone transmitter in these cases.
- Also try holding the buttons down longer, approximately 1
second per digit.
I can’t hear the outgoing message very well
- Record a new outgoing message.
- Speak closer to the microphone when recording. The microphone
is located under the handset on the front of the telephone.
The line is disconnected when someone leaves a message:
- An incoming message may be up to 120 seconds in length.
After this time, the call will be disconnected.
- If the caller pauses approximately 7 seconds or more, the call
may be terminated, since the voice control function believes
that the caller has hung up.
I only hear a tone sequence when I press the playback button:
- There are no incoming messages.There are no incoming messages.
If the device still does not work, please contact the place of
purchase for service.

9
English
Declaration of conformity
Doro hereby declares that the product Doro PhoneEasy
record 327cr conforms to the essential requirements and other
available at www.doro.com/dofc
Guarantee
This product is guaranteed for a period of 12 months from the
date of purchase. In the unlikely event of a fault occurring during
this period, please contact the place of purchase. Proof of
purchase is required for any service or support needed during the
guarantee period.
This guarantee will not apply to a fault caused by an accident or
a similar incident or damage, liquid ingress, negligence, abnormal
usage, non-maintenance or any other circumstances on the
user’s part. Furthermore, this guarantee will not apply to any fault
a matter of precaution, we recommend disconnecting the device
during a thunderstorm.
Batteries are consumables and are not included in any guarantee.
This guarantee does not apply if batteries other than DORO
original batteries have been used.
UK
technical support is available by email on tech@doro-uk.com
-premium rate telephone number: 0905 895 0854, calls cost
50 pence per minute
Customer Services
Doro UK Ltd
1 High Street
Chalfont St Peter
Buckinghamshire
SL9 9QE
Further contact details are available on our website:
www.doro-uk.com.

1
Français
Utilisation
Appeler
Appel normal
1. Prenez le combiné.
2. Composez le numéro désiré.
Touche Bis
Lorsque la ligne de votre correspondant est occupée ou si vous
désirez rappeler le dernier numéro composé, prenez le combiné
et appuyez sur la touche .
Touches des mémoires directes
Ce téléphone possède 3 touches de mémoire directe.
Une fois qu’un numéro est enregistré sur l’une d’elles, vous le
composez en pressant simplement la touche correspondante.
Vous pouvez placer une photo ou un symbole sous le couvercle
transparent des touches d’appel direct pour reconnaître facilement
le destinataire.
Appeler un numéro en mémoire directe
1. Prenez le combiné et attendez la tonalité.
2. Sélectionnez le numéro d’appel direct désiré en appuyant sur la
touche correspondante.
Réglage du volume
Utilisez le curseur pour ajuster le volume du combiné en
cours de conversation.
Appareil auditif
Le combiné intègre une boucle à induction permettant une
compatibilité directe avec les porteurs de prothèse auditive. Pour
utiliser cette fonction, mettez votre appareil auditif sur la position T.

2
Français
Utilisation du répondeur
Le répondeur doit être en service pour pouvoir prendre les
messages. Mettez le répondeur en/hors service en appuyant
sur la touche !située sous le couvercle. Lorsque le répondeur
est hors service,
--
lorsqu’il est en service.
Quand le téléphone sonne, les appels sont pris au bout du nombre
Quand le répondeur prend l’appel, votre correspondant entend
l’annonce. Il entend ensuite un bip et peut laisser un message de
2 minutes maximum.
La mémoire a une capacité d’enregistrement de 15 minutes
Lecture des messages
La lecture commence toujours par les nouveaux messages. Si,
par exemple, vous avez trois messages lus et deux nouveaux,
seuls les deux nouveaux sont lus puis le répondeur repasse en
veille. Appuyez à nouveau sur la touche de lecture pour écouter
tous les messages, en commençant par le plus ancien.
1. Appuyez sur 9/pour commencer la lecture.
2.
nouveaux messages sont enregistrés à la suite des anciens.
Les fonctions suivantes sont disponibles en cours de lecture:
Touche Fonction
8 8 Répétition du message courant, ou, en appuyant
jusqu’à l’émission d’un bip, retour au message
9 9
!
CSuppression du message en cours de lecture
+/-
9/
Appuyez à nouveau sur 9/pour continuer.

3
Français
Effacer les messages
Pour effacer un seul message, appuyez sur Cen cours de
lecture.
lecture :
Appuyez sur la touche Cjusqu’à ce que vous entendiez un bip
prolongé.
Vous ne pouvez effacer les nouveaux messages qu’après les
avoir lus.
Filtrage
Vous pouvez écouter le message durant l’appel de votre
correspondant. Ajustez au besoin le volume avec les touches +/-.
combiné. Si l’enregistrement ne s’arrête pas automatiquement,
appuyez sur la touche !du répondeur, ou sur la touche * de
votre téléphone.
Activation à distance
Le répondeur peut être mis en marche à distance.
1. Appelez le répondeur. Au bout d’environ 10 sonneries, la
machine répond et émet un bip prolongé.
2. Entrez le code de sécurité, voir ci-dessous. Le répondeur émet
deux bips si le code est correct.
3.
service. Raccrochez.
Accès à distance
Vous pouvez interroger le répondeur à distance au moyen des
touches d’un téléphone avec numérotation à fréquence vocale.
Pour l’interroger à distance, appelez le répondeur et entrez votre
code de sécurité après la diffusion de l’annonce. Une fois le code
accepté, vous disposez de plusieurs options d’interrogation à
distance.
Code d’accès à distance
Vous devez utiliser un code de trois chiffres pour accéder aux
options d’interrogation à distance du répondeur. Ce code est
imprimé au dos de l’appareil.

4
Français
Accès à distance
1. Appelez le répondeur.
2. Entrez votre code de sécurité pendant la diffusion de l’annonce.
Le répondeur émet deux bips si le code est correct.
3. Composez dans les 10 secondes la commande correspondant
Commande Fonction
25 .............................Lecture des nouveaux messages
2# .............................Lecture de tous les messages
En cours de lecture
3# .............................Effacement du message en cours de lecture
6# .............................Passage au message précédent.
7# .............................Passage au message suivant.
8# .............................Répétition du message
## .............................Arrêt de la lecture
Après la lecture
3# .............................Suppression de tous les messages
7# .............................Enregistrement d’une nouvelle annonce.
Arrêt de l’enregistrement =7#
9# .............................Mise en marche/Arrêt Deux bips = en
service, trois bips = hors service.
0# .............................Activation d’une écoute à distance de 30
secondes.
Appuyez sur 5# pour couper.
Remarque !
Si l’interrogation à distance du répondeur ne fonctionne pas, essayez
d’appuyer plus ou moins longuement sur les touches du téléphone.
Normalement, le répondeur réagit aux fréquences vocales de 0,5 à
1 seconde, mais des fréquences vocales plus longues sont parfois
nécessaires pour certains réseaux téléphoniques.
Si vous ne sélectionnez pas d’option d’interrogation à distance, le
répondeur se coupe au bout de quelques secondes.
Si vous écoutez un message de plus de 2 minutes 40 secondes, vous
entendez un bip. Appuyez sur n’importe quelle touche pour continuer.

5
Français
Activation vocale
Le répondeur enregistre le message de votre correspondant tant
de parler, le répondeur se coupe au bout de quelques secondes.
Mémoire pleine
La mémoire du répondeur a une capacité d’enregistrement
totale d’environ 15 minutes. Elle est commune à l’annonce et
aux messages. Quand la mémoire est pleine, vous devrez faire
une lecture de tous les messages puis les effacer pour pouvoir
recevoir de nouveaux messages.
Quand la mémoire est pleine, le symbole FL
répondeur répond au bout de 10 sonneries pour vous permettre
de lire et d’effacer les messages à distance.
Coupures de courant
Les données en mémoire du répondeur sont conservées en cas
de coupure de courant ou lorsque vous débranchez l’appareil
pour le déplacer. Le répondeur doit être sous tension pour
prendre des messages.

6
Français
Réglages
Raccordement
1. Reliez le câble téléphonique fourni à la prise téléphonique et à
la prise située au dos du téléphone marquée T.
2. Reliez le bloc d’alimentation à la prise située au dos du
téléphone marquée Y et à la prise de courant.
3.
gauche du téléphone marquée q.
4. Un déclic indique que la prise est branchée correctement.
5. Rest bien sur 300
6. Prenez le combiné : vous devez entendre la tonalité.
Sonnerie
Utilisez le curseur
régler le volume de la sonnerie.
Touches des mémoires directes
Enregistrer un numéro en mémoire directe
1. P
.
2.
appuyez sur la touche PR
3.
PR
4. Sélectionnez une plage de mémoire en appuyant sur la touche
correspondante.
5. Raccrochez. Le numéro est enregistré.
Une fois tous les numéros enregistrés, n’oubliez pas de remettre
le curseur R/Pde la base du téléphone sur R.
Insérez une pause en appuyant sur .

7
Français
Réglage du répondeur
Annonce
L’annonce est le message que votre correspondant entend quand
il appelle.
Le message peut, par exemple, dire au correspondant qu’il peut
parler juste après le bip sonore qui suit votre annonce.
Exemple d’annonce :
-“Bonjour, vous êtes bien chez les Dupont. Nous ne sommes
pas à la maison en ce moment, mais veuillez nous laisser un
message après le bip sonore et nous vous rappellerons dès que
possible. Merci de votre appel.”
Enregistrement de l’annonce
1. Gardez le doigt sur la touche 8 8
2. Enregistrez l’annonce. Parlez clairement, à environ 15-20 cm
de l’appareil.
3. Relâchez la touche 88
4. Votre message est répété au bout de quelques secondes.
Procédez de la même façon pour changer votre annonce.
L’annonce existante est automatiquement effacée à
l’enregistrement d’une nouvelle annonce.
Appuyez brièvement sur 8 8. L’annonce est diffusée.
Régler le nombre de sonneries
régler la façon dont le répondeur prend les appels.
2 = les appels sont pris au bout de deux sonneries.
6 = les appels sont pris au bout de six sonneries.
TS = le mode économiseur d’appel est activé.
La fonction économiseur répond aux appels au bout de six sonneries,
jusqu’à ce qu’un message soit enregistré. Après, le répondeur se
déclenche au bout d’environ deux sonneries. Ce mode est utile si
vous interrogez votre répondeur à distance : si le répondeur ne se
déclenche pas après la troisième sonnerie, vous pouvez raccrocher
et ainsi économiser le coût d’un appel inutile puisque vous n’avez pas
reçu de nouveaux messages Toutefois si le répondeur se déclenche
au bout de deux sonneries, vous avez des messages.
Other manuals for PHONEEASY RECORD 327CR
2
Table of contents
Languages:
Other Doro IP Phone manuals