Doro PhoneEasy 337ip User manual

Admin Manual
Doro PhoneEasy®337ip

Contents
Getting started 1
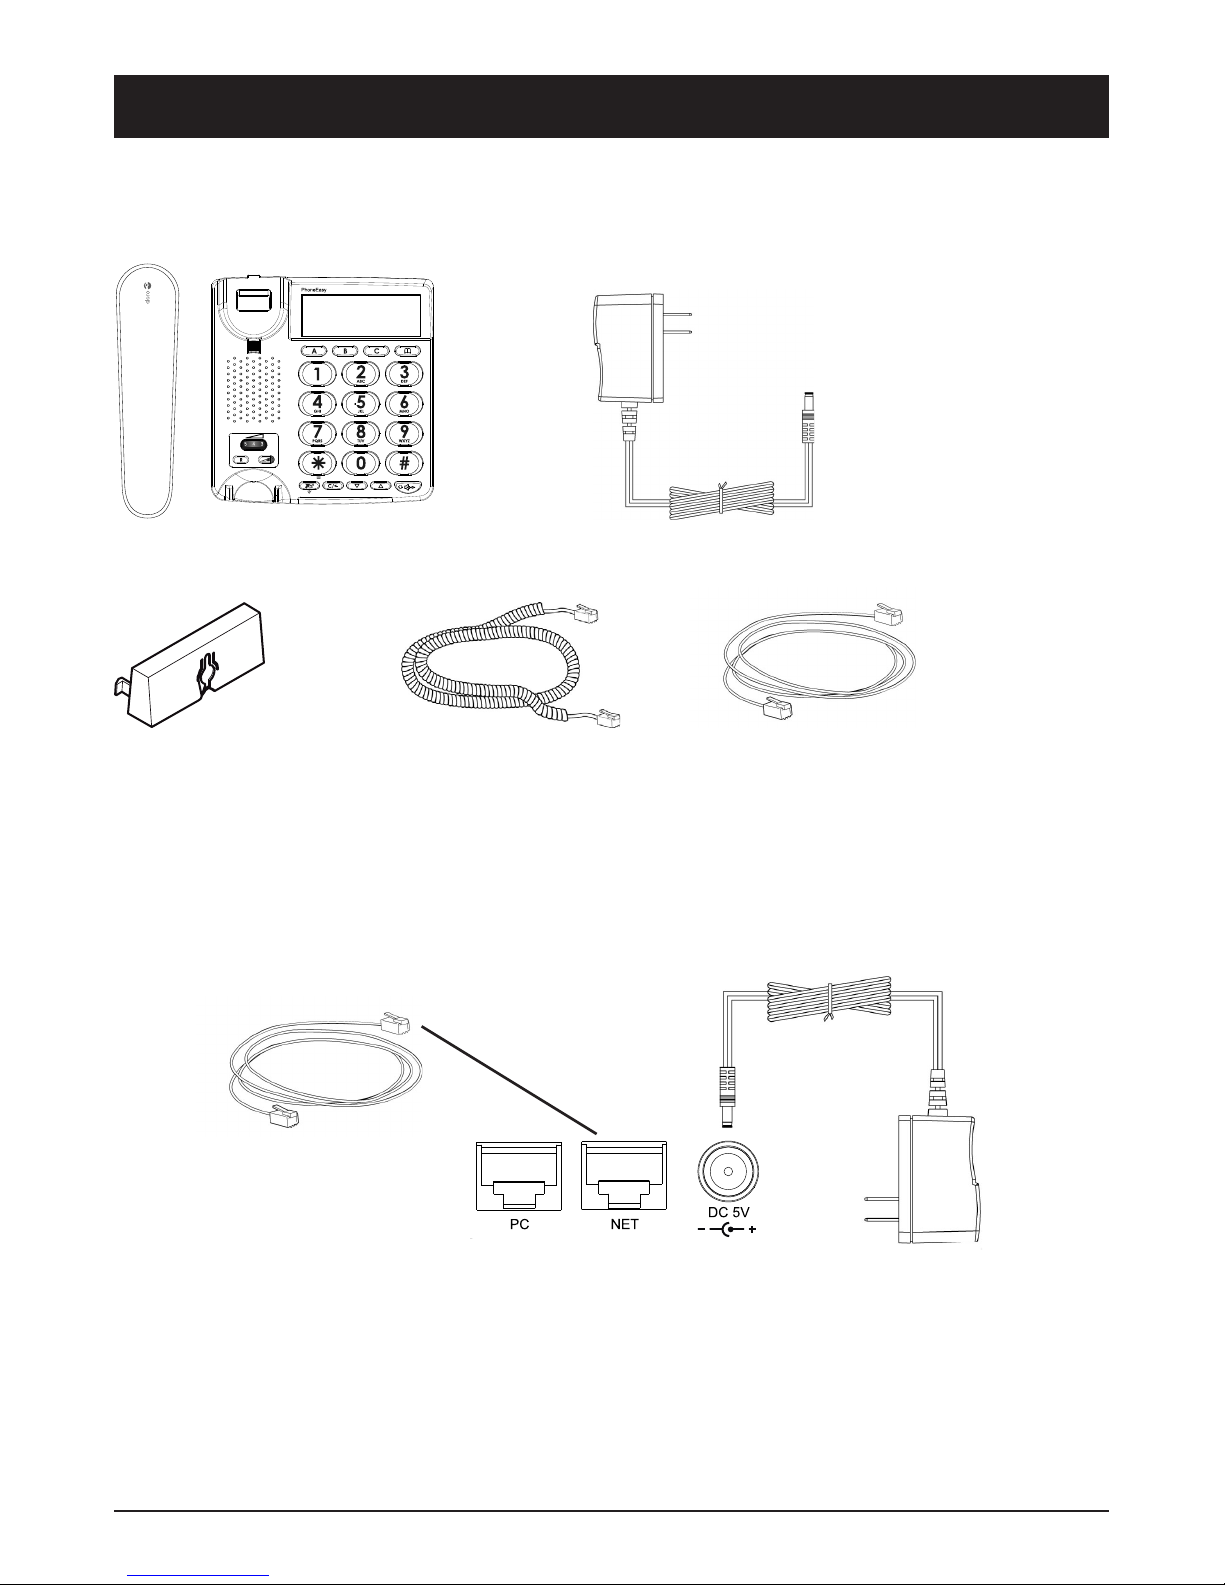
Packing List ���������������������������������������������������������������������������������������������������������� 1
Connect Network and Power ����������������������������������������������������������������������������������� 1
Basic conguration and registration 2
Conguring via Web Page �������������������������������������������������������������������������������������� 2
Network Settings ��������������������������������������������������������������������������������������������������� 2
Account Settings ��������������������������������������������������������������������������������������������������� 3
Advanced Settings 4
Account���������������������������������������������������������������������������������������������������������������� 4
Basic settings ���������������������������������������������������������������������������������������������������������������� 4
Codecs�������������������������������������������������������������������������������������������������������������������������� 4
Advanced ���������������������������������������������������������������������������������������������������������������������� 4
Network���������������������������������������������������������������������������������������������������������������� 7
WAN ����������������������������������������������������������������������������������������������������������������������������� 7
LAN������������������������������������������������������������������������������������������������������������������������������ 7
Advanced ���������������������������������������������������������������������������������������������������������������������� 8
Phone������������������������������������������������������������������������������������������������������������������� 9
Preference��������������������������������������������������������������������������������������������������������������������� 9
Feature�������������������������������������������������������������������������������������������������������������������������10
DSS Key�����������������������������������������������������������������������������������������������������������������������10
Voice����������������������������������������������������������������������������������������������������������������������������10
Ring�����������������������������������������������������������������������������������������������������������������������������11
Tones ���������������������������������������������������������������������������������������������������������������������������11
Dial Plan ��������������������������������������������������������������������������������������������������������������������� 12
Contact �������������������������������������������������������������������������������������������������������������� 13
Upgrade ������������������������������������������������������������������������������������������������������������� 14
Basic ���������������������������������������������������������������������������������������������������������������������������14
Advanced ���������������������������������������������������������������������������������������������������������������������14
Security�������������������������������������������������������������������������������������������������������������� 15
Auto-provision 16
Obtain the server address ����������������������������������������������������������������������������������������������16
The following are the details of each process: ������������������������������������������������������������������16
Download conguration les ��������������������������������������������������������������������������������� 18
Resolve and then apply the congurations �����������������������������������������������������������������������19
Encrypting conguration les�������������������������������������������������������������������������������� 21
Example:����������������������������������������������������������������������������������������������������������������������21
Other updates�������������������������������������������������������������������������������������������������������������� 22
Description of conguration parameters in CFG le ������������������������������������������������� 24
Provisioning ����������������������������������������������������������������������������������������������������������������� 24
Account settings ���������������������������������������������������������������������������������������������������������� 26
Network Settings���������������������������������������������������������������������������������������������������������� 33
Time Settings �������������������������������������������������������������������������������������������������������������� 35
Phone Settings ������������������������������������������������������������������������������������������������������������ 36
Security Settings���������������������������������������������������������������������������������������������������������� 44
Sample les 45
Common le ������������������������������������������������������������������������������������������������������� 45
Phone Specic le����������������������������������������������������������������������������������������������� 46
Warranty and other information 52
Declaration of conformity�������������������������������������������������������������������������������������� 52
Guarantee ����������������������������������������������������������������������������������������������������������� 52

1
Administrator manual
Getting started
Packing List
The following are included in your package:
PhoneEasy 337ip AC Adapter
Wall mount bracket Handset Core Ethernet Cable
Connect Network and Power
There are two ways for network and power source connections� You can either connect
the phone to the AC Power directly using the power adapter or to a PoE compliant
switch or hub. Your system administrator will advise you on which one to use.
Note:
1. If inline power is provided, do not install AC adapter. Make sure the Ethernet
cable and switch/hub are PoE compliant.
2. The Internet Port can be also connected to Hub/Switch/IP PBX or other
internet devices.
The phone can also share the network connection with other network devices such as
a PC� Connect the phone’s PC port and computer’s Network Port using an Ethernet
cable.

2
Administrator manual
Basic conguration and registration
If you are administrator, you need to do some simple conguration to make the phone
work. If not, please contact your internet administrator or service provider for more
details�
Conguring via Web Page
Press and hold * on the phone to enter the status menu and nd out the IP address
of IP phone. Enter it (for example http://192.168.3.35) into the address bar of web
browser. The default login name and password are both “admin”�
Note:
Please locate your PC in the same network segment of IP phone (192.168.3.X)
to access the web conguration page. Please consult your system administrator
for help.
Network Settings
Choose Network->Internet Port (WAN)�
Field Description
DHCP The device will acquire its IP address from the DHCP server
automatically�
Static IP
Address
IP Address IP address of your IP phone manually�
Subnet Mask Subnet mask of the IP phone.
Default
Gateway
Set the gateway of the IP phone�
Primary DNS Domain Name System (DNS) of the IP phone�
Secondary DNS Backup Domain Name System (DNS) of the IP phone�
PPPoE User User Name for internet access. Provided by your ISP.
Password Password for internet access. Provided by your ISP.
DHCP: By default the phone attempts to contact a DHCP Server in your network in
order to obtain its valid network settings, e.g. IP address, sub mask, gateway, DNS
server, etc.
Note:
Using the wrong network parameters may result in inaccessibility of your phone
and may also have an impact on your network performance. Please contact your
network administrator.

3
Administrator manual
Account Settings
The phone attempts to register to the SIP server using the account/registrar data
provided by the automatic or manual initialization.
Choose Account, you will nd the following parameters:
Field Description
Register Status Displays the register status of the phone
Line Active Choose on/off to enable/disable the account
Display Name Display name is shown as the Caller ID when making a
phone call� It is used for local user interface as well as
SIP signalling�
Register Name Authentication ID
User Name Account for register, provided by ISP.
Password Password for the account
SIP Server & Port SIP Server address/port for registration
Enable Outbound Proxy
Server
Enable/disable outbound proxy function
Outbound Proxy Server
& Port
Outbound Proxy Server address/port
Backup Outbound Proxy
Server & Port
Backup Outbound Proxy Server address/port
NAT Traversal Disable/(Enable) STUN NAT Traversal
STUN Server & Port STUN Server address/port
Voice Mail Number to access voice mail service
Proxy Require A Special parameter just for Nortel server. If you login to
Nortel server, the value should be: com.nortelnetworks.
rewall
When you have nished the Network and Account setting conguration, the phone
is ready to use unless there’s any specic parameters that needs to be adjusted.
Please see Advanced settings for more information�

4
Administrator manual
Advanced Settings
The following chapter describes the parameters on the Web UI
Account
Basic settings
See Basic conguration and registration as previously described.
Codecs
The phone can support the following codecs: G723_53, G723_63, G726-16, G726-
24, G726-32, G726-40, G722, G729, PCMU and PCMA.
On this section you can set which codecs that should be enabled and in what priority
they should be used.
Advanced
Field Description
UDP Keep-alive
Message
Denes whether to activate the UDP Keep-alive
mechanism. The default is Enabled.
UDP Keep-alive Interval This parameter species how often the phone will send
UDP keep-alive packet to the SIP server. Default is 30
seconds�
Login Expire This parameter species the time frequency that phone
refreshes its registration. The default interval is 3600
seconds�
Local SIP Port Local SIP port. The default value is 5060.
RPort The parameter allows you conguring the proxy to send
responses back to a particular address and port. The
default is disabled.
SIP Session Timer The time, in seconds, that the IP phone uses to send
periodic re-INVITE requests to keep a session alive. The
proxy uses these re-INVITE requests to maintain the
status of the connected sessions�
Subscribe Period This parameter denes the period of the subscription.
The default value is 1800.
DTMF Type There are there types of DTMF to choose: INBAND,
RFC2833 or SIP INFO�

5
Administrator manual
Field Description
How to INFO DTMF It denes the type of How to INFO DTMF of the account.
Disabled, DTMF-Relay, DTMF or Telephone-Event.
The default is Disabled.
DTMF Payload It denes the value of DTMF Payload of the account.
Integer from 96 to 255� And the default is 101�
100 reliable
retransmission
It denes whether to enable the 100 reliable
retransmission of account�
Enable Precondition It denes whether to active the Enable Precondition of
the account�
The default is Disabled.
Subscribe Register It denes whether to active the Subscribe Register of the
account�
The default is Disabled.
Subscribe for MWI It denes whether to active the Subscribe for MWI of the
account�
The default is Disabled.
Caller ID Header It denes the type of Caller ID Header of the account.
FROM or PAI�
The default is FROM�
Use Session Timer It denes whether to enable the Session Timer of the
account�
Session Timer This document denes an extension to the Session
Initiation Protocol (SIP)� This extension allows for a
periodic refresh of SIP sessions through a re-INVITE or
UPDATE request. The refresh allows both user agents and
proxies to determine if the SIP session is still active.
Refresher It denes the type of Refresher of the account: Uac or
Uas� The default is Uac�
Use user=phone It denes whether to active Use user=phone of the
account�
The default is Disabled.
Voice Encryption(SRTP) It denes whether to enable the Voice Encryption (SRTP)
of the account�

6
Administrator manual
Field Description
ptime It denes the value of ptime of the account.
“ptime” gives the length of time in milliseconds
represented by the media in a packet.
Disabled means the server will not negotiate with the
phone and the IP phone will accept the default ptime
value of the server.
10 stand for 10ms�
20 stand for 20ms�
And so on�
The default is 20ms�
BLFList URI It denes the value of BLFList URI of the account. No
default value.
Anonymous Call The phones you call will not be able to display your name
when you set this parameter as enabled.
Anonymous Call
Rejection
The anonymous calls incoming will be rejected when you
set this parameter as enabled.

7
Administrator manual
Network
WAN
Field Description
DHCP The device will acquire its IP address from the DHCP
server automatically.
Static IP
Address
IP Address IP address of your IP phone manually�
Subnet Mask Subnet mask of the IP phone.
Default
Gateway
Set the gateway of the IP phone�
Primary DNS Domain Name System (DNS) of the IP phone�
Secondary DNS Backup Domain Name System (DNS) of the IP phone�
PPPoE User User Name for internet access. Provided by your ISP.
Password Password for internet access. Provided by your ISP.
LAN
Field Description
As Bridge The Bridge Item is to setup the SIP Phone
Bridge mode Enable/Disable. If you set the
Bridge On, the two Fast Ethernet ports will be
transparent�
As Router (If
you select the
Router mode,
the SIP phone
will work as a
router)
IP Address Congure the PC port IP address.
Subnet Mask Congure the PC port Subnet Mask.
Enable DHCP
Server
If you set the DHCP server on, the device
connected to the PC port will get the IP address
automatically between the start IP address and
the end IP address. But if you select the bridge
mode, the DHCP server will be disabled.
Start IP
Address
Indicate the start of the DHCP IP range.
End IP Address Indicate the end of the DHCP IP range.

8
Administrator manual
Advanced
Field Description
VLAN
(VLAN is
a group of
hosts with a
common set of
requirements
that
communicate
as if they were
attached to
the Broadcast
domain,
regardless of
their physical
location�)
LAN Port Active Choose whether to enable/disable
the VLAN function of the LAN port�
VID VLAN is a feature on the IP
phone that allows for multiple
logical Ethernet interfaces to send
outgoing RTP packets over a single
physical Ethernet as described
in IEEE Std 802�3� On the IP
phone, you congure a VLAN ID
that associates with the physical
Ethernet Port 0�
USRPRIORITY This parameter is based on the
Type of Service (ToS), Differentiated
Services Code Point (DSCP) setting
for SIP (tos sip parameter), RTP
(tos rtp parameter) and RTCP (tos
rtcp parameter)� It is the mapping
between the DSCP value and the
VLAN priority value for SIP, RTP,
and RTCP packets�
PC Port Active Choose whether to enable/disable
the VLAN function of the PC port�
VID Species the VLAN ID used to pass
packets to a PC via Port 1.
USRPRIORITY Sets the priority value used for
VLAN packets to a PC via Port 1.
Voice QoS Voice QoS It denes the value of Voice QoS. Integer from 0 to 63.
The default is 40
SIP QoS It denes the value of SIP QoS. Integer from 0 to 63.
The default is 40
Local RTP
Port
MaxRTPPort Denes the range of the port for voice transmission.
MinRTPPort Denes the range of the port for voice transmission.
SNMP Port It denes the Port of SNMP. Integer from 0 to 65535.
The default is 0�
Trusted
Address
It denes the Trusted Address of SNMP.

9
Administrator manual
Phone
Preference
Field Description
Language The IP phones can support different non-European
languages. You can have the Web UI display in a specic
language as required. When you set the language to use,
all of the displayed page will display in that language� This
IP phones support the following languages on the Web UI:
Chinese-S, English, Turkish and Russian�
Time Zone Sets the Time Zone you expect to use the phone in� Time
Zone from -11 to +12� The default is +8�
Primary NTP Server Specied server which is used to synchronize the clocks of
the phone�
Secondary NTP Server The backup NTP Server. The IP phone will synchronize
with this server when the Primary NTP Server is
unavailable.
Update Interval Sets the time frequency in seconds that the unit refreshes
the time automatically�
Daylight Saving Time The parameter used to active the daylight saving time.
StartTime When to start the daylight saving time.
EndTime When to end the daylight saving time.
Time Format Changes the time to 12 hour or 24 hour format�
Manual Time Enable or disable to set time manually.
Inter Digit Time Denes the length of time to call out automatically without
pressing the SEND key�

10
Administrator manual
Feature
Field Description
Forward Cancel Forward To disable the call forward function.
Always Forward to Forward all calls to the set number.
Busy Forward to When the extension is busy, it will forward
new incoming calls to the set number.
No Answer Forward
to
When the extension is not answered, it will
forward the new incoming call to the set
number after dened seconds.
Busy/No Answer
Forward
When the extension is busy or not answered,
it will forward the new incoming call to the set
number after dened seconds.
Auto Answer Enable/disable the auto answer function. If
you set it as Enabled, all incoming calls will
be answered automatically.
DSS Key
Conguration for the memory keys A/B/C.
Field Description
Name Enter the name as speed dial for the special memory key�
Ofce Number Enter the number as speed dial for the special memory key.
Voice
Field Description
Echo
Cancellation
Echo
canceller
Enabled/disable the function of removing the
unwanted echo signals. This to get a higher quality of
voice.
VAD The purpose of voice activity detection (VAD) is to
conserve network bandwidth by detecting periods
of relative “silence” in the transmit data path and
replacing that silence efciently with special packets
that indicate silence�
Enable/disable this function.
CNG Choose Enabled to open the Comfort Noise Generation
function�

11
Administrator manual
Field Description
JITTER
BUFFER
Type It is a shared data area where voice packets can be
collected, stored, and sent to the voice processor.
Select the type of JITTER BUFFER, Adaptive or Fixed.
Min Delay Denes the value of Min Delay.
The default is 0�
Max Delay Denes the value of Max Delay.
The default is 300�
Normal
Delay
Denes the value of Normal Delay.
The default is 120�
Ring
Field Description
Internal Ringer Text When receiving a call, Distinctive Ring tone is an advanced
feature that enables the phone to play a specic ring tone
that is dened in the SIP Invite message. The ring tone
can be an internal ring tone stored in the phone ash or an
external ring tone which you can download via a URL that is
dened in the SIP Invite message. Since the SIP message is
controlled by the server, the feature needs the server support.
By this eld, users can specify a name for the group to play
the distinctive ring tone. For example, Family, Colleagues,
Friends and so on�
Internal Ringer File Select a preferred internal ring tone for the group�
Tones
Conguration of the call progress tones.
Field Description
Select
country
Choose the country you are in� In custom mode, you can write the
tones manually in this format: element = freq[+freq2]/duration[,
freq[+freq2]/duration]. Set freq=0 for silence.
Dial Dial tone, which played when you pick up the handset to make a
call. Enter the frequency and time period (in ms) as the following
format: Frequency /Time Period (for example 425/8000).

12
Administrator manual
Field Description
Ring Back Ring back tone, which played when you are calling someone, but
the call is not yet answered. Enter the frequency and time period (in
ms) as the following format: Frequency /Time Period (for example
425/1000,0/4000 )�
Busy Busy tone, which played when the called party is busy or the
account cannot dial out. Enter the frequency and time period (in
ms) as the following format: Frequency /Time Period (for example
400/500,0/500)�
Congestion Congestion tone, which played when the network can not be
connected�
Call Waiting Call waiting tone, which played when someone calls while you are on
a call�
Dial Recall Recall tone, which played when the current call is to be recalled.
Record Record tone, which played when the current call is start to be
recorded�
Info Info tone, which played while receiving a specic message, for
example, the dialled number is not the in service area...
Stutter Stutter tone, which played when voicemail has been received.
Message Message tone, which played while receiving an incoming text
message�
Auto Answer Auto answer tone, which played while auto answering an incoming
call�
Dial Plan
Customisation of number plan
Field Description
Replace
Rule
Prex The Prex of a number (or the whole number) you want to
replace. This eld can only be numbers.
Replace The number to replace the set prex. This can be
numbers or letters.
For example, If Prex is set to 123, Replace set to 25, if
you dial number 123, the actual number dialled out will
be 25. If you dial 1231, the actual number dialled out
will be 251.

13
Administrator manual
Field Description
Dial-now Dial-now
Rule
Dial-now enables you to dene the specic length of any
number/letter in advance(for example xxx), next time
when users dial out the 123 whose length matches the
Dial-now rule, the phone will dial out 123 in one second
without pressing Send button.
Area Code Code To set the country/area code, then when you dial a
number, it will add the code to the head of the number,
and then dial out automatically�
Min
Length
To the min length of a valid area code.
Max
Length
To the max length of a valid area code.
Block Out Block Out
Number
The specic phone numbers can be forbidden to be called
out from your IP phone�
Contact
Field Description
Name Set the name for a contact�
Number Set the phone number of a contact.
Browse Browse the specic contact list le in XML format, and
then click Import button. The imported contact lists will be
shown in the Directory�
The format of the le when importing the contacts (phonebook) must be as follows:
<?xml version=”1.0” encoding=”UTF-8”?>
<contactData>
<group>
<contact sDisplayName=”First” sOfceNumber=”111”></contact>
<contact sDisplayName=”Second” sOfceNumber=”222”></contact>
<contact sDisplayName=”Third” sOfceNumber=”333”></contact>
<contact sDisplayName=”Forth” sOfceNumber=”444”></contact>
</group>
</contactData>

14
Administrator manual
Upgrade
Basic
Field Description
Reset to Factory
Setting
Use this button to reset your IP phone to the factory setting
at once. Note: All congurations will be lost.
Reboot System Now Use this button to reboot your IP phone.
Select and Upgrade
Firmware
Click the Browse button to select the rmware le in your
local computer, then Click Upgrade button to update the new
rmware. Note: Please do not power off during the updating.
Advanced
Field Description
Custom Option To specify a wanted DHCP option number which is supposed to
contain the auto provisioning server address. Please see Auto-
provision for details�
Custom Option
Type
There are two custom types available: IP Address or String.
URL URL of the auto provisioning server.
Account Account which may be used when the access to the URL requires
authentication�
Password Password which may be used when access to the URL requires
authentication�
Specied AES
Key
Must match the encryption key with the key that the common CFG
provisioning-le has been encrypted with.
Per-phone AES
Key
Must match the encryption key with the key that the Phone-
specic CFG provisioning-le has been encrypted with.
Check New
Cong
The period that your phone checks the new rmware from the
server: Power on, Repeatedly, Weekly, Power on + Repeatedly,
Power on + Weekly and Disabled.
Click here to
Autoprovision
Now
Click this button to auto provision immediately.
Export / Import
Cong
To export the conguration les to backup the settings, and then
you can also import all the settings after a reset�

15
Administrator manual
Field Description
Export System
Log
There have two methods to restore the system log, to local or to
the server. If you choose the Server option, you should set the
server address rst. Then click the Export button to export the
system log�
Security
Field Description
User Type Select your type� If you log in as user, you can only change
your own password� If you login as an administrator, you can
modify both the user’s and admin’s passwords.
Old Password Enter the old Password�
New Password Enter the new password you want to change for logging in�
Conrm Password Re-enter the new password again�

16
Administrator manual
Auto-provision
The following will show you how to auto-provision the phone. The process of a
successful auto-provision is:
Obtain a server address which store the conguration les.
Download the conguration les from the server.
Resolve and apply the congurations written in the conguration le.
Do other updates, for example the rmware updating.
Obtain the server address
When the phone boots up, it will go by the following process to try to obtain the
provision server address:
DHCP custom option âDHCP option 66 â DHCP option 43 âPhone Flash
The following are the details of each process:
Detect DHCP custom option.
Custom option must rst be set to the phone by web management:
Note:
A valid Custom Option is from 128 to 254� The Custom Option Type must be in
accordance with the one dened in the DHCP server. If the phone fails to get any
information from custom option, it will try to detect DHCP Option 66.
1.
2.
3.
4.
1.

17
Administrator manual
Detect DHCP Option 66. The phone will check this option by default. If the
phone fails to get any information from DHCP Option 66, it will try to detect
DHCP Option 43.
Detect DHCP Option 43. The phone will check this option by default. If the
phone fails to get any information from DHCP Option 43 and Check New Cong
is not Disabled, it will go to detect the phone ash (pre-congured provisioning
server).
Detect the phone ash.
The value is what you can read from the web management of the phone:
Note:
This process depends on the setting of Check New Cong and if it is set to be
Disabled, the phone won’t detect the FLASH.
The supported protocols of a URL are: HTTP/HTTPS/FTP/TFTP. Account and
Password will be used to access to the URL if required. FTP server always has
this requirement. If the phone fails to get any information from phone ash, the
current round of obtaining server address will stop here.
2.
3.
4.

18
Administrator manual
Download conguration les
There are 2 conguration les both of which are CFG formatted that the phone will
try to download from the server. The les are called Common CFG le and Phone-
specic CFG le. The Common CFG le will be activated for all the phones of the
same model. However, a Phone-specic CFG le will only be activated for one
specic phone which has a matching MAC address. A common CFG le has a xed
name for each model while a Phone-specic CFG le is named after a MAC address
of a specic phone (001d29002794.cfg).
The name of the Common CFG le for 337ip is:
y000000000006�cfg
There are 11 zeros between the letter y and the last number.
To have this name division on conguration les will help when doing same auto
provision to mass phones. For example, assumed that you have 1000 pieces of
337ip and you want to update rmware for all phones, you only need to prepare one
y000000000006.cfg in which it denes the rmware update request, and then put
it onto the provisioning server.
Note:
In case that the phone is on a live call, it will keep on asking for the CFG les
with an interval of 30 seconds for up to 2 hours.
Other manuals for PhoneEasy 337ip
1
Table of contents
Other Doro IP Phone manuals